Welcome to RennTech.org Community, Guest
There are many great features available to you once you register at RennTech.org
You are free to view posts here, but you must log in to reply to existing posts, or to start your own new topic. Like most online communities, there are costs involved to maintain a site like this - so we encourage our members to donate. All donations go to the costs operating and maintaining this site. We prefer that guests take part in our community and we offer a lot in return to those willing to join our corner of the Porsche world. This site is 99 percent member supported (less than 1 percent comes from advertising) - so please consider an annual donation to keep this site running.
Here are some of the features available - once you register at RennTech.org
- View Classified Ads
- DIY Tutorials
- Porsche TSB Listings (limited)
- VIN Decoder
- Special Offers
-
OBD II P-Codes - Paint Codes
- Registry
- Videos System
- View Reviews
- and get rid of this welcome message
It takes just a few minutes to register, and it's FREE
Contributing Members also get these additional benefits:
(you become a Contributing Member by donating money to the operation of this site)
- No ads - advertisements are removed
- Access the Contributors Only Forum
- Contributing Members Only Downloads
- Send attachments with PMs
- All image/file storage limits are substantially increased for all Contributing Members
- Option Codes Lookup
- VIN Option Lookups (limited)


bar10dah
-
Posts
155 -
Joined
-
Last visited
Content Type
Profiles
Events
Forums
External Paint Colors
Downloads
Tutorials
Links Directory
Collections
Store
Posts posted by bar10dah
-
-
I'd like to replace the overflow hose off the power steering reservoir. I want to replace it with a hose that'll run down to below the engine. That way, any overflow will not just drip onto the top of the block.
Anybody know, what size hose it is?
-
When you pull up on the parking brake, does the brake light on the dash illuminate?
-
How funny... I should just let Maurice handle these questions, since we seem to be thinking the same thing. The funny part is that all that I know about these tops is from reading the articles he and Mike Focke have out there on the web! I appear to be Maurice's apprentice...
I do have to say thanks again to you Maurice. And Mike, if you're reading this. Because of the info you guys posted, I was very successful in replacing my own top! :)
-
Seems very strange that all six would be stripped, at the same time. Can you try to just run the screws into each of the six holes, without the canvas and cardboard strip in place, and see if they take?
As for the tension cable, positive the top end (attached to the spring) is connected? And the bottom of the cable is indeed held on by the screw? Next, when the top is open, close the top and watch the part of the top where it's going outside the channel. Does it appear that the finger spring is keeping the sliders back all the way until the top is nearly closed? The whole job of those fingers is to keep the tension cable pulled back until the last very few inches of top travel. After that, I'd check the routing of the straps underneath that section. The straps that connect to the cross bar.
No worries dude, we'll keep throwing ideas out there until it's fixed. ;)
-
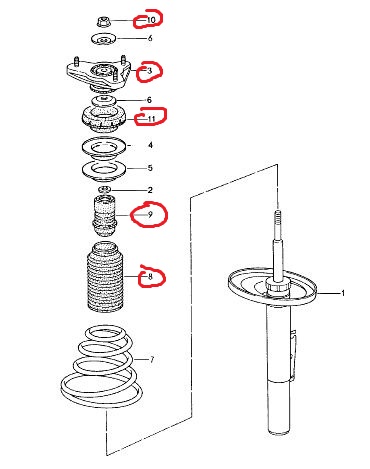
Oh ROW M030 suspension that's been sitting on my garage floor for the past six months... almost time to dust you off and install you! :)
About the time I was going to start my install, a CEL problem plagued me for the next several months. Now that it appears my problem is fixed, it's finally time to get back to what I was doing!
So far, ordering what appears to be wear items on the struts. Pretty much anything rubber. This is what I have so far:
996-343-301-02 rubber bump stop front strut
996-343-505-00 protection boot for front shock
996-343-515-05 front shock absorber mount
900-380-012-01 front/rear shock absorber mounting nut
987-333-059-00 rear shock absorber mount
900-380-005-01 rear shock absorber mounting nut
999-084-447-01 front shock absorber mounting nut
997-343-018-01 shock mount flange for front shock absorber
986-333-285-01 rear shock mount seal
986-333-301-01 rear shock rubber buffer
986-333-505-01 rear shock bellows
I also added the nuts, but, since they don't stretch like bolts do, should I just skip them?
Not looking at replacing the control arms at this time. But, anything else I should be looking at under there?

-
Look at #21 at this link:
http://sites.google.com/site/mikefocke2/topreplacementpage2
"To line this part of the front edge correctly, make sure that the leather or cardboard strip lays in between the two slight metal ridges that run from left to right, and that it lines up snug against the rearmost of the two ridges when you are gluing/clamping that part of the canvas top."
-
Your cardboard strip isn't seated properly.
-
Could it be the valve that shuts the EVAP canister off from venting?
I have a spare EVAP canister shut-off valve 996-605-201-01. Left over when I thought it was faulty, but it tested fine. http://www.renntech.org/forums/topic/41644-evap-canister-valve/
I can send it to you for whatever the cost of shipping is, $5? If it fixes your problem, send me an additional $30 (list is $112.81?). If not, just send the part back and not only will you have eliminated that as a problem but you'll only be out ~$10 for shipping both ways.
Again, don't know if this'll fix your problem.
-
166 miles since replacing the tank vent valve (the one under the driver's side intake manifold) and still no CEL. Looking good!
Also, did ten 1/4 mile runs tonight. Best time was 14.867 @ 92.86. So much fun! Can't wait to get back out there again. :)
-
That beeping is probably telling you a switch somewhere is open. Try opening and then securely closing your center console lid. That seems to be the usual culprit.
-
Cables (I ordered both sides) arrived today and installed. Thanks again for the part number btoppping.
-
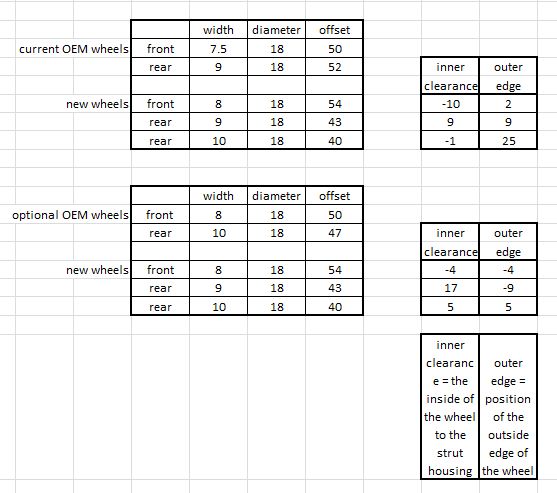
I have OEM 7.5 x 18 w/50 mm fronts and 9 x 18 w/52 mm rears. I believe they're called Turbo Twist IIs. I really like the looks of these wheels, but recent damage to one of them, plus the fact that I'm not sure the other three are even straight (other party's insurance was going to get the damaged one straightened), has led me to start looking at some aftermarket options.
The wheels I'm considering are 8 x 18 w/ 54 mm fronts and either 9 x 18 w/ 43 mm or 10 x 18 w/40 mm rears.
Appears the new fronts will have 10 mm less inner clearance and extend the outside edges by 2 mm from my current wheels. Will that work/fit? How about fitment after I install my ROW M030 suspension?
Which option rear should I select, 9 or 10 inch width? 9 inch width would be 9 mm more inner clearance and stick out an additional 9 mm from my current wheels. 10 inch width would be 1mm less internal clearance and stick out an additional 25 mm. At this time, I'm leaning towards the 9 inch rear.
Those numbers are the differences from my current rim/offsets. But since there's a larger width rim that was available from the factory (8 x 18 w/50 mm and 10 x 18 w/47 mm), can I use those numbers to help confirm the max widths/offsets I can use? If so, the differences as compared to the larger wheels would be fronts 4 mm less inner clearance and outer edge reduced by 4 mm. And the rears would be 17 mm more inner clearance and reduce outer edge by 9 mm for the 9 inch width. And 5 mm more inner clearance and stick out an additional 5 mm for the 10 inch width.
I created this chart to help understand what each wheel size does to the inner/outer positions.
My main priority would be fit. I don't want anything to rub. Especially with the ROW M030 suspension on it. Secondly, I'd like to keep as close to the stock appearance as possible. I really don't want the wheels sticking out horrendously from the body. Opinions would be helpful. I hope to order these wheels this afternoon.
Additional pics of these wheels on an arctic silver Boxster.
-
Buy yourself one of these:
http://www.pelicanparts.com/catalog/ShopCart/BOOK/POR_BOOK_bkptec_pg2.htm
There's an article in there about replacing the starter.
-
Replaced the vent line I mentioned in Post #58, the one with the valve on the end of it, underneath the driver's side intake manifold. Also replaced the purge valve in Post #62, the one on the top of the EVAP canister.
I didn't notice any difference in the purge valve between the new and old one. So appears I may have just replaced a good part. Speculation.
However, I was able to blow air both ways through the valve on the end of the old vent line. I'm guessing that's bad, as I can't blow air either way through the new vent line. Replaced that line and the next thing I noticed is where before I couldn't hear any mechanical noises when I activated "fuel evaporative valve" with Durametric, now I hear that valve on the end of that vent line clicking! So, progress. Not sure if this solves my problem, but progress.
I'll drive it for a few days and report back.
-
Still curious as to why both connectors were showing 6.6 V? Is that just the offset baseline voltage for that circuit? I can't imagine why a baseline other than 0 V would be helpful.
-
Thanks Logray. With ignition on, I checked the valve under the driver's side intake manifold and it read 6.6 V engine off. Then tested it with "fuel evaporative valve" activated in Durametric and voltage was flip/flopping between 6.6 and 12 V. So, appears the wiring at that point was getting the correct voltage. I didn't hear any mechanical clicking with that valve. Swapped with a new valve and now I hear clicking.
Still not sure about the valve on the charcoal canister, but at least I tracked down one bad valve. I did replace the valve on the charcoal canister as well. Maybe a certain drive condition must be met before 12 V is applied to the valve on the charcoal canister?
-
Awesome, thanks!
Taking that number to PET, I did find where they're listed. I would have never known to look there on the same diagram as the roll bars. And, the pic doesn't even look like these cables.
Thanks again!
-
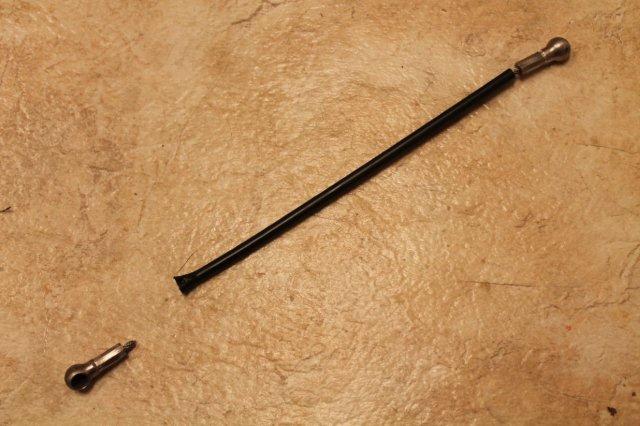
When putting my top in service mode today, noticed the cable that holds the rear of the top down was broken. I coudn't find it in PET. Anyone know the part number?
-
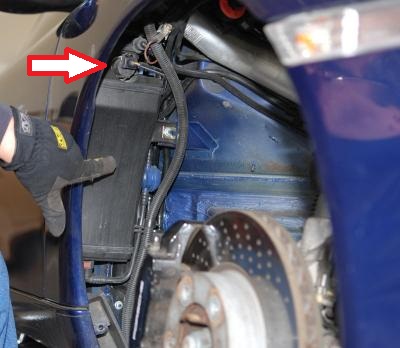
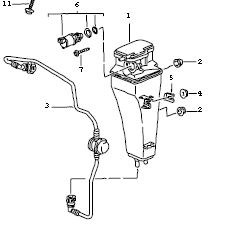
That valve at the top of the EVAP canister, where the arrow is pointing to, purge valve 996-605-201-01...
...what voltage should be there? Thought mine was bad, so ordered a new one. When I had it apart today, hooked up a voltmeter and got 6.6 V with the ignition on but engine not running. Thought this was the "fuel evaporative valve" in Durametric, so activated it and didn't see any changes in voltage at the connector. Turned the car off, and still got 6.6 V. Started the car and got 7.4 V. Let the car idle for about three minutes, but still got 7.4 V.
The part is labeled 12 V. So, hooked the old part directly up to the battery and the plunger snapped shut (or open, not sure exactly how it works) so the part must be operating correctly. However, should I have a constant voltage at the part, no matter if the ignition is on or off?
-
That doesn't appear to be the right hose. In fact, that looks like a radiator hose! :eek: Who owned that car before you?! If you know the person that did that, go smack them in the back of the head and tell them to stay away from your car.
The hose that should go there, the vent line for the AOS, is rigid so it will not collapse when negative pressure builds up.
Buy the correct hose here. Or, if you have a Porsche dealer locally, you can always pick it up from there. Just give them part# 996-107-146-00. And when you do get your new hose in, do NOT invite your "friend" over to help you put it in. ;)
-
Sak, you're absolutely right. That 4 mm vacuum hose off the passenger side intake manifold boot connects to the check valve you circled.
-
I know it's a hard pill to swallow, sinking $287 into a Durametric, but it's well worth the cost. Whether you find someone to clear your airbag light or not, definitely consider getting a Durametric.
-
I can't speak specifically on the Boxster, but here's an example (quick animation towards the bottom of the page) of how one works in general.
-
Or you can also just unplug the check valve's electrical connector, it should be normally closed and hold vacuum. If it does not, then the check valve should be replaced.
Let me know if I'm off-track here. If that purge valve, #6 in the pic, is faulty and not fully closed when it should be, it might be the cause my intake air leaks. So, to test this theory, I unplug it. Next, I still get my normal DTCs. What does this tell me? Well, all it tells me is I have an intake air leak. I really didn't eliminate/validate that part or not. The leak could be from some other component in the system. So thinking the test worked, and I have a bad purge valve, I order a new one. But, since that test really didn't eliminate/validate anything, I might have replaced a good/working part. But, I wouldn't know that until after I spent the $100 on it and then still get my normal DTCs. So, since I really can't troubleshoot that component, but I want to eliminate it as a source for my leaks, might as well save myself the work of pulling the fenderliner twice and just buy/replace the part to begin with.
So, back to clamping the hose in the engine compartment, #14 in the pic on post 58. If I clamp that hose, and my codes reappear, the problem is somewhere else in the system. But if the codes are gone, then something in the EVAP system is faulty. Could be anything between the throttlebody and the EVAP canister. Heck, it could be the EVAP canister.
Sheesh... what to do next... maybe I'll just order both those parts and go from there. Another $200 and methodical guessing. Hope I have better luck this time. :)

Airbag deactivation bar
in 986 Series (Boxster, Boxster S)
Posted
Nope, not that easy. Well... okay, removing it *is* that easy. However, you'll need to have a PST or PIWIS to turn off the child seat occupancy. Otherwise, your airbag fault lamp will illuminate.