Welcome to RennTech.org Community, Guest
There are many great features available to you once you register at RennTech.org
You are free to view posts here, but you must log in to reply to existing posts, or to start your own new topic. Like most online communities, there are costs involved to maintain a site like this - so we encourage our members to donate. All donations go to the costs operating and maintaining this site. We prefer that guests take part in our community and we offer a lot in return to those willing to join our corner of the Porsche world. This site is 99 percent member supported (less than 1 percent comes from advertising) - so please consider an annual donation to keep this site running.
Here are some of the features available - once you register at RennTech.org
- View Classified Ads
- DIY Tutorials
- Porsche TSB Listings (limited)
- VIN Decoder
- Special Offers
-
OBD II P-Codes - Paint Codes
- Registry
- Videos System
- View Reviews
- and get rid of this welcome message
It takes just a few minutes to register, and it's FREE
Contributing Members also get these additional benefits:
(you become a Contributing Member by donating money to the operation of this site)
- No ads - advertisements are removed
- Access the Contributors Only Forum
- Contributing Members Only Downloads
- Send attachments with PMs
- All image/file storage limits are substantially increased for all Contributing Members
- Option Codes Lookup
- VIN Option Lookups (limited)

9552T500
-
Posts
68 -
Joined
-
Last visited
-
Days Won
1
Content Type
Profiles
Events
Forums
External Paint Colors
Downloads
Tutorials
Links Directory
Collections
Store
Everything posted by 9552T500
-
ims repair on tiptronic
9552T500 replied to HomePro's topic in 996 Series (Carrera, Carrera 4, Carrera 4S, Targa)
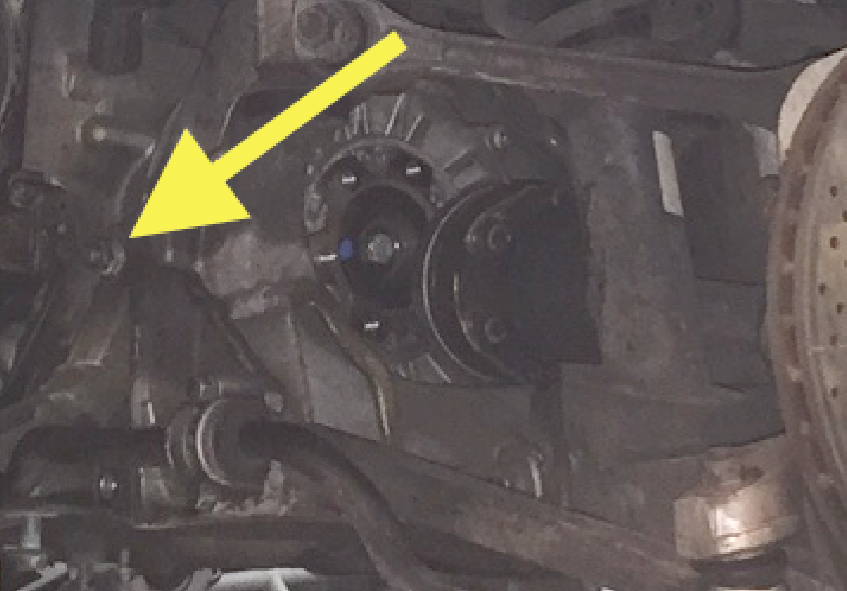
Hi-sorry for hijacking. I am trying to find information on how to remove the 02 C4 Tiptronic drive train. Seems very little documented. Specifically I am puzzled how to remove the upper M12 bolts, which holds the Aluminum cross-bar on the passenger and drivers sides (Note: this is the bar right under the engine/Trans interface - Attaching picture of the problematic bolt pass-side) . I can losen the bolts , but I cannot pull them out (and cross-bar stuck on car in turn) as the Trans output shaft flanges ends are on the way. From my C2/Man the removal of this bar and post was easy. On the C4/Tip the engine removal strategy seems completely different. Any suggestions how to remove the cross-bar on the latter ? My thoughts go towards that I would have to remove the output shafts L+R to access , but I am not really convinced that this can be the (only) way. Thanks in advance.
-
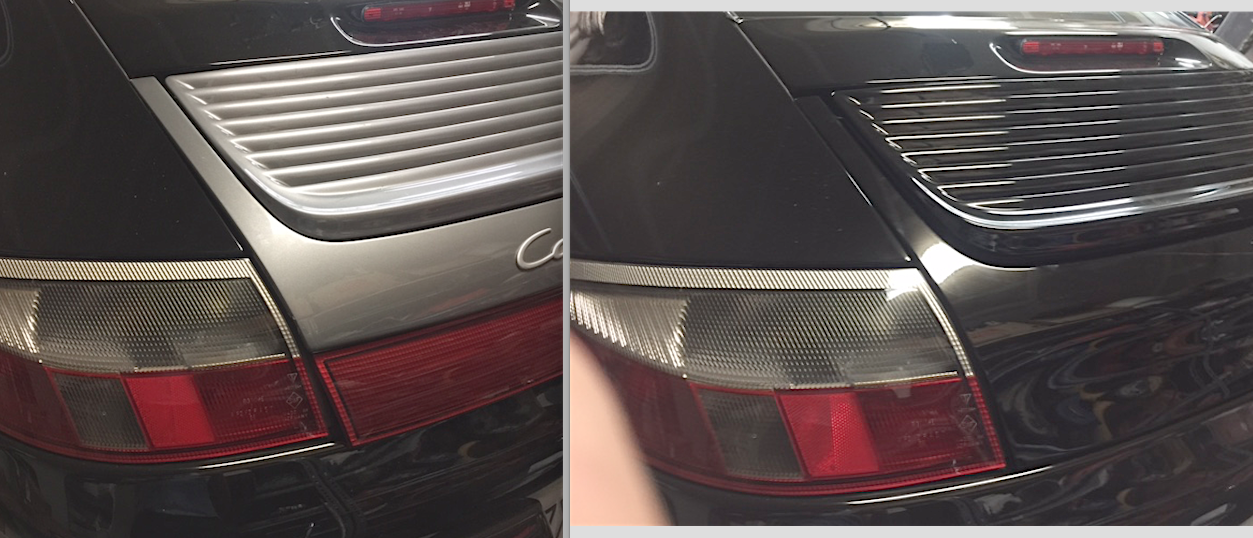
Thanks folks for the input. Decided to leave the drivers car w/o changes to body style, and will be looking for the proper car instead to fix the look in the future. Yet I could not resist to get sth. Changed minimal invasively to accomplish some hint of a connection between the lights to make the real look a bit more classic .... Sharing couple of pics :)
-
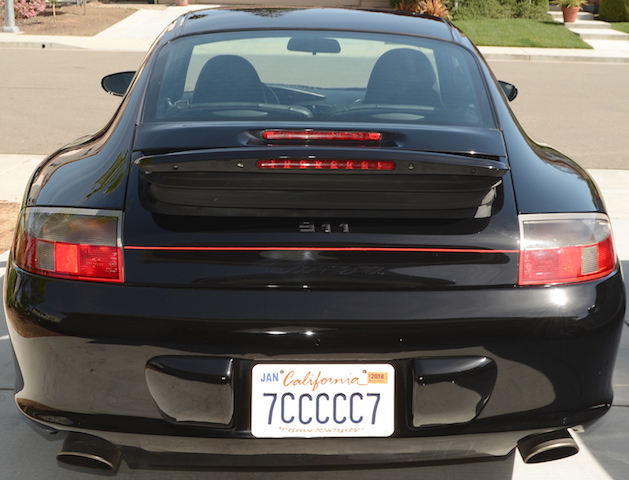
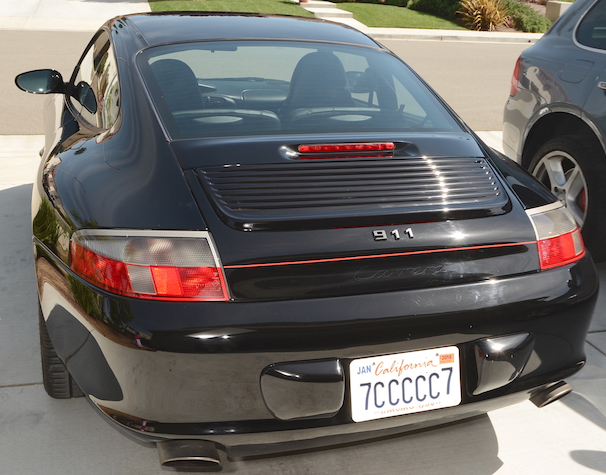
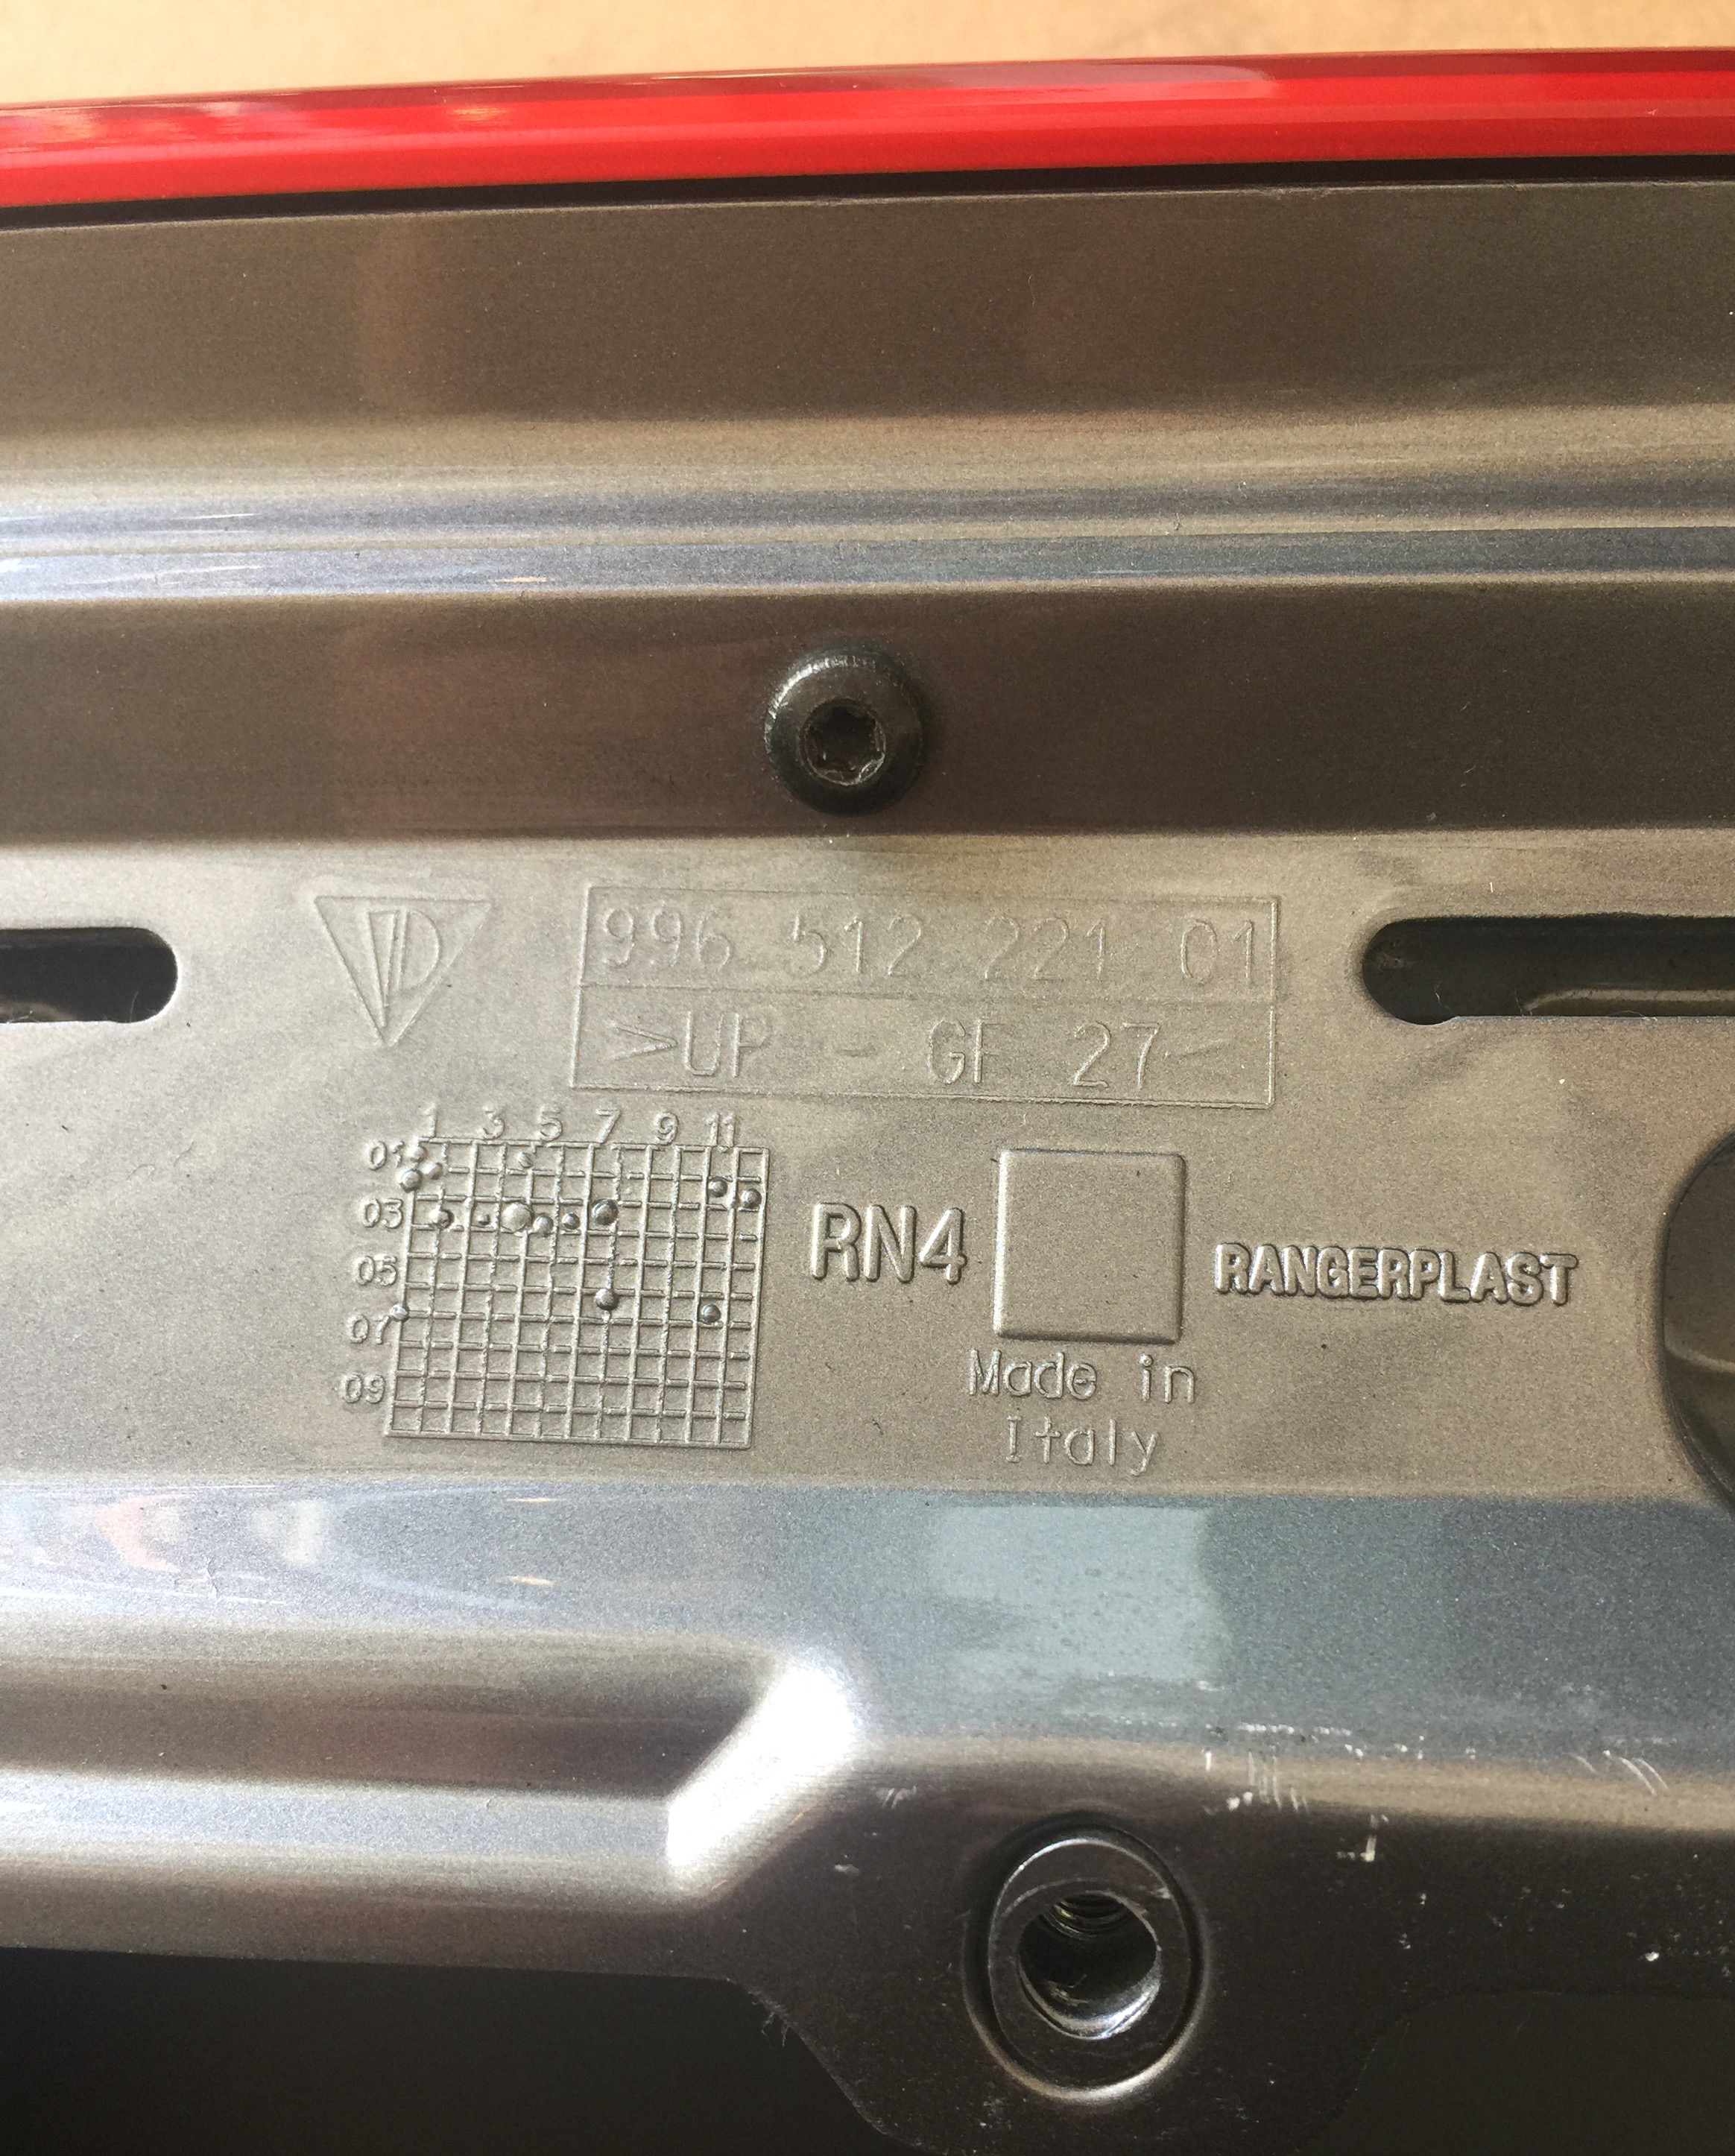
loren, ddavidoff -thanks for your input. looks indeed like a bigger project, for just one of a series of lovely cs4 features i thought simply "bolt-on"on my car (i regret not having taken the opportunity to buy a cheap 04 CS4 cab when i had the choice ($27k was very tempting, but it was in aweful mech & cosm condition compared to the near perfect c2 i got the same day.). for sure i am not a big fan of aftermarket upgrades upgrade the rear to newer model as it remains an 02 after all . to get the strip i will likely try to get back to make my sticker-based strip idea - trying to make a decent 10 ft view). otherwise, getting back to the cs4 hood in have - , is there a chance to at least tell whether factory- or not ( concerned about your comment in that factory should be metal??) based on the pn 996 512 221 01 ( see attached pic of the label on tge cs4 hood i have)
-
I am trying to find information about an engine 996 engine hood design change. I have a 02 C2 , and want to have the classic reflector strip between the rear lights on the hood as on the C4S. I thought about a sticker solution , but which seemed ugly. Then I thought to take a factory CS4 hood - which I hoped to swap easily (...just bolts...30 min or so...). Got a grey OEM unit from a 03 CS4 on ebay (w/o spending a fortune as most sellers ask for) , and hoped a paint job is all I would need.... The hood featured quite a few changes in design (the whole thing is from fiber glass (vs. steel)), and the clearance to the body panels is still there, yet noticeable smaller. The latter may workable (Fiberglass base could be made slightly narrower before getting it painted....) . However, where I am stuck is that the hood seems a few cm longer, and does not fit due to contact with bumper. My impression is that I need at least a different bumper as well as rear lights. My question would be, whether sb. tried this type of conversion before/whether this is possible at all w/o major body change. Attaching 2 pix with both hoods on my car...
-
need sport exhaust?
9552T500 replied to Chuckey996's topic in 996 Series (Carrera, Carrera 4, Carrera 4S, Targa)
Hi there- daily driving my 02 C2 with open windows to listen to the flat-six music is sth. I am getting more addicted to... Wanted to intensify the acoustical feedback a bit, yet get back to normal when needed... So I am looking for the C4S PSE. I tried to find used PSE OEM mufflers, but which leads nowhere as they seem either N/A due high demand or junk after years of use. After some researching the market in german homeland, my attention got the PSE mufflers from Sommerfeld-Porschetuning (see screen shoot of one of their ebay listings). My question to you would be whether anybody here has experience with this German aftermarket muffler ? Also, the valve seems to be operated by vacuum. Q: Where is the vac taken from (Crank case?) ? If sb. has a link to an acoustical reference of this system vs. factory - this would be great. Thanks.
-
Hurra! Neither Brake Booster failure nor CEL anymore, brakes precisely and the beast roars as it should be . Took several weekends to deal with the aftermath from winter driving (fun, but somehow regret...) . Now washed & waxed, and happy wife for life...Thanks once more to the folks here for the guidance. In turn - let me share my fix with illustrations: 1. drill hole in old tube close to firewall to keep the substance but arrest the crack growth; 2. Pull rubber tubing (1mm wall thickness (some old Nissin brake hose seath from my motorcyle used-spares box (Typically collecting and I don't throw stuff like this away as there will be a re-use someday...)) over 1.5 in and the old spigot on the counter part ; 3. I also re-did the joint on the Tee below motor mount using a 8/12 mm ID/OD rubber tubing. To connect this tube with the old plastic line I found some 1/2 in ID PEX tubing (Sharkbite...some residue form my last plumbing project on the house). This was a light interference fit by hand, and instantly perfectly sealed (some metal clamps maybe for safety , but I will leave it for the case the joint fails...). That's it. After a few minutes drive around the block the BB failure msg was gone, and the CEL a further 15 miles down the road. Attaching few pix
-
did not think about jb weld, but thanks - i will keep that in mind
-
Replacing item 13 does not look convenient at all :(... I was thinking about shrink tube to seal it first . Maybe put a line in parallel and cut closer to BB . Will post an update when I found a working workaround...
-
Double checked both sources of vac (pump and the line from crank case merging into BB ), and neither behaves abnormal. So, I am excluding this for now. Dismounted the VAc pump / motor mount to trace the vac line going to firewall. Good news is that I found a crack of the joint in the elbow just before entering the firewall (longitudinal & facing firewall-hard to see until I removed the stuff above & making space to move the line around). Going to fix this next. This line was already triggering BB failure couple years back (Tee under Motor mount)- so I hope this new found vac leak is responsible for the strange brake behavior too. Again - the brake worked perfectly fine, and rather suddenly started acting up after driving in winter / very low temps for a week in January & all the CEL & other vac leaks since then. I think it must be very simple from here (brakes were done last summer , and all fluids levels did not change since then)...
-
depresses right away upon start & takes 1-2 strokes to stiffen after engine is off.... the brake feels spongy as of late & bottoms out / overall short on stoppung power. there are no leaks on the hydraulics , so i assume it is directly related to bb-failure itself or lack of vac pressure. question: what does this vac pump actually do? i noticed that there is already vac reaching the bb from the crank case. i am wondering whether the separate vac pump is only supplementing the main source of vac, while nether may be sufficient on its own ( pump/crank). if so, and my vac lines to bb dont look like leaking i would suspect the vac pump itself.
-
update : installed the new purge valve . car runs great. hope no acting up during next gas fillup. i continued searching for the vac leak/ causes for the vac pump is running non-stop. i have not found any obvious damage to the line connecting the pump with the brake booster. however, there are 2 lines going off the tee after the pump, with lines ending up along the cyl head, amd down behind the engine. i am not yet certain where these ending into, but was wondering whether applying static vac to the system ( eg some vac dessiccator pump ) via line which normally connects to the pump & monitoring pressure change over time may allow any conclusions on the size of the leak.
-
ordered 948 110 202 03 ( this seems to be the latest rev per parts specialist @ my local p-dealership). hope this will do the trick. thanks again to the folks here pointing me to another potentially faulty emission control device...
-
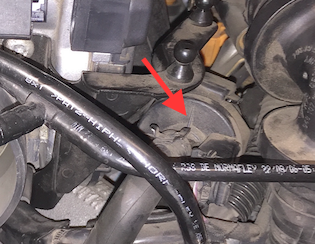
Would be purge valve be the part pointed to with red arrow in pic below ? (looks like pn 955 605 517 00)
-
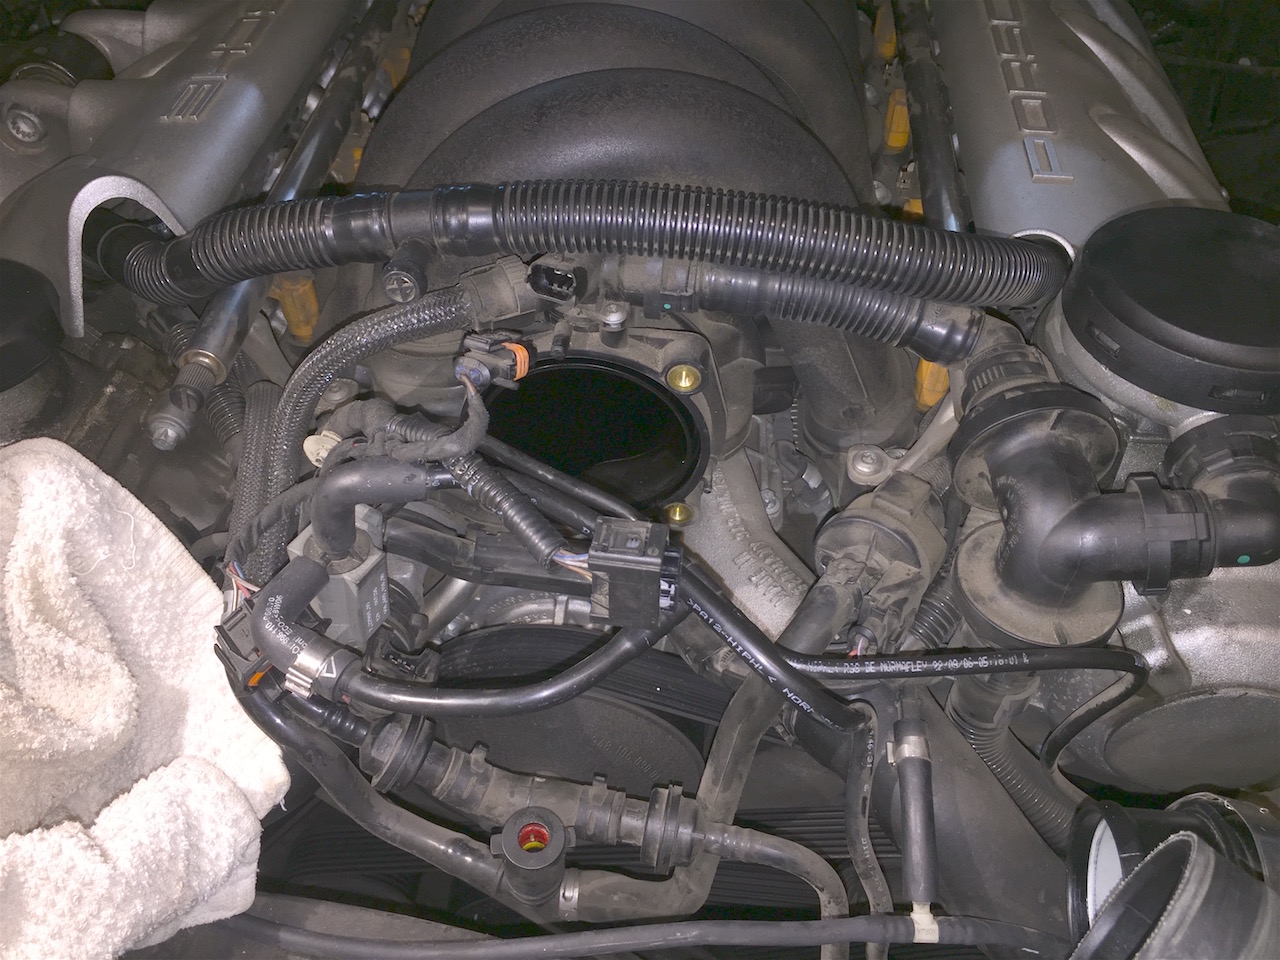
thanks lewisweller. Your Pic 1 - 13/14 region is what I think I inspected thoroughly while trying to exclude misc. vac lines failure under the intake (my attached pic 1), then extended search to check valve & AOS . The only leak (obviously broken part) I found was on the check valve that goes the up-back (see picture of the broken membrane) . I replaced that check valve (porsche OEM part from pelican), thoroughly cleaned (sonic bath) all other parts, and put all back together. I did not check the role of the check valve alone on how engine runs, but cleaning/sealing the pre-intake/vac lines/valves , improved the the throttle response noticeably (from turbo-boost pressure literally having no noticeable effect on acceleration, to the more usual thrust gain when the turbos kick in). This was the first I noticed. Also, the engine sounded running smoother @ idle just after starting, and CEL went away within less than 50 miles (can't tell exactly how many as wife just happily texting this update that cel was gone...). The car was then smogged a few 100 miles later w/o problems. However, a few days later, CEL appeared again. An apparent thing I noticed is that when the fuel tank is filled up , in two cases (thought cap not closed etc. when my wife reported, and second happend to myself, and I assume it may repeat...), the car just did not want to start at all (just cranking for seconds - not even an attempt to start). More by coincidence, I think I figured that pulling the key , central locking car & just try all again, worked. The car was idling bad for the first seconds thou, but ran perfectly fine few seconds later. ...your hint on the vac pump remaining so busy, seems to indicate that I need to start looking into where Brake booster line may go through firewall (tried to push out as of terrible accessibility...). PS.: current codes are P2187, P2189, P0441
-
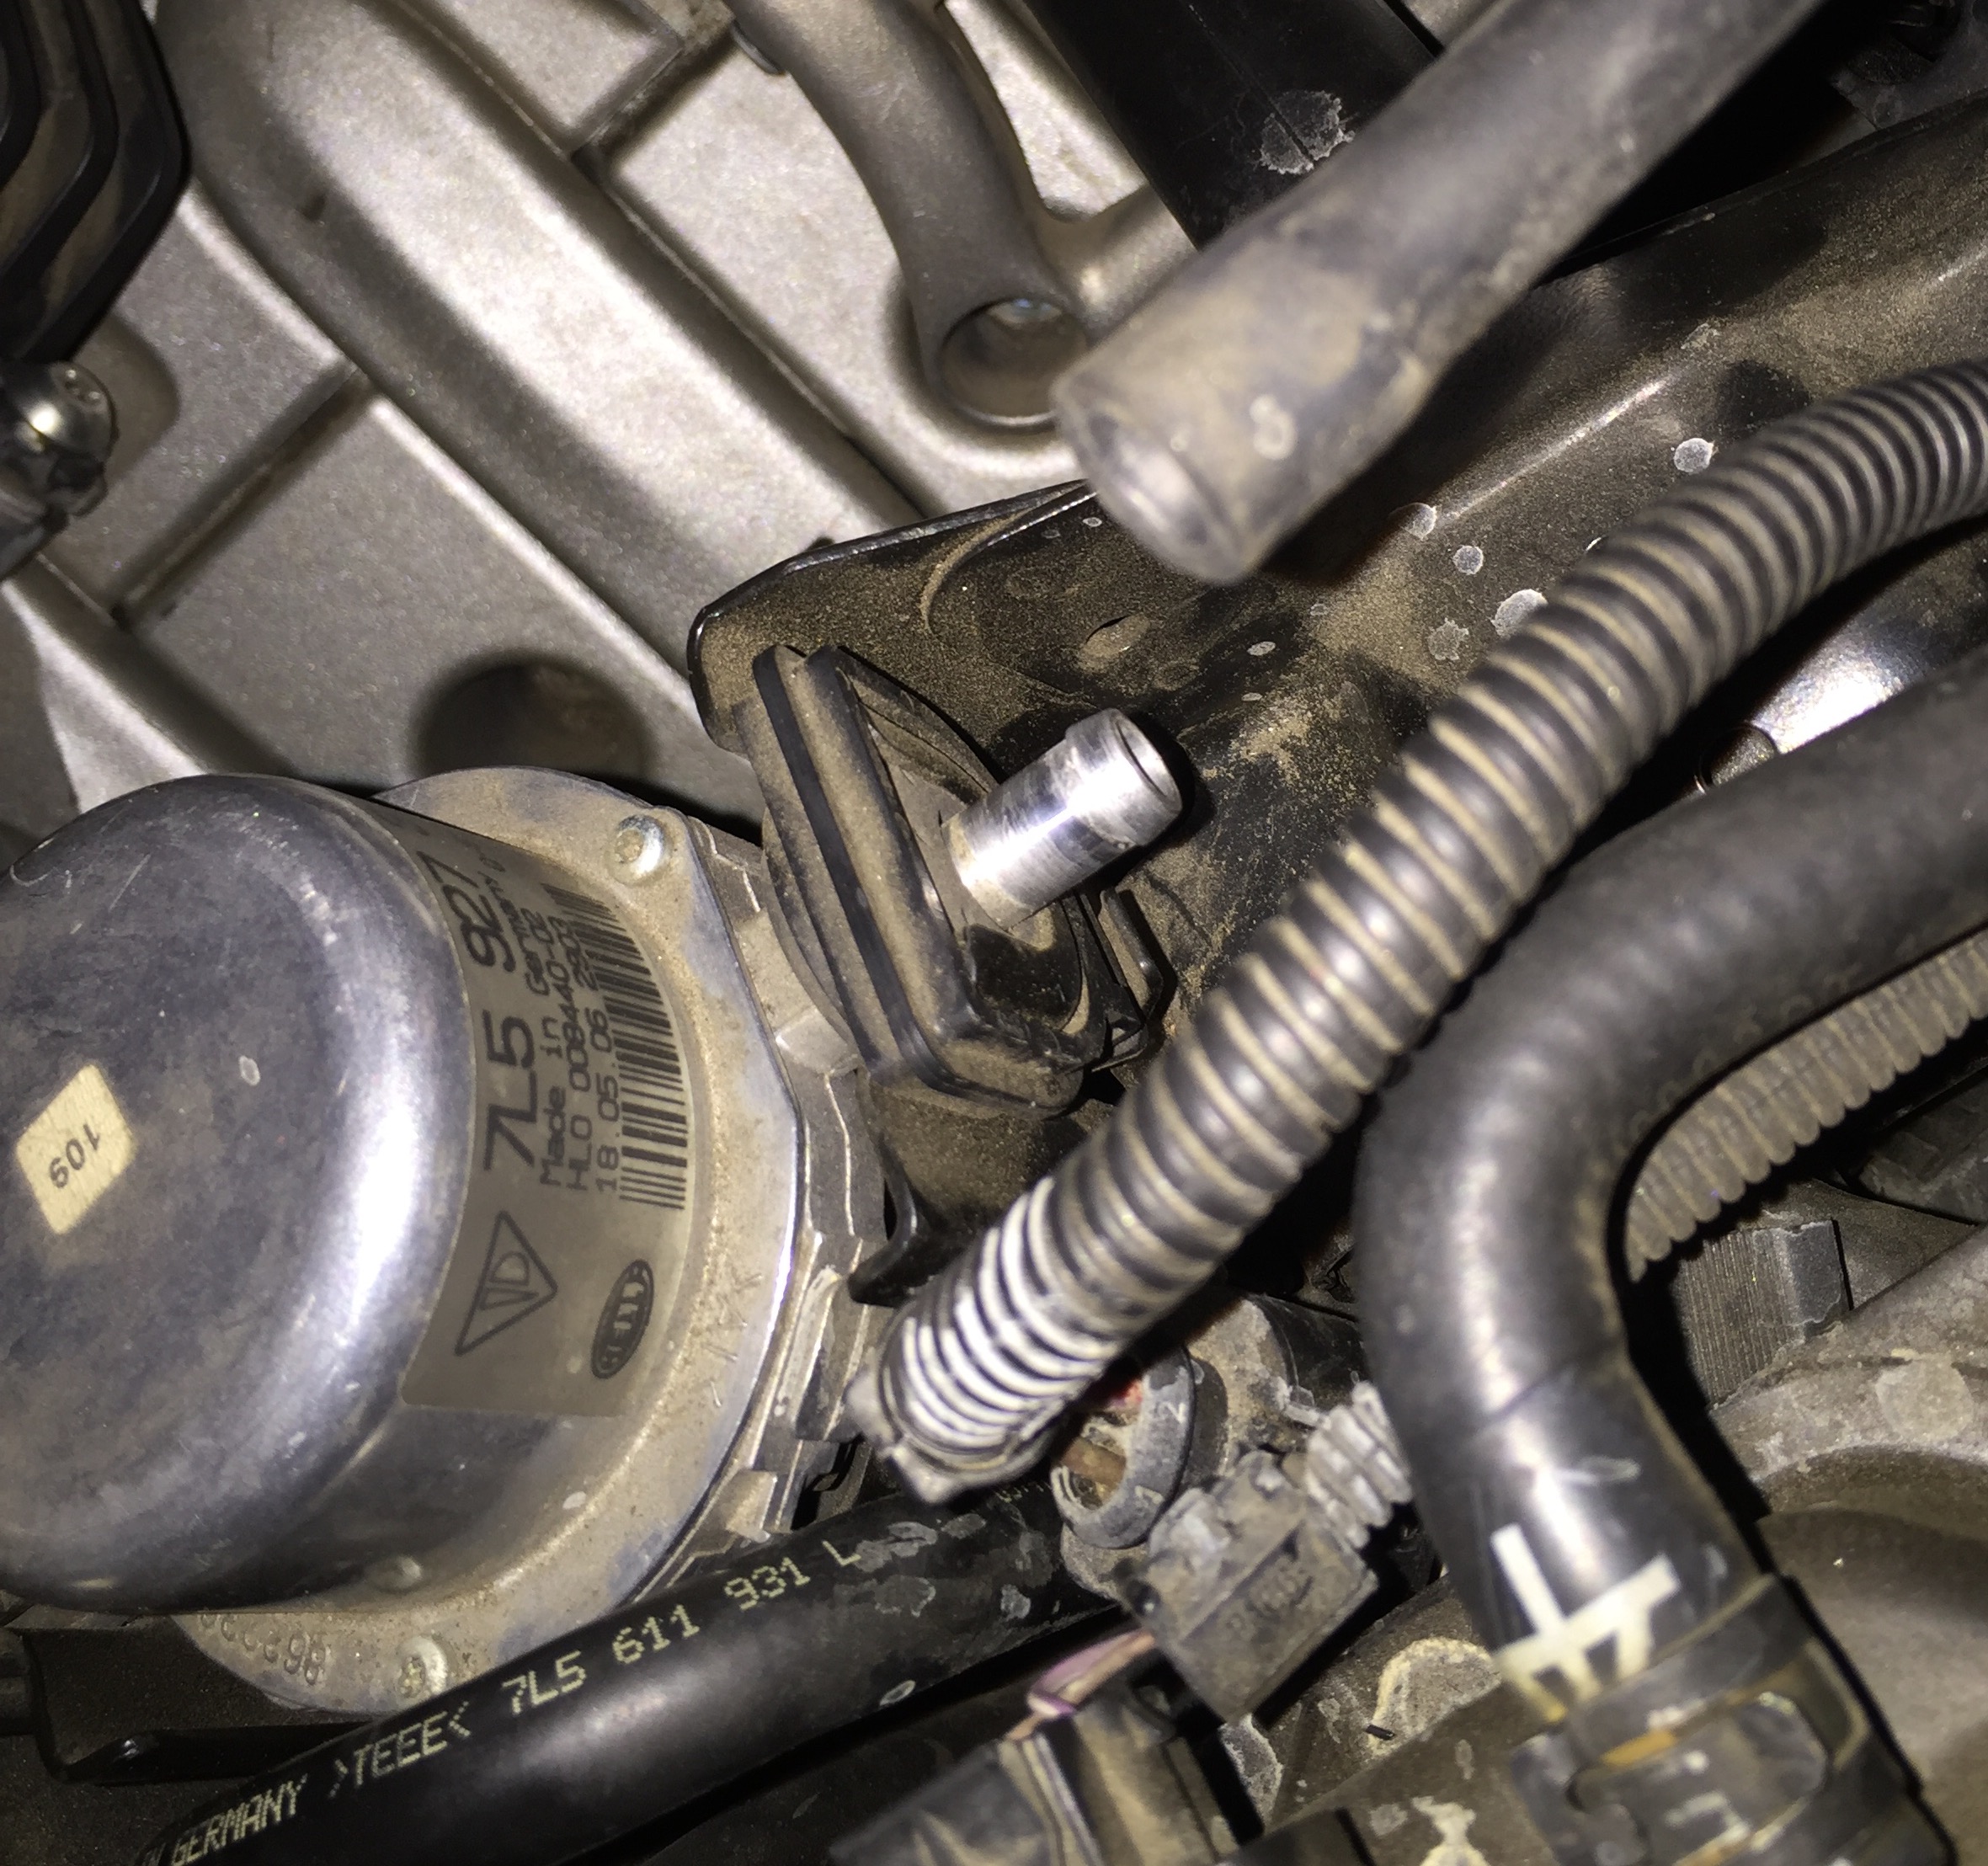
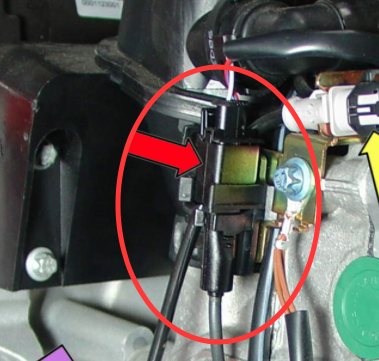
sorry hijacking, but this one here seems the closest to my issue with the 06 ctts since i tourured the car in snow and -15c in january at tahoe... getting cel, accellerates like a v6, brake booster failure note , lean on both banks and codes on purge valve ... replaced several broken vac tees /tubes, check vac valve ( broken membrane) , sparks, coils, oil filler cap ( vac check showed leak) , gas cap( perimeter gasket cracks ). the car runs better , and sporadically no cel, but i still have lean codes on both banks , booster failure, and when warm start, i see rpm going to ca 1200 for 1-2 s, then dropping 600-650. what i notice is consistent noise ( like a pump running at full speed)coming from the part i am showing in the picture below. i do not know what it is , but the shiny metal body gets hot . any hints would be appreciated... thx
-
sudden oil leak from Cylinder head
9552T500 replied to 9552T500's topic in 996 Series (Carrera, Carrera 4, Carrera 4S, Targa)
thanks too for sharing on the proper tool . -
sudden oil leak from Cylinder head
9552T500 replied to 9552T500's topic in 996 Series (Carrera, Carrera 4, Carrera 4S, Targa)
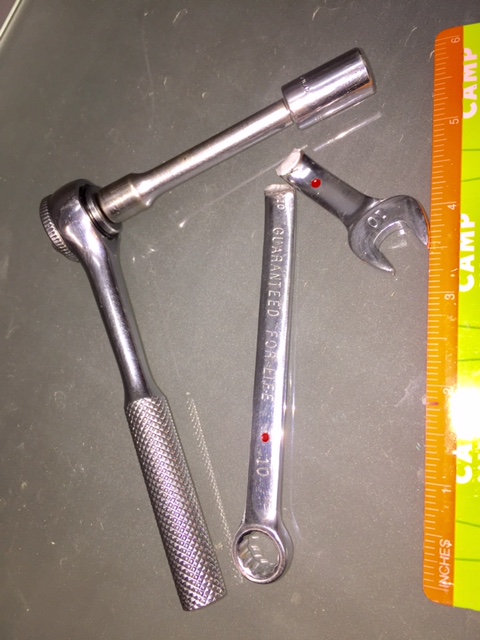
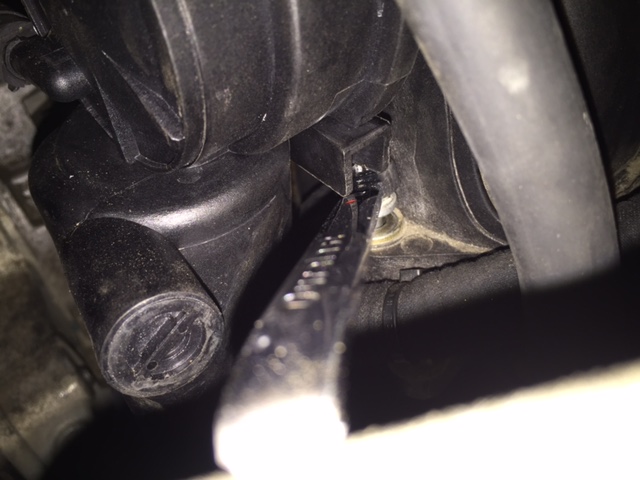
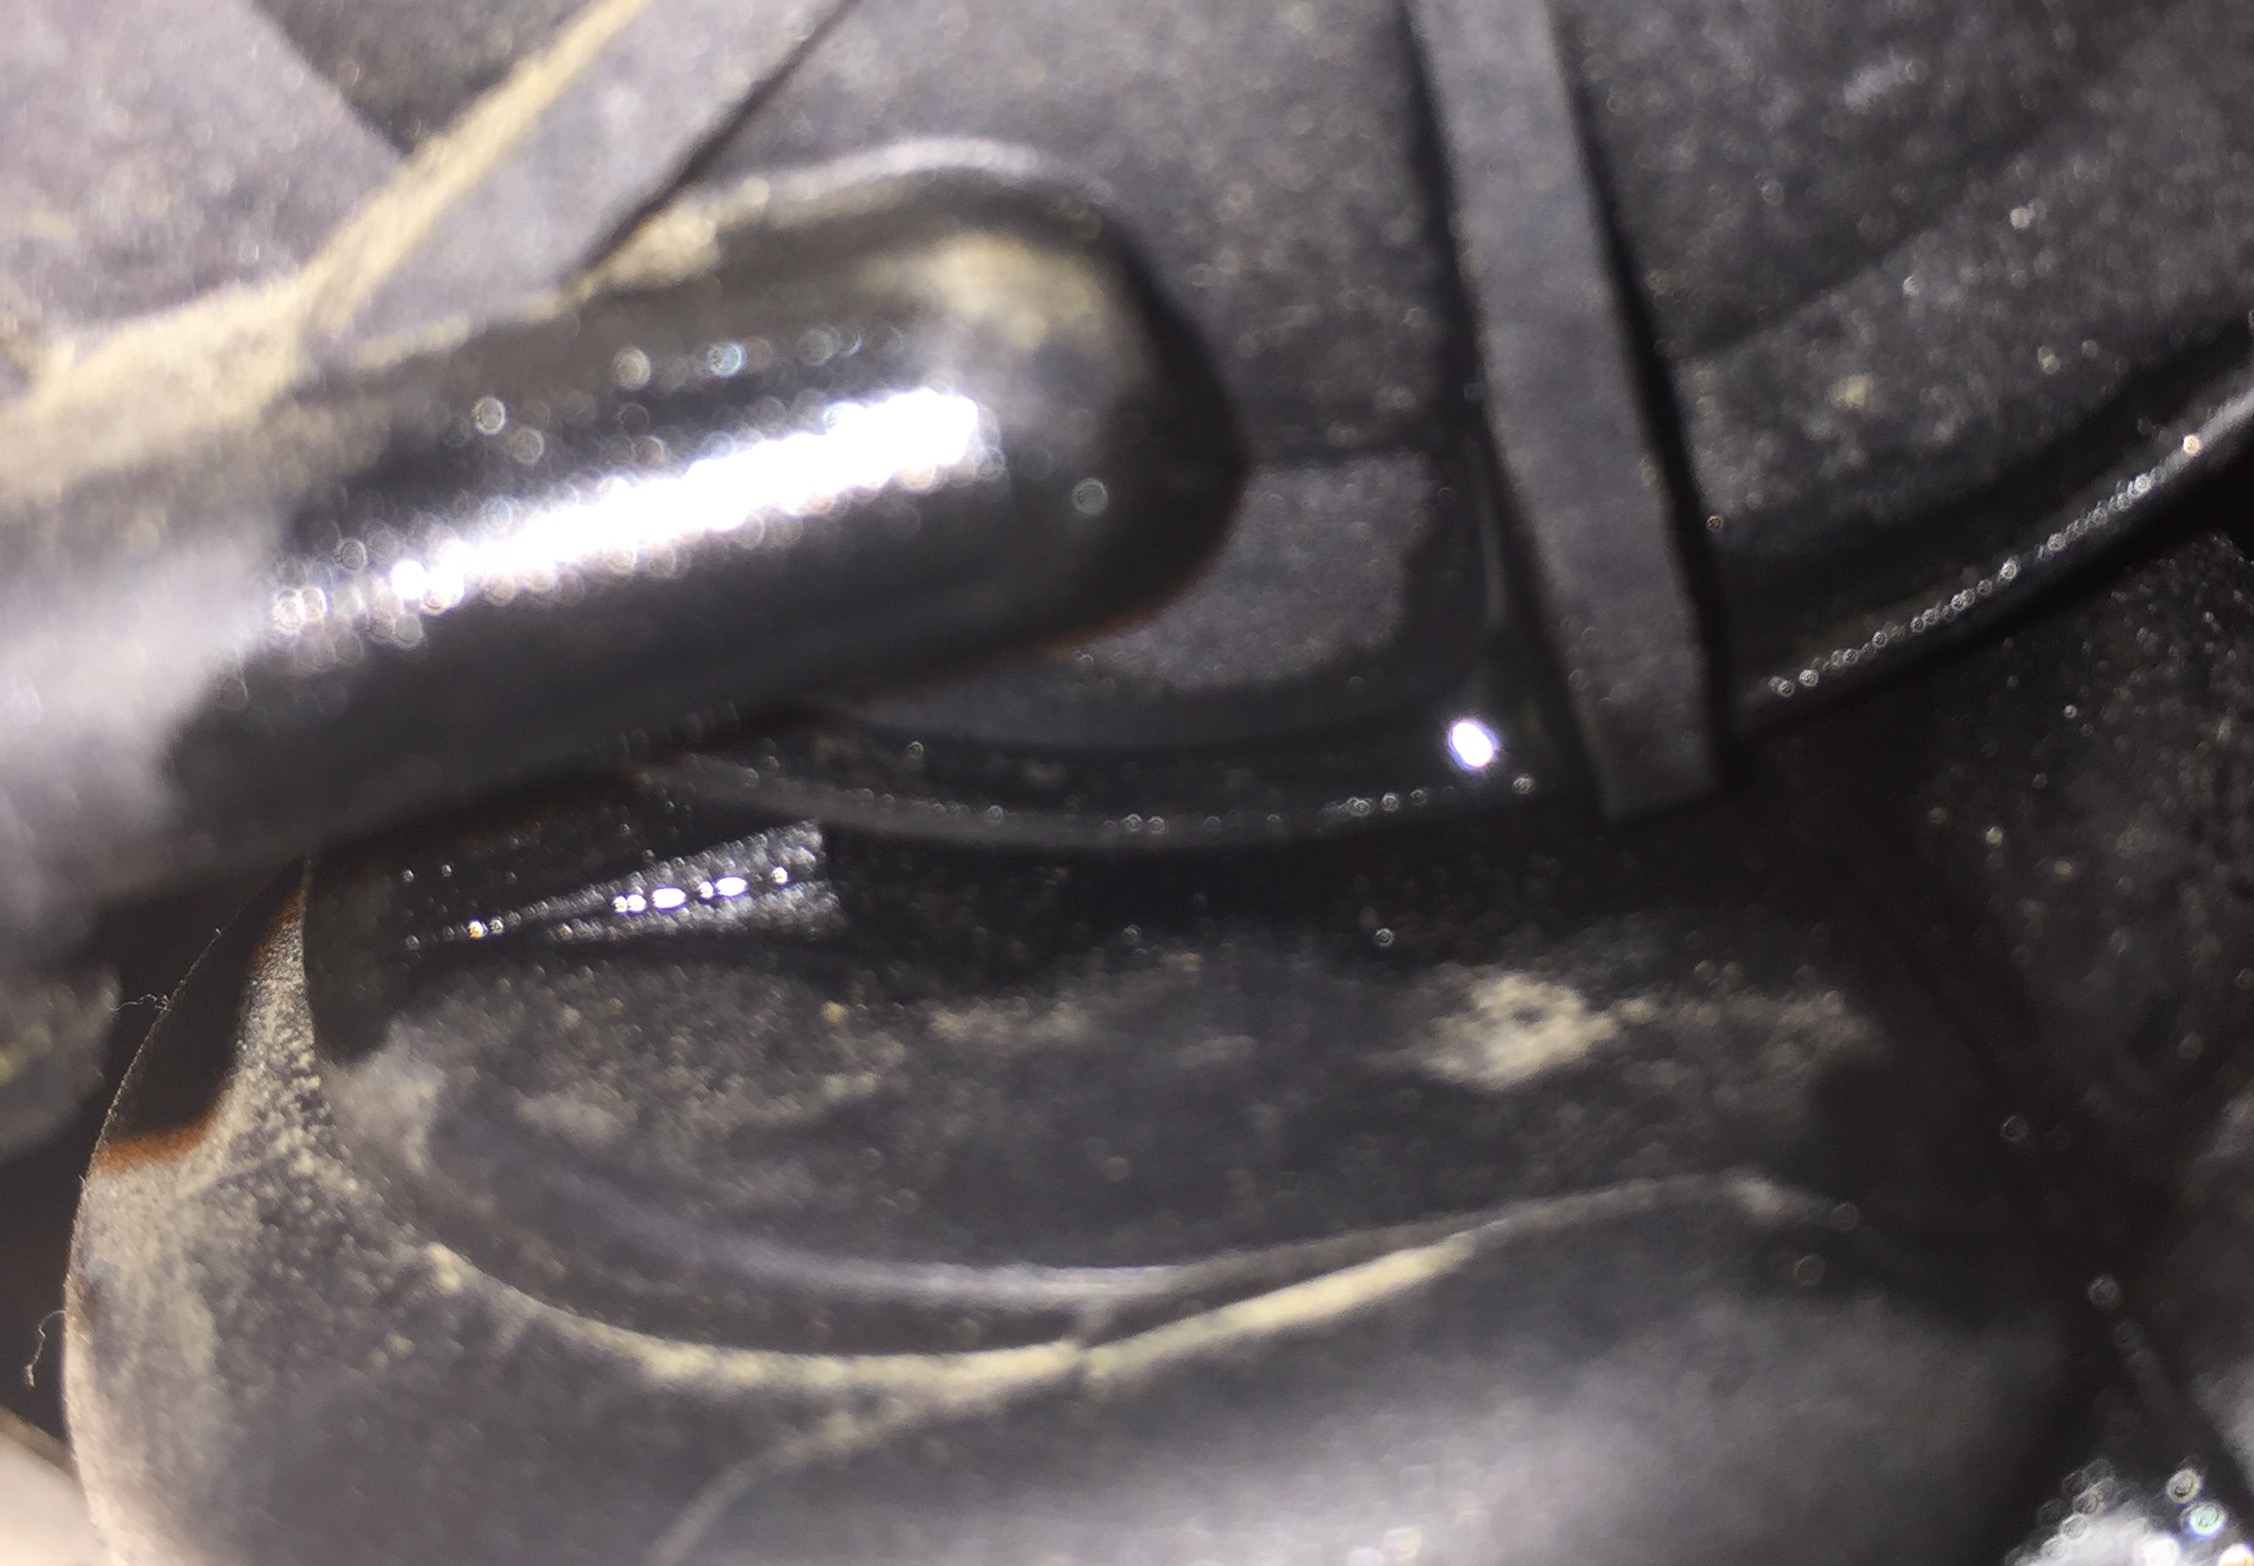
just a little update after I did the the re-assembly of the car today. My conclusion is - never again w/o taking the engine out ! The "pelican-way" is what worked for me overall. However, it possibly took way too much time (a full day... ), and I almost through, I figured that that small extra feature on my new AOS made it basically impossible the install the rear manifold screw the way I removed it (via 10 mm socket). The feature was literally above the screw-head (See the inspection camera view). I am not sure whether this feature is normal on all new AOS, but possibly I should not have chosen the aftermarket AOS. However, since Pelican sells both , I'd like to share how this minor issue was fixed w/o tearing all apart again. All I needed was a ~4 in long 10mm ring-wrench (I just broke one I had in two pieces). Getting the wrench between the AOS and screw was still difficult, but after rotating the screw-head a couple of turns by hand, I could get the wrench in place, and patiently rotated the screw until the manifold was proper held in place. OK. all connections are in place, no screws are left over, and all fluids at proper level...:). in the morning I hope the first startup & post will go smoothly .
-
sudden oil leak from Cylinder head
9552T500 replied to 9552T500's topic in 996 Series (Carrera, Carrera 4, Carrera 4S, Targa)
well, i had to stop at the coolant reservior removal as my 3/8th inch drive was not strong enough to loosen the two engine mounting bolts to lower it slightly.... short of a 1/2 in drive, but i believe i am already far.... at the same time i already removed tge front screw holding aos. the rear may be accessible as well ... thinking of removing the alternator will give me better access . i am just curious... if a no-go working i will finish it the pelican way this we. -
sudden oil leak from Cylinder head
9552T500 replied to 9552T500's topic in 996 Series (Carrera, Carrera 4, Carrera 4S, Targa)
no. the leaking one is the one which was in the car . i only consider this problem already as remedied - from the moment on , when i identified the mechanically broken ( fractured) plastic part . heat cycles and dry west coast climate were obviosly not considered enough when material choices were made. these cheap things brought my cayennes down multiple times with the last ten years i owned one, and seeing this here on the 966 ( and much better accessible) looks so much easier to call it done... -
sudden oil leak from Cylinder head
9552T500 replied to 9552T500's topic in 996 Series (Carrera, Carrera 4, Carrera 4S, Targa)
sorry. i just realized the typo in the thread. i mentioned 02 in the footer though. yes it's certainly a 3.6l. however, you maybe right- while digging in the car i have found misc signs that the engine may have been out for some service during the car's life (eg some difficult to reach plastic tubing is date stamped 2003...). but having had the car for 2 months now, and having adressed three of the major m96 issues diy ( ims,rms, aos), i realized how well this car is designed - to be easily taken apart, and that engine removal ( which would likely save a lot of time i spent), now looks much easier than i could imagine . it is the first car i really enjoy to work on. -
sudden oil leak from Cylinder head
9552T500 replied to 9552T500's topic in 996 Series (Carrera, Carrera 4, Carrera 4S, Targa)
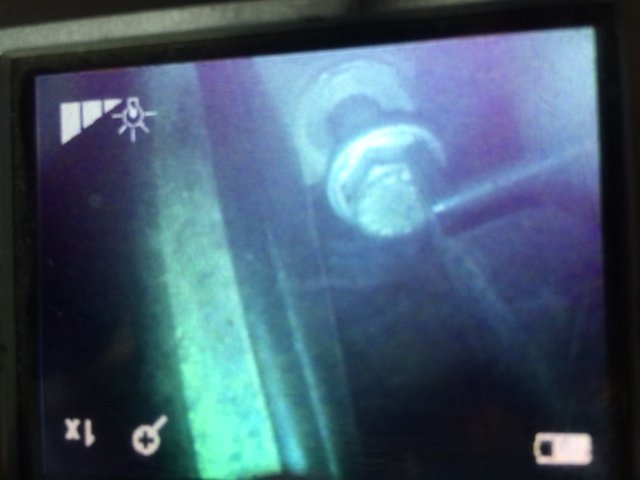
root cause found! the aos dome is severely cracked over at least 1 inch along the perimeter, cose to the small tube soigot. container is breathing oil towards the lhs of the engine. i finally discovered it by profiling the the dome cover by finger from the bottom of the car. then i tried to take a decent snapshoot- sharing below. glad to get to this point before leaving for a b-trip for the week late tomorrow. will be just in time to receive the new aos for completion of the replacement on during WE. thank you all once more for your constructive hints.
-
sudden oil leak from Cylinder head
9552T500 replied to 9552T500's topic in 996 Series (Carrera, Carrera 4, Carrera 4S, Targa)
thanks folks for the advice so far. attaching picture of the aos from view under the car. i realize the very oily connector is farther away from gasket plane than assumed before seen. also visible is that the aos features only a (very)light vertical stain of oil, and the visible hoses and connections seem dry. working now myself to aos from the engine bay side ( the pelican way ). hope this gives more insights on the source of the leak.
-
sudden oil leak from Cylinder head
9552T500 replied to 9552T500's topic in 996 Series (Carrera, Carrera 4, Carrera 4S, Targa)
if the aos or hoses are right above i could imagine to have capillarity force oil down along the gasket interface and may appear leaking itself. i hope it is the case. will try to get more light into this with an inspection camera. just in case the aos needs replaced- do i have to remove the engine - or has this been done before while in car? -
sudden oil leak from Cylinder head
9552T500 replied to 9552T500's topic in 996 Series (Carrera, Carrera 4, Carrera 4S, Targa)
yes, i mean the gasket - not the split casing of the cam cover . i pointed to the interface where the main oil spill emantes with red arrows in the picture of my original post. -
sudden oil leak from Cylinder head
9552T500 replied to 9552T500's topic in 996 Series (Carrera, Carrera 4, Carrera 4S, Targa)
the highest point I can see at this moment is the circled connection . Heavily oily. Can send pictures tonight. The cam covers are dry (attaching pic as well). The cam cover was not touched during IMS work.