Welcome to RennTech.org Community, Guest
There are many great features available to you once you register at RennTech.org
You are free to view posts here, but you must log in to reply to existing posts, or to start your own new topic. Like most online communities, there are costs involved to maintain a site like this - so we encourage our members to subscribe or donate. All subscriptions and donations go to the costs operating and maintaining this site. We prefer that guests take part in our community and we offer a lot in return to those willing to join our corner of the Porsche world. This site is 99 percent member supported (less than 1 percent comes from advertising) - so please consider an annual subscription or donation to keep this site running.
Here are some of the features available - once you subscribe RennTech.org
- View Classified Ads
- DIY Tutorials
- Porsche TSB Listings (limited)
- VIN Decoder
- Special Offers
- Paint Codes
- Registry
- Videos System
- View Reviews
- and get rid of this welcome message
It takes just a few minutes to register, and it's quality Porsche information at a low cost.
Contributing Members also get these additional benefits:
(you become a Contributing Member by subscribing or donating money to the operation of this site)
- No ads - advertisements are removed
- Access the Contributors Only Forum
- Contributing Members Only Downloads
- Send attachments with PMs
- All image/file storage limits are substantially increased for all Contributing Members
- Option Codes Lookup
- VIN Option Lookups (limited)


casperlabs
-
Posts
43 -
Joined
-
Last visited
Content Type
Profiles
Events
Forums
Exterior Paint Colors
Downloads
Tutorials
Links Directory
Collections
Classifieds
Store
Everything posted by casperlabs
-
Fuel Gauge Stuck on "Full"
casperlabs replied to espooner's topic in 986 Series (Boxster, Boxster S)
I am traveling, and did not take a picture at the time. Can do so after getting back, if you give me an email. There are many ways you can make this tool (a number of designs are evident in the ones sold on ebay). I had a worn out diamond saw blade disk that was the same diameter as the tank ring . I then cut 4 pieces of 1.5" angle steel 3/4 " wide. One side of each angle was slotted 3/4 inch deep about 0.150 wide (to engage the raised ribs on the retainer OD). The angles were then spot welded to the disk 90 degrees apart. If you don't weld, bolts could be substituted. In the center hole of the disk, an old 3/8" sq. drive socket was welded for wrenching. You could also just put a big bolt and nut in the center. What ever you make, it needs to be stiff. Otherwise it will pop off the relatively small drive lugs (which are very soft plastic). BR -
Starting issue, cranks won't start
casperlabs replied to tradergarry's topic in 986 Series (Boxster, Boxster S)
When ever you get a crank with no start condition, please remember there are a couple somewhat unique design features to these cars. First, the Bosch ECU does not turn on the fuel pump relay (never) unless it is getting pulses from the crank position sensor. This means, if the engine is not turning under crank or run conditions, there is no fuel pressure. This is intended to help prevent engine fires. So, if the engine will not start, you have to do the old fashioned check for fuel and ignition. Since these cars do not have fuel pressure sensors, the OBD will not be any help here. Pull the FP relay and jumper the pins with the ignition off. Remove the fuel cap and have someone turn the ignition on (not crank) while you listen at the filler neck, If you hear the pump run continuously , the pump is probably fine, but you still have to do a pressure check at the engine fuel rail to verify actual pressure meets spec. for a complete check of the fuel delivery. If the pump does not run, leave the relay jumper in place and check for 12v at the pump elec connector under the battery. No voltage there means a wiring problem. These pumps often fail to spin intermittently on a start-up before they quit completely. So if you get it restarted , don't shut it down until you are home. If the pump checks out, pull a spark plug connector and check for spark with a clean plug and everything properly grounded. If there is no spark, the problem is likely the crank or a cam sensor. You will have to go the manuals for this procedure. While on the subject of fuel pumps, it is interesting to note the early 986/996 use the same pump as millions of VW's and Audis going back to 1993. While the pn's may vary (often because they are sold with the sender) the pump is the same unit. Examination of the performance specs is so close, it makes no difference to the engine. Phycical examination with a vernier down to the detail part level cannot find any difference at all . The pump you want is the Airtex equivalent of their pn E8366. These can be shopped for as little as $50 (as opposed to $300 for a VDO), or a salvage yard find if your budget is challenged. When you pull the top off the old pump assembly, you will find the classic alum can turbine fuel pump inside. About the size of a roll of 50 cent pieces. Nothing special. Pelican parts has a good article on FP replacement (with the exception of chiseling off the retaining ring). Get or make a tool for this, it will save a lot damaged hardware, cost, delay, and a possibly dangerous hazzard. . Bill Ryan Casper Labs -
Fuel Gauge Stuck on "Full"
casperlabs replied to espooner's topic in 986 Series (Boxster, Boxster S)
I would like to pass along a recent experience that may help explain a lot of erroneous fuel level indication issues. My 986 has always been in the South, and subject to long periods of storage. The fuel level indicator moved in large increments rather than gradual change with fuel consumption. When the sender was removed for check out, the float arm was found to stay in any position it was placed in (could not fall of its own weight). Closer examination of the steel rod that the arm is made of, revealed a uniform layer of tan colored oxidation over the entire length. The arm can be pulled by opening a couple of snaps, and sure enough, the oxide extended into the pivot bushing hole. After scraping the oxide off with a pocket knife, and polishing the pivot area with crocus cloth, it was reassembled and found to pivot perfectly. Problem solved! The 10% ethenol in our gas can hold up to 40% water (by volume ) in suspension and still burn! Just because you cannot see water in the fuel does not mean it is not there. (Do a wikipedia on ethenol for more info.......dry gas is just ethenol) The high relative humidity here in FL just adds to the problem,..... if you don't drive the car and get the fuel cycled thru.. The oxide is probably zinc oxide, coming from a protective coating put on the bare steel arm. It was tan instead of white because of the fuel dye used in motor fuel. The arm should be recoated to prevent rust accumulation in the future. I used a fuel proof epoxy. Nickel, copper, or chrome plating would be better, but perhaps anal on a used car. Yet another reason why ethenol is better in your favorite beverage than in your mogas. If you want to check out your float, read Wayne Dempsy's article on fuel pump replacement in the Pelican Parts web site. His safety emphasis should be heeded in this potentially dangerous part of your car. The job is not very difficult, but I do take strong exception to one step he describes. He advocates removing the tank unit retaining collar with a big screwdriver and a hammer. This is for complete hacks (sorry Wayne, you must have missed that class at M.I.T.). You can do far more expensive financial damage with this method,.... than a trip to the dealership. Buy or make a tool. It took me an hour to make a nice one. This is the same unit in the 996,.... by the way. Bill Ryan Casper Labs -
We sold a bunch of the production "no suspension dismantling required" bearing tools to various DIY mechanics. But the pro mechanics did not like the fact it pulled only the smaller bearings used in the Boxsters, and 996 front wheels. So,..... we redesigned it to pull both front and rear wheel bearings of Boxsters thru 04, and 996 thru 05. Now all configurations of these cars can be serviced with one tool (regardless of FWD, RWD, S model, or base model). You can see it on Ebay with a "Porsche wheel bearing puller" search. This tool is less than half the cost of a shop replacing just one wheel bearing! Bill Ryan Casper Labs, Inc.
-
Casper Labs Ceramic IMS Bearing
casperlabs replied to valley996's topic in 996 Series (Carrera, Carrera 4, Carrera 4S, Targa)
We have been away from this forum for a bit, because you folks have been keeping us busy. We sold the 76th bearing yesterday, and have had to double the manpower assembling bearings. We are shipping dual row and single row bearings, as well as pullers and drifts for the same. We direly need to update our ebay listings, and get an alternate supplier qualified to make IMS support studs (for those of you that have run the assembly to complete destruction). So far no one has needed a stud replacement, as all the bearings have gone into engines that had serviceable bearings or very early failure detection. Best of all, we are finding that the customers who call us..... have heeded our warnings about the knowledge and skill required to make the bearing swap. These guys are studying the free on-line Porsche OEM workshop manual before they call us. They realize the complexity, are thinking before wrench twisting, and are prepared for the task. We have not had a negative incident yet, which has exceeded our expectations. The demand for the 1st generation single row bearing has been far greater than expected, and we have had a couple periods where customers had to wait nearly two weeks for their bearings. We are trying to get ahead of this situation, but there may still be short delays in the near future for certain items. Best of all, customers are now asking themselves why an installed bearing kit has to cost at least a thousand dollars! Some of the comments from customers who have installed one our competitor's product on a previous vehicle are really priceless! Too bad I can't quote them here (Loren would censor me). Lately, I have been asking customers to post to this forum. I expect you will start to see the results of this soon. The typical bearing purchase to installation period is running 4-6 weeks. So, you should be seeing some feedback in short order. Bill Ryan Casper Labs, Inc. -
Some really good, informed discussion here. It is important to note that the updated IMS bearing supports with the wider 3 rib seals also have very significant seal MATERIAL change. The early black o-ring seals are made of buna rubber. The 3 rib are orange (silicone). If you are using synthetic oil(which everybody should if they can afford it), the buna will eventually soften to the point where it will not seal. On conventional oil, silicone rings of similar size will take a compressive set in less time than buna, but life expectancy under synthetic oil is still worth making the material change. Metric silicone o-rings can be had from specialty houses if you wish to put them on the original support. Always check the bore of the IMS for a really smooth varnish and burr free surface. You can damage the o-ring on the stud if it is not smooth and lubricated when it is assembled. The Porsche service manual torque for the IMS stud nut is 10 ft/lbs. Many of the failures you hear about regarding these studs are the result of damage beacuse of over torque. All this stud is designed to do is set the running position of the IMS. It takes no axial load in service beyond the stretch imposed by tightening. It is also free of any radial load whatsoever (radial loads go thru the part of the support in the bearing ID. BR
-
Casper Labs Ceramic IMS Bearing
casperlabs replied to valley996's topic in 996 Series (Carrera, Carrera 4, Carrera 4S, Targa)
Your 99 came with a dual row bearing. Check maint. history to see if it is still in there. There are so many factors involved in oil selection, I would not dare make a quick comment on what is "best" for your application. All the major oil companies have lube chemists or applications engineers you can speak with. Get in touch with them. As a general comment I can say we are fortunate to live at a time where so much really great oil is readily available. Any mineral oil (coming from a top oil company) with an SG rating is going to be 1st class. Likewise the top synthetics. Synthetics are best for the ceramic hybrid if really cold weather starts are expected. The transmission type has no impact on IMS bearing performance. NONE. See earlier forum discussion on the merits/weakness of the 3 different IMS bearings used, and the mechanisms that lead to failure. Preparation of stored Boxster/996/997 vehicles with conventional IMS bearings should include topping up the oil and running to normal operating temp. b4 storage. Any hybrid bearing engine should be topped up b4 1st start (after long storage) to assure the bearing is flooded. Owners of these cars should be more careful in general than typical auto owners) of keeping the oil full. We do not let the oil go down more than 1/2 qt b4 topping. Periodic starting will be of no advantage to the IMS during storage. BR -
Thanks Loren, The B90 is a very popular tool with the Porsche community,.... high quality. BUT, we have taken it one step further by eliminating the need to pull axles/hubs/compress and partially remove front struts to get the old bearing out and new one in (req'd with the B90). This will save the amateur mechanic about 4 hours (pro...at least 2hrs) on a front bearing,.... with no need for additional tools (spring compressors, joint separators, etc.). The B90 is usable on different make cars. Our first tool will work on base 996/986 front and rear wheel bearings (exact same bearing). This same bearing is also used on some Audi's and BMW's, so we will have to look at the design of these cars to see if the geometry permits application. For a shop working these car models, it can add a lot of productive manhours. Our ugly prototype was drawn on CAD/machined on a lathe/mill/welded AND .....the bearing pulled in less than 4 hours. Production version will be very user friendly, made from 4130 chrome moly and 52100 bearing steel, and "pretty". Best of all, it will be half the price of the B90. Note: It is never advisable to install new bearings by applying loads "thru the balls". The installation w/the new tool applies pressure on the OD race only. BR
-
Oops! Should have mentioned......the tool also has built in capability to re-install the new bearing. BR
-
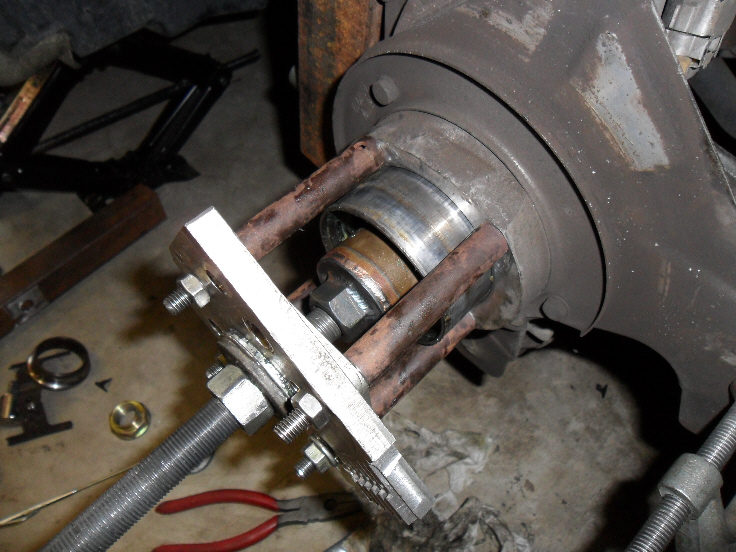
Here is the prototype puller with the bearing just about out. It is rough looking, but the production tool will be professional grade. This is a very robust puller, and will pull hundreds of bearings if used properly. Don't ask to see the mechanism, we will not tell you. Sorry, if you want to see how it works ...you will have to buy it Bill Ryan

-
Early wheel bearing failure (40K miles or more) is pretty common on these cars. Just did one of mine last week with 45k. The 30MPH range is typical of when the noise can be heard inside. If the noise is independent of if the clutch is depressed or not, it is probably a wheel bearing. It is usually pretty easy to audibly tell which side the problem is on, but determining front to back is more difficult (at least on my Boxster). W/o the front wheel drive, you can remove the wheel and brake pads (5 min.) and spin the hub. If noise or roughness is felt, you found it. If you think it is gone, but not positive, remove the caliper and rotor. The bare hub has a fraction of the inertia of the disk, and your sense of bearing "feel" will be amplified several times. With a half shaft in place, it is more difficult to isolate noise and feel this way (the CV's add drag and ball movement is not as smooth as a bearing. Suspect you may have to put car on a lift with engine running and in gear. A stethoscope placed on each bearing carrier will quickly let you know which has failed. Other readers may have alternate methods. On the rwd 996/986, the rear wheel bearings are pretty easy to replace for the home mechanic (using the B90 type pullers described in other wheel brg forum messages). You have to pull the 6 socket head cap screws holding the inner cv to remove the 1/2 shaft, NBD. The fronts are another matter. The front hubs won't let conventional pullers like the B90 work until the bottom end of the McPherson strut tube is moved out of the way, and the stub axle removed. This requires compressing the strut spring/disconnecting suspension links, etc.. Lotsa special tools and hours. This means the home mechanic has to be the determined type. We do a lot of bearing work (see Casper Labs IMS bearing in forum). On the wheel bearing I replaced last week, a special puller was made that lets you leave the 1/2 shaft and/or stub axle in place!! No axle removal, no suspension disassembly. Old bearing out/new bearing in in 30 min. (for average wrench twister). Only drawback to the tool is that it is specific to one size bearing. For example, the Boxster S bearing is larger, and will require 2 different parts. We have a pic of the prototype tool, but I have't the time at the moment to figure out how to attach it. Any one who wants to see it... just email me (N1WR@juno.com). We have material ordered to make a few production tools, to see if anyone is interested. Bill Ryan
-
Casper Labs Ceramic IMS Bearing
casperlabs replied to valley996's topic in 996 Series (Carrera, Carrera 4, Carrera 4S, Targa)
Loren What email would you like it sent to? BR -
Casper Labs Ceramic IMS Bearing
casperlabs replied to valley996's topic in 996 Series (Carrera, Carrera 4, Carrera 4S, Targa)
On the subject of mechanic qualifications for installing the hybrid bearing kit.................. If your mechanic has personal experience doing Variocam actuator replacement, has renewed the chain guides both on the Variocam actuator and in the crankcase, has removed and replaced all the three (totally unique but unfortunately interchangeable) chain tensioners, has sequenced and timed the camshafts on both banks, and has field serviced an open bearing or two in his past............then he is qualified (he understand how this valve train works). If he says " I've done it on a Toyota, same thing..." get in your car and leave immediatly! The experience has to be directly with these Porsche water boxers. BR Casper Labs, Inc -
Casper Labs Ceramic IMS Bearing
casperlabs replied to valley996's topic in 996 Series (Carrera, Carrera 4, Carrera 4S, Targa)
Thanks Loren, hope this can be resolved as I do not like letting people think they are sending messages to a vacuum! All personal incoming messages thru the Renntech system are in miniscule text regardless of which of my 3 computers I am using. To read them I have to forward the message using my regular JUNO email. When the forwarded message opens, it is in my usual text size. However,.........any links in the original message will not open, making a reply impossible unless the writer has included a direct email address. This situation is completely unique to Renntech correspondance. This problem goes all the way back to when I registered to be a Renn member. I had to send a regular email to the system admin to get the confirmation pushed thru on the other end. Call me if you wish 561-575-3157 ETZ 8-5 weekdays. Regards BR Casper Labs, Inc. -
Casper Labs Ceramic IMS Bearing
casperlabs replied to valley996's topic in 996 Series (Carrera, Carrera 4, Carrera 4S, Targa)
Mike, You sent me a direct message thru the Renntech system, and I could not reply because the text size would require a microcope to read it. I have written to the webmaster, but the problem persists. Please send me a direct email at N1WR@juno.com On your requests above.............our position with this bearing replacement is that it is a job for trained, skilled, mechanics who already have experience with major repairs to these specific engines. There are so many unique construction features and special tools required for these engines, that the chance of a novice installing one w/o creating more problems is just about nil. I have an installation manual I can mail you. It is written with a very specific procedure. If you do everything exactly as written , it seems very simple. However,.....people change things, or mistakes get made.............and then (OH NO!) if you don't know what is going on inside the engine, you can really mess up an expensive powerplant. In the past two weeks I have talked 3 customers out of purchasing for self install. They just did not have a clue what they were getting into. You have to have the experience of going thru one of these engines to really appreciate what I have just written. We have no intention of developing a marketing brocure. The market for this bearing upgrade is pretty small right now. As these vehicle age, and more and more shops start rebuilding them, the market will grow. We will be here with a reasonably priced solution to the IMS worry. All the history and misinformation surrounding the OEM bearing is not helped by the fact there are very few of us who have experience with ceramic bearings. Customers don't know if these bearings are a real solution, or just more smoke and mirrors from someone trying to make a sale. They don't know which aspects are critically important, and which do not matter at all. You can't solve these problems overnight, and you can't provide the education/experience needed with a brocure. The parts in the kit are shown in the ebay ad with the exception of the syringe (which we intentionally did not show), The present kit has a bearing, retaining ring, spacer, and cup plug. You will also need OEM consumables (seals) depending on what support/stud you elect to use. We also recommend a new factory clinch nut, but it is not absolutely necessary. We have (optional) pullers and bearing drifts shown on the ebay ad as well. At the present time, all the shops we recommend are in FL, however .....there are hundreds of qualified mechanics that are out there and could easily step up to the job. We can tell over the phone (in less than a couple min.) if the mech knows what he is doing by the questions asked. Would also like to talk to you about some other elements you might consider for your IMS comparison web page. Bill Ryan Casper Labs, Inc. -
Casper Labs Ceramic IMS Bearing
casperlabs replied to valley996's topic in 996 Series (Carrera, Carrera 4, Carrera 4S, Targa)
The bearings are shipped with an extremely light oil that is really just for preservation (as a lube it is pretty much worthless). Reason for this is that viscous oil masks the feel of contaminant in the bearing. Our sense of feel is critical to determining if any foreign objects got in during handling or tapping in place. BR -
Casper Labs Ceramic IMS Bearing
casperlabs replied to valley996's topic in 996 Series (Carrera, Carrera 4, Carrera 4S, Targa)
We gave some thought to making a full pressure lubed journal bearing kit that would completely eliminate any IMS failure scenario short of some loss of oil pressure. It is really quite simple, using a bearing essentially the same as a pressed in cam in block camshaft bearing. The oil pump has plenty of reserve capacity in these engines for the miniscule add'l oil req'd, and the risk of damaging the bearing going in...... is much lower than any ball bearing. The drawbacks are an external oil line (and you have to drill a hole thru the open bell housing side of the case to feed the oil line to the bottom side of a new support --no nearby pressurized oil sources), and a lot more parts. You would have to sell 4000 of these to get a price that would make it affordable. If I make that much money, the IRS will be wondering where it all came from! When the engine is running with a hybrid bearing IMS, the RPM is sufficient to create enough windage that very little liquid oil gets to the bearing. It is being lubed by oil vapor virtually all the time. This windage keeps the possibility of FOD way down when spinning, and the stack up of parts is also helpful (the face of the bearing is close to the vertical side of the support,... and the ball separator we use blocks the opening). This limits the size of foreign objects that can find their way in. The greatest possibility of something getting in is when the engine is stopped and the oil level full (above the bottom of the bearing), then.... something could float in. Since oil has a specific gravity somewhere around 0.8, it is not going to be anything made of metal that "floats in". There just are not materials in these engines that have low S.G. and enough hardness to damage one of these bearings. Gasket material and little bits of chain guide will be mashed by the ceramic ball w/o causing bearing problems. To give you an idea of how little space there is on the open side of the bearing, we ship each kit with a veterinarian's needle syringe to startup lube the the bearing (after it is in place and locked). The needle is .030 diameter, and you can just get it past the ball separator. Now, ....if you put a screen it there, it has to be supported. That means it has to spin (remember the OD rotates on this bearing). Having a fragile screen spinning at approx 3000 rpm is not a good idea. If it comes apart, most of it will be centerfuged away, but it could end up in the bearing. What is the benefit when you are down to .030" anyway? Regardless of what bearing you buy, it all going to come down to the installer. There is not a bearing made that can't be ruined in hearbeat by dirt or overload. Everybody should be focused on who they pick to install it. For those of you contemplating purchasing one of these cars, if the seller tells you it has a ceramic bearing,.............ask to see the invoice. I had one independent shop tell me that he replaced an engine in a Boxster for IMS failure. The customer was upset because the seller told him it had been upgraded to the hybrid. When the mech pulled the support, ...it was just another steel bearing. BR Casper Labs, Inc. -
Casper Labs Ceramic IMS Bearing
casperlabs replied to valley996's topic in 996 Series (Carrera, Carrera 4, Carrera 4S, Targa)
One additional reason the dual row lasts longer than the early single row (same diameter ID/OD) is the reduced deflection of the ID race under load. Every bearing develops normal wear that increases internal clearances. As the clearance opens, the seal has to deal with more runout. This gets to an unacceptable level faster with the single row because of its lower load rating (faster wear) and lack of the "wheelbase" of two ball rows. Once the runout exceeds the seal's sealing limit, the bearing is on its way out. A bearing with small balls will have a larger angular wobble than one with big balls given the same internal clearance. I sometimes think we should have added some hi-tech coating or other superfluous feature and priced the bearing higher than LN. There will always be those who believe higher cost means "superior". There is a particularly large Porsche market down here in south Florida. My survey of the dealers and independent shops shows there are less than a dozen cars down here with the hybrid bearings. If you multiply the cost of a bearing by 4000 supposed users..... you have at least $2million 400 thousand in sales. Do you believe that? Our experience with these simple bearing types,.... is that every failure will be traceable to an installation error. If you survey the major bearing manufacturers, they will repeat this. Properly designed, a bearing has truly incredible life. That means no sealed, grease lubed bearings immersed in hot oil. BR Casper Labs, Inc. -
Casper Labs Ceramic IMS Bearing
casperlabs replied to valley996's topic in 996 Series (Carrera, Carrera 4, Carrera 4S, Targa)
Your assessment is pretty much correct. If you have the engine apart it would be advisable to find an earlier shaft, or possibly have the existing one reworked for the dual row configuration. We have very mixed feelings about removing the outer seal when you have steel balls in the bearing. Any piece of metallic FOD could start a bearing failure. In the mean time, keep your oil level topped off at all times. Sustained high RPM running of that big bearing should be avoided in our opinion. BR Casper Labs, Inc. -
Casper Labs Ceramic IMS Bearing
casperlabs replied to valley996's topic in 996 Series (Carrera, Carrera 4, Carrera 4S, Targa)
Those of you who have tried to clean these engines, know that the outside casting roughness and number of crevices make this a difficult to clean. With all the environmental concerns with this type of operation, we suggest you consider pressure washing... if the engine needs a major clean-up. Washing with only water at 1500PSI or greater is very effective at mechanically removing all the grime without dealing with solvents. The grime comes off in small chunks that are easily floated to the edge of a concrete or asphalt surface, where they can be collected with a shovel. Typical homeowner grade grade units of 4HP or greater seem to work well. Renting units may be more practical for those of you wanting to try it out first. Use care around more delicate parts (such as the crank rear main seal) to avoid damage or water intrusion. This process is not necessary for most every IMS bearing repacement, as the condition of this area can vary considerably in cleanliness. BR -
Casper Labs Ceramic IMS Bearing
casperlabs replied to valley996's topic in 996 Series (Carrera, Carrera 4, Carrera 4S, Targa)
Also, readers should note the photo in post #93. Every engine case should be this clean before removing the support. Do what ever it takes to prevent dirt and grit from getting into the new open face bearing when installing. Even light tapping of the bearing drift will dislodge particles if not removed before hand. BR -
Casper Labs Ceramic IMS Bearing
casperlabs replied to valley996's topic in 996 Series (Carrera, Carrera 4, Carrera 4S, Targa)
Those 12 point nuts are categorized as "reduced diameter types". They can develop the full tensile rating of the male thread with much smaller OD. They use them for two primary reasons in aircraft. 1)They are lighter, and 2) they let you put more fasteners per square inch of space (stronger joints for a given area). In the IMS they have only one disadvantage. Since the diameter is reduced, the socket size is small. Small sockets don't have much space for a nice wide screwdriver blade (and generously sized/twist resistant shank) that is resistant to coming out of the stud slot. That is why we use the Porsche nut, it is much larger diameter and customers are much less likely to have to bench grind the sides of the blade flats to get it to pass thru the wrench. When we offer the replacement studs (for customers with damaged studs) we may go that route because the screw slot will be replaced with an allen type recess (and pass thru diameter concerns disappear). A box of 100 of the aircraft nuts can be had for about 15 to 20% of the unit cost of the Porsche OEM nut. So, at that point it makes sense. BR -
Casper Labs Ceramic IMS Bearing
casperlabs replied to valley996's topic in 996 Series (Carrera, Carrera 4, Carrera 4S, Targa)
We have given that some thought. The 12 point nut LN uses is a standard aircraft product. Very good quality, available in "inch" dimensions only, and strictly one tightening cycle. Anyone who uses these nuts,immediatly picks up on how well they support the socket, there is very little socket rock. It is hard not to like them. The problem is the screw slot. As you say, the tightening process is not easily coordinated, as the screw blade wants to twist out of the slot. It is easiest to do this tightening if two people do it. One concentrates on holding the the screwdriver in the slot both axially and in torsion. The other turns the torque wrench. If you go to the recessed hex instead of a screw slot, it gets much easier. The allen wrench does not have the problem of twisting out, so one person can do the tightening easily. When you get to the tightening specs for small fasteners, you find there is usually big margin. Since the nuts used in this app are prevailing torque (clinch) types, you don't have to worry about thread distortion under torque to prevent loosening. The distorted nut does the locking. Since there is no design axial load on the IMS, now you have a lot of flexibility. Fortunately, torque is not very critical here. You just have to find a way to keep people from grossly over torqing (that leads to a broken stud/nut rattling in the bell housing). Expect we will offer some low cost beam type torque wrenches with a hole thru the square drive (or make your own). The more adapters, crows feet, etc. you add to the wrench,....the more calibration accuracy lost. Keep it simple. BR -
Casper Labs Ceramic IMS Bearing
casperlabs replied to valley996's topic in 996 Series (Carrera, Carrera 4, Carrera 4S, Targa)
Valley996, When we decided to go forward with this project, we were well aware that the years of unresolved issues surrounding the IMS were going to present a challenge (to overcome ingrained perceptions, doubt, and poor Porshe product support). The automotive market is a lot different from other markets we serve, because it relies so heavily on word of mouth reputation (as apposed to regulatory agengy approval for product endorsement). When you come in and say, " This does not need to cost so much!". People think, "cheapo version". It is going to take time for the misconception to right itself. This thread has been helpful to us in figuring out how to give all of you the information you need to understand everthing we discussed (as well as our ad info). We think the best way to go from here is by making a web accessed .pdf file of the installation manual, as well as some You Tube videos. The links to these will be posted on a later reply to this thread. We have had a few highly specialized Porsche products on the market with Wayne Dempsey since 2004. Like the IMS bearing, we came up with a metalurgical fix for the infamous 911 head stud. Thousands of these have been in service since 1993, and have never, ever, had a failure. We have seen studs that looked like they were installed with a pipe wrench and four vice grips, and they never fail. One of the top 911 engine variant builders in the USA uses these studs exclusively (and sells they under his brand name by agreement with us). Ask Wayne if he has ever had a report of a product failure on even one of our parts. People pass over the stud in the catalog every day because they are 30 to 40 per cent less than the highly (and expensively) advertised studs made by others. "Those can't be any good at that price!" Some of those other aftermarket studs are made of material designed for 400 deg F max service. Since the CHT frequently exceeds this even on a street engine , They fail right where the stud passes into the head after about 100hrs of thermal transients. The good news is, we put another six of these beaings on the road in the last two weeks. This is going to be an interesting project (and a challenge) for a while. Like Wayne, I return all emails and phone messages (if not immediatly available). N1WR@juno.com or 561-575-3157 (9a-5p ETZ) Regards, BR -
Casper Labs Ceramic IMS Bearing
casperlabs replied to valley996's topic in 996 Series (Carrera, Carrera 4, Carrera 4S, Targa)
There are a lot of tightening "specs" floating around on these engines. Going back to Porsche's 1996 approach (early design), the only torque values used were initial values to "set" or flatten gaskets before going to the final compressive load by "angle of turn" (to a ridiculous + or - 2 degrees in the OEM manual). The angle of turn method gained big momentum years ago, when the US military was looking for a way for mechanics to reliably tighten hardware in the field under less than ideal shop environments. As you all know, the amount of load on any screw fastener can vary greatly with lubrication, thread condition, etc.) It is a great deal easier to reliably set the preload on a large diameter/very short lenght fastener by angle of turn, than on a long, slender one. So, the Navy mechanics fixing a 9" battleship cannon have a lot fewer issues with "angle of turn" than Army helicopter mechanics. The average auto mechanic has neither the time or patience for angle of turn. You have to get all the oil off the fastener head, and some how mark it. (How do they achieve + or - 2 deg. accuracy on a 6 or 8MM fastener?) . He wants to grab his 6% accuracy click type torque wrench, and yank on it. You really cannot blame him. Fortunately there is enough design margin on most fasteners, that everything works out OK. I was hoping to avoid this post for fear of diverging into this contentious torque issue. The point of my prior post is that this 8mm stud has only one role in the bearing design, to set the axail running position of the bearing/IMS. Again..........there are no axial loads imparted on the IMS from any source. If you took a plain nut, threaded it finger tight with the ID race up against the support, and had some miracle "glue" to hold the nut from loosening............it would fullfill all of its design job requirements. Forget about the nut torque (for now) for the purpose of understanding how the IMS design wiorks. Since the OEM nut is a clinch lock type, there is no need to use Loctite. Do you wear a belt with suspenders? In fact, the Loctite acts as a lube, slightly altering the preload at constant torque. But, much worse could happen. If the stud threads get really goobered up with loctite, and it runs down the stud to the O-ring,................ it will lock up the O-ring. Loctite type compounds in an o-ring groove will cause leakage every time. I know this sound like heresy to some of you,.... sorry. BR