Welcome to RennTech.org Community, Guest
There are many great features available to you once you register at RennTech.org
You are free to view posts here, but you must log in to reply to existing posts, or to start your own new topic. Like most online communities, there are costs involved to maintain a site like this - so we encourage our members to donate. All donations go to the costs operating and maintaining this site. We prefer that guests take part in our community and we offer a lot in return to those willing to join our corner of the Porsche world. This site is 99 percent member supported (less than 1 percent comes from advertising) - so please consider an annual donation to keep this site running.
Here are some of the features available - once you register at RennTech.org
- View Classified Ads
- DIY Tutorials
- Porsche TSB Listings (limited)
- VIN Decoder
- Special Offers
-
OBD II P-Codes - Paint Codes
- Registry
- Videos System
- View Reviews
- and get rid of this welcome message
It takes just a few minutes to register, and it's FREE
Contributing Members also get these additional benefits:
(you become a Contributing Member by donating money to the operation of this site)
- No ads - advertisements are removed
- Access the Contributors Only Forum
- Contributing Members Only Downloads
- Send attachments with PMs
- All image/file storage limits are substantially increased for all Contributing Members
- Option Codes Lookup
- VIN Option Lookups (limited)


ciaka
-
Posts
469 -
Joined
-
Last visited
-
Days Won
14
Content Type
Profiles
Events
Forums
External Paint Colors
Downloads
Tutorials
Links Directory
Collections
Store
Posts posted by ciaka
-
-
I ended up replacing a lower control arm yesterday on my PTT. I may have a write up about it, partial pictures.
About upper control arms, I noticed that the upper control arms are NOT connected directly to the air shock as they are on the Cayenne.
The upper control arms appear to be mounted to the vehicle body, with bolts accessible after removing the wheel well lining, as well as inside the engine bay.
I have not replaced one, but to me it looks like you would have to:
- open engine compratment
- remove the corner trim piece (next to the washer fluid for passenger side, or next to coolant cap area for driver side)...this gives access to one of the nuts for control arm
- raise the car
- remove wheel
- remove wheel lining (there are 4 screws under car for rear facing part of lining, and another 4 screws for the front facing piece of lining, under the car)
- separate the upper control arm ball joint (secure control arm so it does not slam into top of wheel well (put a bungee on it or tie down - ball joint separation will launch it fast)
- remove the expansion plug for level sensor attached to the control arm
- remove the level sensor attached to the control arm
- remove nut inside engine bay for each of the upper control arm bolts (two in total)
-- not sure about the bolt removal, I have not inspected how much clearance there would be
- once bolts are out, remove control arm
- install new control arm
- replace level sensor into new control arm
- plug in level sensor expansion plug to secure level sensor in new arm
- Tighten both side bolts/nuts
- Tighten ball joint at steering knuckle
- Put back the wheel well lining
- Put back the trim pieces inside engine bay
If I was to estimate, first time would take probably 3 or 4 hrs as long as no surprises arise (like ball joint seized to knuckle, etc.).
Subsequent visits I expect to take about 2 hrs.
This appears to be a good place to start digging if you hear squeaking/banging noises when you go over bumps. It is hard to determine by trying to move upper control arm by hand, since bolts will keep that part secured tightly. After you remove the control arm, you will notice tears in the rubber.
Hope this helps. If I get in there one day, I may do a write up with decent pics.
-
wow. The lock finally arrived. Nearly $200 for it too.
Works perfect though. Now, remove them, and never use again (will probably save for when I choose to put them back on). Good end to the story.
-
I was read in a service manual about removal of the upper control arm, and think it stated there is access to screws, without need to remove the entire shock.
Can anyone comment on this from experience? I will be doing this soon and wanted to get additional info on this. Avoiding removal of shock saves you need to disconnect from air suspension, removing entire shock. On Cayenne that was the case, where upper control arm required removing entire shock, so access to upper control arm could be made.
Thanks in advance.
-
there is diy for brake booster issues, go check diy section.
-
If you are at standstill, and start accelerating slowly, you will begin to hear and feel clunking coming from under middle of the car. Can be felt coming from variety of locations since the problem area is located in middle of the car, around back of center console.
When you start accelerating, you will hear the banging increase. You can also raise suspension on the cayenne, crawl under there, and put your hand on the cardan shaft, near the bushing. If you can easily move the shaft around (up/down, etc), the bushing is gone and your cardan shaft is no longer stationary. It starts wobbling creating the banging noise.
While you are under there, check the flex disk (right at front of the drive shaft), the shaft is screwed down to it with bolts. The flex disk looks like a black thick rubber round disk.
If you inspect, you will likely find tears or cracks in it. This is due to shaft not being centered in line.
Once you make the determination the shaft is going, I would suggest you get yourself a good person to do the replacement (cost would be about $1600 including parts & labor), or follow a DYI. I made on on here. Give it a read to see if you are handy enough to do yourself. You will save at least $1000 by DIY.
I ordered mine from Colorado Drive shafts when it happened to me. Most Cayennes did have this problem. Its a question of when, not if.
DIY for cardan shaft replacement - CLICK HERE
Good luck. Let us know what happened.
-
...as another update, I compared the servo motor Porsche part numbers, between 2003-2006 Cayenne, and 2007-2010.
Compared servos for front and rear AC zones. All numbers are identical. All of the 2007-2010 cayenne parts refer to 955 numbers.
This means identical parts, so as long as you get them new, you will be set.
Getting used parts means you will take 50/50 chance. It may work, or it may not. If the part is old, chances increase that it will not work correctly, or will fail sooner than later.
For all the work to do on removing these, it will be wiser to just get the new parts.
-
Cayenne Instrument Cluster LCD Brightness Repair
Symptom: Your LCD display inside your instrument cluster is very dim, or was dim before, but now you cannot see anything at all on it. So you are left with only the analog dials (needles) to rely on, for information. This prevents you from accessing settings for the car. This DIY will help you fix this issue. Most of the time, the issue is a transformer located on the main board of cluster, that becomes defective. Remedy is to replace it. Below info will show you every step of the way, fr
-
Author
-
Category
-
Submitted05/21/2018 11:48 AM
-
-
Panamera - Gas Cap Replacement
If at any time you get errors related to EVAP (small leaks, etc), chances are your gas cap is not holding pressure in the tank. This is one of most common ways to fail inspections. Then they sell you a gas cap at twice the price, charge you for half hour or an hour of time, and you end up paying $250 or more to get it done. Who on here finds this a familiar situation? Don't raise your hands (I wont see anyways...lol). Well, you can get this done in about 5 minutes, if you include a
-
Author
-
Category
-
Submitted05/14/2018 02:04 PM
-
-
Is it recommended to replace coils with spark plugs on the PTT?
I would assume not, unless coil is damaged in some way. Cayennes had them cracking.
Thanks.
-
Thanks. I did see them, but arent these the actual jack lift points that go into your car, in case they get ruined?
That is my understanding at least. I am looking for adapters that I can put onto jack lift which will fit into the lift points on the car.
I saw folks making some, but hoping there are some for sale cheap. Thank you.
-
To wrap this thread up, I ordered replacement key based on serial number I had on original.
Its been a week or so, but it will take about 3 weeks (must be ordered from Germany factory, who will order from UK manufacturer).
Then I get it.
Once comes in, I will use to remove 4 lugs, then throw it away (or sell to
some suckersomeone who wants to have some very specialty lock bolts). -
So far I am able to do everything I need on Panamera, using the front car ramps (easy and quick).
When I start doing other maintenance stuff, I wanted to see if there are adapters, which I can get, to put onto car jack or car stand, which will fit exactly into the Panamera lift points.
I saw some DIY stuff, but before I head down that hole, I wanted to see if these adapters can be purchased cheaply.
Thank you.
-
Can someone go over my take on how air suspension works on Panamera?
I looked through the repair manual, scanned through many places. Hope I am accurate.
NOTE: Please dont take below as absolute truth until I remove this note (Means someone with knowledge verified accuracy).
The air suspension is closed system, filled with nitrogen 5. Min pressure of 16bar (235psi), max pressure of 17bar (249.9psi).
Each air shock is connected to an air line.
Each air line and air shock, have a Schrader type valve at air connection location, so nitrogen does not escape.
Air lines connect air shocks to the valve block.
The valve block is the mechanism which releases pressure form shocks, if one wants to lower the car.
So if you sit in seat, press the lower switch (or PASM to make shocks softer), the ECU in back of your car will tell the valve block to open valves to each shock, allowing some nitrogen gas to come out of the shocks, making car lower/softer.
The escaped, or bled out nitrogen goes from the valve block, into a gas tank, called the air accumulator. That gas sits there (does not escape to outside), until you get back into the car, and press a button to make the car higher.
When you press button to make car higher, the ECU turns on the compressor (that is connected to the valve block and the accumulator), pumping gas from the tank, through the valve block, into each shock. This makes your car go higher or stiffer.
Process repeats as you use the button, etc.
In my conversation with dealer, I was told the air shock may slowly leak a bit of gas left overnight, but as long as the car raises in the morning, all is OK. That would make sense from view of not having all that pressure inside all shock bellows all the time. Leaking some gas back into accumulator tank (or through shocks bellow), would allow pressure to reduce, prolonging life of shock. Only when you enter car, and start driving it, does the gas process start, to pump into shocks for driving.
How was that? I hope someone can straighten me out if not correct. Please chime in if you KNOW something is not correct. Thank you very much.
-
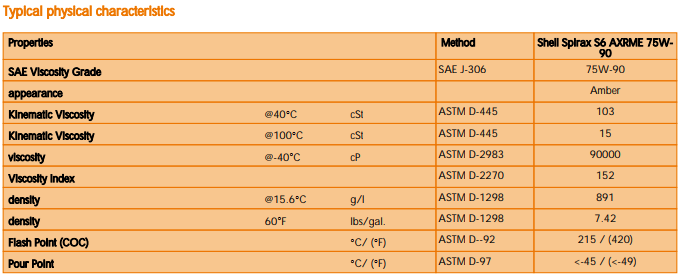
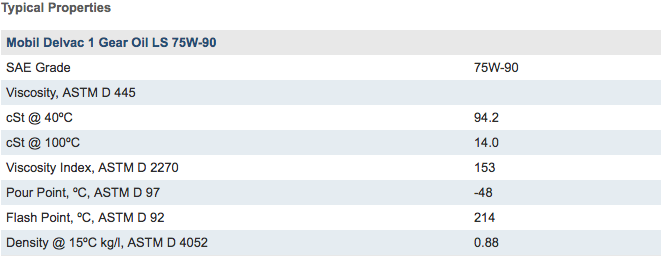
Through bit more research, I found cross reference between Shell Spirax gear oil.
Attached links for datasheet to each, took snapshot of properties tables.
Looking at both, I think using the Mobil Delvac 1 synthetic gear oil LS 75W90, will be safe. If anyone can chime in to stop me with reasons, please do. I would hate to learn this lesson expensive way.
Thanks.
Shell Spirax S6 AXRME 75W90 Synthetic Oil Datasheet Info:

Mobil Delvac 1 Gear Oil LS 75W90 Datasheet Info:
-
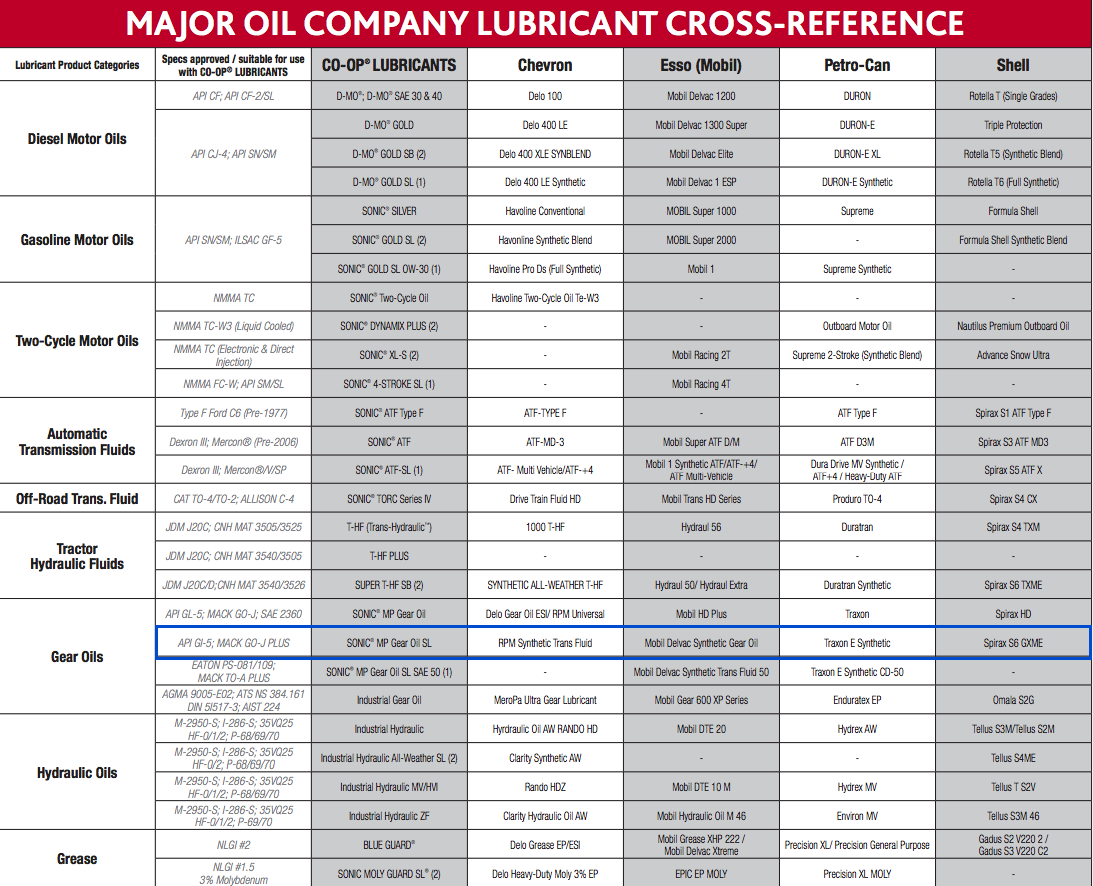
Just now, Loren said:
Shell Spirax S6 GXME is 75w80 -- not 75w90.
...this means I must have been looking at the wrong cross reference. The PET 2 parts clearly state 75W90, with PN 000 043 205 30.
-
I was just able to confirm that Porsche Cayenne Turbo 2003-2006 uses same part number for gear oil.
Porsche PN for Cayenne Turbo differential oil: 000 043 205 30 - 75W90
Porsche PN for Panamera Turbo differential oil: 000 043 205 30 - 75W90
Since both cars use same PN for same fluid, and since for years folks including myself used the Mobil synthetic gear oil LS 75W90, what say you? I guess I am looking for reassurance, even though my mind is kind of made up here (hey, gotta be honest).
Thanks again.
-
I came across a cross reference where the Shell TF 0951 gear oil (Spirax), was on same cross reference line with Mobil Synthetic gear oil (same certifications: API GI-5; MACK GO-J PLUS).
Does that help in saying the Mobil synthetic gear oil 75w90 would be fine? The viscosity of the OE gear oil is same - 75W90. Hoping to do the change this weekend. Thank you.
-
On Cayenne we used Mobil 1 75W90 Synthetic Gear Oil LS.
Is it safe to assume that will also apply to Panamera?
What exactly is the TF 0951? Is that some rating from Shell? Would love to understand.
-
Have been doing more research which answered some question and created more. So my new questions are below...
1. Where is the access point I would use to evacuate entire air suspension system of air and moisture?
2. I assume once I know #1, I will know which access point is used to fill the system with Nitrogen.
3. How would I go about checking pressure in the air suspension, to see if it needs top off with Nitrogen?
4. I really would love to get instructions on how to rebuild the compressor for air suspension. Mine is not failing and not running all the time (actually do not hear it run all that much), but I do want to remove the compressor and replace any rebuild parts to refresh the unit (will make the pump more efficient and extend its life).5. What role does the valve block do? Is it just air distribution or does it actively manage where and how much air goes to a shock (this would mean possibility of fail point if valves do not open correctly).
Thank you for help. -
as they say, what comes up must come down. Its down.
-
Did the bumper removal yesterday. I would never pay someone $500 to do it. Removal is super easy. Save yourself a bunch of money and DIY.
-
Started looking for info/details on changing differential fluid for the PTT.
I plan to do both front & read diff.
Hoping it is as easy as on Cayenne.If anyone has seen a link to DIY info, has instrucitons details, I will greatly appreciate. Again this is for front and rear diff.
I will be doing a DIY for it, so that others can benefit.
Thank you.
-
Does anyone on here do air shock maintenance on the bags (rubber)?
I mean putting some rubber lubricant that will keep the bags malleable, and help them stay elastic and not brittle?
I figure that may be a good maintenance item to do on each shock. What do you think? I am willing to try something, but need to find a suitable lubricant that will not interact with the rubber to help decompose it.
Thanks.
-
Through some searching I came across threads (in multiple forums) about Panamera air suspension being filled with Nitrogen 5.
I am not exhibiting issues yet, but have been reading many many posters talk about their issues with shocks, so I guess I am preparing for eventual repair.
Can someone chime in on this, to confirm with certainty?
Also have questions:
1. What is the exact reason for using Nitrogen here? Just corrosion management and inertness of gas?
2. What if you do not fill with Nitrogen and let compressor use regular air?
3. Can someone confirm that the air shock has to be filled with gas to specific pressure (I read between 16 and 17 bar - max of 249.9psi)
4. Is there a special process to do the fill? One shock at a time or all shocks connected and filled at once?
5. Where did you get your setup to do your own fill?
6. How do you compensate for gas trapped in line when filling the shock?
Thank you as always.

2010-2013 Panamera Turbo Brake Pad Choices
in 970 series (Panamera, 4, S, 4S, 4S Executive, S E-Hybrid, Turbo, Turbo S, Turbo Executive, GTS, 4 Sport Turismo, 4S Sport Turismo) (MY2010 - 2016)
Posted · Edited by ciaka
Can anyone recommend good front pads for the PTT?
I have iron discs, and looking to put new pads on front for the car.
Went to EBC for yellow stuff, but did not see pads info for the car.
Looking for good pads, with ability when needed, not necessarily because I will use it every day, but better to have and not need.
Appreciate help.
EDIT: Compiled these for others as reference. These are what I found that I would consider for the car.
Looking for replacement pads for my vehicle, 2011 Panamera turbo.
After doing some research, I found some numbers which I think others can use for their maintenance purposes. Hope it helps.
Went to Hawk & EBC web site and researched front pads for my vehicle 2011 Panamera Turbo (non PCCB).
I am considering ceramic to reduce brake dust.
Very unusual for me to be stomping on the brakes full tilt. So for me, it would be between ceramic and street hps 5.0 pads.
Still, having and not needing is a nice place to be overall. We will see by the time I have to choose.
2010-2013 Panamera turbo rotor sizes:
Front:
Size: 360mm
New thickness: 36mm
Replace thickness: 34mm
Max wear: 2mm
Rear:
Size: 350mm
New thickness: 28mm
Replace thickness: 26mm
Max wear: 2mm
HAWK BRAKE PADS:
Hawk Performance Ceramic brake pads:
Hawk Performance HPS 5.0 brake pads:
Hawk Performance StreetRace brake pads:
EBC BRAKE PADS:
EBC Yellowstuff 4000 Series Street And Track Brake Pad Set:
EBC Bluestuff NDX Trackday Brake Pad Set: