Welcome to RennTech.org Community, Guest
There are many great features available to you once you register at RennTech.org
You are free to view posts here, but you must log in to reply to existing posts, or to start your own new topic. Like most online communities, there are costs involved to maintain a site like this - so we encourage our members to subscribe or donate. All subscriptions and donations go to the costs operating and maintaining this site. We prefer that guests take part in our community and we offer a lot in return to those willing to join our corner of the Porsche world. This site is 99 percent member supported (less than 1 percent comes from advertising) - so please consider an annual subscription or donation to keep this site running.
Here are some of the features available - once you subscribe RennTech.org
- View Classified Ads
- DIY Tutorials
- Porsche TSB Listings (limited)
- VIN Decoder
- Special Offers
- Paint Codes
- Registry
- Videos System
- View Reviews
- and get rid of this welcome message
It takes just a few minutes to register, and it's quality Porsche information at a low cost.
Contributing Members also get these additional benefits:
(you become a Contributing Member by subscribing or donating money to the operation of this site)
- No ads - advertisements are removed
- Access the Contributors Only Forum
- Contributing Members Only Downloads
- Send attachments with PMs
- All image/file storage limits are substantially increased for all Contributing Members
- Option Codes Lookup
- VIN Option Lookups (limited)


Fixxxer
-
Posts
42 -
Joined
-
Last visited
-
Days Won
1
Content Type
Profiles
Events
Forums
Exterior Paint Colors
Downloads
Tutorials
Links Directory
Collections
Classifieds
Store
Everything posted by Fixxxer
-
 Thank you both!
 -
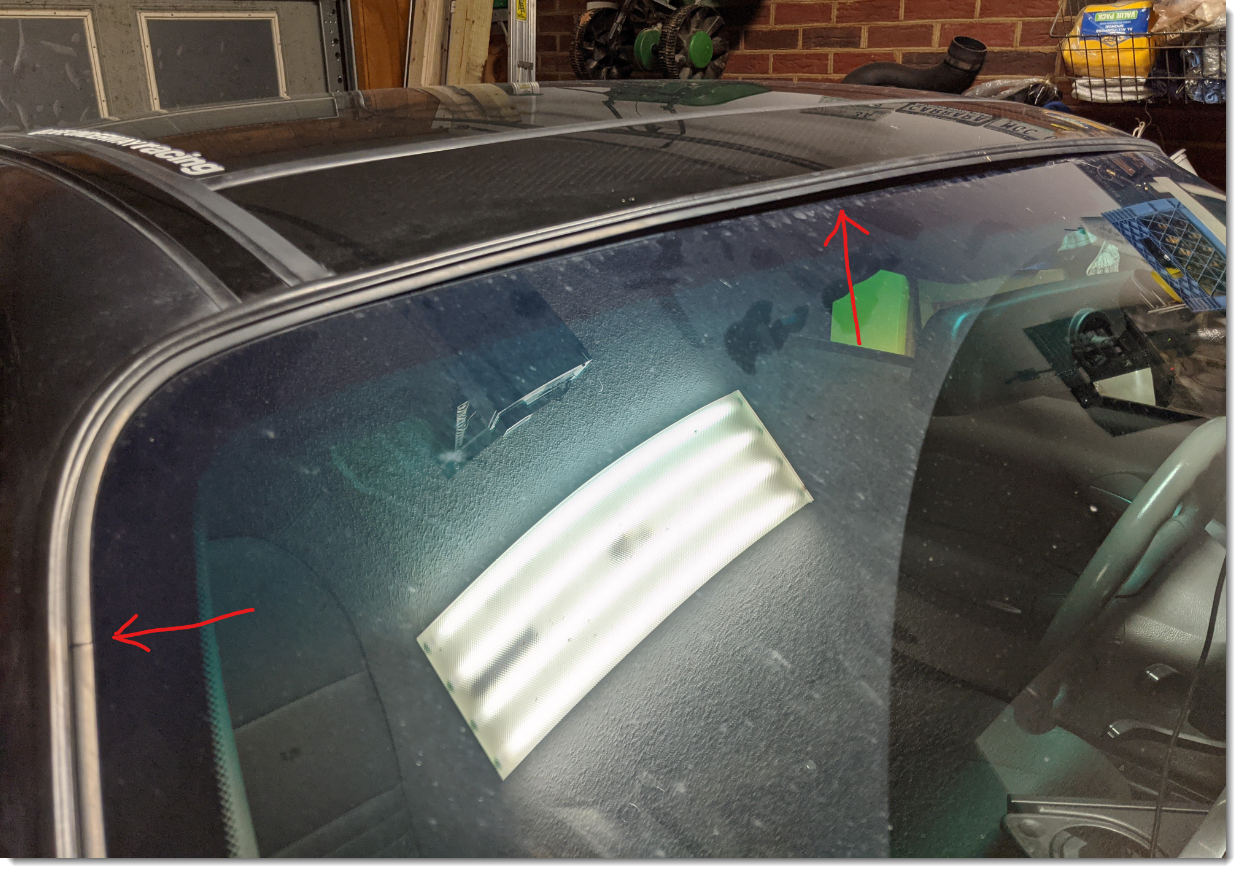
I have a 2004 996 Targa and the rubber gasket that runs around the top and sides of the windshield pulls away from the top of the glass any time I drive over 50-60 MPH (see the top red arrow in the attached photo). There's also a metal strip running through it that appears to have cracked in half (see the left red arrow in the attached photo). I've searched all over the place, but I cannot seem to find a replacement part... Only random rubber gaskets. Can you guys help with a part number and/or a place where I might be able to get a replacement? Thank you!

-
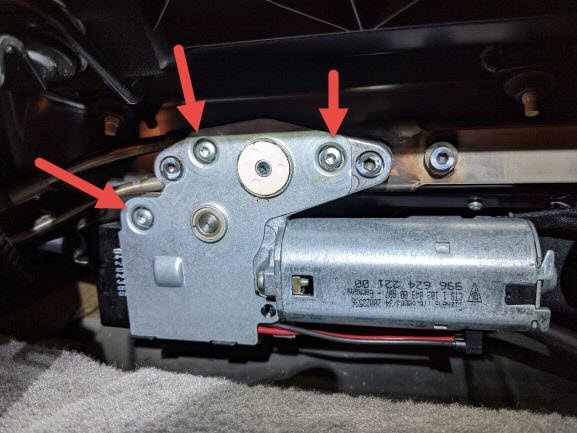
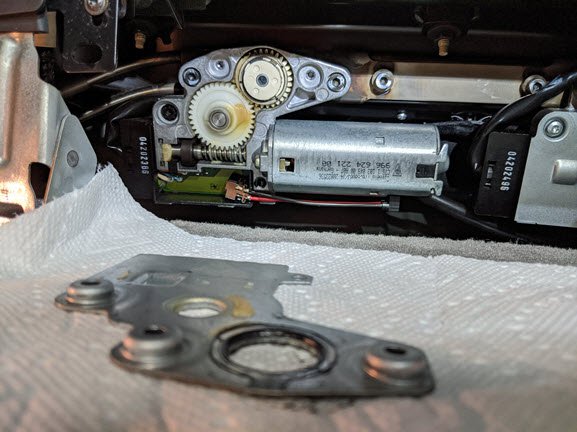
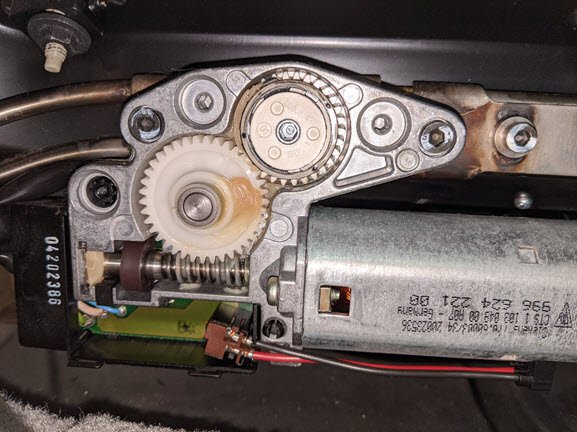
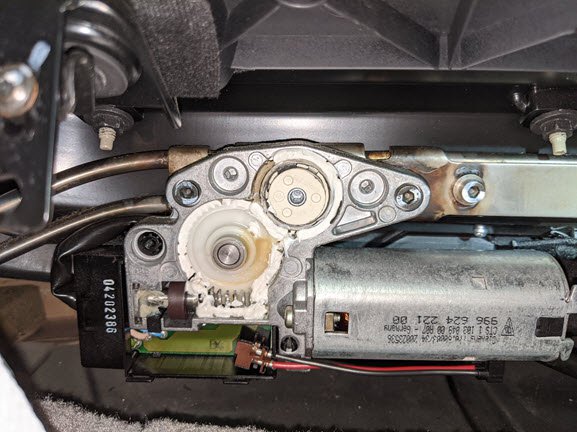
Here we go... These photos apply to both motors. Remove these three screws: Here's the gearbox with the cover removed: Here's what it'll look like with the factory grease: Clean up what you can and put in new grease. I was in a hurry, so I didn't pull the gears and I used white lithium grease. I intend to pull it back apart soon and clean everything up properly: Hope this helps.
-
FYI - I did this tonight and it works great! I took a bunch of photos too. I'll share as soon as I can... Thanks @jay04v6
-
Trying to create a tutorial
Fixxxer replied to Fixxxer's topic in 996 Series (Carrera, Carrera 4, Carrera 4S, Targa)
Thanks, man. But even at 800px horizontal in PNG at 72 DPI the group of photos comes out around 14MB. I'll try to finish up the tutorial with links to photos instead. -
Trying to create a tutorial
Fixxxer replied to Fixxxer's topic in 996 Series (Carrera, Carrera 4, Carrera 4S, Targa)
I understand. Unfortunately I'm not in a good place right now to contribute financially to anything (hopefully it'll be resolved soon). I'll see if I can find a way to do it with links. Just trying to help others out. Thanks, Loren! -
Hey guys, I'm trying to create a tutorial on how to disassemble & repair a noisy secondary air injection pump, but I'm running into the 2MB total photo size limit. I've resized all of my photos so that they're around 200KB each, but I'm still running out of space. I can't resize them to be much smaller because a whole lot of the detail will be lost. Any suggestions? Thanks,
-
High mile role call
Fixxxer replied to violaGT3's topic in 996 Series (Carrera, Carrera 4, Carrera 4S, Targa)
My 2004 Targa just turned 100K miles this week! She's still running like a bat out of hell, too! FWIW, the previous owner replaced the RMS, but the IMS has never been changed. I plan to have it done whenever I get the clutch replaced, but so far I've been keeping my RPMs up and changing my oil regularly with no issues. My clutch was last replaced by the previous owner at around 50K miles, so I'll probably be due for a new one before long. I'm going to ask the shop to hang onto the old IMS bearing for me so I can check it for wear. I'll share my findings.
-
I Made A Thing (for a 996 Targa)
Fixxxer replied to Fixxxer's topic in 996 Series (Carrera, Carrera 4, Carrera 4S, Targa)
Hmm. I could certainly give it a try, but it'll have to wait until I can pull out one of my rear belts to get the measurements. I'll let you know! -
I Made A Thing (for a 996 Targa)
Fixxxer replied to Fixxxer's topic in 996 Series (Carrera, Carrera 4, Carrera 4S, Targa)
Happy to help! -
I Made A Thing (for a 996 Targa)
Fixxxer replied to Fixxxer's topic in 996 Series (Carrera, Carrera 4, Carrera 4S, Targa)
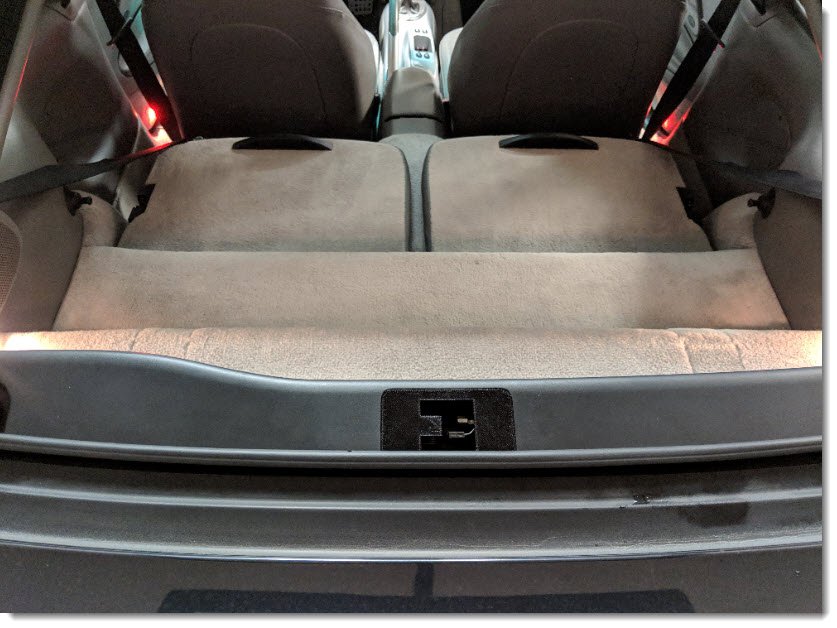
It just rests in there. There's a groove along the edges that the original piece was molded to fit into. My 3D print has some bits that fit into that same groove to hold it in place. -
I Made A Thing (for a 996 Targa)
Fixxxer replied to Fixxxer's topic in 996 Series (Carrera, Carrera 4, Carrera 4S, Targa)
Thanks! If you already have a 3D printer and filament, it's really only a few cents worth of material to print. If anyone here needs one, I'll happily make one for them for the cost of shipping. Only takes about an hour to print. -
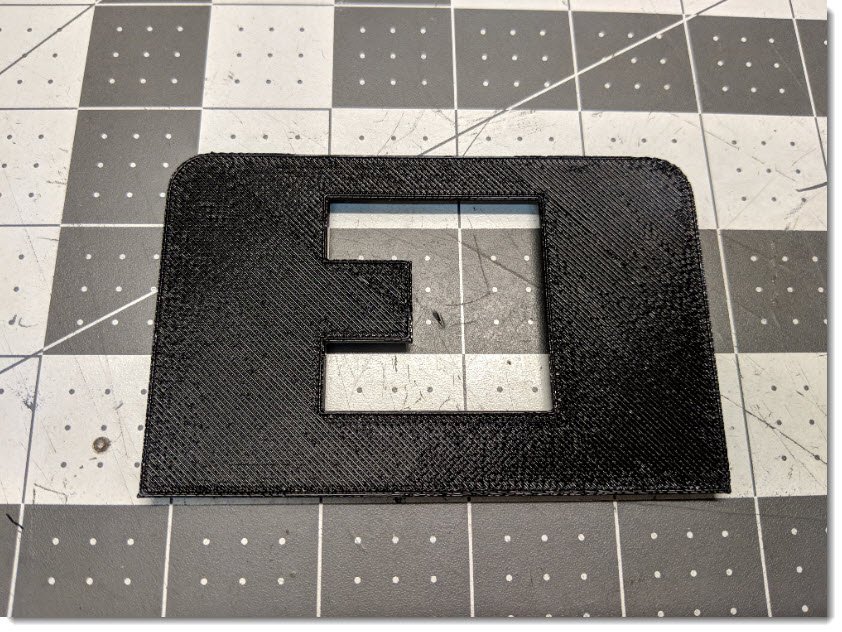
If you have a 996 Targa you'll know that the little rubber piece that covers the rear glass' latch tends to degrade and fall apart. I designed a replacement piece that you can 3D print. Just make sure that you use PETG or ABS plastic so it doesn't melt when your car is sitting out in the sun. I'll probably get some filler primer and some matte black paint to make it match the rest of the trim, but I think it turned out pretty well. I don't know how much a genuine replacement costs, but it was a fun little exercise for me. Download for FREE here: https://www.thingiverse.com/thing:3287876 Enjoy!
-
Oil Filter Debris
Fixxxer replied to Fixxxer's topic in 996 Series (Carrera, Carrera 4, Carrera 4S, Targa)
Thank you, sir! -
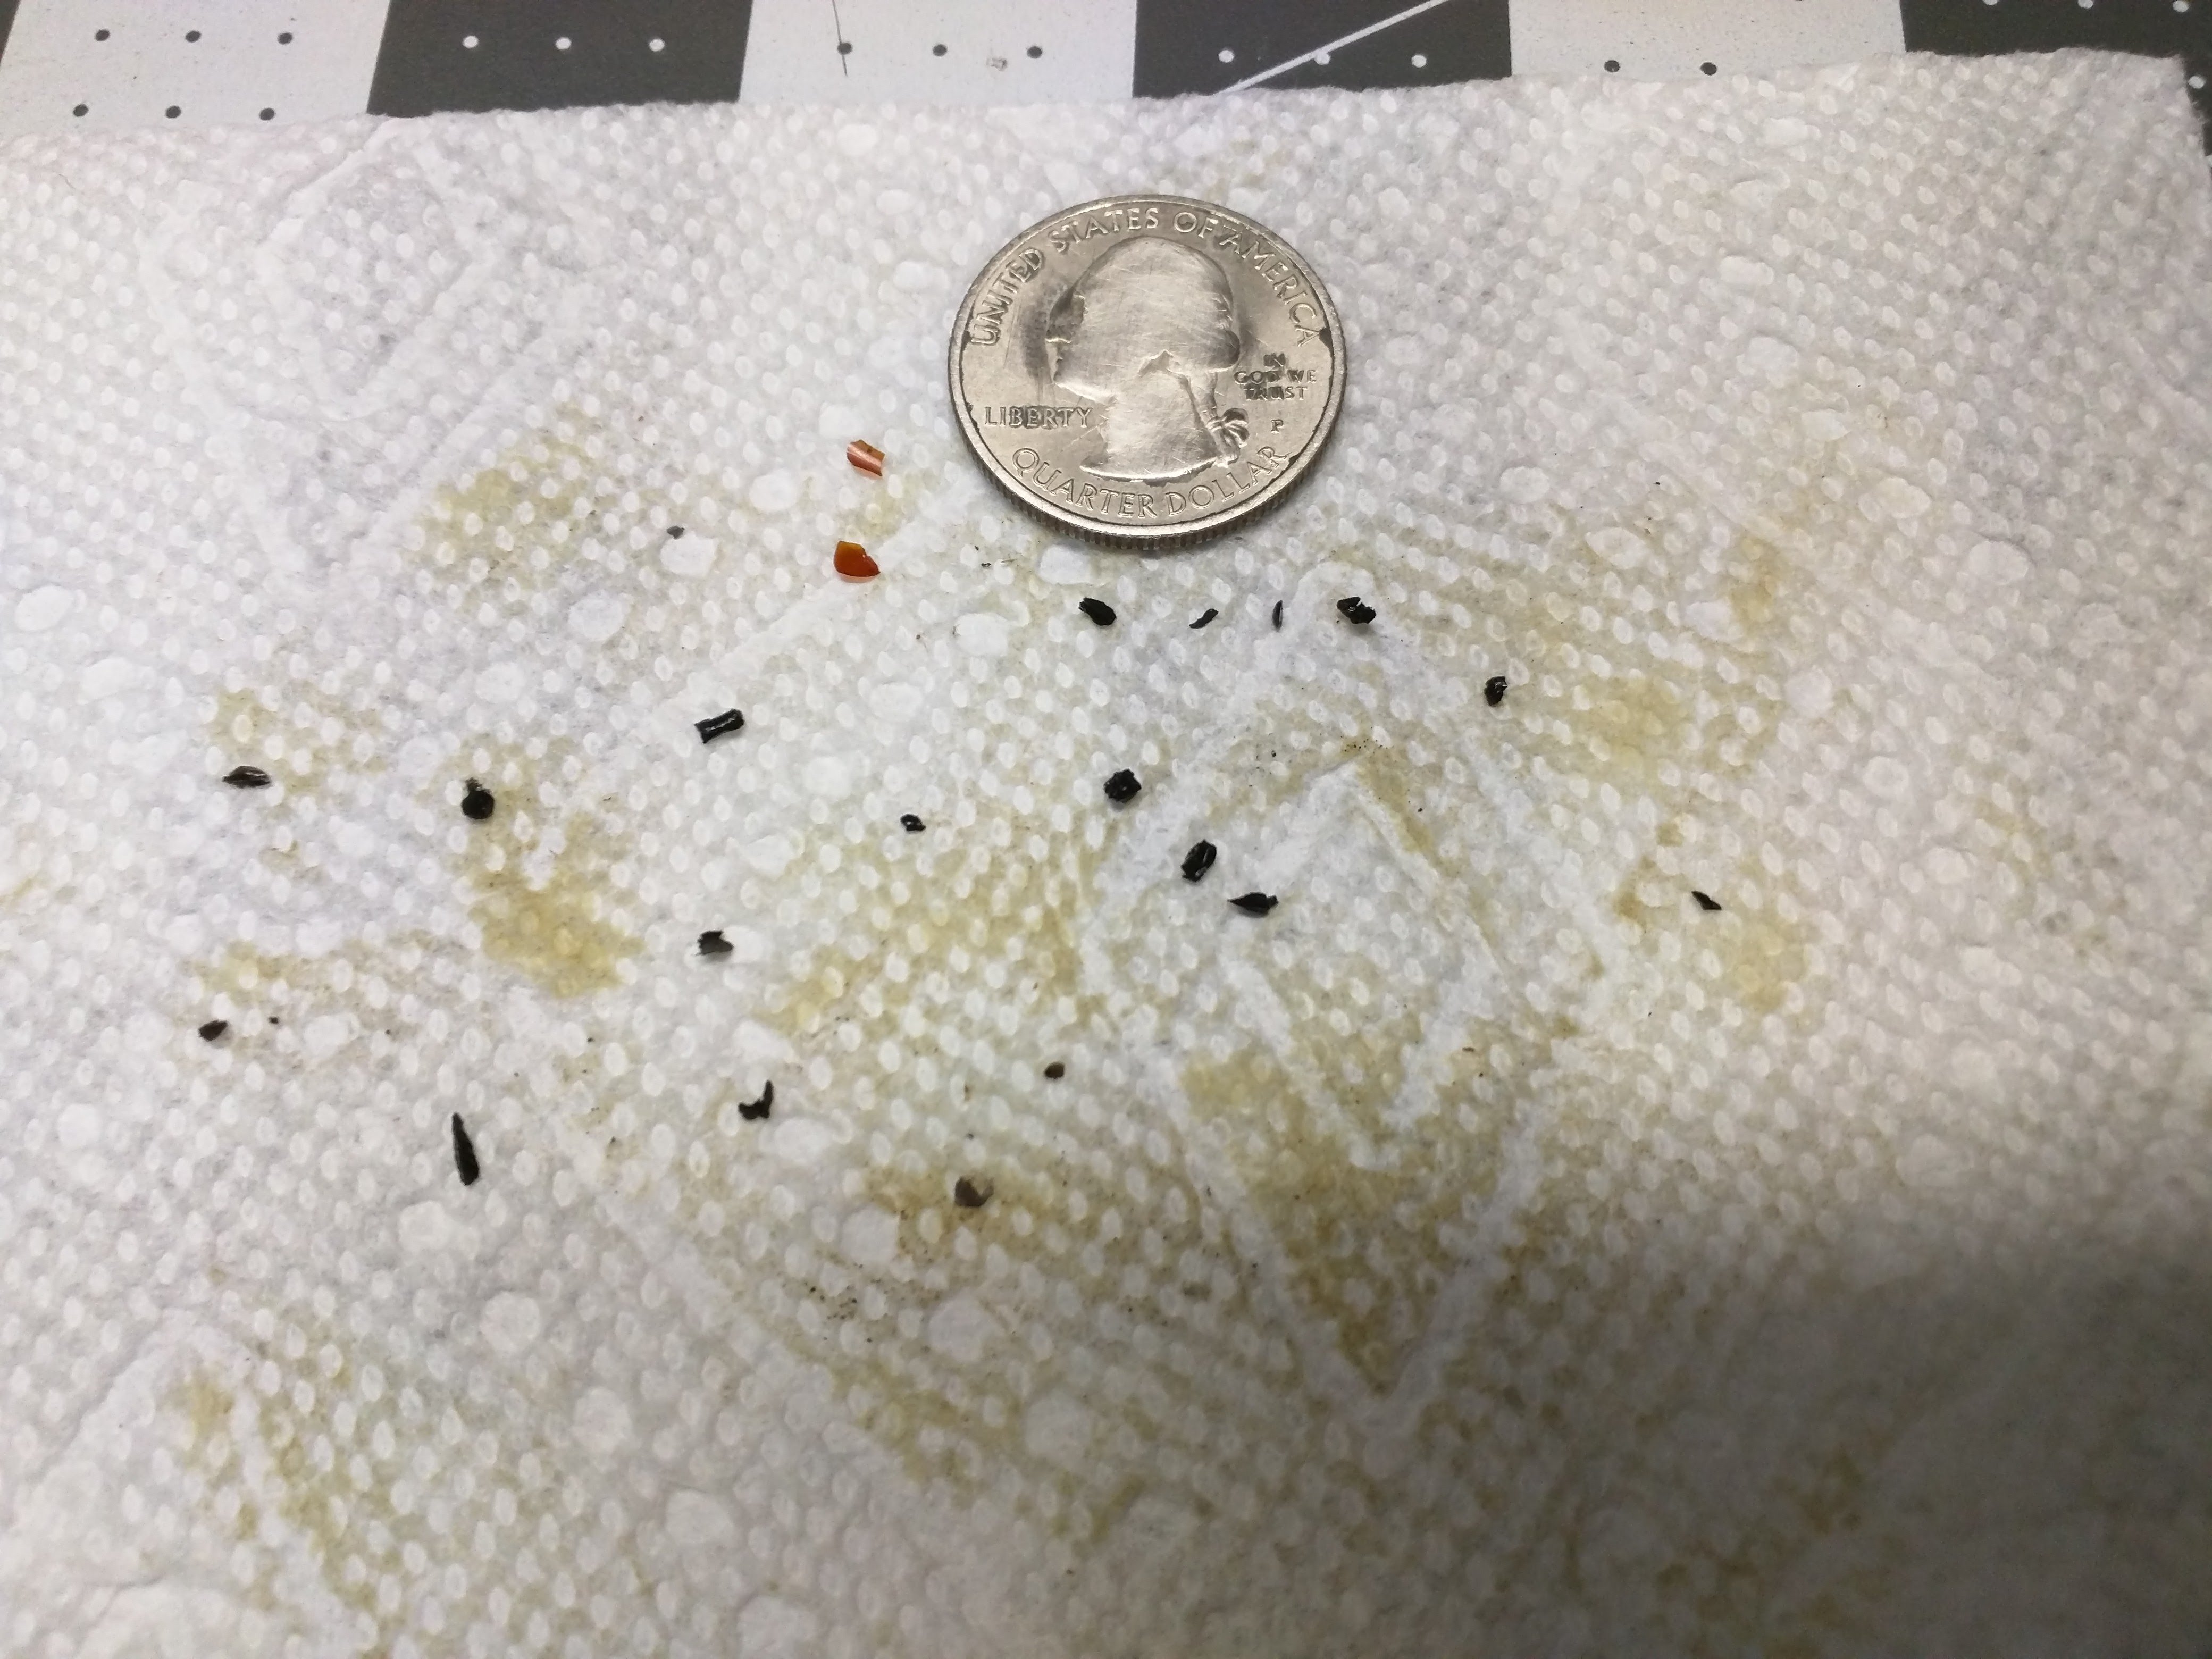
Hey guys, 2004 911 Targa owner here. I just changed my oil at ~86,000 miles. I always cut the oil filter open and inspect it for debris - except for the last time when I didn't have time to do it, so I saved the filter and opened it up at the same time as the most recent one. So the debris in the attached photo is actually from TWO separate oil filters/changes. None of the material in the photo is metallic. It all appears to be plastic or maybe some kind of resin. The orange/red stuff is transparent. I'm actually used to seeing the orange/red stuff in my filters after oil changes, but I have no idea what it is. The black particles are relatively new though... I don't recall seeing them in this kind of volume before. I'm not too concerned because none of it is metallic, but there's definitely something shedding some kind of material in my engine that I'd like to track down. Do any of you know what this debris could be? Thanks!
-
Rear Seat Belt Trim Removal?
Fixxxer replied to Fixxxer's topic in 996 Series (Carrera, Carrera 4, Carrera 4S, Targa)
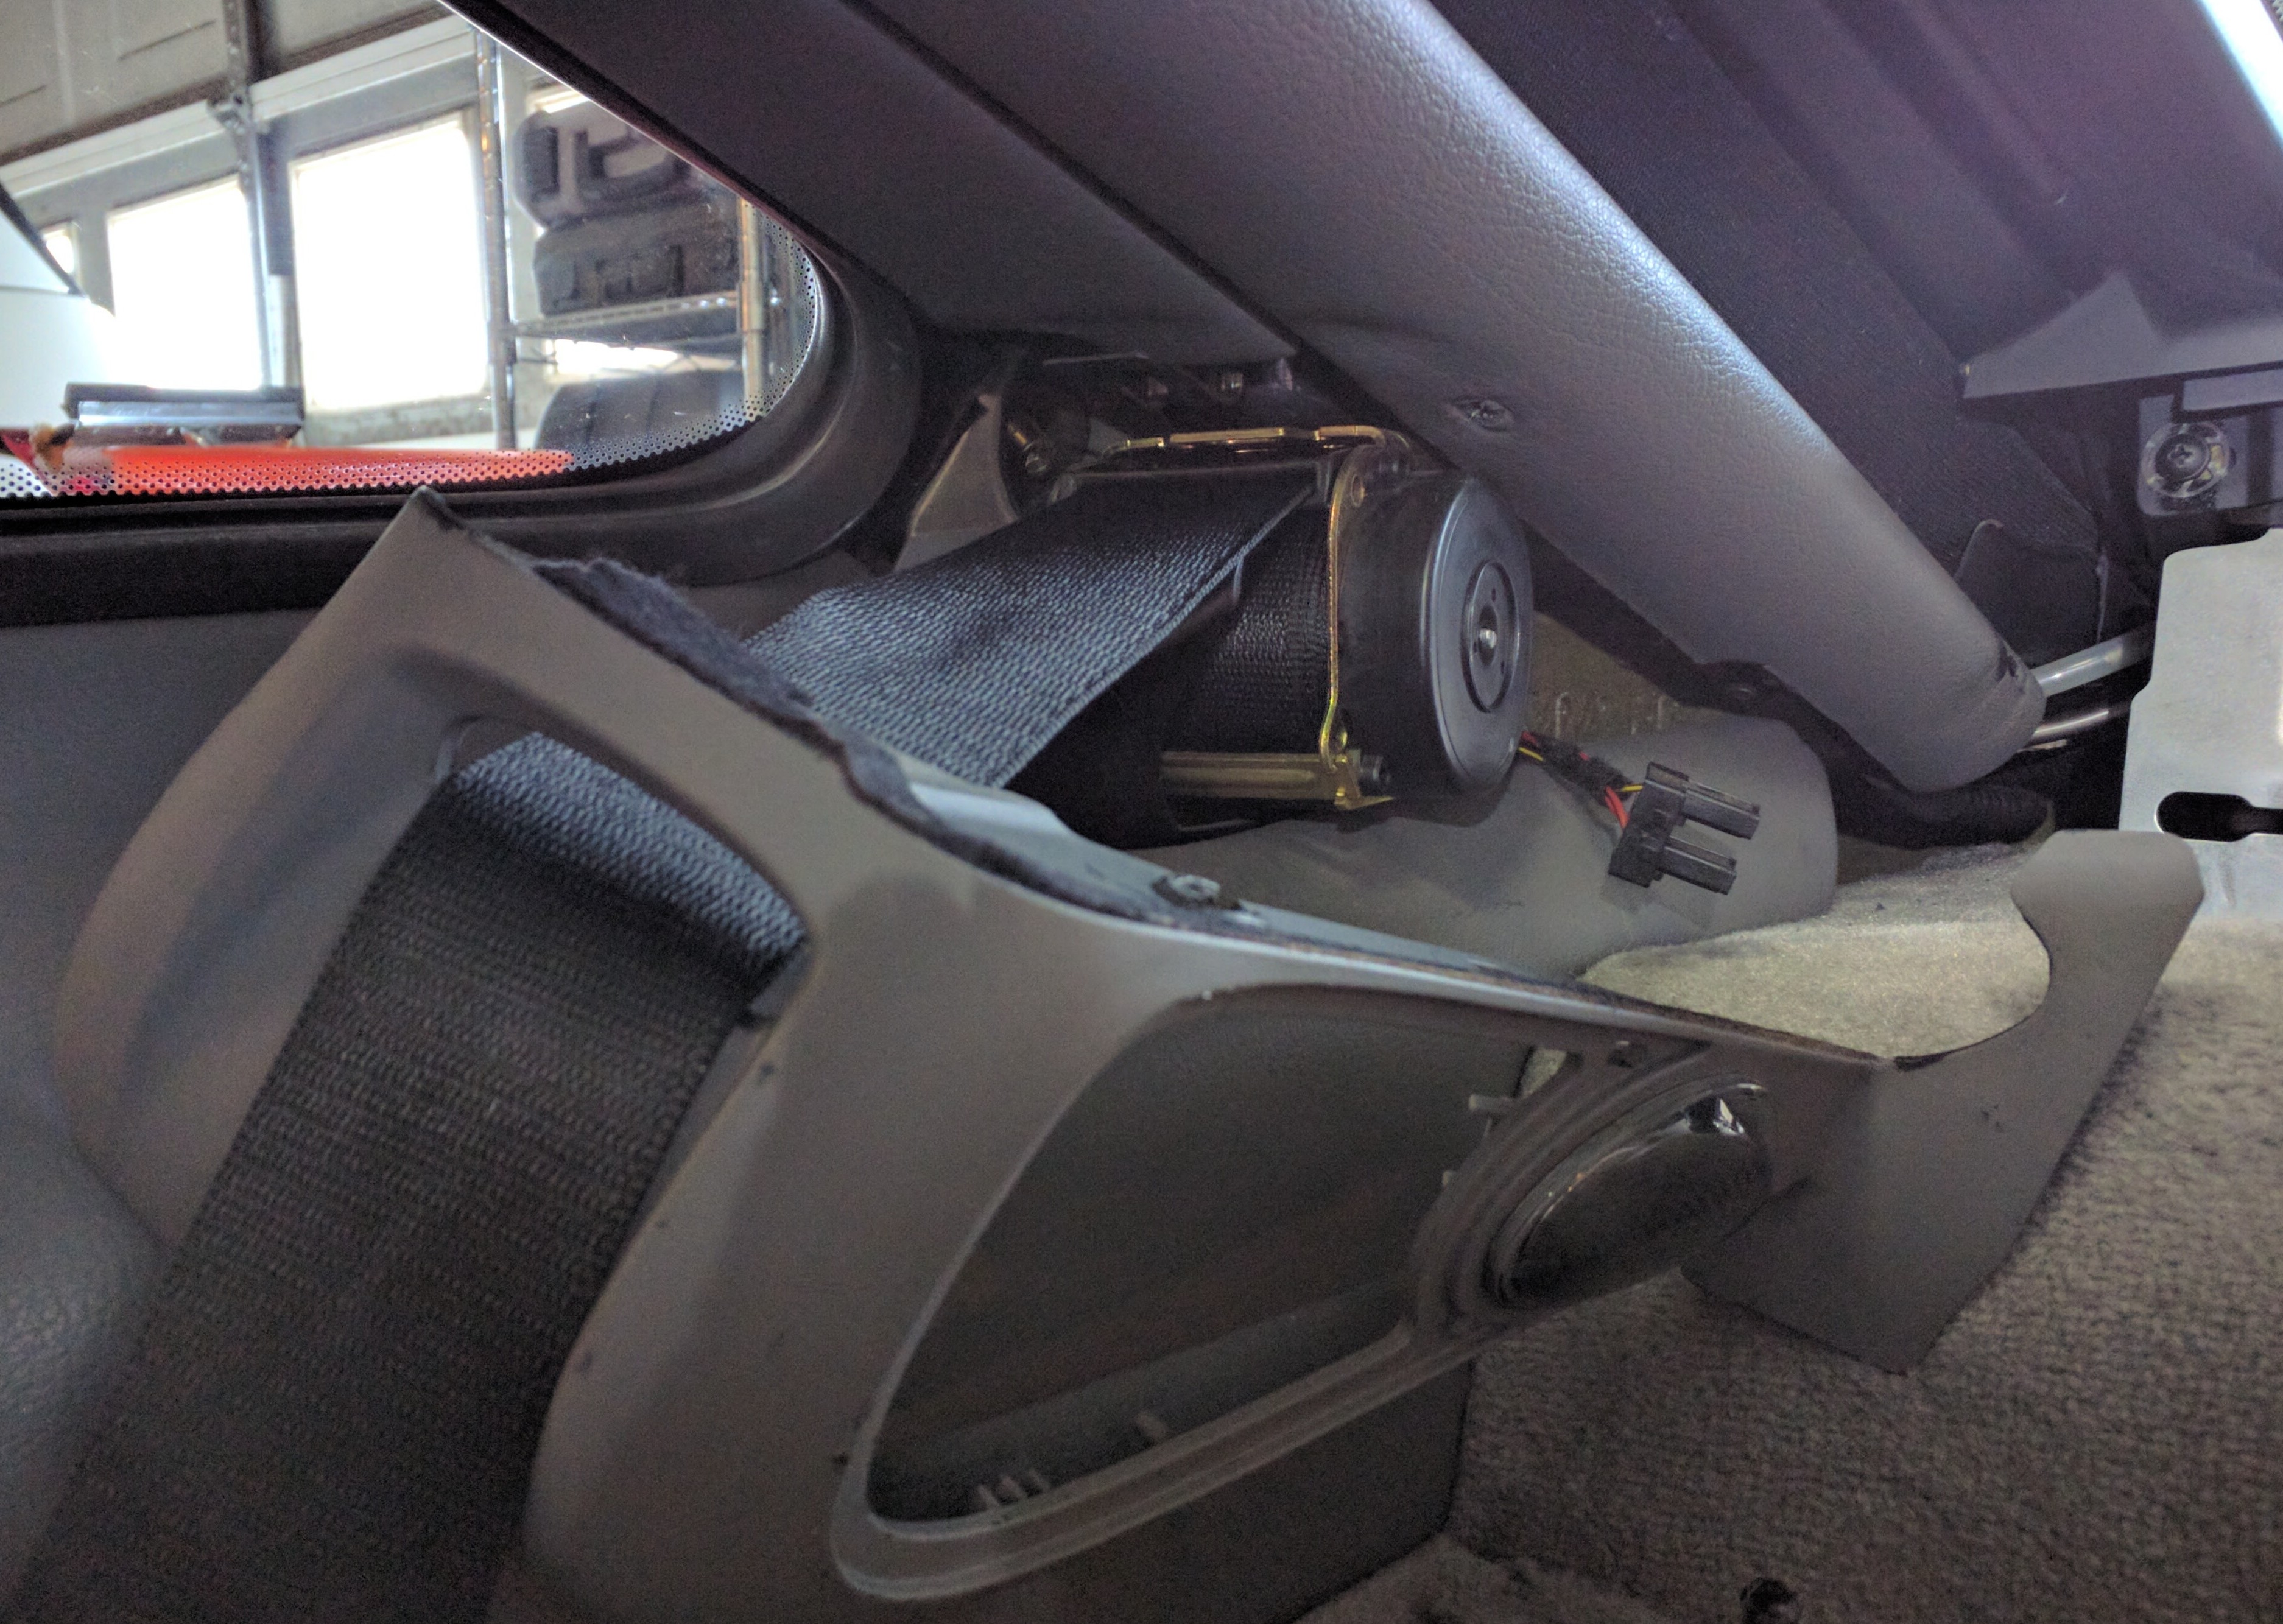
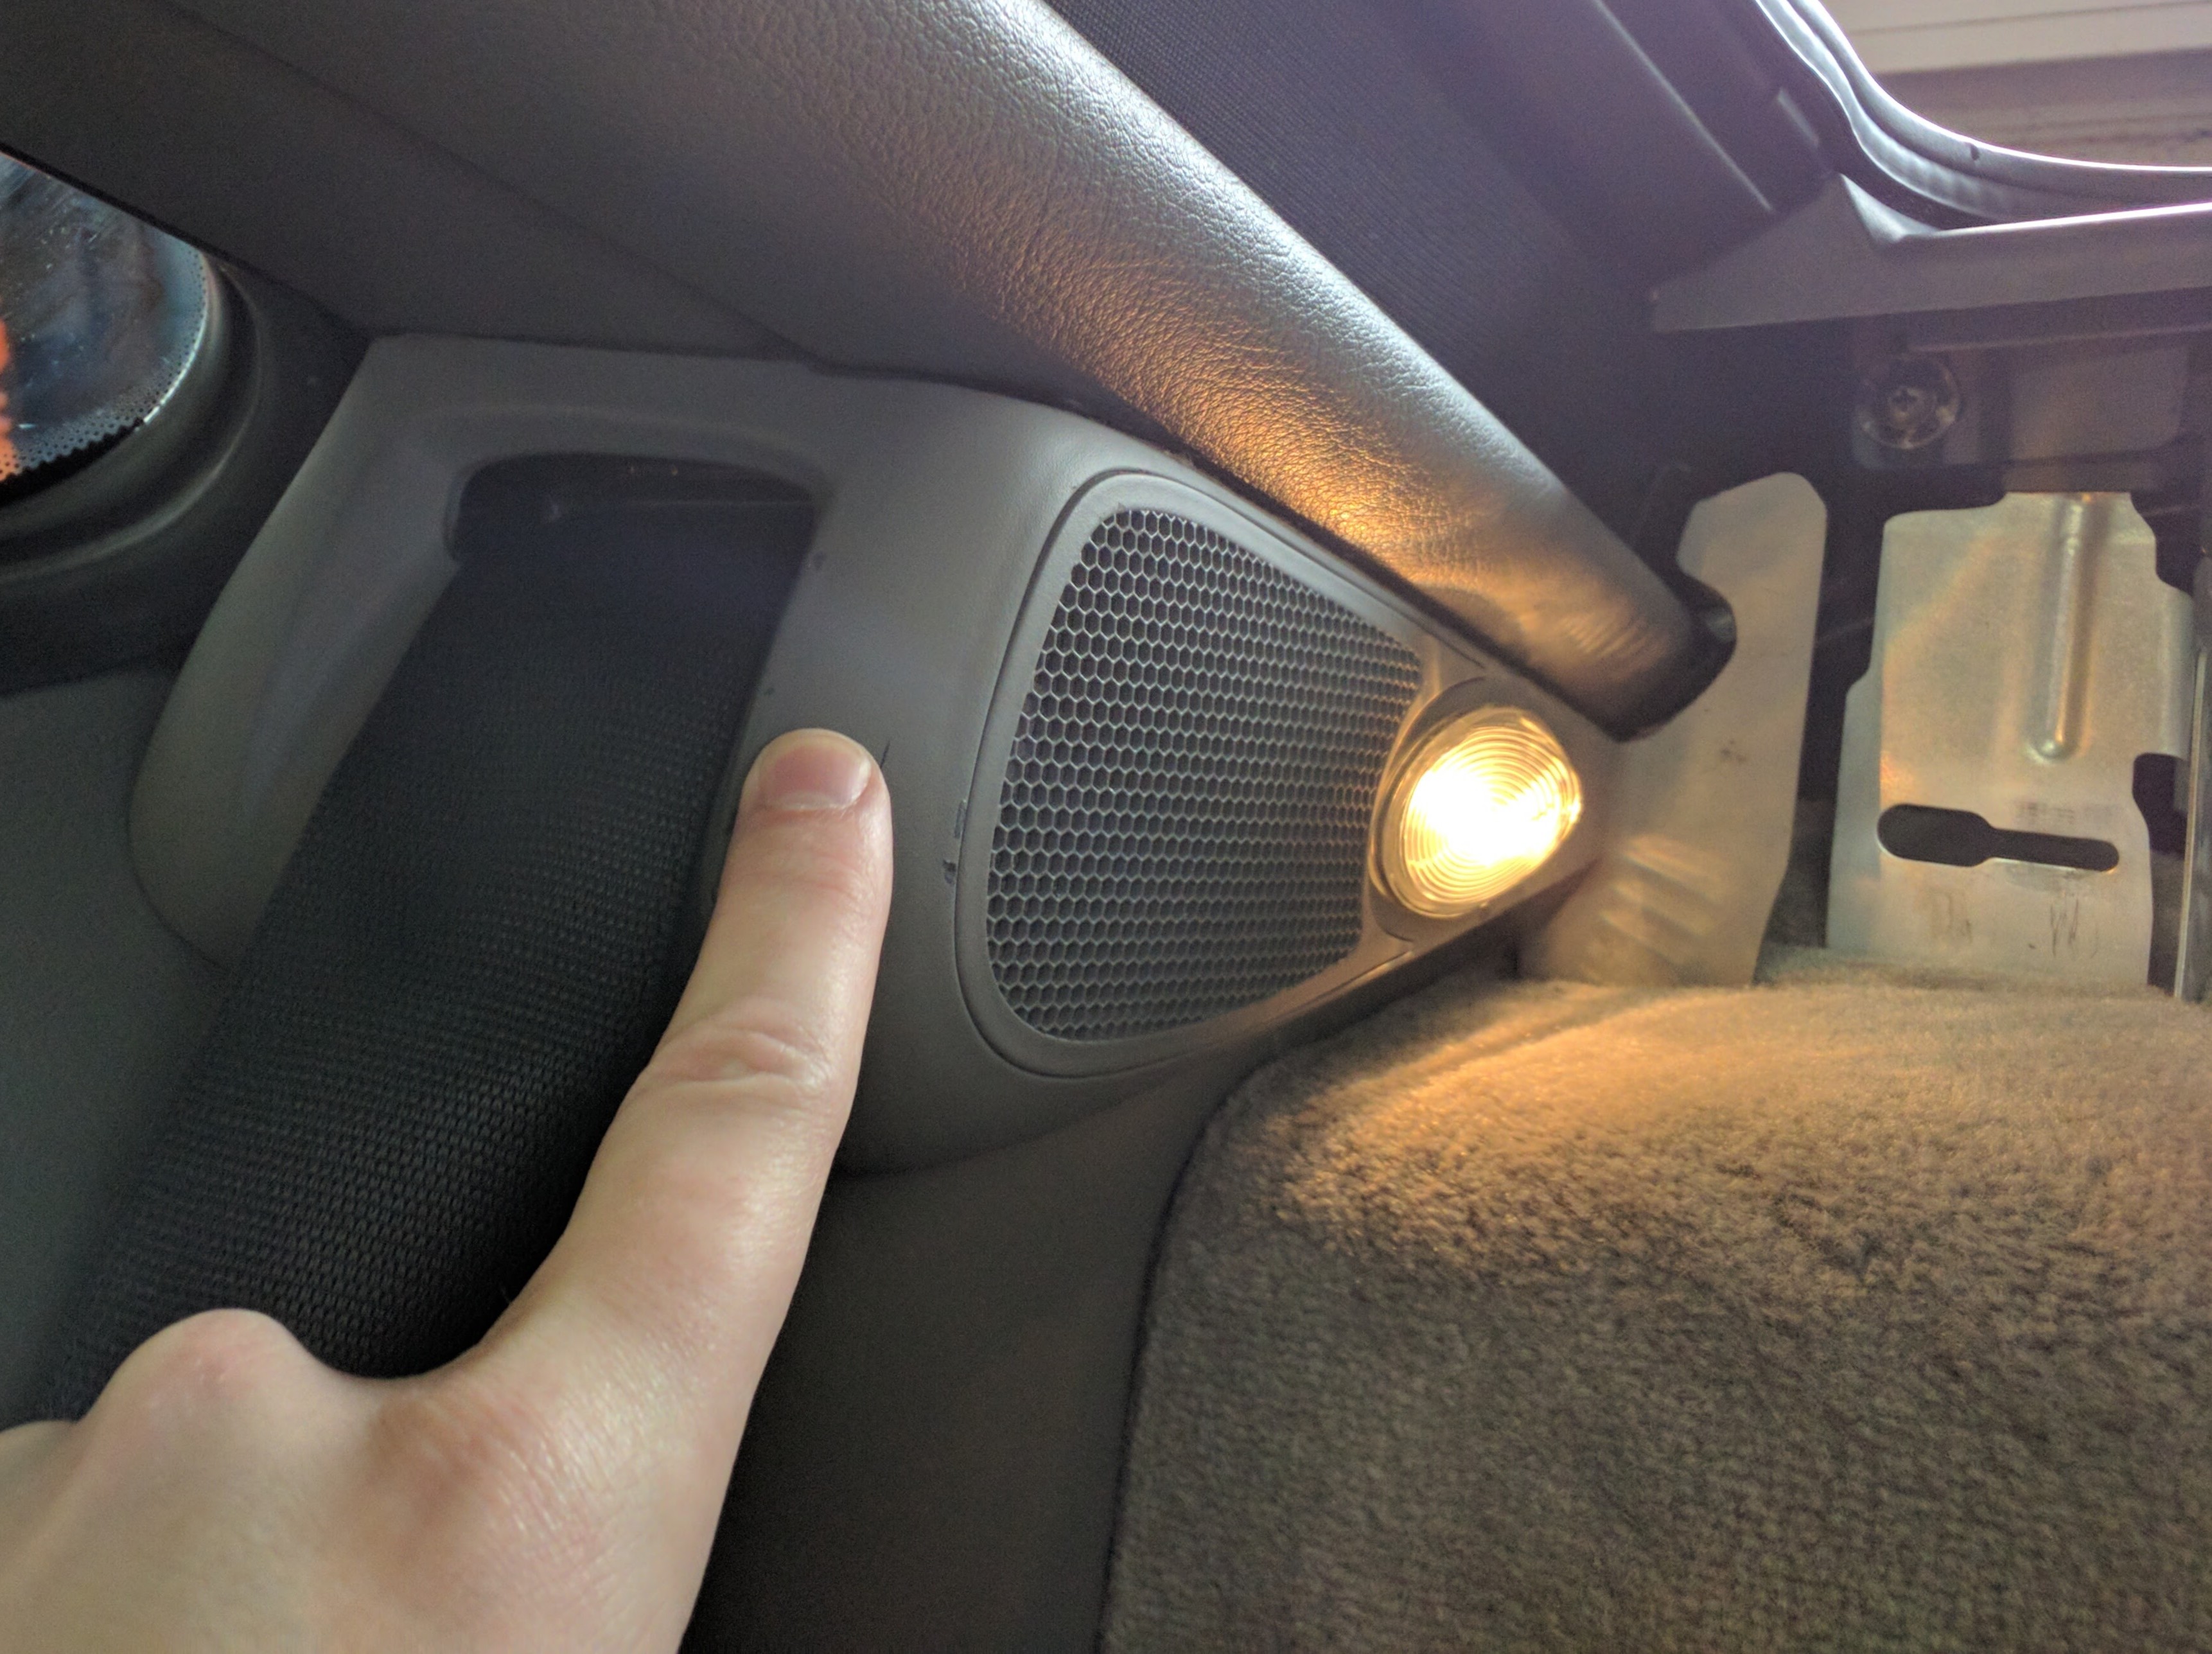
That did it! Thank you again! (Also, it's a fake speaker grille back there. WTF?)
-
Rear Seat Belt Trim Removal?
Fixxxer replied to Fixxxer's topic in 996 Series (Carrera, Carrera 4, Carrera 4S, Targa)
Thanks! Looks like there may be another screw behind the speaker grille... I'll check now and report back. -
Can anyone tell me how to remove the plastic trim piece that encases the rear seat belt tensioner on my 2004 996 Targa? I found/removed the screw at the very back that's under the rearmost piece of carpet. There's a clip or something else closer to the front of the car that's still holding it in place though, and I can't see it. I don't want to just start pulling and break it...
-
AOS - Coolant vs Non-Coolant
Fixxxer replied to Fixxxer's topic in 996 Series (Carrera, Carrera 4, Carrera 4S, Targa)
LOL, thanks for your reply here and on Rennlist! :) -
My 2004 Targa has started leaking coolant. I've found the source, and it's the AOS. I called my local Porsche shop to get a replacement, and they only one they can get is the AOS that doesn't have any connections for coolant lines. Will this work in my car? If so, what do I do with those existing coolant lines that went to the old one? Thanks!
-
Another Key Fob Fix
Fixxxer replied to Fixxxer's topic in DIY Articles - Carrera (996) - Common Fixes and Repairs
FYI - I just added a second, more precise method to the original tutorial above. It should appear as soon as the Admins approve it. :) -
Update: I drove the car through a pretty intense rain storm today, then left it in the work parking lot all morning while it was still raining. No leaks!
-
The adjustment bolt was in the middle of the "slider" channel before I started. I ended up sliding it almost all the way in (towards the vehicle.) It may be a bit too far, but I'm going to wait and see if I get any leaks or wind noise before I make further adjustments. Just a visual inspection of the gaskets seem to indicate that's it's still sealing though.
-
I fixed it! It was the in/out adjustment for the rear of the window (with the passenger door open, the adjustment on the bottom of the door: 2nd from the right.) I had to adjust the back of the window to lean in a bit more - thus, moving the bottom of the window out a little. Now it's not dragging on the gasket as much and moves up and down great.
-
Well, it's still acting up. Looks like I'm going to be opening up the door and seeing if I can tighten up the regulator cable.