Welcome to RennTech.org Community, Guest
There are many great features available to you once you register at RennTech.org
You are free to view posts here, but you must log in to reply to existing posts, or to start your own new topic. Like most online communities, there are costs involved to maintain a site like this - so we encourage our members to donate. All donations go to the costs operating and maintaining this site. We prefer that guests take part in our community and we offer a lot in return to those willing to join our corner of the Porsche world. This site is 99 percent member supported (less than 1 percent comes from advertising) - so please consider an annual donation to keep this site running.
Here are some of the features available - once you register at RennTech.org
- View Classified Ads
- DIY Tutorials
- Porsche TSB Listings (limited)
- VIN Decoder
- Special Offers
-
OBD II P-Codes - Paint Codes
- Registry
- Videos System
- View Reviews
- and get rid of this welcome message
It takes just a few minutes to register, and it's FREE
Contributing Members also get these additional benefits:
(you become a Contributing Member by donating money to the operation of this site)
- No ads - advertisements are removed
- Access the Contributors Only Forum
- Contributing Members Only Downloads
- Send attachments with PMs
- All image/file storage limits are substantially increased for all Contributing Members
- Option Codes Lookup
- VIN Option Lookups (limited)


creekman
-
Posts
474 -
Joined
-
Last visited
-
Days Won
1
Content Type
Profiles
Events
Forums
External Paint Colors
Downloads
Tutorials
Links Directory
Collections
Store
Posts posted by creekman
-
-
First off I've read some of the TSB's, fuel level posts, but I'm not sure where to start with my problem... I had the car down for 7 months, on my first drive I ran out of gas, UGH... The fuel gauge showed 3/8 of a tank when it went dry. When we put gas back in the gauge started working. For the last 2,000 miles The gauge seems to have been working, but I never let the tank go below 1/4 of a tank.
For whatever reason it appeared that the gauge was stuck again at about 1/4 of a tank so this evening I tried to fill it up. I got about 6 gallons in it, but the gas nozzle would back up every few seconds. I fought it and got 5.5 gallons in and quit. I complained to the cashier about the backing up he said that he had had a lot of complaints. So from there I went down the street to another gas station and had the same problem. I had driven 225 miles mostly city driving so between the 2 gas stops I got 6.1 gallons in the tank. I'm not getting 36 MPG so something is a mist here... After the 6 gallons the gauge still was reading 1/4 tank.
I read where if the cluster is changed that you might have to re-calibrate the sender. I've had my cluster out and the circuit boards were removed so could that be one issue? Does the spitting back of gas during filling have anything to do with the gas gauge?
Summary:
1. Gas gauge is not working
2. Gas fill with not take fuel without shutting off the nozzle every 10-15 seconds.
3. Battery had been disconnected for 7 months.
4. Instrument cluster has been worked on, same gauge.
5. Can the backing up of gas in the fill pipe be caused by a bad fuel gauge?
6. My MPG and miles to empty doesn't work due to my engine conversion. I believe the Porsche engine measures
the fuel flow, thus the panel is able to give MPG and miles left to go.
Any and all suggestions will be appreciated...
Thanks,
-
One additional way to get bolts to break free is to give them several good whacks with a hammer. Sometimes you can upset the bolts by doing this.
-
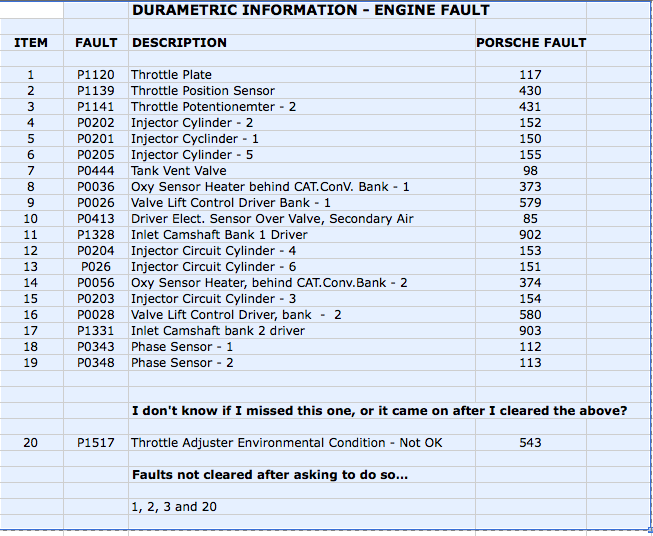
Post the codes thrown.
Here ya go... if I knew which one of these codes cancels the water temp gauge fault it would be extremely helpful. BTW: the reason I have so many engine faults is that the Porsche engine is gone (LS3 V8 is the replacement) so most of these are N/A, I think. But one or more will cancel the water temp gauge fault. As you can see none of the faults would seem to have anything to do with the water temp, expansion level sensor, or the engine room blower?
Thanks,
If most of the codes are moot anyway, why not just clear everything, see if the temp gauge starts working, and what codes resurface.
That is exactly what happens, I clear the codes, the temp gauge comes back online, until it faults again with the same codes that I had previously erased. There doesn't seem to be anyway to narrow the codes down, it's all or nothing. I've got a call into the lead tech at the San Antonio Porsche dealer to see if their PST2 code reader will cancel one code at a time. I doubt that it will...
Thanks for your reply.
I'm afraid you are going to find most system dump them all at one time.
Sadly I'm sure you're right... I'll have to figure something else out to stop the water temp faulting...
Thanks,
-
Post the codes thrown.
Here ya go... if I knew which one of these codes cancels the water temp gauge fault it would be extremely helpful. BTW: the reason I have so many engine faults is that the Porsche engine is gone (LS3 V8 is the replacement) so most of these are N/A, I think. But one or more will cancel the water temp gauge fault. As you can see none of the faults would seem to have anything to do with the water temp, expansion level sensor, or the engine room blower?
Thanks,
If most of the codes are moot anyway, why not just clear everything, see if the temp gauge starts working, and what codes resurface.
That is exactly what happens, I clear the codes, the temp gauge comes back online, until it faults again with the same codes that I had previously erased. There doesn't seem to be anyway to narrow the codes down, it's all or nothing. I've got a call into the lead tech at the San Antonio Porsche dealer to see if their PST2 code reader will cancel one code at a time. I doubt that it will...
Thanks for your reply.
-
Post the codes thrown.
Here ya go... if I knew which one of these codes cancels the water temp gauge fault it would be extremely helpful. BTW: the reason I have so many engine faults is that the Porsche engine is gone (LS3 V8 is the replacement) so most of these are N/A, I think. But one or more will cancel the water temp gauge fault. As you can see none of the faults would seem to have anything to do with the water temp, expansion level sensor, or the engine room blower?
Thanks,

-
On the same topic, does anyone know if the Porsche PST2 code reader can cancel one code at a time, as opposed to the OBD reader and Durametric program that cancel all the codes at once? To identify which code cancels my faulting water temp gauge I need to know which code it is. None of the codes that are thrown identify the specific code that cancels and restores the water temp gauge.
Thanks in advance for any suggestions...
-
Rob, for us tourist would you explain a 4 stalk OBC hack? OBC=on board computer?
Thanks,
For cars without the 4th stalk on the lower left of the steering wheel, there is a way to activate it and install the 4th stalk to let you see outside temp, avg mpg, avg speed, miles to empty and I think a speed gong to let you know when you're driving over a pre-set limit. You can also activate it and put a switch somewhere within reach that lets you scroll through the information screens.
Sorry I can't help the OP's question.
OK, I have the 4th stalk, however since my LS3 conversion that is the one feature that has gone south. I have all of the above with the exception of average MPG and miles left in the tank. Are you staying that all ECU's have that information and the only thing you have to do is to install the selector stalk?
-
Rob, for us tourist would you explain a 4 stalk OBC hack? OBC=on board computer?
Thanks,
-
Call Steve at Renegade Hybrids in Las Vegas... They're removing engines all the time, maybe they'll have a lead for you. They connected me with a buyer when I removed my engine for a LS3 conversion.
-
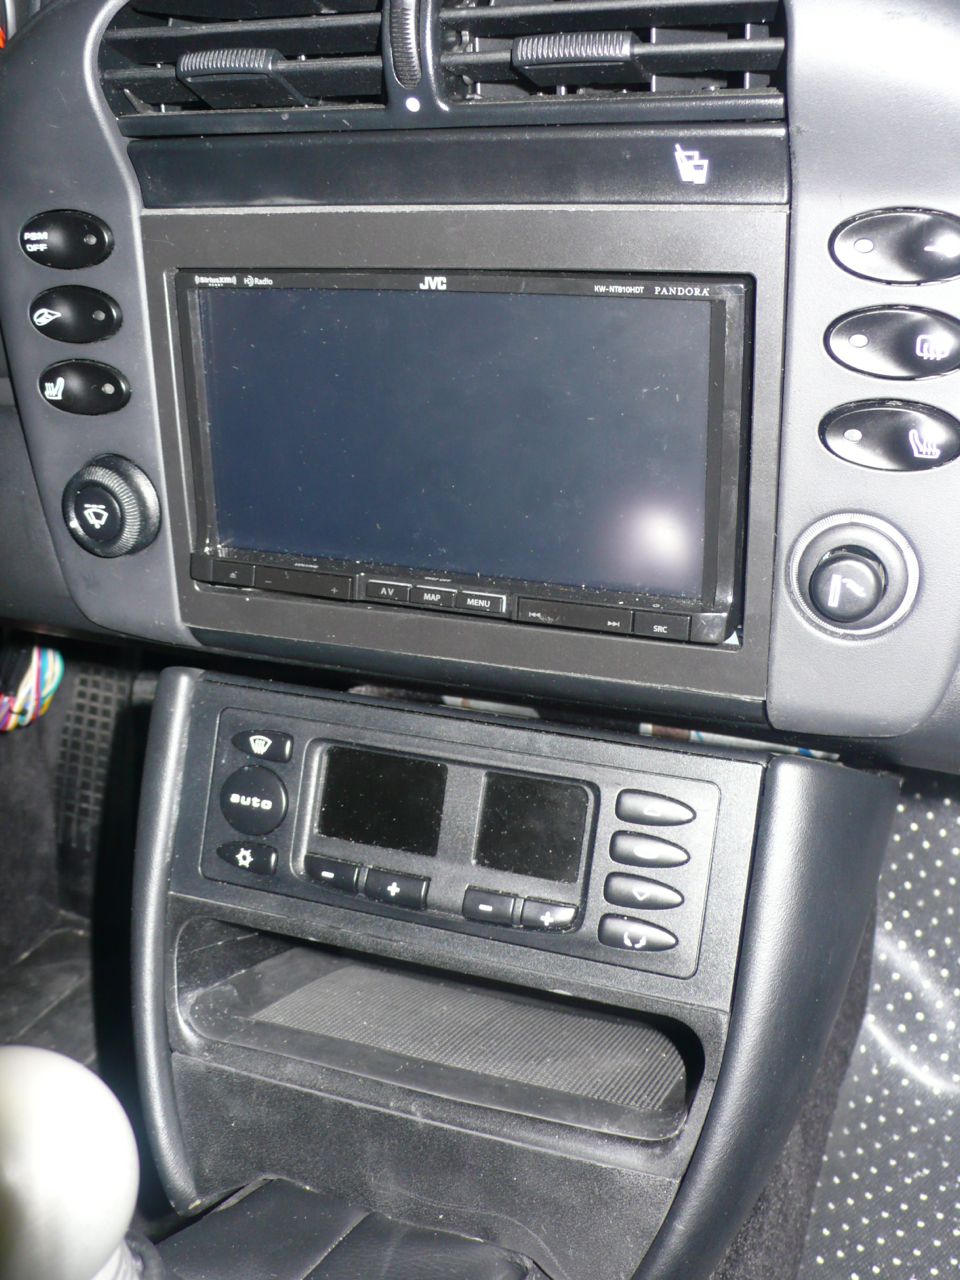
Here's a pix of my GPS/Nav JVC install... I had to take the hard way and move the storage cubby to the bottom. To make it fit I sectioned the cubby, if you look closely you can see the part line where I took out about 1/4". I moved the seat heater switches to the horse shoe panel. I had 2 available switch positions, that took some doing to move the various switches around, but I'm happy with the results.
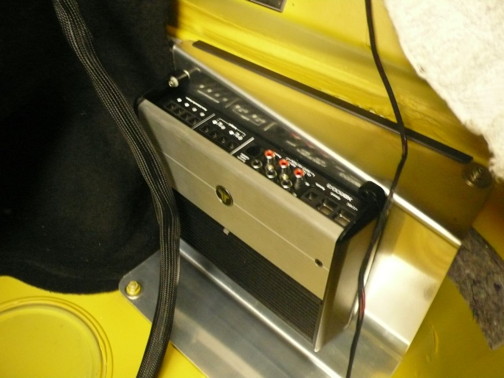
Update: I just remembered that we also upgraded the radio/DVD/i-Pod player amplifier. It wasn't that I had a choice, the new double din JVC unit does not support the Porsche factory fiber optic system, so we had to install an analog amp to work with the new double din unit. I guess the reason for this is that the aftermarket units would be more expensive if they used a fiber optic system. So that added time and expense, plus the new amp did not fit in the factory cradle so I fab up a new bracket. I then had to cut and fit the upholstery and the floorboard in the trunk. However the new amp really improved the sound quality of the system, I'm not sure if it was the amp, new player, or my imagination. My guy that helped me did say that people will upgrade their speakers when really you'll get more improvement by changing out the amp...
I installed the JVC mic through the existing factory mic position. I also measured and cut down both the GPS antenna and mic cables to get rid of the extra unused wiring.
-
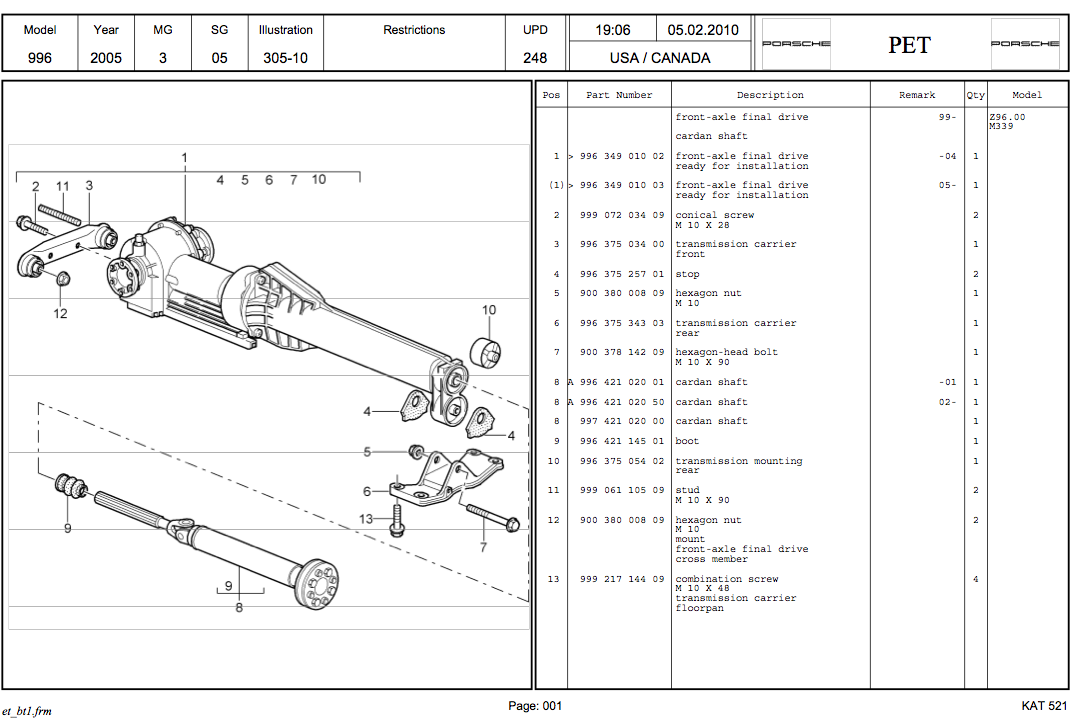
Johan,
Yes, this should be an easy DIY project. You'll need to know the torque settings for the universal bolts. Do you have a Bentley's manual, if not that would be a good investment to make before any project. If you need the torque information I can look it up for you.
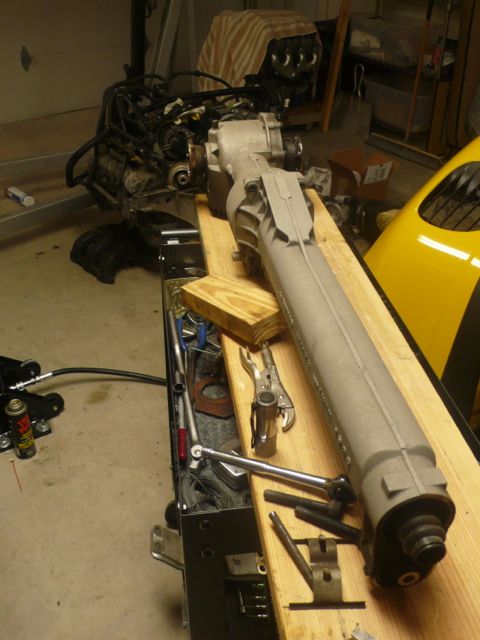
It appears that the drive shaft comes as a unit. I have one for sale after removing my front diff, but any savings would be offset by the shipping cost.
Johan, -
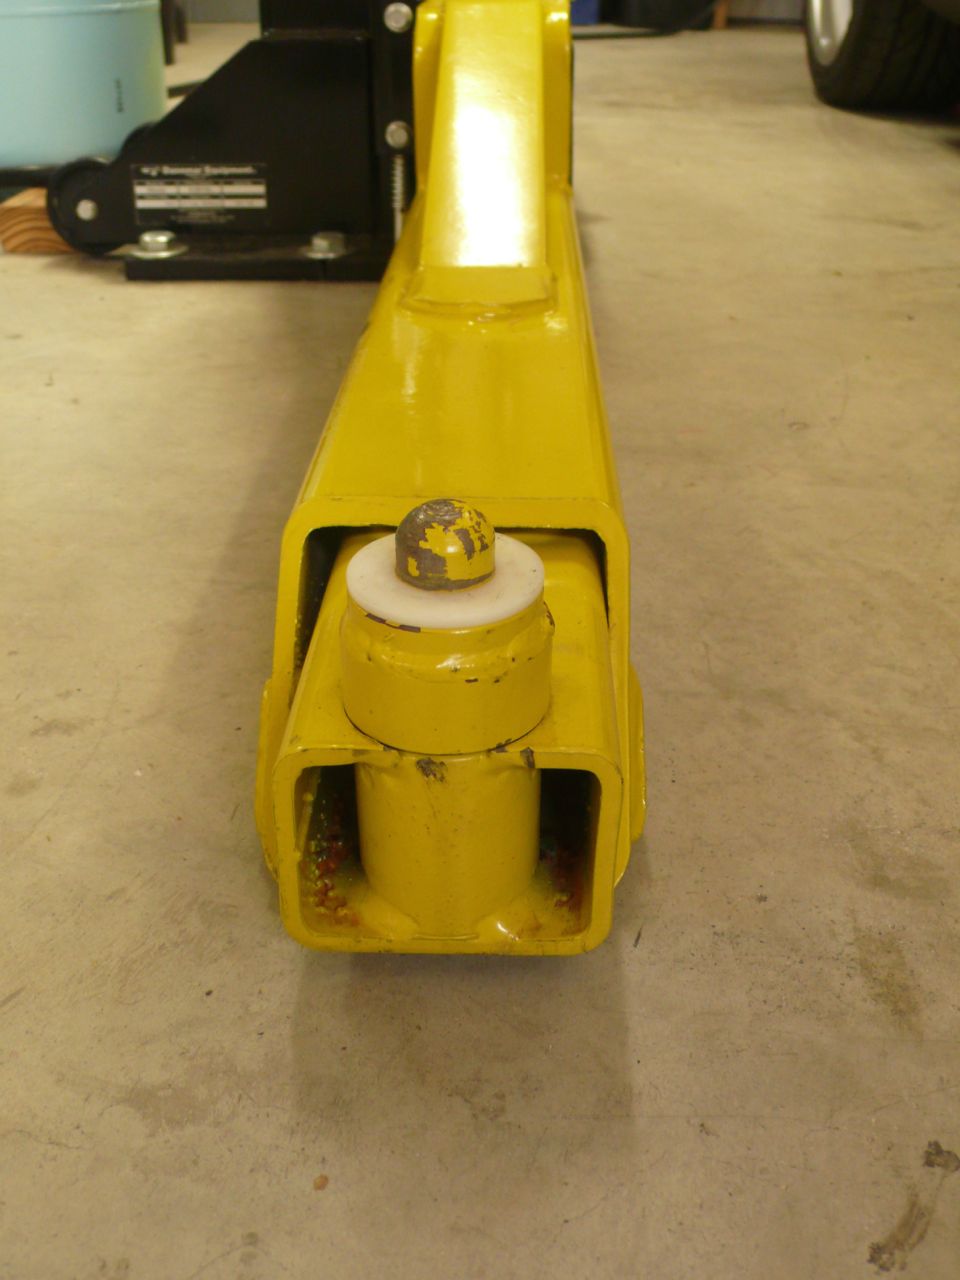
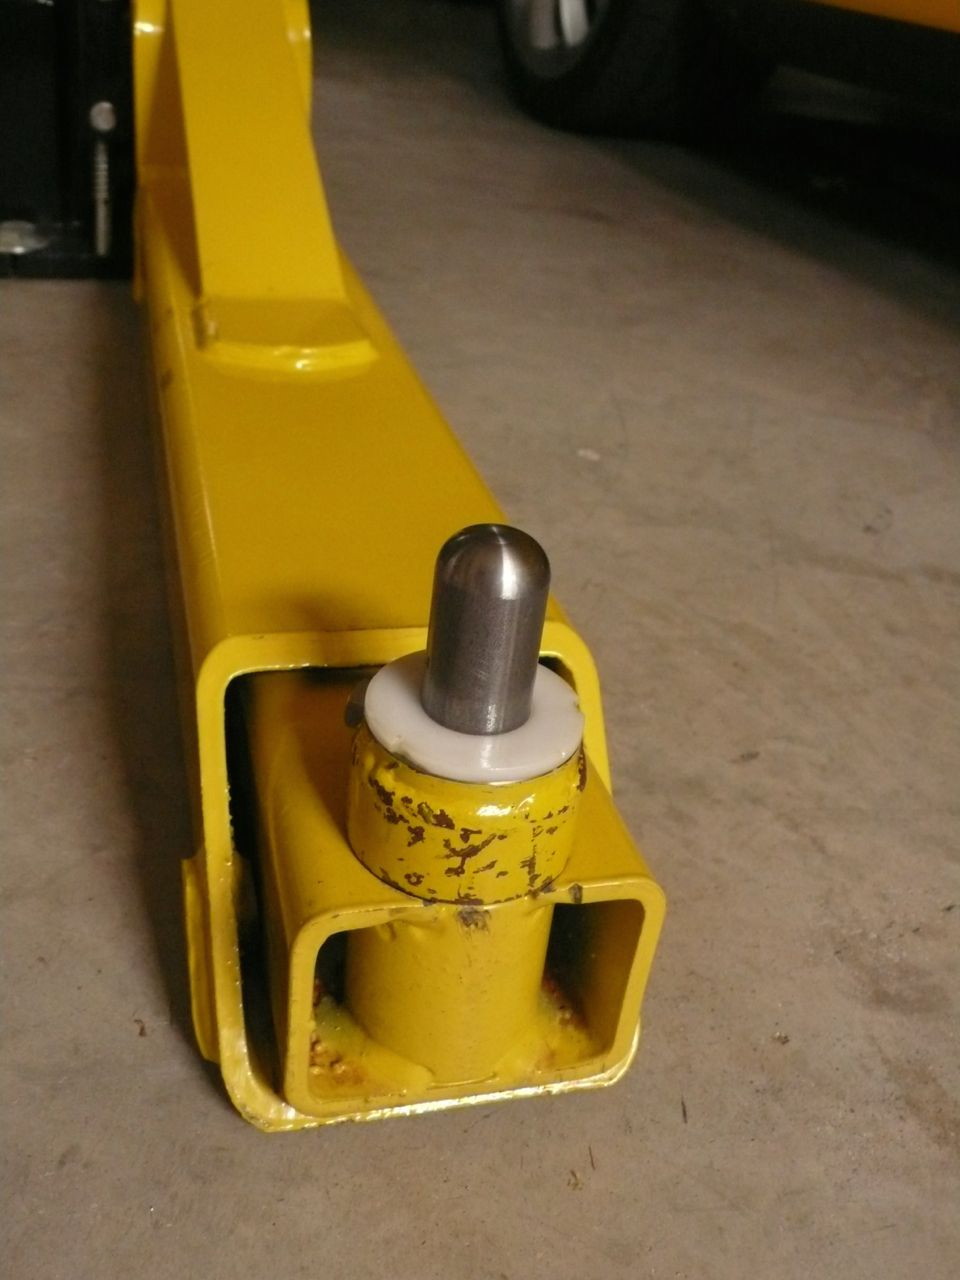
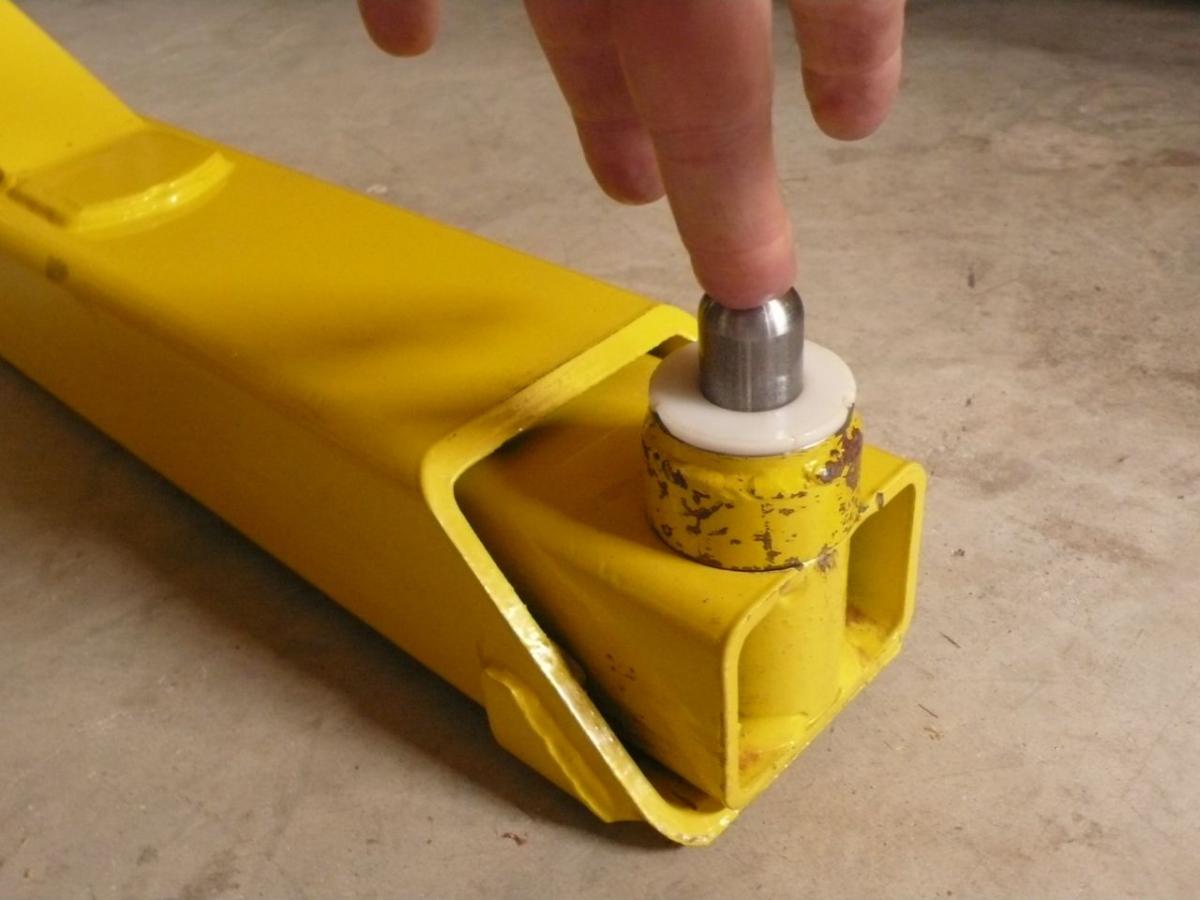
When I installed my 8' MaxJax lift I remodeled the lifting points so the pins nested in the Porsche receivers. It appeared to me that the furnished rubber pads were going to take out some of the plastic liners, piping, etc. I didn't like the idea of wood blocks... I felt my lifting pins would not harm any of the underside and also be more secure since the arms couldn't slip since the pins were nested in the receivers.
However aligning the pins became a labor intensive task since each pin had to be exactly aligned. Sometimes I would have to get up and down a dozen times before I knew all was well. When the lifting arms are raised the arms nest into a rachet that locks the arms in place. When this happens the arm alignment can change enough so my pins would not align with the receivers. So to save the old knees I came up with a spring loaded pin. The pin is supported by a low tension S.S. spring which can easily be retracted while placing the lifting arm under the car, let go of the pin and it pops into the receiver. Yea...
Before:
Spring loaded:
-
Jim,
I'm no expert, but I've been into my instrument cluster several times, it's not that hard... Just take your time, keep track of which screws goes where. However, I had an occasion to remove my speedo face to get to the cruise control LED and I got stopped because I couldn't get the needle/pointer off. I decided that I wasn't going to use any more muscle and gave it up at that point. I ended up sending off the cluster to the speedo man to do what I wanted.
Let's see what some others have to say, but I think before I would do this I would pay North Hollywood Speedo or Palo Alto speedo to do this. You screw something up and then you'll spend more money having the repair done.
If you decide removing the cluster and opening it up to expose the instrument faces is pretty easy. Maybe someone will chime in on the needle/pointer removal. If you have any questions on how to get the cluster out or open up the instrument package, let me know and I'll see if I can give you some pointers.
-
Dish,
I've already purchased my backup camera, however you might post the model and information on the combo unit. That sounds like a great unit if you're interested in having both features. Actually the warning sound can often be more helpful that the video...
-
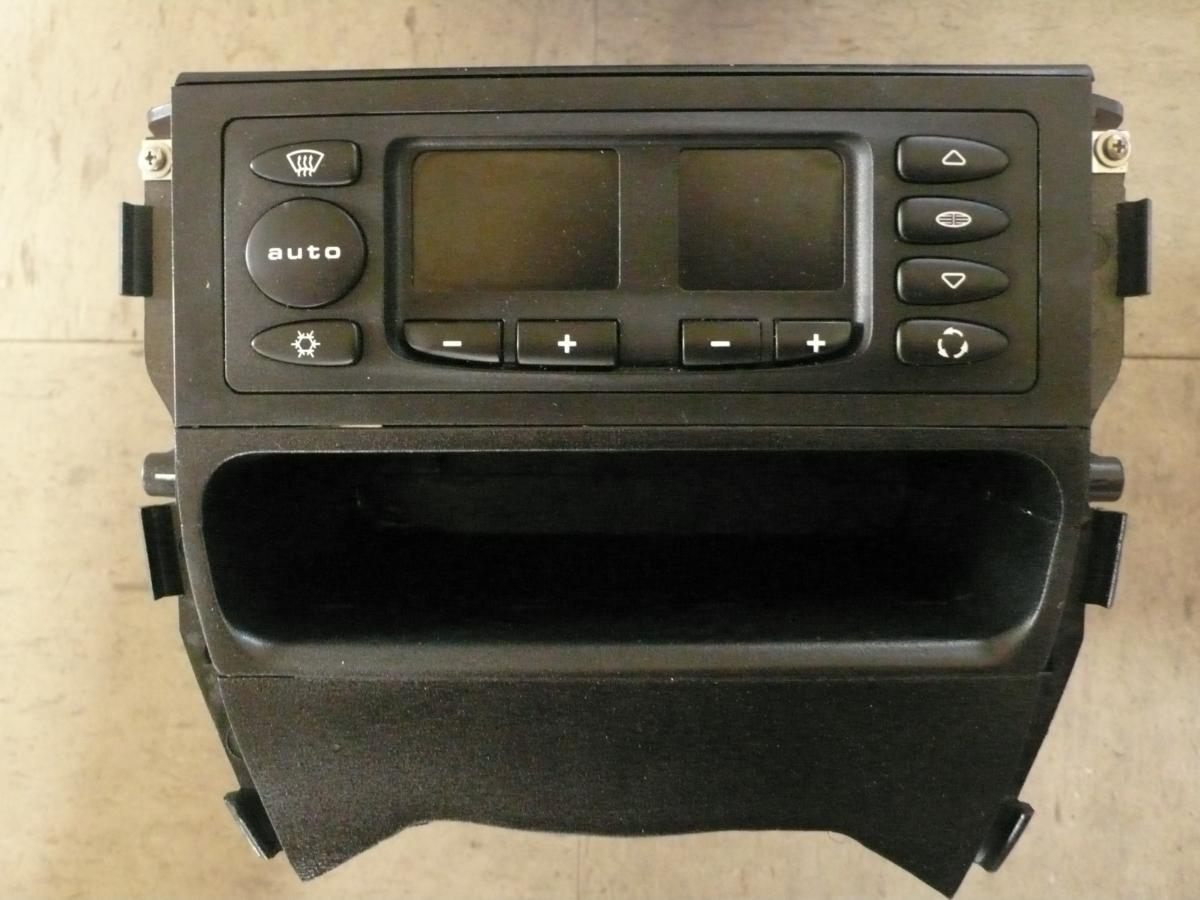
KoB, PM me your address and I'll send you my "batwing" filler panel which has the two holes for your heater project.
-
Here's my relocated a/c control panel and my batwing filler panel that I made. I had bought the black plastic on line that is for control panels, etc. I might offer a word of warning, the plastic that I got had a very heavy texture, was not compatible with the factory finishing. To save the piece I wet sanded the filler piece and sprayed it with some textured paint. So if you're buying plastic to make surrounds, etc. be sure you know what the finish is on the plastic.
-
John, well that's not very good news... so what is your recommendation on flushing the system? I guess you need to watch the fluid and when it gets clear in color you've flushed the old fluid out?
Basically, we have customers that always asked for us not to use the blue out of fear it would discolor the plastic reservoir, and we have obliged them. When the gold, or ATE 200 as it is properly known, get old and dirty, it is enough of a change when the clean fluid shows up at the bleeders. With the gold to blue, even Ray Charles could have caught the change over, but as the federal nannies have moved to prevent the end of civilization as we know it by banning any other color than yellow-amber for brake fluids, you will need to pay a bit more attention when flushing the car.
Here's my relocated a/c panel and my batwing filler panel that I made. I had bought the black plastic on line that is for control panels, etc. I might offer a word of warning, the plastic that I got had a very heavy texture, was not compatible with the factory finishing. To save the piece I wet sanded the filler piece and sprayed it with some textured paint. So if you're buying plastic to make surrounds, etc. be sure you know what the finish is on the plastic.
-
John, well that's not very good news... so what is your recommendation on flushing the system? I guess you need to watch the fluid and when it gets clear in color you've flushed the old fluid out?
Basically, we have customers that always asked for us not to use the blue out of fear it would discolor the plastic reservoir, and we have obliged them. When the gold, or ATE 200 as it is properly known, get old and dirty, it is enough of a change when the clean fluid shows up at the bleeders. With the gold to blue, even Ray Charles could have caught the change over, but as the federal nannies have moved to prevent the end of civilization as we know it by banning any other color than yellow-amber for brake fluids, you will need to pay a bit more attention when flushing the car.
John,
I had to laugh at the "Ray Charles" reply... very funny and thanks.
-
John, well that's not very good news... so what is your recommendation on flushing the system? I guess you need to watch the fluid and when it gets clear in color you've flushed the old fluid out?
-
Someone earlier had ask if they could mix the blue and gold ATE brake fluid. I'm sure you can, but it defeats the purpose of knowing when you've purged the old fluid. One time you use the gold fluid, the next you use the blue. By doing this you'll know when you've disposed of the old fluid by watching the fluid color change.
If you don't have a pressure bleeder and you're doing your own brake work, you should have this bleeder:
-
Johan, I don't have the information that you're looking for, but if you can't change the settings on your radio I think you could just find another American delivered radio pretty cheap. I just took one out of my car for a double din GPS installation. I doubt these radios (CDR23) have much value?
I hope this helps,
-
I believe that unused plug is for a telephone.
I like the idea of moving the seat heater switches. but you don't have to make a new filler piece. that one is commonly called a "batwing," and I'm pretty sure its available for not too much money from Sunset or Pelican.
I think we'd agree that those unused blank switch filler plugs just drive us crazy. I've just gotten used to them and don't think about them any more. Your seat heater switch idea is very "cool."
great job!
Judge, Thanks for the reply and the "batwing filler" information. I'll look into that...
-
Thanks Loren... After looking at the back of the switch for some time I found that by pushing a 1" wide putty knife down between the body and the frame it released the switch. However I can't tell you which side of the switch I inserted the putty knife. Also when you inserted the putty knife I found that you had to push it in as deep as you can, then the switch released.
FYI: I'm installing a double din monitor nav and installing the A/C control panel directly under the 7" monitor, the non-conformance location... LOL I'm also moving the seat heater switches up to the horse shoe frame since I had 2 unused locations on the panel. I'll make a new filler piece where the seat heater switches were located.
BTW: I have a 4 prong unused plug laying under the console, you told me one time what that was for, but I've forgotten.
Thanks for all of your help,
-
I want to remove some rocker switches from the center dash panel. I can't seem to figure out how they release from the frame? Before I get physical I thought maybe someone knows how to do this...
Thanks,


Fuel Fill Problems...
in 996 Series (Carrera, Carrera 4, Carrera 4S, Targa)
Posted · Edited by creekman
Kbrand... My C4S E6 fuse shows it's for: TERM 30 TELEPHONE/HANDY, NAV, ORVR. I don't know what the ORVR is? However the fuse is good... I checked the connections on top of the tank and all seems good. When I push the filler pipe door in I hear a solenoid click.
Is the Figure 1 picture that shows on the Technical Information Sheet, "Fuel Tank Hose Modification" under the fender at the fuel fill cavity? Or in the tank itself?
Can a bad fuel gauge make it difficult to fill the tank, or does the plumbing make the fuel gauge not work? Fuel gauge seems stuck just above 1/4 tank.
I reviewed Loren's maintenance post on "Replacing the gas/fuel door actuator"
http://www.renntech.org/forums/tutorials/article/45-replacing-the-gasfuel-door-actuator/
However it doesn't say how to check to see if the actuator is good or not? Is the clicking I hear when I push the filler neck flap in coming from the actuator, so it's good?
Thanks for your reply...