Welcome to RennTech.org Community, Guest
There are many great features available to you once you register at RennTech.org
You are free to view posts here, but you must log in to reply to existing posts, or to start your own new topic. Like most online communities, there are costs involved to maintain a site like this - so we encourage our members to donate. All donations go to the costs operating and maintaining this site. We prefer that guests take part in our community and we offer a lot in return to those willing to join our corner of the Porsche world. This site is 99 percent member supported (less than 1 percent comes from advertising) - so please consider an annual donation to keep this site running.
Here are some of the features available - once you register at RennTech.org
- View Classified Ads
- DIY Tutorials
- Porsche TSB Listings (limited)
- VIN Decoder
- Special Offers
-
OBD II P-Codes - Paint Codes
- Registry
- Videos System
- View Reviews
- and get rid of this welcome message
It takes just a few minutes to register, and it's FREE
Contributing Members also get these additional benefits:
(you become a Contributing Member by donating money to the operation of this site)
- No ads - advertisements are removed
- Access the Contributors Only Forum
- Contributing Members Only Downloads
- Send attachments with PMs
- All image/file storage limits are substantially increased for all Contributing Members
- Option Codes Lookup
- VIN Option Lookups (limited)


creekman
-
Posts
474 -
Joined
-
Last visited
-
Days Won
1
Content Type
Profiles
Events
Forums
External Paint Colors
Downloads
Tutorials
Links Directory
Collections
Store
Posts posted by creekman
-
-
Hi8... It would be easier if you had the part description included, if item 18 is the single post terminal, then that would be the battery + lead to the terminal post included on the attached pix, then from the terminal to the starter, I think???? Anyway that terminal post housing on my 2003 C4S is on the right side frame at about the firewall. It's hiding high on the frame...

-
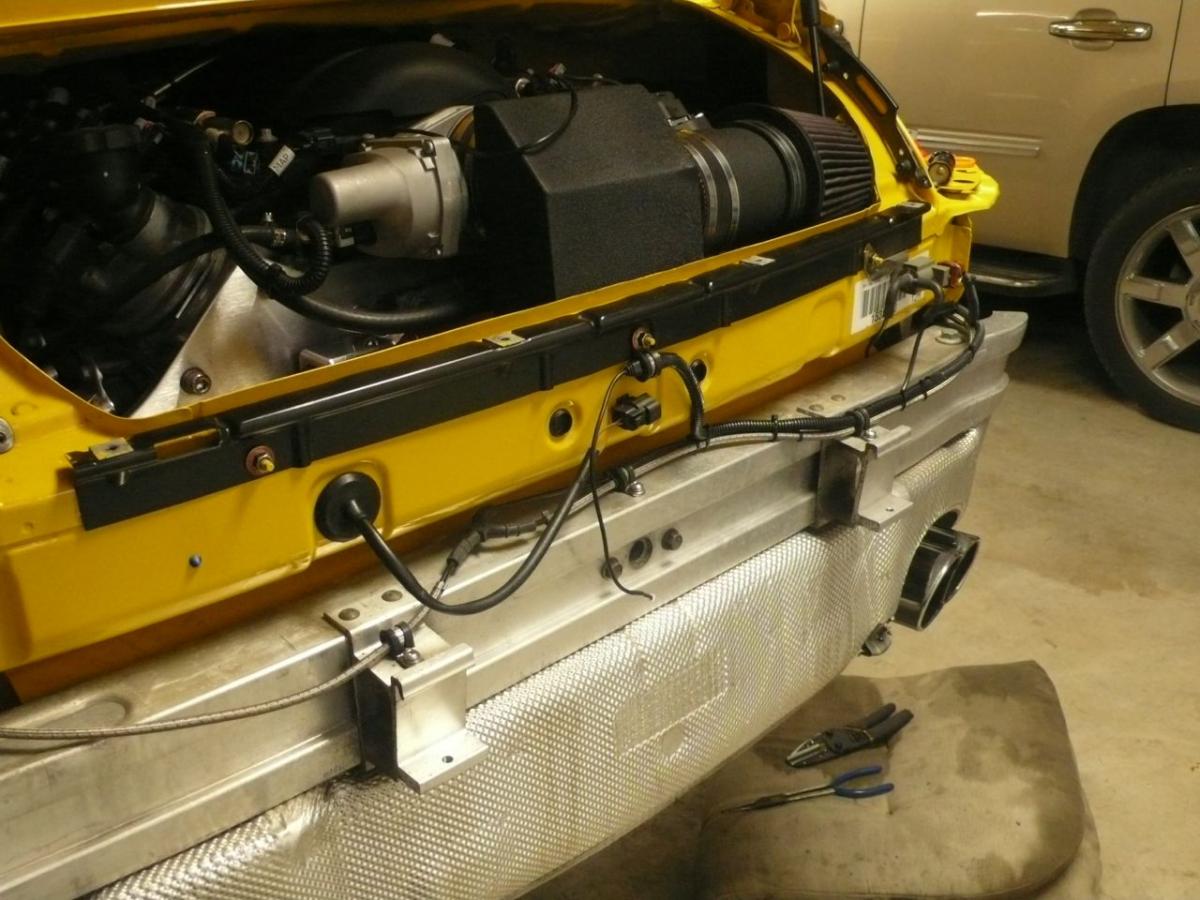
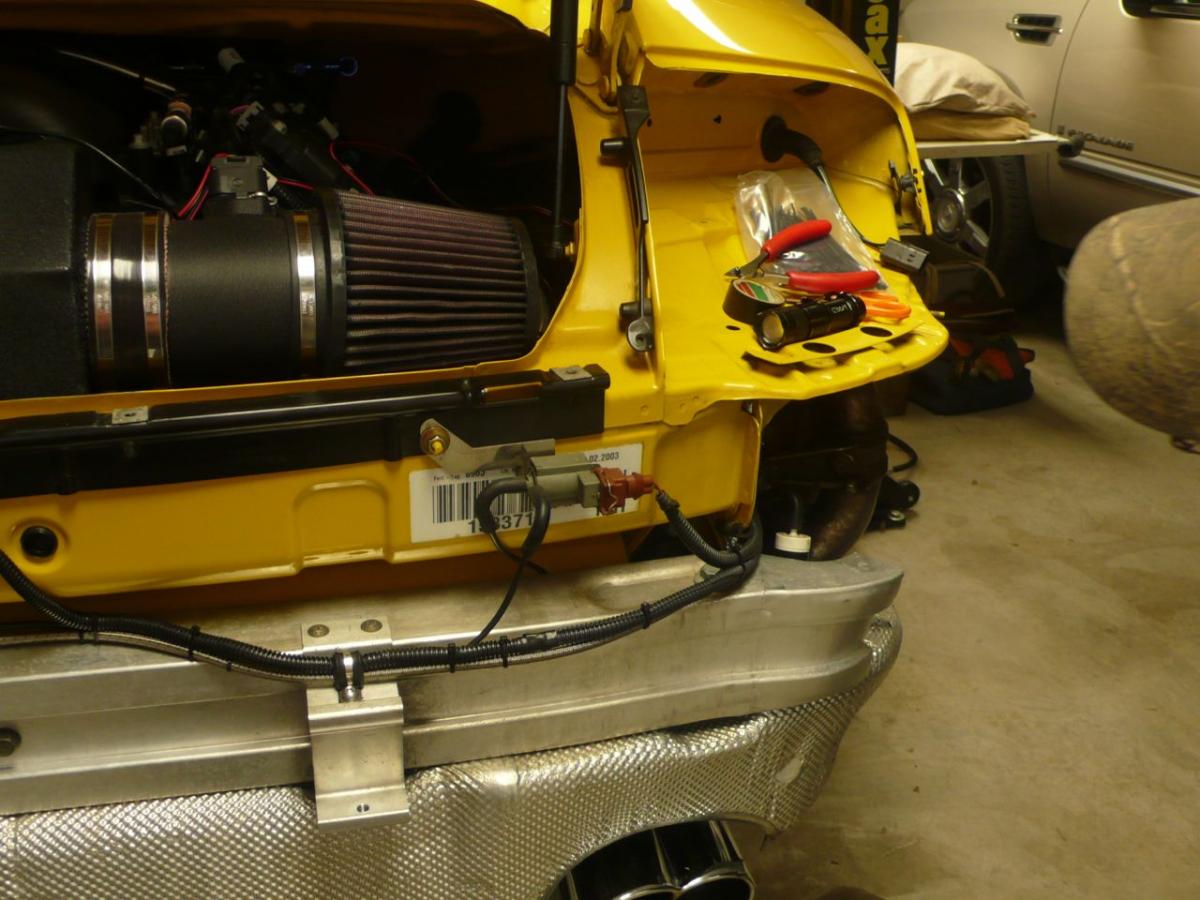
Here's the way I ran my backup camera wiring. However the one problem area that I alluded to early is that you need to wrap the wiring that runs behind the aluminum heat shield where the muffler is mounted. I used some exhaust pipe wrap as an added shield. Here are some pixs...
-
Hi8, I've got the rear valance down and tomorrow evening I'll run the cables. One way I was thinking about running the cable is through the fender well where my PSE vacuum line goes through a rubber grommet. However the muffler is right there and the only protection from heat is the foil insulation. Once into the engine room I'm going to look at going through the big grommet that houses the 2 engine harnesses. They are located high on the right fender well. This will allow me to get into the rear seat area...
-
When you connect the + of the camera to the revers bulb wire ( -/gound can be connected anywhere on the chassis), the camera gets power when the reverse gear is engaged. When the camera is powered it will send video signal to the GPS and you should view the image from the camera. Presume the GPS must be on as well. I would not connect the GPS power to the reverse power wire because the GPS would only work when reverse is engaged. Would suggest to read the GPS instructions as to how to connect the camera. Does it makes sense?
Hi8,
I never intended to connected the GPS power wire to the backup lights, however I had a friend that just installed a backup camera in his truck and he thought there was a backup camera wire out of the back of the monitor that switched the screen to the backup view. Once I have the new Nav I'm sure I'll come up with the correct wiring.
I'm off to the garage to put the car on the lift, then I'll remove the rear bumper/valance to install the backup camera and run the wires into the engine room. From there I can run wire forward and into the right side tail light housing.
Thanks for the reply...
-
After reviewing the minimal installation instructions that came with the backup camera I'm not sure the above information works. Now I'm thinking that the + and - goes to a switchable power source, and "maybe" a wire comes off the back of the monitor and connects to the back up light wire in the tail light to tell the monitor that you're in reverse?
I don't have the GPS 7" monitor yet so I won't know if this is correct or not... Stay tuned, film at eleven...
-
We've run a lot of new wiring up the left side threshold area during my engine swap, that gave us good proximity to the fuse panel. However having had most of the interior out of the car at one point or another I have yet to never figured out how to run wires forward through the center console under the rear seat pan.
I bought this backup camera from Crutchfield, very small, 165 degree view, it reverses the rear view. It comes with a 6' pig tail and 22' of cabling with connectors. I had the local avionics guy cut down the 6' pigtail to 1' so I didn't have a bunch of extra wiring behind the bumper. The wires are small gauge so I didn't want to muck up the wiring with my solder job.
Nice unit, a tad pricey... http://www.crutchfield.com/p_074RVC115T/Accele-RVC1150T.html
Thanks for the replies...
-
I'm installing a bumper mounted (on the recess above the license plate) backup camera in conjunction with a double din GPS monitor. The directions are rather sparse, can I go to the backup light wiring in the tail light for power? This would give me both switching and power.
Thanks,
-
Hi8ha... Thanks for the quick reply... I placed an order. BTW: recently I placed an order unknowingly with a Chinese vendor for a laptop battery. It took them nearly a month to deliver it, they kept telling me it, "was in the mail". I finally got the battery, but had already bought one, now
they want me to send it back and they will settle on the shipping charges after they receive it, ya good luck. Bottom line I would stay away from
foreign vendors unless you have first hand information regarding their integrity. That's my rant for today...
Here's the product I bought per your information, and thanks again...
-
Contact Tony Garcia at Autobahan Interiors. Tony specializes in Porsche interiors...
-
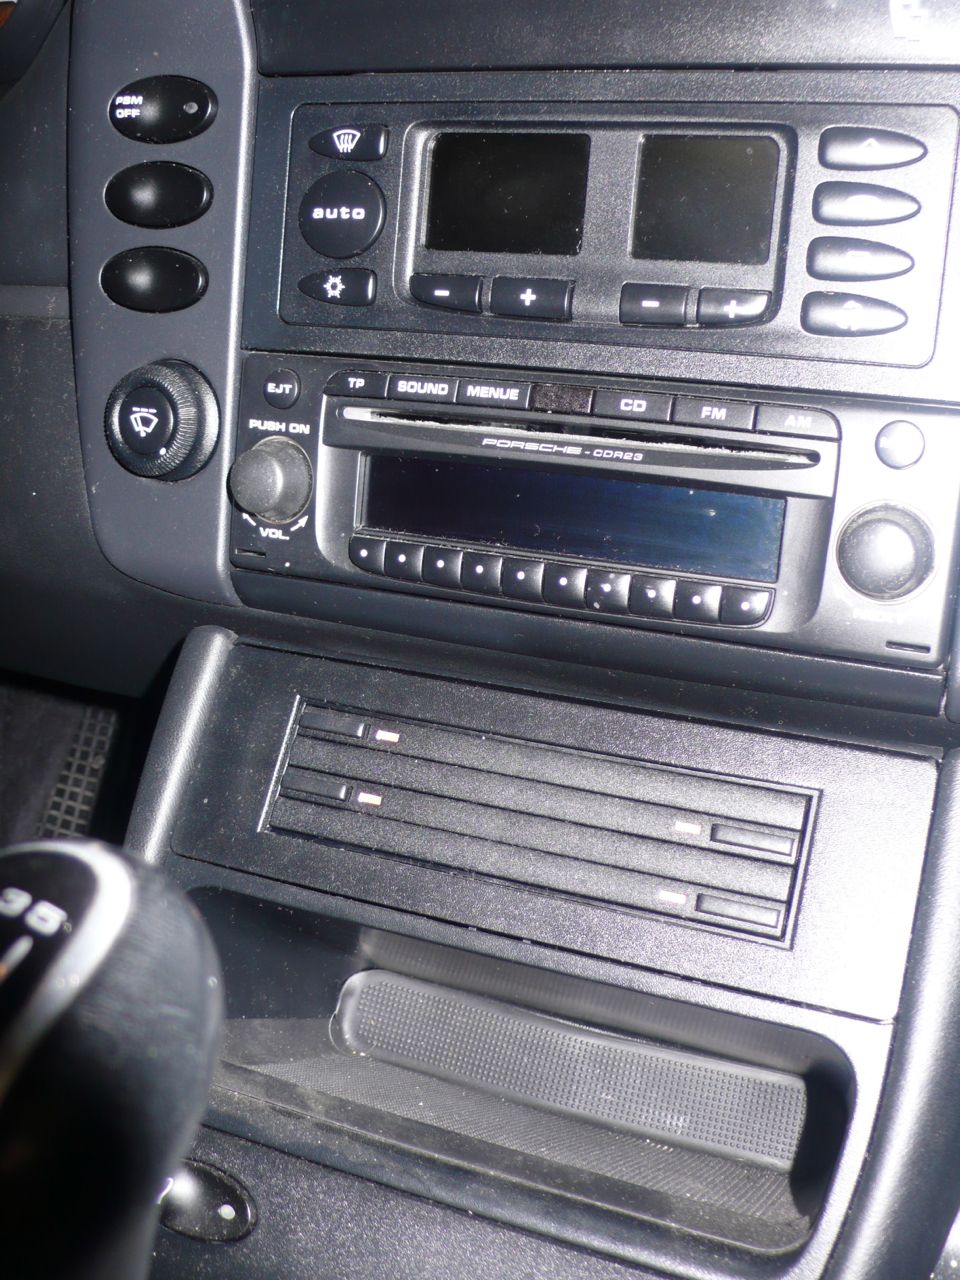
Do you need special tools for removing the stock Porsche radio/player (CDR23) from the dash?
Thanks,
-
I agree, I had the same issues and gave up on the mounting buckles. The mats have stayed put, no problem...
-
For the most part the determining torque value will depend on the quality (grade) of the bolt, the material you're installing the bolt into, and
whether you're lubricating the bolt with either Lock-Tite, anti-seize or installing the bolt dry. There are all sorts of charts on the internet that will help you determine
the correct torque settings. Here's one: https://www.swtc.edu/ag_power/diesel_engines/lecture/metric%20torque%20values.pdf
-
I just received my 101 Projects book from Pelican Parts today. First off Wayne gives kudos to our fearless leader, Loren Cook for his contribution. The book is well done, great graphics and pictures. The text is well laid out and easy to follow. I
don't think it's intended to replace the Bentley's book, but it certainly is a fine addition for any DIY'er. Definitely worth
the money.
-
Whooops, I misread the question, I immediately jumped to the conclusion that it was the "clutch" pedal and not the brake pedal.
Sorry...
-
Thanks John, I had a good a laugh out of your comment, "we just buy them by the bag full". I guess that pretty well sums the answer to my question.
-
Is it me, or are the 6 front belly pan clips difficult to get off? I bought new ones since the old ones seemed like they had
seen better days. Now the new ones came off the first time easily, but don't seem to want to release without tearing them up
to get them off a second time.
Does anyone have a secret to preserving the longevity of these retaining clips?
Buy them by the bagful, they are going to break.
JFP, I guess your reply says it all, I just doubled my order...
Thanks,
BTW:Do we have a first name for you? Anyone who is as helpful as you are
I'd like to be on a first name bases. Thanks for your contributions
on this website.
Mitch
-
Is it me, or are the 6 front belly pan clips difficult to get off? I bought new ones since the old ones seemed like they had
seen better days. Now the new ones came off the first time easily, but don't seem to want to release without tearing them up
to get them off a second time.
Does anyone have a secret to preserving the longevity of these retaining clips?
-
Hi8ha, nice installation... who's monitor is that? Did you ever consider installing the A/C panel in the C/D storage bin? I read on one of the
replies that it complicates the install. I'm not sure if you can get a face plate, or you'll have to make one. Did you install a backup camera?
I'm considering that, I have one in my D/D and it's pretty handy. Plus in my old age my neck doesn't swivel around like it use too.
Thanks for your reply,
-
G'day Creekman,
From factory the avic control is in the bottom cubby (storage) therefore the wires are long enough.
If you want to keep the storage and move the avic to the current cd storage unit, there are modifications required (not for the faint hearted and not reversable) however, in my opinion, more ergonomic. There's a detailed 'how to' written by Eurospeed from memory on rennlist. I used the Eurospeed double DIN kit and as mentioned above, great product
Good luck
P-Kay, many thanks for your informative reply... You've told me what I need to know, now I just have to search the threads and find what works for me. I agree with you that my choice would be to move the heat/A-C controls to the CD storage area and leave the storage recess/bin in its present
location.
I saw one Double Din face plate with PORSCHE emboss on the face plate. It that a factory faceplate?
Thanks,
-
Thanks for the leads and heads up... What I don't understand is what you do with the heater/A-C control panel if you're installing the double din monitor?
Does the A/C panel move to the CD storage opening? If it does then will you have to lengthen the wiring to make that happen?
-
Can you install a "double din" monitor into a 2003 996? I want a GPS Nav, back up camera, DVD and blue tooth options. Does
anyone have any "current" information and pixs for products that would work with this requirement?
I know that some of this has been posted before, but when you look up the manufacture and model they have been discontinued.
Thanks,
-
I would not be running anything but the correct fluid in the car, even to clean it out. There are a myriad of flexible seals in this system, and the use of an incompatible fluid could lead to swelling or other problems. The system does not hold that much fluid, so it simply is not worth the risk......
__________________________________________________________
Thanks, I hadn't thought of that, I'm glad you responded maybe saving me some problems...
-
Anyone have a write up on performing this service? Time and tools involved? Thx for all replies.
A total "flush" of the system requires disconnecting the low pressure return line under the car, and then adding fluid in the engine bay while turning the steering back and forth with the car idling until clean fluid comes out. It is a two person job, and you need to be careful not to let the pump run dry during the process as they do not like that, and the pump is expensive. There are aftermarket firms that make quick disconnect fittings with filters and magnets to cut into that line that will make future service a much easier affair:
An easier, and perhaps more practical approach would be to simply siphon off all the fluid you can get out of the reservoir and pump, refill the system, then drive the car a short distance and repeat the process. Unless the existing fluid is really in bad shape, this is probably all you need to do.
As part of our normal annual service protocol, we drain and refill the power steering reservoir on all the cars we service. While not replacing all the fluid, or flushing out all the debris, it does continuously replace most of the old and dirty fluid in the system on a regular basis, at very little cost.
JFP... When you disconnect the return line, you mean disconnect the return line at the steering rack? If so for clarification for anyone doing
that, it's the larger diameter pipe of the two pipes. When you bleed/flush the system does the engine
to be running?
I have an electric power steering pump, it made a terrible groaning noise, turns out that I had some debris in the system so I'm replacing the
pump. Since I don't know if there's some contamination in the steering rack I'm going to flush the system with cheap P/S fluid, then fill with the
Pentosin. My local Car-Quest auto parts house carries the CHF 11S for about $25.00 a can. And I'm going to add the P/S inline filter as well...
-
This is a sore subject for me. When I removed my engine recently getting the plugs undone without damaging the plastic clips was the hardest part of the operation. Each plug seemed to have a different release, and like Ahsai says, the releases are hidden about half the time so you better be into "braille". Porsche didn't make it easy... Sorry, I had to get that off my chest...


Backup Camera...
in 996 Series (Carrera, Carrera 4, Carrera 4S, Targa)
Posted
I received my new 7" dbl din JVC GPS/Nav unit, turns out there is a wire from the back of the unit that connects to the reverse light wiring. So you have a switched + and the ground, then in my case I have a purple/white wire from the back of the unit that shows connecting to the reverse light wiring.