Welcome to RennTech.org Community, Guest
There are many great features available to you once you register at RennTech.org
You are free to view posts here, but you must log in to reply to existing posts, or to start your own new topic. Like most online communities, there are costs involved to maintain a site like this - so we encourage our members to subscribe or donate. All subscriptions and donations go to the costs operating and maintaining this site. We prefer that guests take part in our community and we offer a lot in return to those willing to join our corner of the Porsche world. This site is 99 percent member supported (less than 1 percent comes from advertising) - so please consider an annual subscription or donation to keep this site running.
Here are some of the features available - once you subscribe RennTech.org
- View Classified Ads
- DIY Tutorials
- Porsche TSB Listings (limited)
- VIN Decoder
- Special Offers
- Paint Codes
- Registry
- Videos System
- View Reviews
- and get rid of this welcome message
It takes just a few minutes to register, and it's quality Porsche information at a low cost.
Contributing Members also get these additional benefits:
(you become a Contributing Member by subscribing or donating money to the operation of this site)
- No ads - advertisements are removed
- Access the Contributors Only Forum
- Contributing Members Only Downloads
- Send attachments with PMs
- All image/file storage limits are substantially increased for all Contributing Members
- Option Codes Lookup
- VIN Option Lookups (limited)


abcounts
-
Posts
20 -
Joined
-
Last visited
Content Type
Profiles
Events
Forums
Exterior Paint Colors
Downloads
Tutorials
Links Directory
Collections
Classifieds
Store
Everything posted by abcounts
-
I have a 2002 911 996 Cabriolet with 84K. I am looking to have a new clutch, IMS, and RMS bearing installed, if needed. I live on lower Delaware shore. Closest Porsche Dealers are Annapolis, and Newark. Does anyone know a nearby independent with good experience they can recommend? Thank you.
-
ONLY-left turn signal mystery
abcounts replied to abcounts's topic in 996 Series (Carrera, Carrera 4, Carrera 4S, Targa)
OK. I received the new socket from Pelican, put it in and everything is fine with the world. In hindsight, I didn't think the sockets were interchangeable between headlights, or that no obvious signs of wear would prevent the socket from working. So one of the earlier steps in diagnosis should be: If the new bulb doesn't work, try moving the bulb with the socket to other side headlight. It was the socket that was bad. -
ONLY-left turn signal mystery
abcounts replied to abcounts's topic in 996 Series (Carrera, Carrera 4, Carrera 4S, Targa)
Thank you. I have checked the rear. It seems very good and actually works but blinks very fast like the dash arrow. Since then, I switched the front bulbs (with the sockets attached this time) and now the left side works fine and the right does not light and flashes on the dash very rapidly like the left did before. I am thinking it is the socket itself and have ordered one from Pelican. It will take a few days till I receive it and can tell for sure. I'll update if it works or not. Thanks again. -
ONLY-left turn signal mystery
abcounts replied to abcounts's topic in 996 Series (Carrera, Carrera 4, Carrera 4S, Targa)
Sorry. I forgot to say these are Xenon Litronic headlights. Thank you again. -
I drive a 2002 996 Cabriolet with 6 speed transmission. I was driving with the top down no lights on when I used the left turn signal, and it started blinking very fast. I pulled over to examine my lights and discovered ONLY the left turn signal was not working. I replaced the bulb with a new one, cleaned up everything as I went along, but it still does not work and it is only this single bulb which does not light. I checked the fuses which all seem to be very good. I replaced the relay with one I got from auto zone (Novita EP36) which caused the very quick blinking to slow to normal speed, but still no left turn signal. So, I put the old one back, and I've ordered Wherle brand from Pelican Parts. I will wait 5 days till I get that one to check. I've cleaned around the bulb socket sprayed with CRC electrical cleaner, stretched the contacts so they make a solid connection, but still ONLY this single bulb does not work. I also examined and spray cleaned the head lamp "Pin" connector and could not see any damage. I've also removed and cleaned two ground contacts on the car body near the front wiring harness. I also used my durometric reader and detected no faults, but as far as I can tell, it (the Enthusiast version) has no way of checking this particular circuit. I would like to emphasize that the signal stalk appears to be working very well. I drive it and it returns in both directions and all of the light switch functions also appear to be working well. So any help would be greatly appreciated. Is there anyway to isolate this for bulb for testing while in the headlight installation? Can I test to see if electricity at the pins is getting to this particular bulb? It must be reaching all the others cause they are all working. Can I test to see if electricity is reaching the individual pin? I've removed the inside wheel well cover to check to see the pins are seating properly including the suspected A1 pin. They appear to be fine. What am I missing? Thank you.
-
996 leaking coolant lid?
abcounts replied to abcounts's topic in 996 Series (Carrera, Carrera 4, Carrera 4S, Targa)
Yes, I am extremely slow at getting around to these things, usually because I fit them into a tight schedule, using this car as my 2nd family driver. Also, the plate was merely "weeping" only ever adding distilled water to reservoir one time. One of the problems was finding my way through all the rhetoric about the type of coolant to use. Since I bought the car pre-owned (64K miles- now 70K) and I could not ID the type of coolant other than "yellowish", I concluded it would be best to return to Porsche "pink" coolant when I make this repair and drain the coolant. So, as of yesterday, I have re-installed the plate, (simply referred to as "engine plate". I did so according to your/mine specs, and re-attached all hoses, and filled the system with "tap water" starting the car, not letting it go dry, running to 182 degrees to open thermostat, and use heater core. I did this to inspect the integrity of the plate, and concluded it was very secure and dry. I also did this to flush the remaining "yellowish" coolant from the system. As soon as the car cooled, I detached all coolant hoses again, opened the drain, and drained the car of the tap water. BTW- I had it on a scissor jack lifted to 48", with all plastic panels, and front bumper removed. This morning, I intend to start the filling process of 50-50% coolant/distilled water with Porsche pink stuff. I have the Bentley book, and Essential Porsche book, etc. but could not find this simple torque value listed anywhere, other than in generic bolt charts. Thank you for your help. -
996 leaking coolant lid?
abcounts replied to abcounts's topic in 996 Series (Carrera, Carrera 4, Carrera 4S, Targa)
I purchased the new engine cap part #99610101600. It has the rubber ring in it, rather than the gasket which was on my old one. The gasket came off in one piece, but it looks as if there may be some sealant residue on the face of the engine block. I've tried mineral spirits, acetone, and gasket desolver to prep the surface prior to putting on the new cap. Should I try very fine steel wool next? How about muriatic acid? Or, should I put a sealant on the new rubber plate? Should I re-use the old plate and use a sealant rather than gasket? Also, does anyone know the torque value for these two bolts? They are M6, 8.8 class. I'm thinking 11NM, 8.5 ft.lbs. based on bolt size alone, but cannot find out for sure. I called Pelican where I got the part, and checked as much as I can in books, online without success. It would be a shame to lose all the coolant to a leaking plate or to over-torque and strip the bolt. Thanks for any help.
-
Airbag light
abcounts replied to autowerks993's topic in 996 Series (Carrera, Carrera 4, Carrera 4S, Targa)
I just want to add that I wish I had followed Loren's advice (post #21 on this thread), but unfortunately, I did not see (read) it in time. That's my mistake, and for my impetuousness I now have two splices under my seat and more expenditure than I would have otherwise. But, the airbag light has not come on again, so that's at least some sort of progress. I'm still learning. -
Airbag light
abcounts replied to autowerks993's topic in 996 Series (Carrera, Carrera 4, Carrera 4S, Targa)
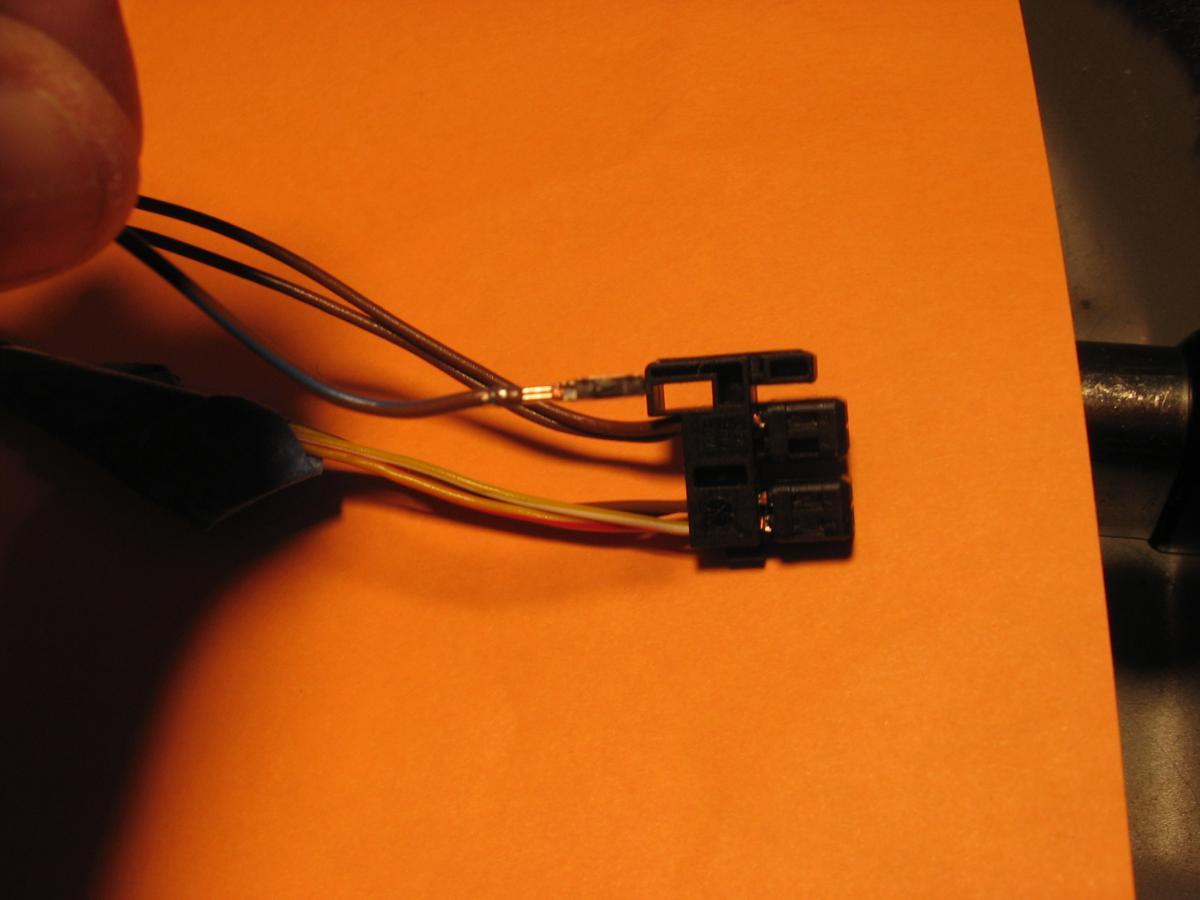
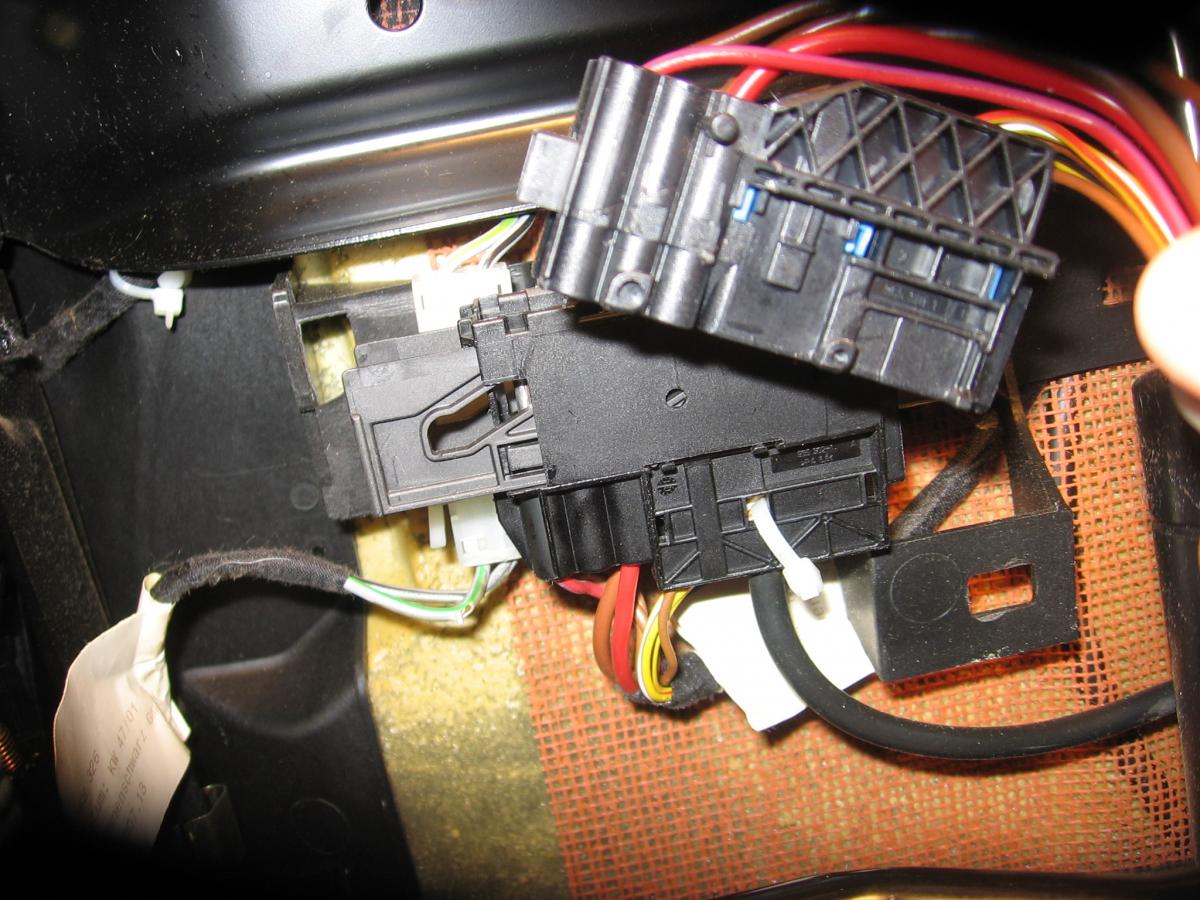
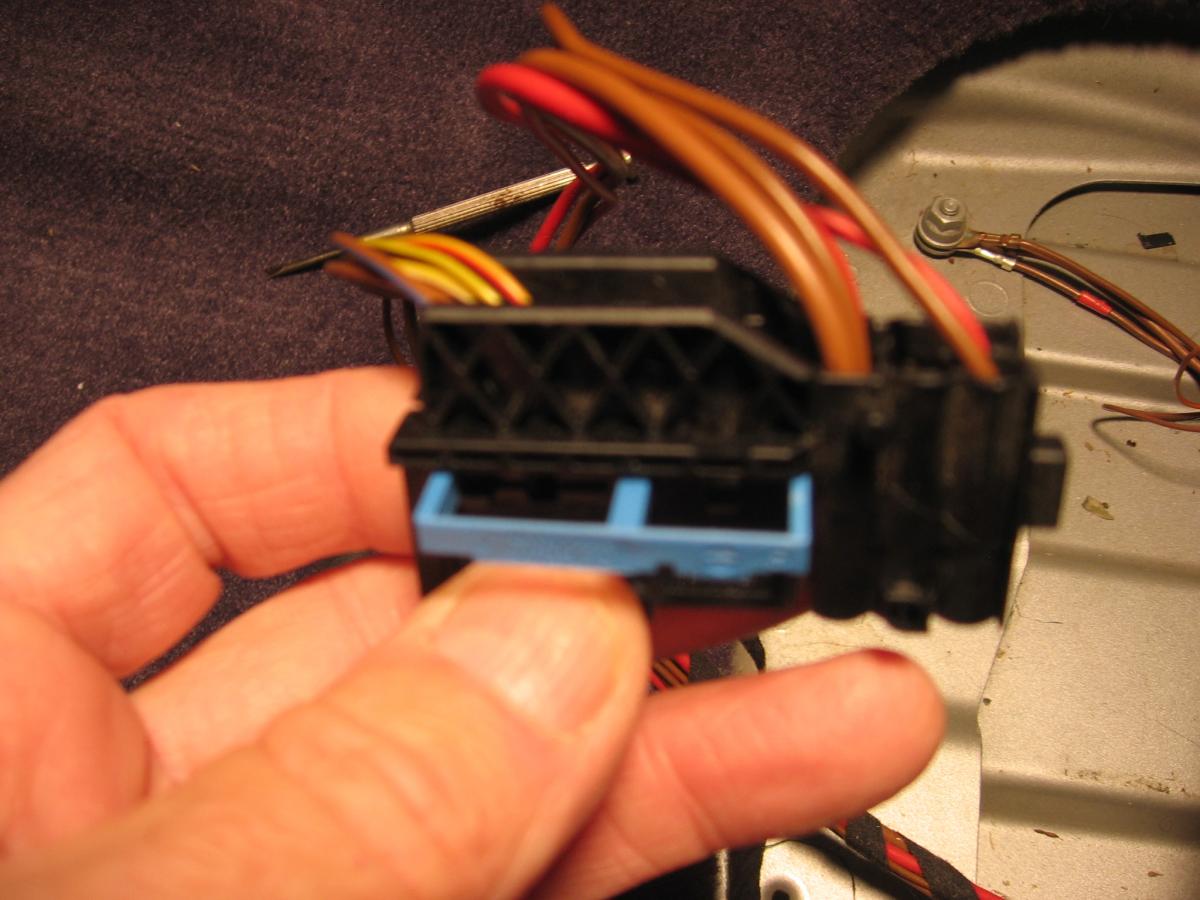
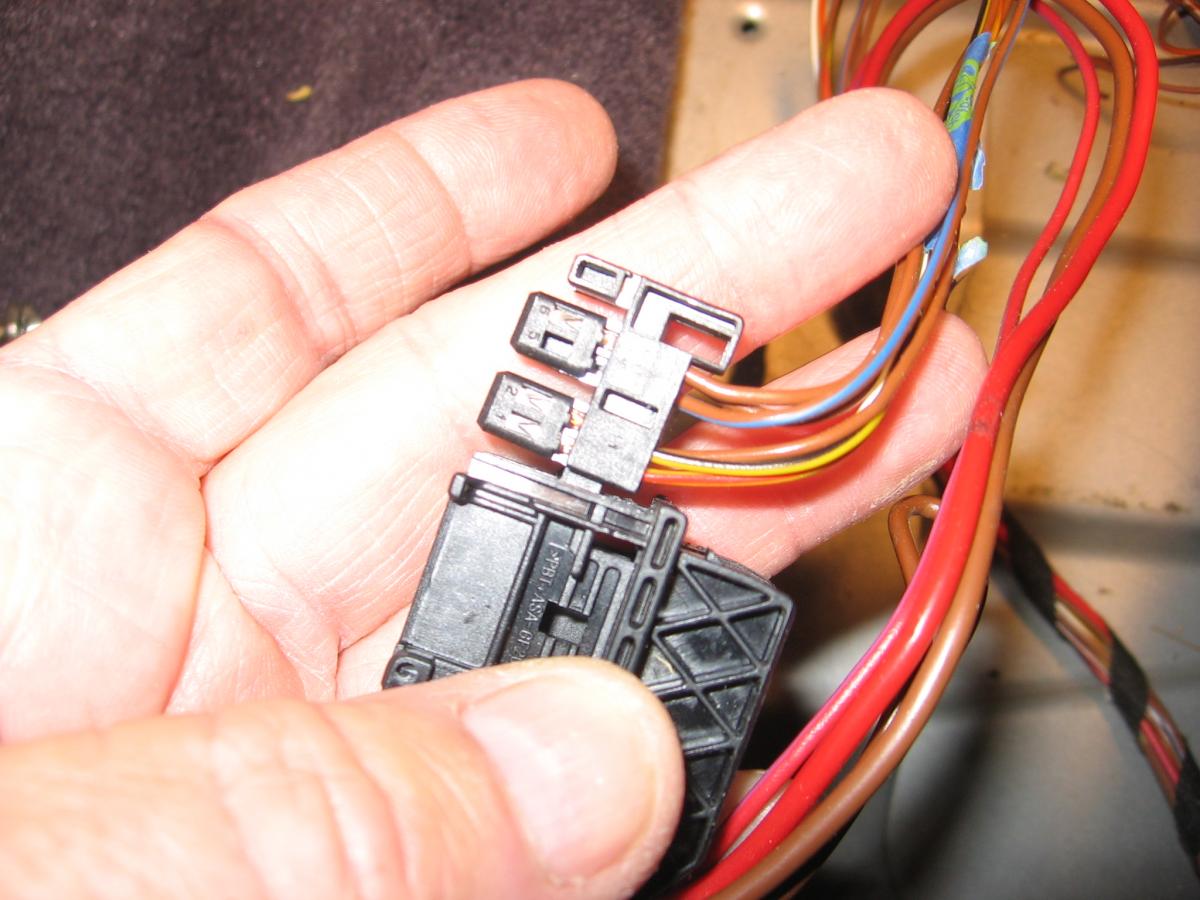
I just completed this project and the my dash light has been extinguished. I've attached a few pictures which I hope might help anyone thinking about doing it. Apparently, the "Kit" is a "general use package" and has enough pieces to do 4 terminals and the grounds, and some plastic that did not fit anywhere on my 02-C2-996, but probably fits other models. Actually, the entire plug-body (not shown in picture) was also in the kit, but like many of the other pieces, I did not use it. The terminals in question were easily located referencing the general wiring diagram (color coded Brown & Brown/Blue) and they were actually numbered directly on the black plastic terminal holder, as long as your eye sight is good enough to see them. To my naked eye, nothing appeared to be wrong with any of the terminals, or the wiring. I did discover two (unrelated) wires under my seat which had the insulation torn and needed taping. I have no idea what these wires do, definitely not part of this procedure, but nevertheless simply repaired them with electrical tape. Since I was already in there for a visual, I decided to follow the TSB, replace the terminals, and splice the wires accordingly. I did not need a special tool to release the terminals from there plastic plug-holder. I merely pushed down on the very tiny triangular shaped "pin holder" (visible through a notch in the plug) with a tiny metal needle, gently pulled the terminal out, and slid the new one directly in. I completed the splicing and soldering as instructed. I then replaced the passenger seat belt buckle with a new one, re-leading the seatbelt wires through various clamps under the seat exactly as they were originally fit and replacing the green plug. The seat belt buckle replacement was a very straight-forward, simple job, and I can't help wondering if replacing the buckle was all I really needed to do? Aside from everything being extremely tiny and light-weight, I did not consider this overall job (TSB instructions) to be too difficult. After re-assembly, and having to use my emergency front trunk pull to re-open the hood which I (very foolishly) closed over the thoroughly disconnected battery, I used my Durametric to clear the fault code. I apparently do not fully understand the Durametric procedures because it took me several attempts, and a short drive with the dash light still on, followed by another few retries, till I was finally able to clear the code and extinguish the dash light. For a while, I thought the procedure was a failure, but I'm also wondering if it takes a little extra time after reconnecting the battery for the airbag system to fully arm itself? Thanks to everyone for their help.
-
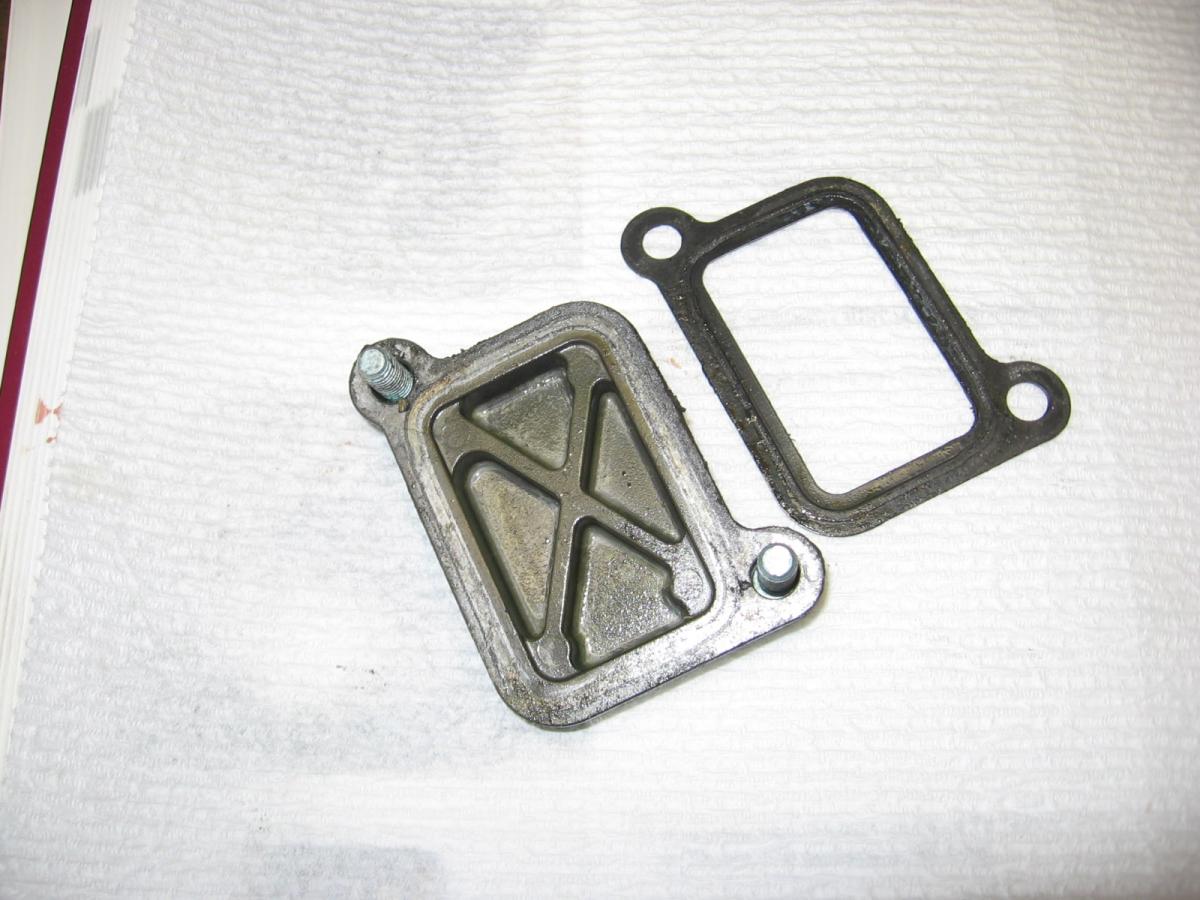
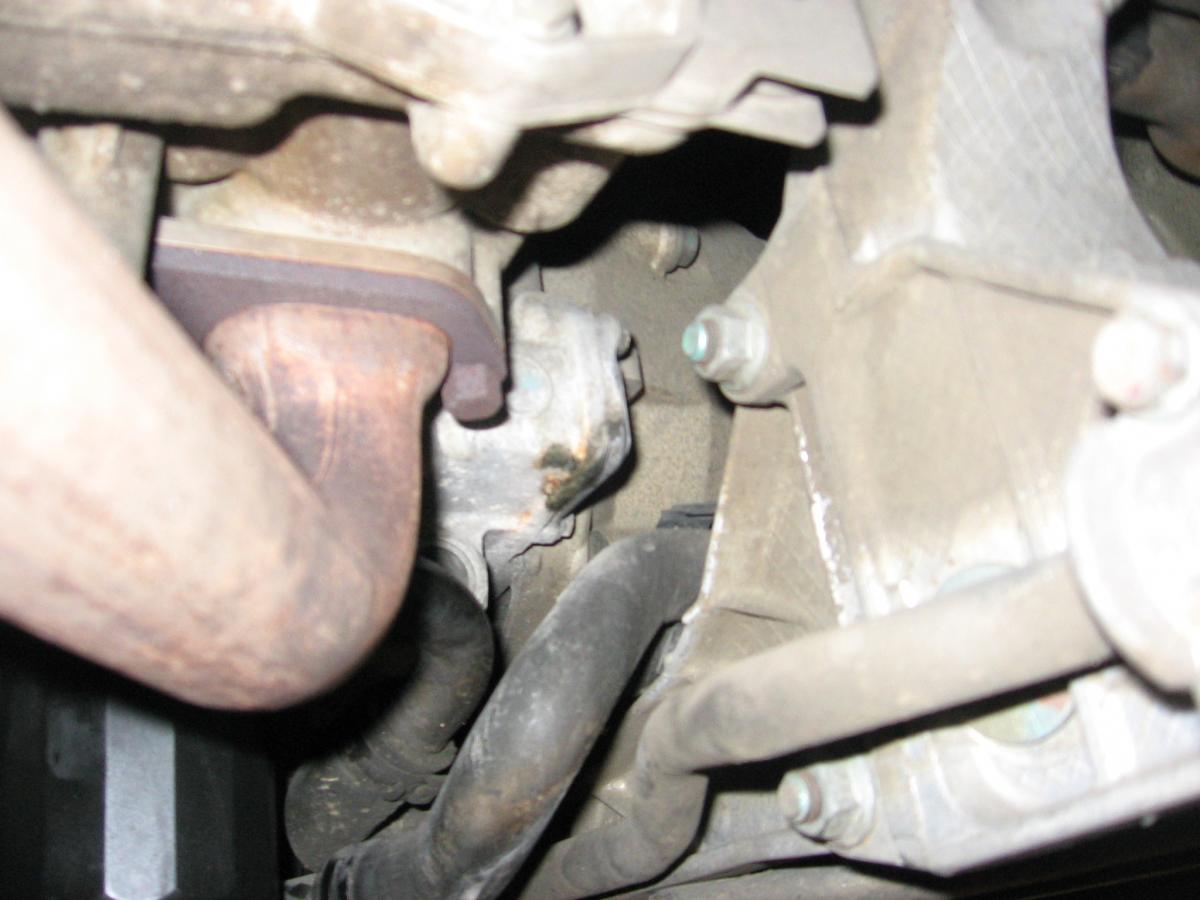
While changing my oil yesterday, I noticed what looks likes coolant "weeping" (no drip yet) from this engine block plate located on the passenger side toward the front of the car. I have not yet noticed any loss in my coolant tank level. However, I'm thinking it is only a matter of time. So, if I am correct, this part is referenced in the parts catalogue as simply a "lid" but there is a gasket here which I should replace with the Porsche part number 996-101-336-50, and I will need to flush/replace the entire coolant system in the process. My coolant had been replaced by a previous owner with greenish-yellow stuff which seems to have worked very well. I didn't notice at the time but it looks like my "hose holder" is also either open or broken and may also need replacing. MY QUESTION: Is this a typical situation (normal wear) on a 2002-C2, with 67,400 miles? Or, should I be looking for any other causes or symptoms of a bigger problem? Thanks.
-
Airbag light
abcounts replied to autowerks993's topic in 996 Series (Carrera, Carrera 4, Carrera 4S, Targa)
YES indeed, regarding the battery disconnect and wait period prior to starting! I find my VIN: S652389 falls directly into the measure B procedure for Code 49, the passenger side belt. I see lots of listings for buckle assemblies, but nothing for the 000.043.206.06 Service Set which I presume I will need. Any ideas where I can get one? Thanks. -
Airbag light
abcounts replied to autowerks993's topic in 996 Series (Carrera, Carrera 4, Carrera 4S, Targa)
I checked the TSB and re-ran the short test with the Durametric reader. I get Current Fault Code 49, but it is shown under the Alarm I32 module and says "K lead", Status: Not Present. By contrast, the Airbag B05 module neither shows "No Faults Found, or any codes at all. The Air bag failure warning light continues to come on at start-up. Is this the same condition described in the TSB? If so, it looks like a new passenger seat belt is warranted, and seems within my mechanical capability. However, as I've been reading, could this simply be the result of something getting wet and not allowing the Airbag B05 module to be checked? Thanks. -
Airbag light
abcounts replied to autowerks993's topic in 996 Series (Carrera, Carrera 4, Carrera 4S, Targa)
I am having the same issue. (02-996-cabrio), My Durametric reader used to show codes 47-49, and used to allow for the codes to be cleared, but no longer shows codes or turns off the airbag failure light. Has anyone had any success re-installing the Durametric software? Any other new ideas? Thanks. -
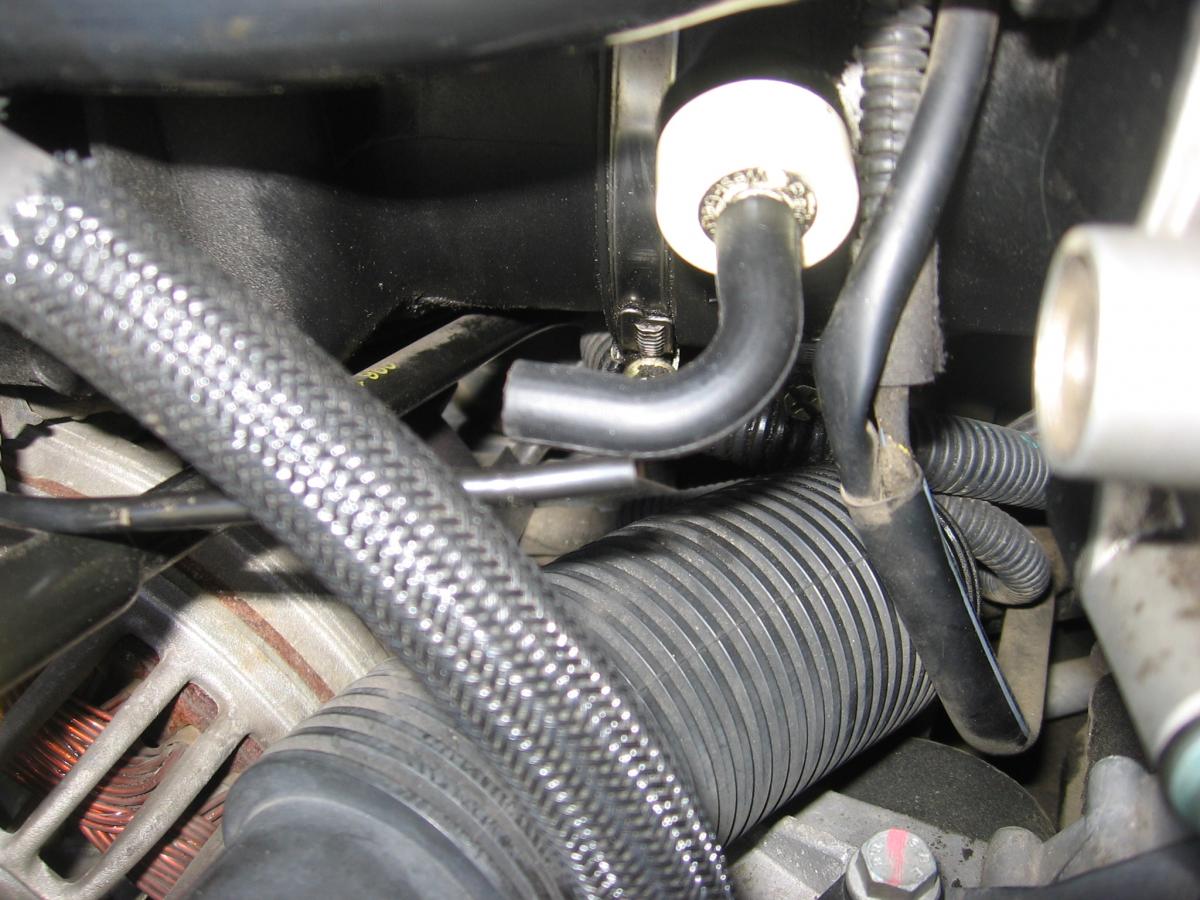
I had the same codes on my 02-996-C2-Cabbie. The line to the vacuum check valve at the resonance intake had dislodged as shown in picture and was a quick fix. But, the same thing happened again the very next day at 20 minutes into my drive. If it is holding vacuum, why would it pull apart? Should I suspect a bad check valve?, worn vacuum lines?, or check elsewhere? Or, should I just attach some hose clamps and see if that does it? Thanks for suggestions. FYI-update. I have had no further incidents with this "dislodged" vacuum line. It was probably self-inflicted, accidentally loosened, and not securely enough replaced, after cleaning dried oil from the resonance intake. No clamps added or other action taken except to inspect rubber, "blow-through", and more firmly re-insert lines.
-
Sweating oil on intake resonance tube
abcounts replied to SA321's topic in 996 Series (Carrera, Carrera 4, Carrera 4S, Targa)
I checked the oil cap after a 1/2 hour drive this morning. It came off quite easily (as normal) but I felt a "very slight" suction, and I noticed a slight increase in engine idle RPM, but still very smooth idle. Does that tell me anything about the AOS? -
Sweating oil on intake resonance tube
abcounts replied to SA321's topic in 996 Series (Carrera, Carrera 4, Carrera 4S, Targa)
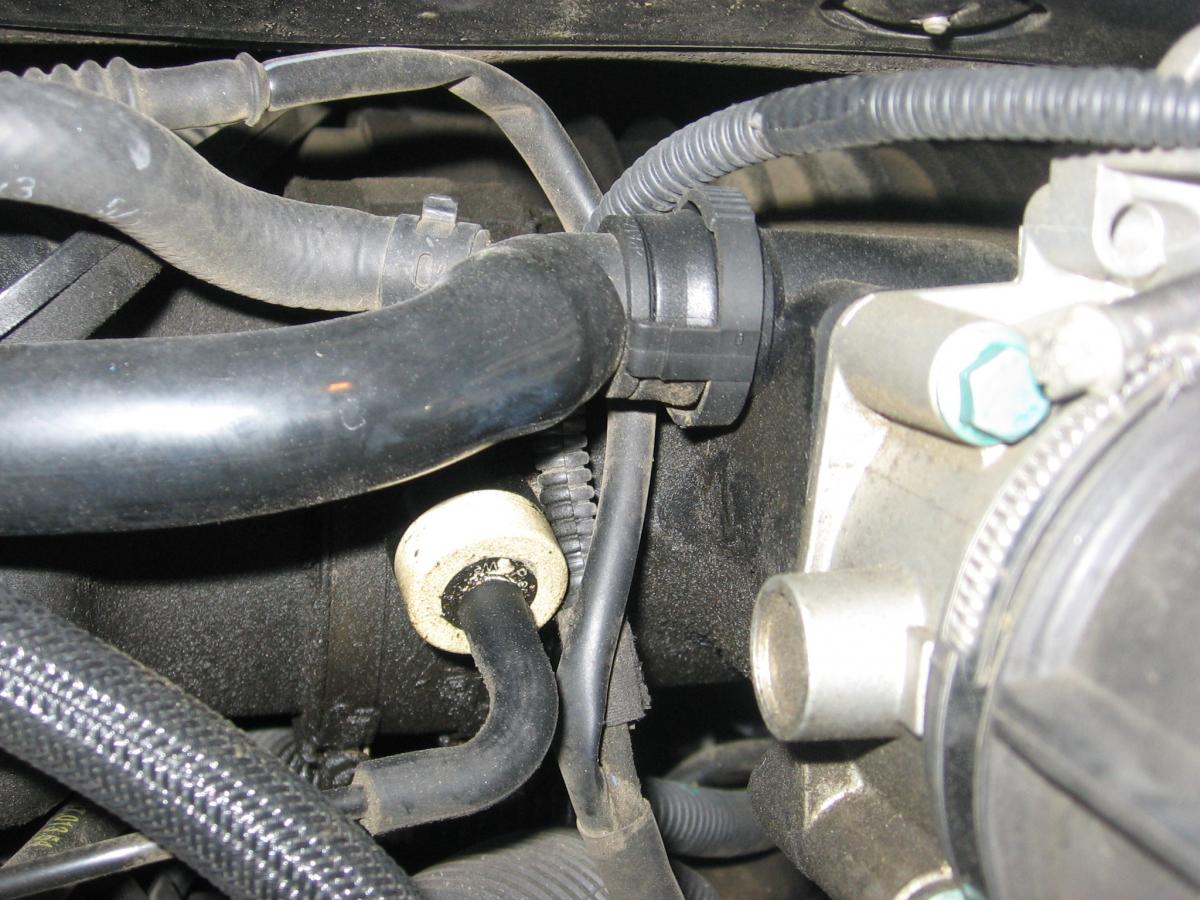
I've attached a picture of my 02-996-Cabby resonance intake tube "weeping" @ 64K miles. I have no fault code on my durametric reader and no smoke. I do consume a very minimal amount of oil, but I haven't yet kept track of the actual amount. Like others, I am suspecting the AOS is beginning to fail, and I am wondering if anyone knows an "actual value" on the durametric tool that might assist in this diagnosis, (perhaps something to do with airflow values?) I do understand the integrity tests for the AOS that have been posted herein, but in the absence of other symptoms, I'm not likely to do all that quite yet.
-
Astonishing! On close examination, though slightly more obscured, there is an equivalent symetrical "crack" on the driver's side lense. It is indeed a "seam" or "mold mark". I plan to proceed with the restoration kit, mindful of the need for a UV coating. Meanwhile, I'm grateful for your expertise and the helpfulness of this site. :notworthy:
-
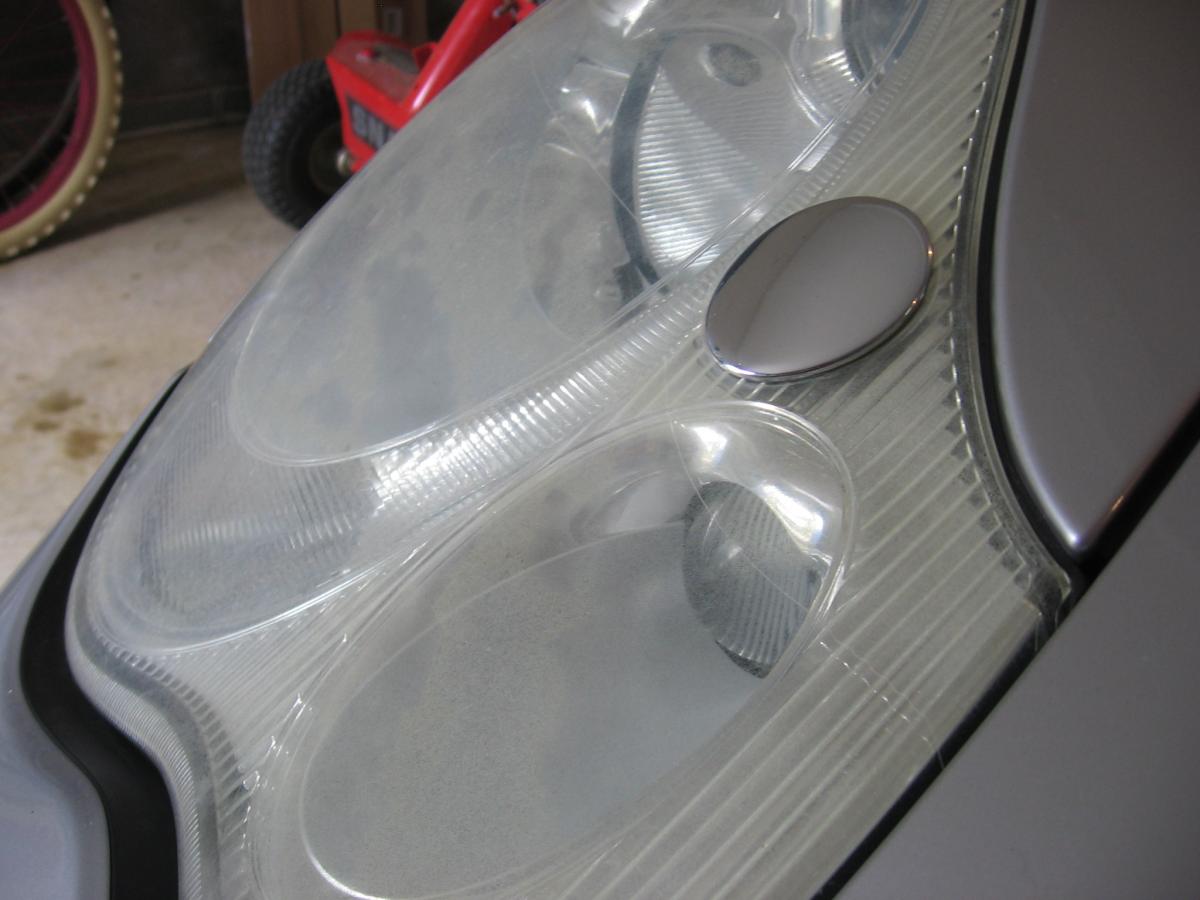
Here is the picture of the lense crack. It is somewhat difficult to see. There does not appear to be any moisture or fogging inside the headlamp. Thanks for any suggestions.
-
Sorry, I don't know how to attach my picture. I'll try to figure it out. Meanwhile I will say it is a "hairline" extending almost directly across the middle of the lense through the chrome washer pump cover emerging on the other side and going to the outer limits of the lense on both sides.
-
As I was preparing to remove my Xenon headlamps for a "Sylvania" restoration treatment, I noticed a "hairline" crack across my passenger side Xenon headlamp. This is probably very new, no older than a few days. What if anything can be done? Can this be professionally repaired? If I must replace the entire unit, what are my options?