Welcome to RennTech.org Community, Guest
There are many great features available to you once you register at RennTech.org
You are free to view posts here, but you must log in to reply to existing posts, or to start your own new topic. Like most online communities, there are costs involved to maintain a site like this - so we encourage our members to donate. All donations go to the costs operating and maintaining this site. We prefer that guests take part in our community and we offer a lot in return to those willing to join our corner of the Porsche world. This site is 99 percent member supported (less than 1 percent comes from advertising) - so please consider an annual donation to keep this site running.
Here are some of the features available - once you register at RennTech.org
- View Classified Ads
- DIY Tutorials
- Porsche TSB Listings (limited)
- VIN Decoder
- Special Offers
-
OBD II P-Codes - Paint Codes
- Registry
- Videos System
- View Reviews
- and get rid of this welcome message
It takes just a few minutes to register, and it's FREE
Contributing Members also get these additional benefits:
(you become a Contributing Member by donating money to the operation of this site)
- No ads - advertisements are removed
- Access the Contributors Only Forum
- Contributing Members Only Downloads
- Send attachments with PMs
- All image/file storage limits are substantially increased for all Contributing Members
- Option Codes Lookup
- VIN Option Lookups (limited)


SpawnyWhippet
-
Posts
243 -
Joined
-
Last visited
Content Type
Profiles
Events
Forums
External Paint Colors
Downloads
Tutorials
Links Directory
Collections
Store
Posts posted by SpawnyWhippet
-
-
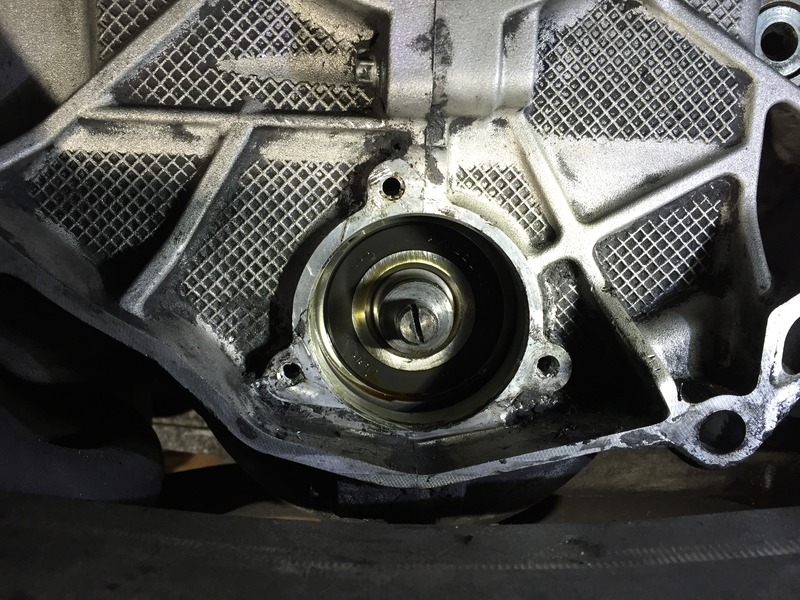
I removed the tensioners, flywheel, IMS flange and IMS bearing c -clip in order to replace the IMS bearing, then discovered it couldn't be done on my engine which was a factory re-man with later IMS bearing.
After putting it back together, refilling with oil and trying a test run, I got a rattle a few seconds after startup. I immediately shut down the motor to prevent possible damage. Is this anything to worry about, or will this awful noise go after the tensioners fill with oil? I was more concerned because the motor started to vibrate a lot more when the noise started.
-
No, I just removed the transmission as I was going to change the IMS bearing. However, thanks to input from Ahsai and JFP in PA we found that my engine is a later factory re-man unit and it cannot be changed.
If the top hose clamp had been installed 90 degrees around the hose, the whole job (excluding trans removal) would have taken less than 60 mins. All of those hose clamps are tricky, but the worst are those 'squeeze and pull' hose connectors on the end of the rigid plastic pipes. I can never get those things off, I always end up using picks to try and release the locking tabs.
-
I just replaced the AOS while I had my transmission out on my 2004 4S. Did everything from below, but the top hose clamp was an absolute bear to remove, due to the angle it had been attached (the position of hose clamp ears would not allow access to any tools to open it). I struggled with that one clamp for more than an hour, even with the cable operated hose clamp pliers. In the end, I had to use penetrating fluid and rotate the hose around the AOS connection with pliers so I could get tools to the clamp. Access was very poor.
For the refitting of the new AOS, I used masking tape to stick the rear bolt, socket and extension piece in position on the AOS prior to locating it in the engine as it is tough to get tools and bolts in that hole. I tightened the bolt up then removed the tape and pulled the tools out.
-
Thanks for the advice. By "removing the IMS bearing rear seal", are you referring to the black seal at the forward end of the IMS that I can see now that the IMS flange is removed, or is there another behind that? Should I apply any grease after removing the seal, or would that just get washed straight into the engine oil?
There was only maybe 1/2 fl oz or 20ml of oil behind the IMS flange when I removed it, as there was nowhere for it to be retained, it all drained out in the slot in the engine case that the c-clip falls into when you remove it from the retaining groove.
While you have the car apart, it would be advisable to remove the IMS bearing rear seal (using something like a dental pick) so that the oil mist in the engine can lubricate it. We have several customers running this way without any issues.
-
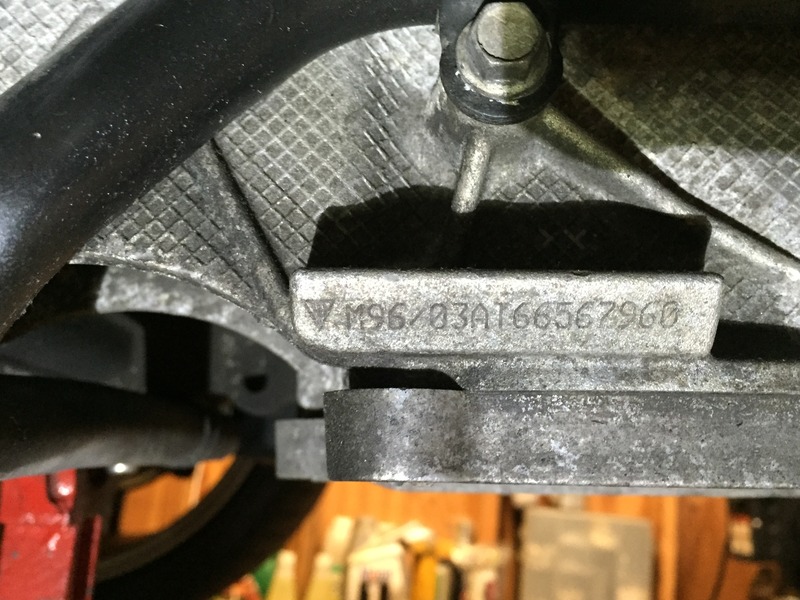
$1500 was for the bearing, LN tool kit and other tools I needed, seals, bolts etc. I have a new AOS to install with the transmission out, that's about the only saving grace here. The most annoying thing about this is that I checked my engine number was a M96 before I started, as I knew the M97 engines were not serviceable.
Calling Pelican now to see if they can take the IMS bearing back.
Clutch, RMS etc were replaced only 10k miles ago by the previous owner. I wondered why they hadn't done the IMS then, now I know...
Learned a new thing - if there is a AT in the engine number, don't try to change the... :censored: IMS bearing
-
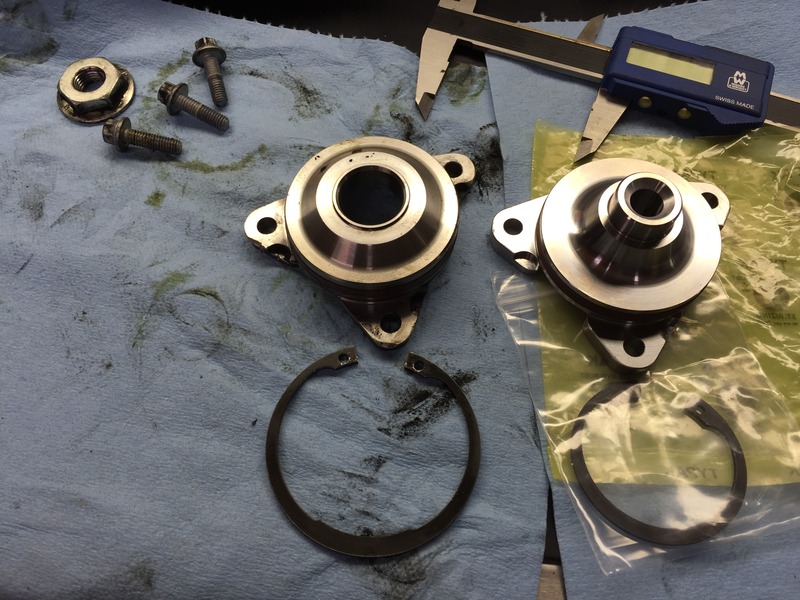
Its 22mm. Does this mean I just wasted more than a week+$1500 pulling all this apart and now have to put it back together again with the old part in place?
-
The engine number says a M96, there is no record of the engine being replaced. I can also wiggle the whole shaft around - it is not bearing play,
If this turns out to be a M97, I am going to cry. I spent about 20 hours and more than $1500 in parts and tools already getting to this point...

-
Fixed the images above - there had been spaces in the file name and that was breaking the links
-
I managed to get the crank locking pin in place, just, it was right up against the holes and a really tight squeeze.
Did that before pulling the tensioners out. I now removed the IMS flange and realized that the old c clip holding the bearing in place is about 15mm wider diameter than the replacement one in the LN kit, and the old bearing itself looks 15mm larger than the new one. Is this just a shell / seal and the actual bearing in a smaller diameter shaft behind it?
-
Came at it with a fresh head after a night of sleep and got the cam tool into place after just 15 mins.
I removed the coolant hoses that run in front of the cam plugs so I could see what I was doing, then jiggled the crank around the TDC point until the cam slots aligned and finally got the tool in place. Turns out that they align when the TDC crank mark is about 2 degrees past the mark on the engine case.
I could not tighten the allen head bolt that came with the LN kit, so I cut down and used a 13mm bolt and a cordless ratchet to bolt the tool to the engine case.
Onto the tensioners... let battle commence.
-
-
Too late to check now, but I did it a month ago when deciding to install the IMS bearing and they were very close (a lot less than 1 deg off). Assuming it is retarded, how straightforward is it to get them timed now, without pulling the engine?
-
well, I've been trying for over an hour to lock the cams by the water pump with no success. Cannot get the cam lock tool into both cams at the same time. The lower cam lock fits when the engine is at TDC mark, but the top one only goes in when it is a degree or 2 past TDC
-
The first thing you need to do is stop reading anything but the LN IMS retrofit procedure. A lot of other "shortcut" methods have been posted, but most tend only to lead people into dangerous places with expensive results. If you do not have the LN procedure, you can find it here : http://lnengineering.com/files/IMSR-Instruction-Warranty.pdf This is the only procedure I know of that works first time, every time. Do not vary from it, and you will not have any problems.
Thanks for the fast response JFP - the LN Engineering instructions are the first ones I read but they are too high level and do not say which cams I need to lock and where - see the extract from their instructions below.
I also do not understand the part about "Lock camshaft in head with tensioner accessed from underside of the engine".
I need a more detailed set of instructions (pref with pics) that show exactly which cams to lock and where, and preferably that also show pics of the IMS to crank tensioner and examples of what a worn one would look like. EPS did a very good set of instructions for the Eternal IMS fix, but it is not for the LN bearing.
Extract from LN instructions:
"6. Use appropriate long cam lock tool for 3-chain or short cam lock tool for 5-chain engine to lock cams prior to removing
chain tensioners. Lock camshaft in head with tensioner accessed from underside of the engine, closest to flywheel.
7. Remove the IMS to crankshaft chain tensioner as well as well the chain tensioner on the cylinder head for which you
have locked the cam. If tensioners are worn or were noisy at startup, replace. NOTE: If the flange does not come off easily, the
bearing is not centered, or you cannot reinstall the flange, then loosen and/or remove the third chain tensioner and verify or
correct camshaft timing."
-
I am doing the LN Engineering IMS retrofit installation now, but after reading half a dozen different tutorials and installation guides, I am still not clear on which of the cams I need to lock on my 2004 C4S. Most of the guides just say 'lock the cams at TDC for cylinder 1'. They don't say if I need to lock just the 2 cams for cyl 1-3 at the rear of the engine near the water pump, or the 2 for cyl 4-6 on the forward starboard side of the engine by the flywheel. or both. The LN tool kit only came with 1 cam lock tool, but I have another cam lock already.
I am also reading contradictory information about whether I need to remove just 2 tensioners or also the 3rd one on the top of the engine near the AC.
Can anyone confirm or clarify these points?
-
I decided not to lower my engine - I was able to change the AOS on my 2001 996 without doing so. I got to all the AOS bolts and lower connections from below, near the rear drivers wheel, then undid the top clips after I pulled the drivers side manifold out. I guess it was also about 5 hours of work for me too, a fair amount of which was bolting the manifold back on.
-
The reset being used by OPCs in England is :- press Preset1, Preset4 and TP simultaneously
This did nothing for my radio. I thought it needed to be recoded by MOST software to talk on the MOST bus?
-
I have the opposite problem. During the course of re-installing my factory CDR23 radio in my 2004 C4S, I noticed that the glove box light never goes out. I guess the micro-switch is stuck in the 'on' position.
I guess I will need to replace that harness, but can't find it cheaper than $47 from porschepartshub.com (the new online store of Sunset Imports)
On another note, can't see to locate the antenna cable that should plug into the radio. The aftermarket one used its own Sirius XM satellite antenna.
-
In answer to my own question, it takes about an hour, start to finish. My noisy SAI pump is now totally silent :-)
-
Thank you, ordered :-)
-
Thanks Loren,
I have spliced the correct connects onto the harnesses, connected up the CDR23 and Bose amp and run a Durametic scan again. For the first time since I owned this car, I can clear all the fault codes and Durametric doesn't crash when it tries to clear the AC faults - green lights across the board :thumbup: .I do have the following outstanding issues to address.
1. My CDR23 powers up but I get an error 'Protect'. Does the radio need to be coded to the car, and if so, can this be done with Durametric Pro, or only PIWIS/PST2?
2. I have located 2 ends of the amplifier end of the fiber cable, what should the second connector go to?
3. All the speaker wires on the old Bose amp connector have been cut and used to connect to the output of a replacement Alpine amp. I guess this means the Bose 2 ohm speakers have also been replaced with aftermarket? Is it better to retain the Alpine amp instead of replacing the speakers?
4. If I do retain the Alpine amp, will the CDR23 connect to the Alpine amp via the CDR23 speaker outputs, or have these been disabled so it drives only the fiber output? If disabled, is it possible to re-enable via Durametric or PIWIS?
5. If I go ahead and re-install Bose speakers, how many speakers are needed? Does the 04 C4S cabrio only have door speakers or others elsewhere? -
Perhaps I misunderstood your reply; I don't want to get a replacement VIN 'number', I want to replace the missing VIN plate with another showing the correct number.
All of the other VIN tags are still present and correct (decal under hood, in door jamb, dashboard, engine number etc) and I have title, service booklet and all the paperwork for the car. Would it be possible to find a company that can re-stamp this VIN number, or is that considered to be illegal in California?
-
Great, that is the part I need. Thanks!
-
IMS "death rattle" ?
in 996 Series (Carrera, Carrera 4, Carrera 4S, Targa)
Posted
I tried submerging them in oil and pumping them prior to fitting, but they were extremely stiff to pump and I doubt very much ended up inside. Most of the oil ended up on me as I fitted them.
Is that vibrating also normal with unfilled tensioners?