Welcome to RennTech.org Community, Guest
There are many great features available to you once you register at RennTech.org
You are free to view posts here, but you must log in to reply to existing posts, or to start your own new topic. Like most online communities, there are costs involved to maintain a site like this - so we encourage our members to subscribe or donate. All subscriptions and donations go to the costs operating and maintaining this site. We prefer that guests take part in our community and we offer a lot in return to those willing to join our corner of the Porsche world. This site is 99 percent member supported (less than 1 percent comes from advertising) - so please consider an annual subscription or donation to keep this site running.
Here are some of the features available - once you subscribe RennTech.org
- View Classified Ads
- DIY Tutorials
- Porsche TSB Listings (limited)
- VIN Decoder
- Special Offers
- Paint Codes
- Registry
- Videos System
- View Reviews
- and get rid of this welcome message
It takes just a few minutes to register, and it's quality Porsche information at a low cost.
Contributing Members also get these additional benefits:
(you become a Contributing Member by subscribing or donating money to the operation of this site)
- No ads - advertisements are removed
- Access the Contributors Only Forum
- Contributing Members Only Downloads
- Send attachments with PMs
- All image/file storage limits are substantially increased for all Contributing Members
- Option Codes Lookup
- VIN Option Lookups (limited)


siddharth
-
Posts
120 -
Joined
-
Last visited
-
Days Won
2
Content Type
Profiles
Events
Forums
Exterior Paint Colors
Downloads
Tutorials
Links Directory
Collections
Classifieds
Store
Everything posted by siddharth
-
Wow ! Good information there. Well - I don't get any crunching sound or anything when raising / lowering the windows. But if the glasses touch (saw window up, and I close the door) then there is a slight glass on glass sound. Looking at the pictures (nice detailed writeup BTW!!) I think I should 1st start out by adjusting the screws at the bottom edge of the door before opening up the side door. I've opened side doors before(although on my girlfriends Nissan Altima !), so it shouldn't be something extreme ...
-
I'd also benefit from the info x5rap is looking for ... I'm in the same situation.
-
Huh ? My friend has a 3.4L 996 with over 105kmiles on it. Its going fine so far. I have 55k Miles on mine. Maybe you're paranoid about the 3.4L engines ... Anyway, I'm thinking that mostly that CEL is due to the MAF or O2 sensors. I had a CEL sometime back and cleaned the Mass Air Flow sensor and its been fine and dandy since then. An $8 fix ! But yeah ... like Loren says, drive to AutoZone and borow their OBD2 reader. The OBD2 port is near the drivers left knee. I didn't know this autozone thingy and spent $110 by having my dealer read those codes to me. The most stupid way I've ever blown $100 ... I can buy an OBD2 reader for that cost.... Hope its nothing major, Sid
-
I'm no expert at this but I'd imagine that if you had a blown head gasket, you'd see some oil/black residue in your coolant tank. Also if you had a blown head gasket, your cylinder compression tests would reveal that. I could be wrong, but it'd be easier to do a compression test and rest your fears than keep hunting for something. Anyways I think during the PPI they do a compression test, so you should be covered (you DID the PPI, right ?) Also, check the DIY section on how to replace a coolant tank. I added stuff I learnt from my adventure - hope that helps you ! Sid
-
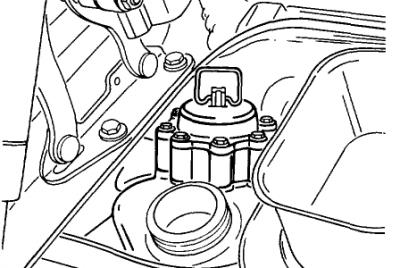
I would add the following to help others attempting this ... please read the above and the below completely BEFORE starting your work. You'll thank yourself ! Getting the tank out I'd remove the air pump instead of tying it to the side as above. Its very simply and takes 30-40 seconds. It gives you room you REALLY need. Plus you won't break the air hose by bending it too much. NOTE: There are two screws that hold the air pump in place - at the bottom. In my case I found out that the nut thse screws go into had fallen off during removal. The nuts are 'suspended' in a rubber tube and age/temperature had made the rubber brittle and the nut had just fallen when I took the screw out. I simply got new speed nuts (2x : part number: 999.500.078.00 : $2) and used them to fit the air pump back again. Its worth taking the air pump off even if you now need to buy $2 more of nuts when ordering your tank - it gives you a lot of room you need ! To remove the coolant reservoir easily out of its harness, slide it towards the engine (i.e. move right) by around 1/2 to 1 inch. Then move it DOWN and out of its rail/holder. There is no need to slide it COMPLETELY (3-4") towards the engine completely as it first appears. The railings have tabs and gaps to facilitate such removal/installation. You probably won't even have that much room to slide it out completely ! When draining the coolant from below the car, you'll need a bucket to keep most of the coolant and may need to empty the tray below into the bucket. Use 2 trays so you can empty one when the other is below the car. The coolant drains fast, so you can't use just one without making a mess. Also, there is a lot of coolant, almost a bucketfull. Coolant is a corrosive liquid - keep it off the paint. If you drop some on the paint, don't panic, just wipe it off with water and a cloth. Use gloves if possible. The drain plug for the coolant is close to the rear bumper, don't search too deep inside near the transmission etc ! There is a coolant level sensor at the bottom of the coolant tank. Its deep and tough to see and you may break it manupulating the tank of get it out of the engine compartment. I'd recommend you reach down and remove it as follows. - when reachable, turn the sensor by 1/4 turn from towards you to towards the engine. - pull the sensor out from the bottom (it needs 2" to fall out, its 2.5" tall). - keep it somewhere ! If you do break it (likely), its around 10-18 bucks, so don't panic ! Lastly, be patient in getting the tank out. Its not difficult but simply time consuming. Be careful not to bend/break other hoses while you try getting the coolant tank out. Putting the new tank back in place When installing the new tank, I found it easy to first install the sensor at the bottom and then twist-lock it (1/4 turn). The electrical connection should point towards the right taillight. First try to get the entire tank in the volume reserved for it in the engine compartment. Don't try to directly fit it in. Make sure you don't leave any tubes/connectors behind the tank during installation. The last think after installation is to realise you need to get it out to rescue a forgotten tube. Now you want to get the tank back in its harness. The harness' as well as the tank's railings have gaps to ease removal/installation. What worked good for me was rotate the tank anti-clockwise by 10-20 degrees when inside the cavity/volume of engine compartment position the right most tab of the tank sticking out of the harness while keeping the other two tabs (on the tank's top) positioned to fall in the gaps between the harness' tabs. Try feeling the gaps with your finger to know where the tank's tabs should land. Slide a 1.5" diameter metal tube at the bottom (running front -> back) slightly to the left (or right?) so that the level sensor wouldn't be obstructed upon rotation. It should gently slide out of its holder. Now level the tank (i.e. rotate it clockwise by 10-20 degrees). The tank's tabs should have fallen where the harness' gaps are and the tank will be one tab sticking out (out = towards the engine) Finally move the tank gently away from the engine, in its final installed position [*] Slide the metal pipe back into its clamp [*] Connect everything else just the reverse as removal. After everything is installed Once you have the new tank in place, you will need to refill it with coolant and 'bleed' the coolant system. Fill the coolant tank with existing/new (porsche recommended) coolant to the max level and close the coolant tank lid. I simply filtered my existing coolant with a old (but clean) cotton t-shirt and poured it in using a funnel. Then, to quote Loren, "Lift the bleed valve." "Start the engine and allow it to get to full operating temperature (I also ran the air conditioning to force circulation). The coolant warning light will likely start to flash. Shut the engine off and WAIT until the engine and coolant has cooled enough to remove the coolant tank cap. Then add coolant to the tank and repeat the process. You made need to do this 2-3 times. When the coolant level fails to fall then the system is bled and you can close the bleeder valve." About bleeding the coolant system. Close the bleeder value after about 40 minutes (total) of good driving. You shouldn't ride with it open for more than this (my Porsche tech told me this). You MUST wait for the coolant to cool between your 2-3 tries, else you won't be filling the tank completely (coolant contracts as it cools). I've had to wait for over 3 hours to cool. If you try before this then the coolant will spill off when you open the cap. You may get a coolant light even with the bleeder valve closed after a few days. This is ok and doesn't mean you cracked your tank or something again. Basically there was some air trapped and the car "burped" it into the coolant reservoir, triggering off the coolant light. Wait for 4 hours for the car to cool and then top off with coolant+water (replacing a lot) or just water (replacing just a little). If even after 3-4 top offs/"burps" you need to keep adding coolant, have it checked for other leaks in the coolant system. In the end, once you've done it, please pat yourself on the back !! Great job :thumbup: !! Even my service tech. at the local dealership said its not a simple job. Its worth doing it on your own if you suspect you're losing coolant. :cheers: Sid

-
Coolant level issue
siddharth replied to siddharth's topic in 996 Series (Carrera, Carrera 4, Carrera 4S, Targa)
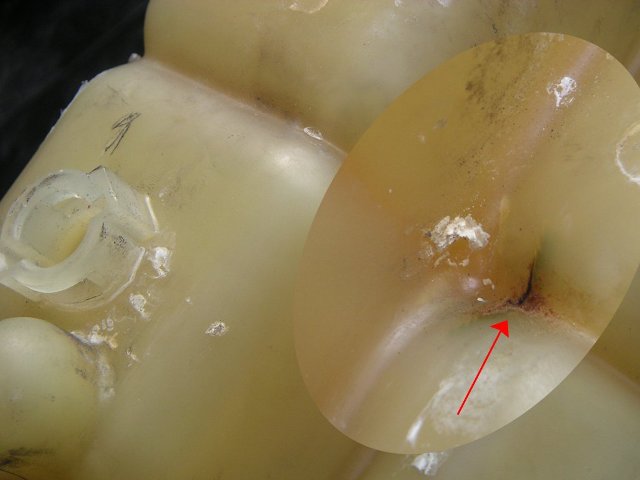
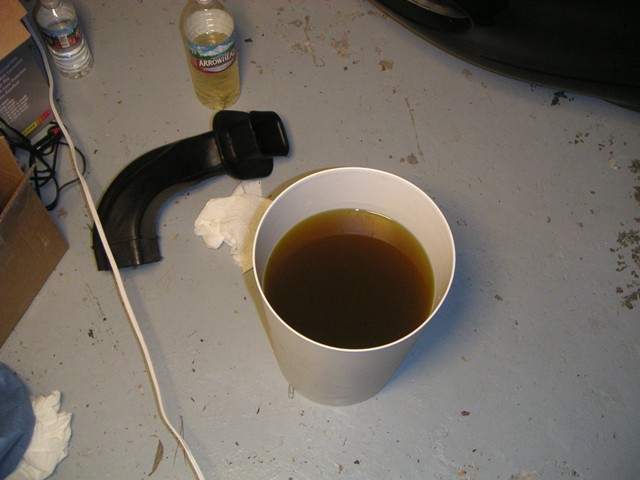
Thanks toolpants !! The picture helped me a lot to find the crack on my coolant tank. Here it is: I took it to the dealership and they too confirmed it to be cracked and recommended that I put in a the newer tank, newer cap, a new sensor and new coolant. My coolant tank should arrive from sunset late next week, so till then the car is lonely in the garage ! BTW, sunset will save me almost $100 against my local dealership (which is one of the inexpensive ones in southern california!). One final question before wrapping up ... should I put in newer coolant or reuse the existing drained coolant ? I've attached a photo of my drained coolant. One technician told me to reuse another told me to put in new. He did mention that the new will mix with the existing trapped in the system (since I didn't do a pressure flush) but said its still better than just reusing the existing one. What do you guys think ?? BTW, the coolant in the photo appears very dark but the coolant is green when in a shallow cup and there isin't any oil or even suspended stuff. I guess when seeing over 1 foot in depth of coolant it appears dark. But this is normal I suppose ?? cheers! Sid
-
Hi guys, I had to add almost 1Liter of water the other day to get rid of the check coolant level flashing light on the dash. This is after the dealer put some 3 weeks back to top off (it was flashing back then too). Anyway after yesterday's addition of 1 liter of water, I thought the coolant tank might be cracked as most others reported. So I ventured out to inspect mine. Well, after a lot of backbreaking effort I managed to get the coolant tank out. And I think in the process I broke the coolant level sensor. Either that or it was broken from before (the plastic base is broken) Now, the thing I found was that I couldn't really identify any crack on the coolant tank !!! Q1) Is there a problematic area I should look closer at ? Q2) Also, given this tank is prone to cracking (from what I read), how are the cracks ? Hairline or wide ? The car body around the coolant tank didn't look corroded/spoilt - just dusty and dirty. The current parts I have are Coolant Sensor : 99664150300 (I need a new one). Coolant Cap : 99610644700 Coolant Tank : 99610614756 Q3) Should I really replace any part with a newer part now that I've opened things up ? Q4) If you think the coolant tank/cap is ok, what else should I look at ? Q5) Is it normal to lose coolant like this ? Am I looking for a problem that doesn't exist ?? Thanks guys !! :cheers: Sid
-
Hmm ... I guess I'll leave the lamps as they are. I thought it might be a small job and for less than $200-150. I'll change them when there is a stronger reason ! thanks guys Sid
-
Thanks for that. My local dealership said that it can be done without changing the whole lamp. They said I'd need to disassemble the lamp and replace with the following parts. Parts required (unverified) : 996-631-04500 (left) 996-631-04600 (right) Cost ~$30 (USD) each. Sunset told me that I'd need to order the entire headlamp assembly on each side. I'll write more when I get more details ... Siddharth
-
How did you get rid of the yellow turn indicators inside the headlamp housing case ? I'm putting clear side marker lights on my 1999 996, to get rid of the yellow plastic on the sides this weekend but was kinda not sure if the headlamp's yellow plastic/glass can be done with for clear stuff. Looking at your car's front end, it appears that can be done. So ... how did you do it and what parts were required ? To know what yellow plastic lights I'm talking about check this ... very similar to my car Thanks Sid
-
Aerokit for 99 996
siddharth replied to mcvgums's topic in 996 Series (Carrera, Carrera 4, Carrera 4S, Targa)
What about installation ? Is it doable on your own or best left to the dealership ? Any guides ? I like Loren's aerokit. Is there a name for that kind of a kit ? -
Ah. Thanks ! Sid
-
I went thru that other thread and had a few questions ... not sure which thread I should pick, this or that ... oh well ... 1. Does this tool also read/clear the P-codes ? I'm thinking of buying a OBD2 reader and if this does it I might as well buy this tool instead. 2. Does it plug into the OBD2 port or some other port on the car ? 3. Does this tool display performance metrics (0-60, rpm etc) similar to the DigiMoto tool ? 4. Does this tool capture logs as you drive with the wires connected to the (secured) laptop :cheers: Sid
-
So you're saying my best bet is to turn the car in and have them fix it for ~$480 ? Its a legitimate suggestion, I just wanted to be sure that's what you mean ! Also, do you know the page numbers of that in the service manual ? - Sid
-
Anybody knows what might be the issue ? So many views but no replies :(
-
Hi guys, I'm having a new problem with my '99 996 C2. When I try opening the passenger door with the window fully closed/raised, the door doesn't open because the top right corner of the window glass jams, being a little behind the rear fixed window glass. I need to lower the passenger window by 1-2 inches and then it opens properly. The dealership said that the window regulator is at fault and would charge me ~$480 to fix it. I'm hoping its something I can do on my own with your help ! The problem is much more noticable when opening the door from the inside than outside. And in either case, the window DOES drop by ~1 centimeter (1/2 inch) when I pull on the handle. Details: I've made a quick diagram since its slightly weird to explain. The diagram is attached to this message. Basically, the vertical edges between those two pieces of glass SHOULD be parallel, but whats happening is that as I raise the passenger window, the glass tilts backwards and ends up finding itself about 1-2mm BEHIND the fixed smaller rear window. The usual distance is around 4 mm between the glass' vertical edges with the rubber seal behind/between them. This gap is properly maintained at the lower end of the windows and looks same as the driver's side (which is perfect). Do you guys know what the problem is and maybe recommend a fix towards it ? Is it really the window regulators ? Must I replace them or are they adjustable ? Thanks in advance ! Sid
-
C4 99 sticky handbrake
siddharth replied to bigmds's topic in 996 Series (Carrera, Carrera 4, Carrera 4S, Targa)
I might want to chip in. I had parked on an incline with the car facing uphill and with the hand brake up (but not pulled really hard) and the car in the 3rd gear. My girlfriend was in the car when I ran inside to get my cellphone. The car actually slipped backwards by almost 4-5 feet !! My girlfriend sorta panicked and got out of the car to call for me (instead of hitting the brakes - different story) and I was lucky that there wasn't a tree/car behind me. I got in and hit the brakes JUST in time. Lesson learnt. 1. The car can still creep backwards even if in 3rd (or higher) gear. I've started using only the first/reverse gear. 2. The hand brake NEEDS to be yanked pretty hard to be 100% effective. 3. On steep slopes (like outside my house) you need a combination of 1st/reverse gear + handbrake + tyres towards the curb. 4. After I park on an incline, I always pause for a couple of seconds looking if the car is slipping away ! hope that helps, Sid -
Mass Air Flow Sensor
siddharth replied to DoubleNutz's topic in 996 Series (Carrera, Carrera 4, Carrera 4S, Targa)
Which chip did you need to switch ? Also what OBD2 codes did you get at that time ? I got P1128 and P1130 (rich air/fuel mixture, both cylinder banks). I'm hoping that the MAF cleanup works. :cheers: Sid The chip in question was for an '87 Targa. I had an aftermarket MAF on it and the shop said the hesitation was due to the "junk" aftermarket MAF hot film sensor. They put on the OE airbox...except...that didn't fix the problem...and billed me $600. Eventually I was able to diagnose this, with help of Autothority, as a faulty chip. Got a new chip and bingo...no problem. Then...asked the shop back for their money and returned their OE airbox. It was a nightmare...but I did resolve it! Now...regarding the code...I did get the P1128. I cleaned the MAF and used Techron and that resolved the issue...for now. The sad part of this story is that tomorrow will be my last day with that C4. I'll be driving an Audi S4 instead...kids are too big for the backseats... :( I cleaned the MAF yesterday. I bought the T20 head with a hole in the middle "tamper resistant toric heads" and an electrical contact cleaner, solvent based and no-residue type. You can find these things at autozone or any other shop. Be careful in picking up the right contact cleaner - I almost picked up a electrical grease cleaner right next to the electroNIC contact cleaner (which is what I want). I can't recall the name but its red and white and has a car electrical socket picture on the can. So anyway, I disconnected the battery, removed the MAF and sprayed the cleaner on the back side where I saw a 'resistor like' sensor. Thinking of it, I didn't really clean the film in the gap, on the other side where the resistor thing was. So maybe I didn't do a complete job of it. I guess I'll just spray the cleaner all over the whole thing today too. Didn't have the CEL come up, but its just been a day. I was thinking of also checking the air filter and the air box as such. I unscrewed all the screws around the air box but the air box cover didn't want to get off. It seemed like I was missing something. Any instructions on how to open the air box and examine the air filter ? Sid -
Mass Air Flow Sensor
siddharth replied to DoubleNutz's topic in 996 Series (Carrera, Carrera 4, Carrera 4S, Targa)
Which chip did you need to switch ? Also what OBD2 codes did you get at that time ? I got P1128 and P1130 (rich air/fuel mixture, both cylinder banks). I'm hoping that the MAF cleanup works. :cheers: Sid -
OBDII Code P1128 ND???
siddharth replied to LVDell's topic in 996 Series (Carrera, Carrera 4, Carrera 4S, Targa)
I hate saying "me too" ... but honestly, me too ! I'm in the same boat with P1128 and P1130. $111 at the dealer to tell me those two codes.... aagh :( !!! Sid -
Mass Air Flow Sensor
siddharth replied to DoubleNutz's topic in 996 Series (Carrera, Carrera 4, Carrera 4S, Targa)
Yes, that will work but you won't know what the problem is and it won't correct the problem. Autozone will read your code for free. Upper right corner of the page click on "Reviews" Oh man ... I paid the local porsche dealership $110 to tell me what the code means ("diagnosis charge") ... I literally paid for my ignorance :eek: So Loren, do I have to tell Autozone anything for that free readout ? Just for future references, till I get the OBD 2 reader. BTW, I still don't know the actual error code, but the service guy told me "you need a new mass air flow sensor" (among other things). I'll ask him for the exact error codes tomorrow to make a more informed decision... About the OBD 2 reader, it looks like the carcode is highly recommended. I guess I'll go for that one then. I'm just surprised how primitive their website is ... at least compared to how great their software has been rated .... Thanks guys, I'll hopefully know the error codes tomorrow (for $110 ... where is the crying 'smiley' !?!) Sid -
Mass Air Flow Sensor
siddharth replied to DoubleNutz's topic in 996 Series (Carrera, Carrera 4, Carrera 4S, Targa)
Wow, I fiddled with that thing and could feel it underneath...why on earth would someone design the clip so the button isn't visible? :cursing: I had cleared the CEL and all has been well the last few weeks. Tonight, pulling into the garage, it came on again. Wasn't my day today. Thanks for the info. How do you clear the CEL light ? I don't have a ODB2 reader (yet) and was wondering if disconnecting the battery would work ? Also, any recommendations on a good ODB2 reader ? :cheers: Sid -
Oh great ! Then I have some questions for you :) ... 1) How did you manage to secure the double din player in that spot ? 2) After installing the double din tightly/securely, how did you manage to cover up the gap between the player edges and the rest of the console trim ? As far as I know none of the porsche trims can be used/reused towards this job. :cheers: Sid
-
Actually I couldn't find a picture of the final installation searching for eclipse and nav. In fact I noticed that most were asking the same question and nobody's really documented a double DIN installation like the other DIY mods. Seems like a lot of people were confused. I don't blame them (=me included!) ... there is no "porsche approved way" and trying to figure out custom wiring, custom mounting as well as a custom trim finish from scratch isin't intuitive. Maybe for the high end audio shops ... but not to me :( ! If you do know the search pattern/link, could you post it here ? It'd be nice. Anyway ... I'm thinking of going this route sometime this summer. If I do and its successful, I'll try do document this into a DIY.
-
Any pictures ?