Welcome to RennTech.org Community, Guest
There are many great features available to you once you register at RennTech.org
You are free to view posts here, but you must log in to reply to existing posts, or to start your own new topic. Like most online communities, there are costs involved to maintain a site like this - so we encourage our members to donate. All donations go to the costs operating and maintaining this site. We prefer that guests take part in our community and we offer a lot in return to those willing to join our corner of the Porsche world. This site is 99 percent member supported (less than 1 percent comes from advertising) - so please consider an annual donation to keep this site running.
Here are some of the features available - once you register at RennTech.org
- View Classified Ads
- DIY Tutorials
- Porsche TSB Listings (limited)
- VIN Decoder
- Special Offers
-
OBD II P-Codes - Paint Codes
- Registry
- Videos System
- View Reviews
- and get rid of this welcome message
It takes just a few minutes to register, and it's FREE
Contributing Members also get these additional benefits:
(you become a Contributing Member by donating money to the operation of this site)
- No ads - advertisements are removed
- Access the Contributors Only Forum
- Contributing Members Only Downloads
- Send attachments with PMs
- All image/file storage limits are substantially increased for all Contributing Members
- Option Codes Lookup
- VIN Option Lookups (limited)


EMC2
-
Posts
33 -
Joined
-
Last visited
-
Days Won
1
Content Type
Profiles
Events
Forums
External Paint Colors
Downloads
Tutorials
Links Directory
Collections
Store
Posts posted by EMC2
-
-
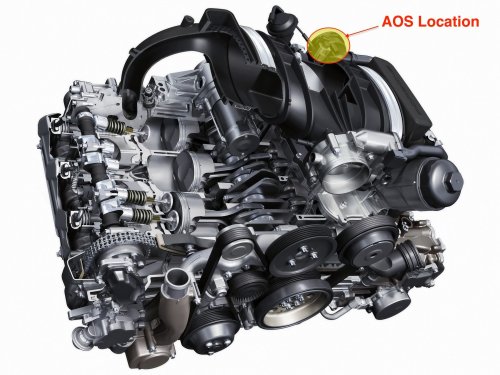
997.2 3.6l AOS (Air Oil / Oil Mist Separator) DIY
I replaced my AOS back in late September this year, and just haven't had a chance until now to compile the DIY. The car was running great and consuming an average amount of oil according to Porsche guidelines, so this was purely a preventative step. Although the car ran great before, it did actually feel a bit better/smoother after the AOS install (particularly at idle and in the lower rev range) At the time the car had about 72k miles on the clock. Please excuse all the pollen & dust
-
Author
-
Category
-
Submitted01/02/2017 05:13 PM
-
Updated02/26/2017 04:15 PM
-
-
991 Style Projector LED Headlights for 997 - Product Tear Down and Review - Pic Heavy
After much deliberation I decided to try out the aftermarket 991 LED style headlights for the 997. These lights are available from many sources online around the world. It seems they are all made by the same manufacturer although I cannot verify this 100%. It appears the primary distributor for these in the US is Spyder Auto, who have unfortunately been rather uncooperative in dealing with the issues described below which were conveyed to them about a month back. I’m not a fan of using afte
-
Author
-
Category
-
Submitted09/30/2016 02:11 PM
-
Updated09/30/2016 05:31 PM
-
-
Greetings
Has anyone had an opportunity to measure the vacuum level at the oil filler neck on a 997.2 3.6l, or have access to what the ideal value should be according to Porsche?
I've seen lots on info on the 997.1 engines but there does not seem to be anything on the 997.2.
Using a properly calibrated manometer, I got 13.9 in. H2O before an AOS replacement and now have 17 in. H2O after installing a new AOS. Car was running great before and actually feels even better now.
As an interesting comparison I get 36 in. H2O on my Panamera GTS.
Thanks in advance for any responses
-
-
Cayenne S 957 V8 Crankshaft Position Sensor Replacement DIY
About 3 weeks back I started getting a CEL with a Code 0335 Crankshaft Position Sensor "A" Circuit. Upper Limit Exceeded. After clearing the code it kept coming back within a day or two and the car stalled on two occasions. Based on research on the forums, this seemed very much in line with sensor failures on 955's and a DIY existed for these model years, but not the 957. My 957 now has around 120k miles, and the engine runs incredibly well, aside from this one recent anomaly. I order
-
Author
-
Category
-
Submitted07/15/2016 07:28 PM
-
-
Here's a snip of what Durametric shows:
Very interesting - thanks for the follow up Doug.
That's precisely what my Durametric scan shows as well.
-
Hi Doug
Thanks for the reply. Did your phantom fault have a code or only the red exclamation symbol?
-
Loren - a 1 month update:
Car has been running perfectly.
I checked with Durametric again yesterday and there are no fault codes active.
the only thing that remains is what I said in post 12:
"red exclamation symbol under Vehicle Electrical System (part no. 7L.593.704.9A) , but no fault codes are present."
I'll run another scan in a couple of weeks and update the thread again.
-
The only thing I'd like to add is in regards to the engine stall, have you cleaned the throttle body and reset the throttle body adaption after a cleaning?
Thanks - this is a good point also - I had cleaned the throttle body and MAF about a year back, just for maintenance purposes. All was good there.
I think this issue was definitely an electrical "glitch"
-
A quick update.
There appears to be no parasitic drain occurring on the battery.
All electrical Fault codes are now cleared after a week of driving, however:
When I run a Durametric scan I get the red exclamation symbol under Vehicle Electrical System (part no. 7L.593.704.9A) , but no fault codes are present.
I'm going to give it another week and see if that clears by itself also.
Apart from that one strange event a week ago, the car has been operating flawlessly. A mystery indeed...
-
Quick update.
I could not detect any shorts from the battery terminals to Ground.
I also took the battery to get tested and it checked out fine.
The only remaining code on the car is 1117 and the description still says Fault NOT currently active.
I called Durametric and they explained that often these kinds of codes cannot be "force" cleared and that the vehicle needs to go through a specific drive cycle before the system clears itself of any codes.
I was familiar with this type of scenario for Emissions testing from other Porsche's when the car can have a "NOT READY" status and has to be driven up to 100 miles before being ready and compliant for an emissions test.
Whilst I hope this was just a one off event and the fault will clear itself, my next steps tomorrow will be:
1) check for any abnormal AC Voltage at the battery terminals (to determine if there is a diode issue in the alternator)
2) perform a parasitic current drain test as a precautionary measure
-
I guess you could disconnect the wire from the alternator (battery disconnected) and then check the resistance of the the B+ wire to chassis ground.
If the resistance is low you have a bad short somewhere.
Any third party add-ons or other electrical changes that might have caused this?
Thanks Loren. No 3rd party add ons.
I checked all the fuses and no problems there.
I haven't had a chance to get to the battery yet but I ran another durametric scan.
Very interestingly the 1117 code is still there but it now states that the fault is NOT currently active, whereas yesterday it was showing as active. The 1494 code remains there and is unchanged in the description also (i.e. still NOT active).
Both fault codes (1117 and 1494) still will not clear.
I also ran an output test with the durametric to independently test all circuits on the vehicle electrical system and every step (including all lights) passed without a glitch.
I am now also wondering if there is an issue with Durametric not being able to clear these codes despite the fact that the faults are not active?
As soon as the car is back I'll be checking for any short via the battery terminals.
More to follow...
-
B+ is the Black wire coming off the alternator.
This is the main power for the start and the other electrical circuits.
So check your alternator and starter connections as well as your chassis grounds.
Thanks Loren. One more quick (and potentially optimistic :) ) question if you don't mind:
Is it possible to test the B+ without removing the alternator (i.e. tapping in further up the wiring)?
-
Thanks Loren: my comments and questions below in Bold Red (note I changed the sequence of points):
Possible causes:
- 'Short circuit to B+' Continuous lighting of side light bulb(s) can only be diagnosed when side light is switched off .Short not active as parking light turns on and off correctly as expected - tested using both sides independant parking light function also- 'Short circuit to ground' Failure of side light bulb(s) can only be diagnosed when side light is switched on, fuse may be faulty.Short not active as parking light turns on and off correctly as expected - tested using both sides independant parking light function also (will check fuse now)- 'Open circuit/short circuit to B+' No lighting of bulb(s) in the event of a'disconnection', can only be diagnosed when side light is switched onIf I understand this correctly, it would show as a bulb not lighting when intentionally switched on?- 'Open circuit/short circuit to B+' Continuous lighting of bulb(s) in the event of a'short circuit to B+', can only be diagnosed when side light is switched on.Which points should I be checking between for this condition (B+ & ?)thanks -
How old is your battery? If it is 4 plus years old I would replace it.
Cayenne's do some pretty strange stuff when the battery is weak.
Thanks Loren - I should have stated that the battery was already replaced 18 months ago.
I also disconnected and reconnected the battery, but am still unable to clear the 2 codes.
Edit - with ignition, lights aircon & radio on (but engine off) I get just over 12V reading on the dash
-
Would a momentary short in the light wiring cause such an error? (just speculating)
-
Vehicle = Cayenne S 2009. TipTronic (957)
My Wife was driving the car today, and whilst she was parking (shifted from Drive into Reverse) the engine stalled. This has never happened before.
She says a headlight warning came up at the same time.
She was able to start the car again immediately without any problem.
The car drove afterwards without any problem.
When she got home I plugged in the Durametric and got the following Faults:
"1117: Load Signal Generator Terminal DF - Implausible Signal, test conditions are not completed, fault is currently active and is not causing a DTC light"
"1494: Parking Light Left - Open Circuit, test conditions are not completed, fault is not currently active and is not causing a DTC light"
I tried to clear the faults, but they would not clear.
I also checked all front and rear lights on the vehicle and all function correctly.
I measured the actual values of the voltages of the car and got the following using Durametric:
"Voltage of vehicle electrical system":
hovering between 13.2V and 13.25V at idle, and
went up to 13.3V at a steady 2k RPM
"Generator Setpoint Voltage"
14.3V at idle and
14.3V at a steady 2k RPM, and
10.6V with engine off and ignition on.
I drove the car for about 15 miles at varying speeds and there is absolutely nothing wrong with the idle or the way it runs. As strong and smooth as ever.
However I am very concerned that this 1117 fault is currently still active.
I spent a lot of time searching and the following is one thread that I found interesting:
http://wiki.ross-tech.com/wiki/index.php/01117
What I don't understand is the connection between the parking light code and the Load Signal Generator code, and how either could have caused an engine stall.
Any tips or advice would be most appreciated.
Thanks in advance.
-
Looks great. what a stable!
Thank you.
A couple of recent additions:

-
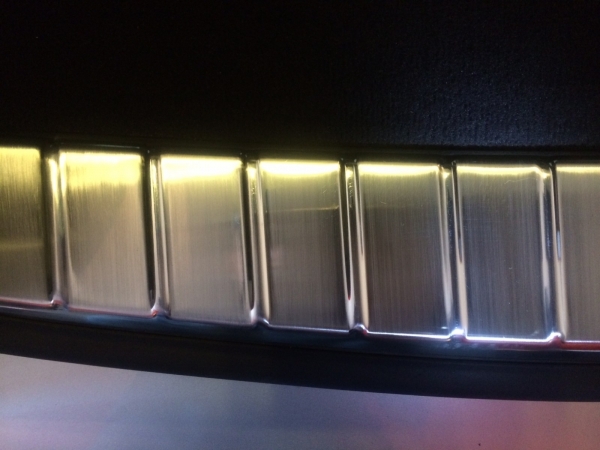
Making scratched door sills look brand new on your Cayenne
The stainless steel door sills on the Cayenne were in pretty bad shape, so I started looking for options to bring them back into respectable condition. This is what they all looked like before I started: So after some research and a little trial and error as well this is what I did: Step 1: Wet sand with 150 grit sandpaper: This is enough to take out even pretty deep scratches, although some may require a little more pressure in the affected area to get rid of) Step 2: Wet sand with 22
-
Author
-
Category
-
Submitted11/03/2013 08:43 PM
-
Updated11/05/2013 09:01 AM
-
-
The stainless steel door sills on the Cayenne were in pretty bad shape, so I started looking for options to bring them back into respectable condition.This is what they all looked like before I started:So after some research and a little trial and error as well this is what I did:Step 1: Wet sand with 150 grit sandpaper:This is enough to take out even pretty deep scratches, although some may require a little more pressure in the affected area to get rid of)Step 2: Wet sand with 220 grit sandpaperFor both of the above steps I used Diablo Palm sander sheets that I had lying around.I wrapped the sandpaper around a sponge sanding block to ensure even distribution of pressure.If you are very careful and linear with your motion you can achieve a nice “brushed” finish as can be seen in the picture.I actually did this with the trunk trim (pictures later in the post), but for the door sills I wanted a high gloss finish.For Steps 3 and 4 I used the Eastwood Automotive Polishing Kit Eastwood Buffing Kit - Paint Buffing Kits - Buffing and Polishing KitI also used a Craftsman Pro variable speed drill (running at 2500 RPM)Step 3: Polish with Tripoli (brown) compound and the large round (cylindrical) buffI do 4 very slow passes with a good amount of downward pressure, followed by 6 more passes reducing the pressure each time, thus allowing the buff to spin increasingly faster with each pass.This step polishes out most of the 220 Grit sanding marks, but still leaves a slightly hazy appearance.Step 4: Polish with White Rouge and the spiral sewn wheel.I do 2 passes with medium pressure, followed by another 4 passes with reduced pressure allowing the wheel to spin faster each time. This results in a high gloss, mirror finish.:dblthumb2:For the trunk I wet sanded with 150 to get the deep scratches out, then I polished with brown compound, to smooth it out a little and then went back with 220grit to get the brushed effect.I didn’t have time to finish it off completely today, but here are some pics in the interim. I should have taken some before pics, but basically this area was even worse than the door sills before I started.
-
Thanks, the double door is 16ft wide x 7ft high and the single is 9ft wide x 7ft hight im guessing?
Love your garage man, i am in the process of building one pretty much the same size. Would you mind sharing the dimensions and door sizes? Thanks!
Thanks Brit6
Dimensions (floor, edge to edge excluding baseboard/skirtng)= 20.5 ft deep x 28.75 wide
Sounds about right. I'll check this weekend and let you know.
I am not worthy to look upon the cathedral you have erected!
:thankyou:
-
Thanks Gagama :)Fantastic! Is it your design idea? Amazing!
I did a lot of research, but ultimately the design was one I came up with. Nothing fancy. Just clean and simple.
-
Very Nice! Thanks for sharing.
WELCOME!!
:welcome:
Thank you K. :)
-
Love your garage man, i am in the process of building one pretty much the same size. Would you mind sharing the dimensions and door sizes? Thanks!
Thanks Brit6
Dimensions (floor, edge to edge excluding baseboard/skirtng)= 20.5 ft deep x 28.75 wide
wow thats such a nice garage.
Thank you!


Engine squeal and vibration - crankcase ventilation / air-oil separator?
in 997-2 Series (Carrera, Carrera 4, Carrera 2S, Carrera 4S, Carrera GTS, 911 Speedster)
Posted
Just to clarify - I know the post is old but I just came across it;
5 inches of water column was for some of the earlier generations.
The 997.2 will have more in the range of 12 to 18inches.
This is based on measurements across several form member vehicles tested and also confirmed recently in one of Jake Raby's videos.