Welcome to RennTech.org Community, Guest
There are many great features available to you once you register at RennTech.org
You are free to view posts here, but you must log in to reply to existing posts, or to start your own new topic. Like most online communities, there are costs involved to maintain a site like this - so we encourage our members to subscribe or donate. All subscriptions and donations go to the costs operating and maintaining this site. We prefer that guests take part in our community and we offer a lot in return to those willing to join our corner of the Porsche world. This site is 99 percent member supported (less than 1 percent comes from advertising) - so please consider an annual subscription or donation to keep this site running.
Here are some of the features available - once you subscribe RennTech.org
- View Classified Ads
- DIY Tutorials
- Porsche TSB Listings (limited)
- VIN Decoder
- Special Offers
- Paint Codes
- Registry
- Videos System
- View Reviews
- and get rid of this welcome message
It takes just a few minutes to register, and it's quality Porsche information at a low cost.
Contributing Members also get these additional benefits:
(you become a Contributing Member by subscribing or donating money to the operation of this site)
- No ads - advertisements are removed
- Access the Contributors Only Forum
- Contributing Members Only Downloads
- Send attachments with PMs
- All image/file storage limits are substantially increased for all Contributing Members
- Option Codes Lookup
- VIN Option Lookups (limited)


Domiac
-
Posts
121 -
Joined
-
Last visited
Content Type
Profiles
Events
Forums
External Paint Colors
Downloads
Tutorials
Links Directory
Collections
Classifieds
Store
Everything posted by Domiac
-
 Roger that. I'll plug my Durametric too and see how this turns out. Once again, my sincere thanks to JFP especially and Steve too!
 -
Breaking news, I performed a leak down test but please note that this was done on a _cold_ engine without oil inside it (engine temperature 30C / 85F). Cyl #1 = 83 / 90 PSI Cyl #6 = 77 / 90 PSI Cyl #2 = 84 / 90 PSI Cyl #4 = 38 / 90 PSI (intake and exhaust passes air) Cyl #3 = 28 / 90 PSI (exhaust passes air) Cyl #5 = 84 / 90 PSI Great :huh: Bad values in both banks. After my last cleaning session, cyl #4 improved around 10% but that is insignificant. I have not rigorously cleaned cyl #3 yet, but based on my borescope session, it should be reasonably clean, hard to see the places where valves actually tighten themselves against the head, I might get it better but too tired to engage into that adventure today. What do you think I should do? 1) put the engine back to the car and try it out? - if it runs OK and sounds good, let it warm 30 minutes on idle, do durametric checkup and finally perform another leak down test properly using a warm engine - after all, I think there is a chance that the combustion and heat can remove the gunk? - this option is fine for me, I don't mind the job but I'd be hesitant to crank this baby up if you guys think there is a fair chance it could go worse 2) start spending serious $$$, haul engine to a shop and be prepared for valve / lifter job - I recently moved to Europe and the sad story is that I think there's no shops on Finland that do these kind of things reliably with reasonable amount of money - for me it would probably mean shipping this engine 1000 km to Germany but I have to research my options.. What can I say, BIG thanks to you guys .. again ...
-
I have only sprayed a tiny dosage of oil to each cylinders, no other chemicals. It seems that the oil is actually braking a bit of the gunk on my cylinder head on the area right next to my valves. Experimenting with a bit of oil more and vacuuming from exhaust port, taking it slowly. Thanks Steve and JFP.
-
Thank you again, I understand the concern on using chemicals, I definitely do not wish to ruin my cylinder coating or rings. One last proposal, would you feel that the following would be a wise move? 1. spray oil through the spark plug inside the cylinder - goal is to let the oil "wet" the cylinder head, but not to flood it 2. let it rest there for a day - hoping it will break down and remove some of the paper residue / carbon from the cylinder head 3. vacuum from the exhaust port - oil's viscosity would snatch removed paper residue / carbon I'd simply like to maximise my chances on getting everything out before I start the engine. Borescope tells that cylinder walls are clear as a sky, it is the cylinder head valves that have residue.
-
Yes, that is my thinking as well, it is likely that there is plenty of carbon pieces everywhere. Even vacuuming from the exhaust port might change the scenario. Would it work if I if? 1. open the exhaust valves 2. attach strong shop vacuum to exhaust port 3. spray some chemical through spark plug => chemical should run right towards the exhaust valves Note: I have a good access both to intake and exhaust valves as I have removed all intake and exhaust parts. If so, what kind of chemicals would you recommend? There's plenty of stuff out there that you can add to your fuel and run the car but this is a bit different scenario as I do not have to run it through fuel system, instead I can apply the product directly. Thank you all again!
-
Had some time to perform a quick leak down test for two cyls. However the test was done cold meaning that the engine's temperature was around 25C / 80F. Also there has not been any oil in the engine for quite some time. I have slowly cranked the engine by hand, only clockwise, about 10 cycles. As a reference, cylinder #1 lost only about 10-15% @ 90 PSI (not obvious from where) but cyl #4 lost about 65% @ 90 PSI (it was clear that the exhaust valves leak). Even if this was performed cold and there is not much of oil inside the cylinders, I assume that the difference is substantial and it worries me quite a bit. I tested cyl #4 twice, cranked it full cycle one more time, same result. The thing is that almost all of the paper was stuck on the intake valves of cylinder 4, I would have thought that the intake valves leak if anything. But the lost pressure for cyl #4 comes out from the exhaust valves. If I am in luck, there's still some burned up crap on the exhaust valves and I am able to clean it a bit more with some chemical. I am fairly certain that there is no more any paper as I did a very thorough borescoping session for all my cyls using camera without mirror and also with a mirror with multiple angles. Any stuff that remains on cyl #4 exhaust valves would be burned up soot. I think my options are: 1) clean exhaust valves on cyl #4 ? - is there a spray or such that might remove the soot and help my exhaust valves to seal better? - should I also tilt the engine 15 degrees so that the stuff I spray to the exhaust valves does not go past piston rings, instead gravity will make it come out? 2) haul my engine to a shop and let them check both heads and all valves? 3) start it up, if it runs good, let it warm well and then try to burn gunk by driving a trip on a freeway? 4) try something else? PS. I once lost my camera mirror inside cyl #3, it sure was a fun 2h trying to get it out without violence, but eventually I did it. I'll perform leak down for all cyls later when I have more time to work with my car and update results here. Also add pictures of my borescope sessions, they are fun to watch. Thanks!
-
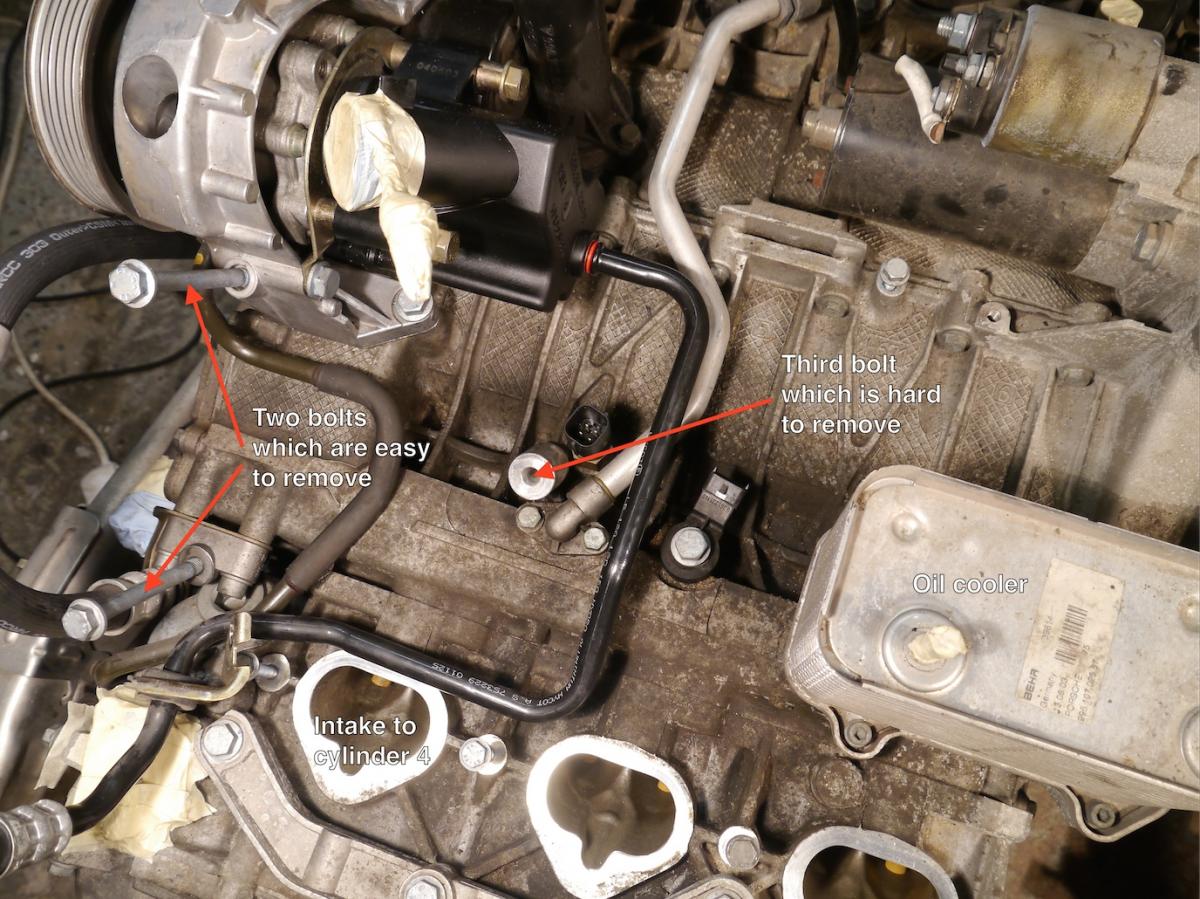
Hello, I made a short video that shows how to remove the third A/C compressor bolt from 996 Carrera 2004. You do not want to strip this bolt. The key for me was to use a borescope which gives you the confidence to turn the bolt as you know for a sure when your grip is good enough. I'd recommend you to buy two USB borescopes, they are cheap. One small one with auto focus and one good quality microscope with manual focus. I am using the latter here. For the better quality one I recommend Andonstar 2MP endoscope. Search ebay with keywords: andonstar 2mp usb endoscope . Should cost $70. Video here: Note that my focus for this video is not that great, I only care about getting a solid grip.

-
996 Oil filler tube replacment
Domiac replied to Eric's topic in 996 Series (Carrera, Carrera 4, Carrera 4S, Targa)
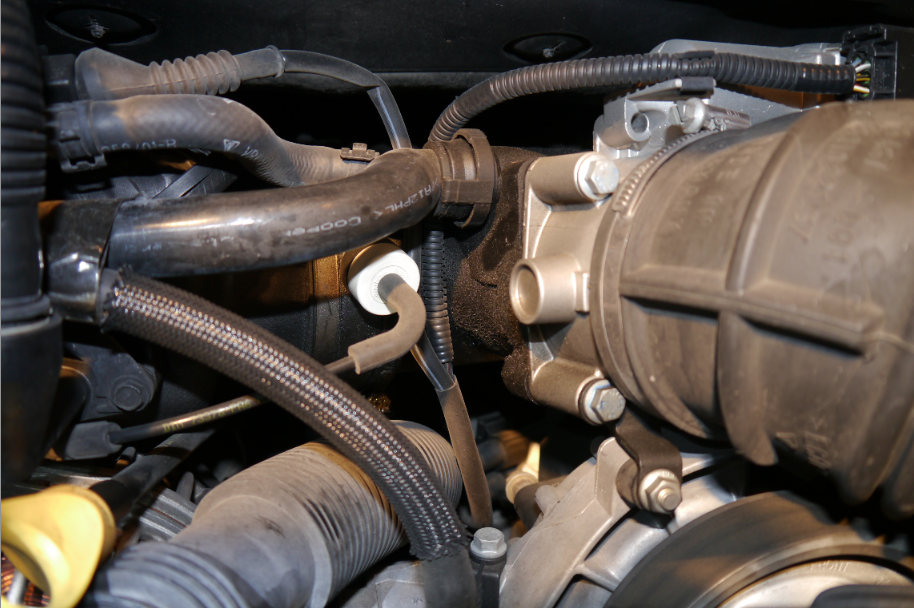
Here's a clear shot of the area you need to work with. It is quite high resolution pic so you can zoom it if needed. https://www.dropbox.com/s/r1ugmbwbzfujiyt/engine-washed.JPG
-
Flange center bolt's nut is 13mm. (I suspect it has been touched because the other three bolts on the flange are "indented" 6 point torx, not traditional hex bolts like some of the other bolts on my images.) Once again, much appreciated, excellent answer JFP, :notworthy:
-
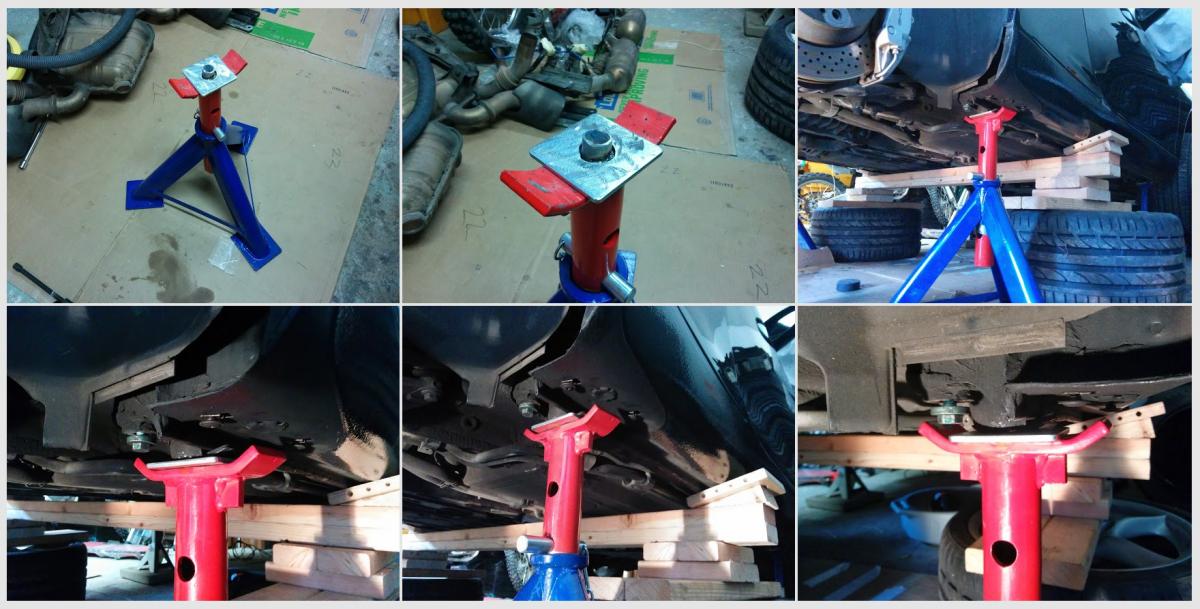
Here's a simple advice on how to create good Jack Stands for your 996. Before anything, I'll also state the usual disclaimer "Do not try this at any circumstances. Jacking up your car and going under it can kill you. I sincerely won't accept any liability if you still decide to do it". Creating a pair of good jack stands for your Porsche are easy to fabricate. 1. Buy a pair of general, e.g. 6 ton jack stands 2. Measure the diameter of the locking hole that exists on your car's jack points 3. Buy big bolt or a piece of metal rod that absolutely fits to the locking hole 4. Cut two stubs out of the bolt / rod 5. Weld the stubs to your jack stands 6. Grind welding points clean and as level as you reasonably can 7. Buy two thick washers and make sure the opening is 1/2" larger than stub 8. Drop washer through the stub => jacks are ready to use The reason why I used a thick washer is that when you weld a stub in to your jack, the welding leaves quite uneven level between the stub and your jack. This you must make level. By adding the washer with big enough opening to escape the weld points you produce a perpendicular angle between the stub and the jack stand => End result for me was a rock solid car that is more or less impossible to move or shake even if you try really hard. Sorry that I cannot share the exact dimensions, but the images should be enough for perfect execution. Take it safe and even if you trust your jack stands, I strongly advise adding some extra safety item under the car to maximise happiness both for your car and yourself.
-
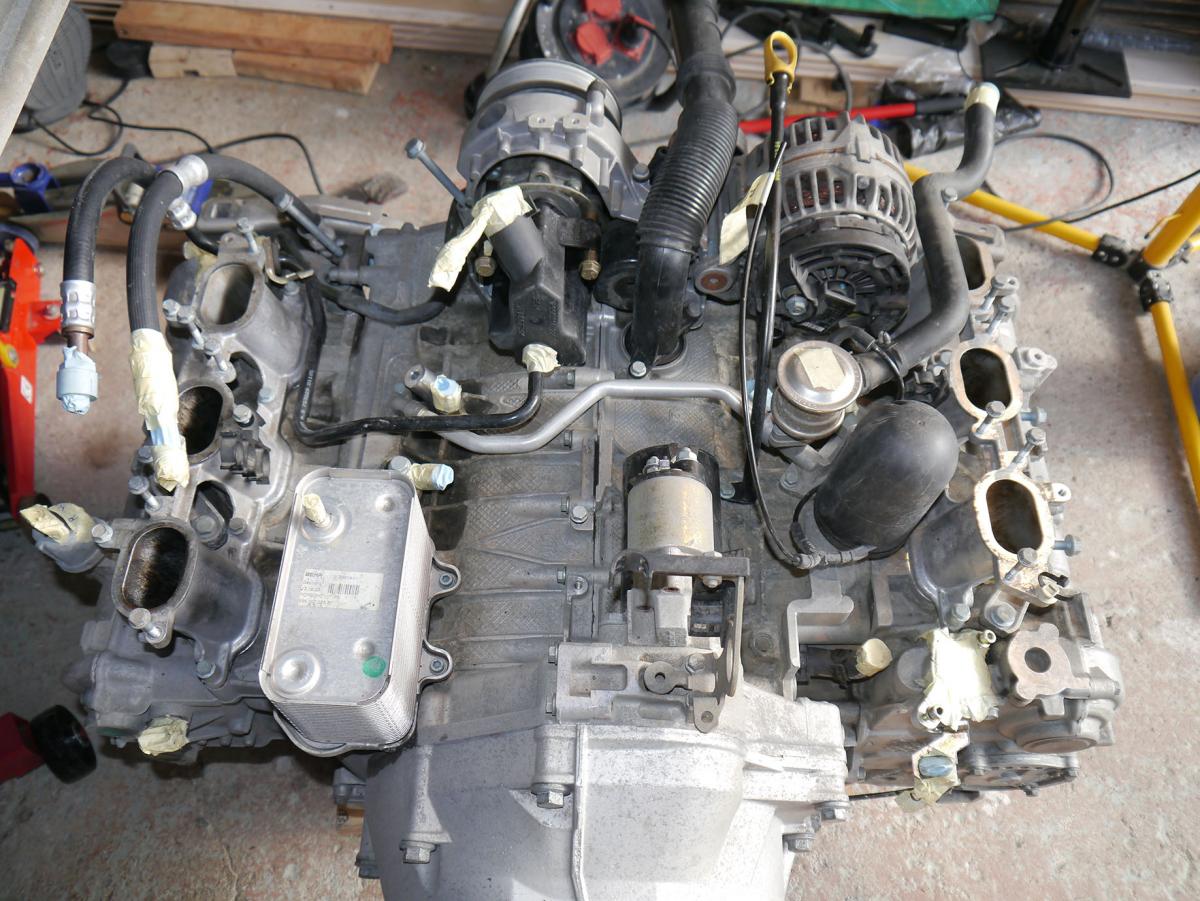
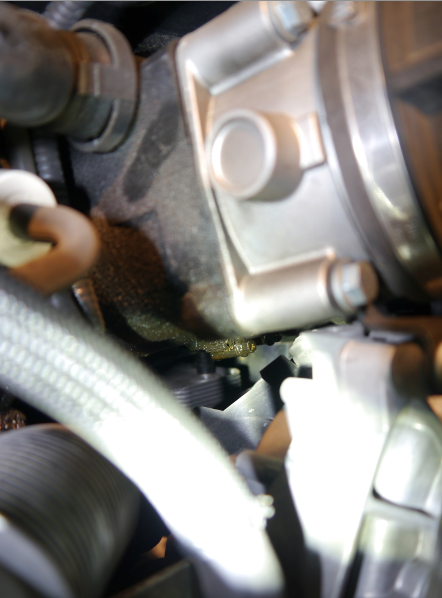
Hello there, my car is an early 2004 996 C4 Cab, 3.6L, 85k miles. Good stuff on my DropBox folder: https://www.dropbox.com/sh/p62gwxshg2zath4/0wYS9yrgfv Engine has not been started for 4 months. Actually it has been on a huge container for 2+ months and just few weeks ago I got the time to start working with my car again. Just before taking these pictures, note that I did wash my engine and transmission while they were still connected to each other, that might explain the glossy oil spots near my IMS (or not). Four months ago, underneath the car it looked that I get a tiny amount of oil after I drive around 500 miles, sometimes even a drop of oil to my garage floor if I drive a lot more. The drop comes right to the spot which usually indicates RMS/IMS leak. Then again, my AOS has been spitting lots of oil out from the connectors and the drop might originate from there too, impossible to say as front left side of the engine near AOS was so full of oil and gunk. I've changed my oil now twice, both the oil and filter ripped open has looked really really clean but this is based solely on human eye :-) I'd like to get a few second opinions to my questions, hopefully this thread is usefull to others too. 1) How does my RMS / IMS look in general? I'd say the leak is reasonably small, most gunk originates from clutch, would you feel the same? 2) Would you change my RMS or just leave it be? It has already been changed once at some point. 3) What exactly seems to be leaking here? To me it seems to be the IMS, but strangely enough the bottom part right below the IMS cover was completely clean (just zoom the images and remember that I washed my tranny and engine just before separating them). 4) Which bolts would you change while doing the IMS? Looking at the pictures, many change bolt numbers 4, 5, 6 and 7, how about you? 5) Curiosity question, what parts are not original? My RMS must be new as the part number is 997.101.212.00. IMS looks old, part number K.99602401 (?). Also would you also feel that many of these bolts have been changed as they look past year 2004 bolts, right? PS. I have a new RMS, LN bearing + tools waiting for the installation.. Big Kudos to everyone who got this far, hope you'll inspect my DropBox picture folder too!
-
Once I have the time, I'll write a separate thread, include good pictures and tips on how to remedy the situation. In the mean time, please PM me if you need tips, hope not :-) Right now I'm working on IMS, RMS, clutch and checking out bunch of other stuff. All in all, I managed to get everything out, without the use of compressed air or e.g. flushing cylinders. And yes, I have a leak down tester and will run it through all cyls and compare results to each other. Thanks again everyone! PS. Some admin could rename this topic "Cylinder misfire, forgot shop towel inside bore".
-
Gentlemen, Finally I got the time to work with my 996. Dropped both engine and transmission, took off all intake parts and with lots of time, patience and some hand made tools I managed to get almost all of the paper out. Had to turn the crank in order to get intake and exhaust valves open and retrieve paper both from intake and exhaust. Have to say that some of that paper was really hard stuck on the intake valves (Cylinder 4 only), most of it was on intake tube just before the intake valves. I am confident that I can get it all out, only one half inch long paper still remains on cylinder 4. After the last paper piece is out, I'll use my borescope with 45 degree mirror to inspect all the cylinders once more. Finally, I'll perform a leak down test for every cylinder. Test will be performed cold, but I am only interested of any variances between the cylinders. I truly hope that all cylinders give similar results, especially that the cylinder #4 does not stand out from the crowd. Updated picture link here: https://www.dropbox.com/sh/rlzlul4q7n58ui6/-tP8T4hMey/Paper-inside-engine
-
Thanks. It's going to be hectic next two months for me in the Silicon Valley, but I'll get back to this during February when I got more time. Clutch / IMS work is needed so I will drop the engine, take my time and clean this up the right way. Will remove exhaust and intake components to gain the best access, use borescope and a strong vacuum cleaner attached into tiny custom rubber hoses with various angles on the end. I'd vacuum rigorously from both sides (intake, exhaust) from all cylinders, inspect with borescope, turn crank a bit so that valves open, and start over again with the vacuuming all cylinders. Last night I had the exact same thought that you had, using compressed air is perhaps not the best idea. It might even force this stuff against cylinder rings. Will post more pictures of this once above is done. Then I have to carefully consider would it be safe to start the engine or should I go even further and remove cylinder heads, inspect valves / lifters / springs before engine is started. Yes, it was me forgetting that piece of paper there and starting the engine, not my neighbor, idiot brother or mother-in-law.. :cursing: PS. Your idea of using copper wire + adhesive is a good one too, thanks!
-
Just see these two screenshots: the first one has two pieces of paper. Lower right is what I managed to snatch from the cylinder, upper left is a piece of paper ripped of from my garage paper towel holder. Updated picture link here: https://www.dropbox.com/sh/rlzlul4q7n58ui6/-tP8T4hMey/Paper-inside-engine
-
Solved it! I managed to pull part of that stuff out near the intake / exhaust valves through the spark plug hole and oh boy do I feel stupid now. I am 99% sure that this stuff is the same paper towel that I used to cover the air intake while taking off the throttle body. ARGH.. It all makes sense since misfire issue started after I cleaned the throttle body, let the car run fine for 15 minutes to warm up, all good, but when I hit the throttle 100% for a few hundred milliseconds gaining 4000rpm and a huge suction which apparently took this paper from air intake inside cylinder 4. Now the real joy starts. How to clean this up properly? Is there any chemical that I could reasonably safely use to break down this paper from air intake all the way to exhaust? Carb cleaner / acetone breaks this paper down good but I'd be really hesitant on spraying such stuff inside cylinders, even if I apply oil there manually, it does not sound right. I hope the rings or valves have not suffered from this paper gunk. I am going to turn crank manually in order to get exhaust valve open on each cylinder, then put compressed air inside each cylinder, using a leak down tester unit, and try to blow all that stuff into exhaust. Another option is to get all plugs out and blow compressed air to intake. Wont start this baby until I get experts opinions from these forums. As always, any ideas appreciated!
-
That being said, it is definitely not from the head gasket. I'd be hesitant to start the engine due to knocking sound and foreign stuff in cyl #4/6. Safe to say there is a leakage somewhere, could you help me to understand why a leak down test would provide useful information? Before I haul the engine to a shop and start burning some serious $$$, I'd appreciate a lot for any comments regarding how I could assess the situation better myself. I could drain coolant + oil and check for intermix. Then drop the engine and open cylinder head, at least that should tell is the engine salvageable or not. The car has never smoked, even the tailpipes are clear as a sky, same thing when this problem happened. 85k miles, original water pump (yes, new one is already coming), coolant level now below minimum(!). At least that is good that this problem happened on the front slope of my garage when I was warming up the engine and not while I was driving in the freeway. Much appreciated JFP for your comments!! I guess my driving days are over for a while, this really really sucks :unsure:
-
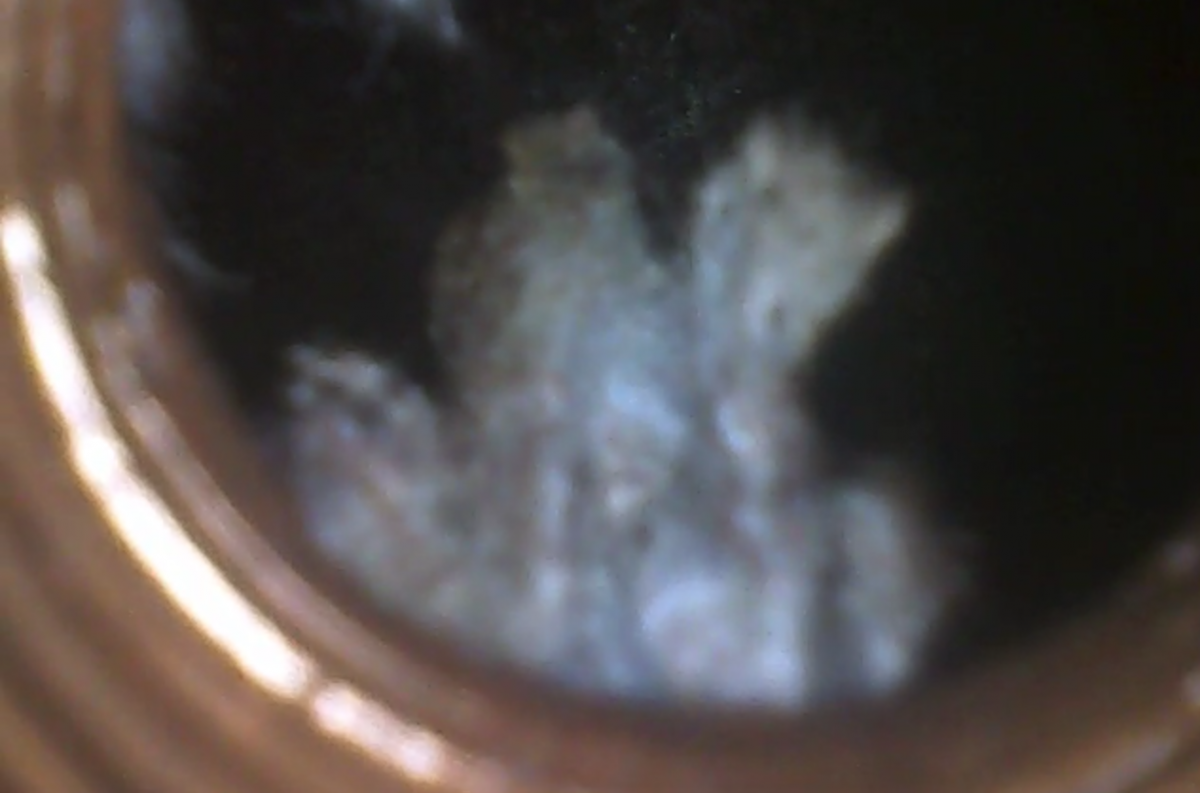
Interesting borescope session from cylinder #4 https://vimeo.com/80341238 As you can see it contains white "fluffy" stuff which I suspect is the main gasket. Note the time after 40 seconds when I go through the stuff, it is quite soft. Plugs looked fine, brown colored, all cylinders look OK too in my opinion, except that gasket stuff. Other cylinders looked fine, but #6 had also small amount of the same stuff that cylinder #4 had. I cleaned my throttle body to figure out small oil leak. After I was done I decided to try it out and noticed that my idle is now better. Engine worked fine for 15 minutes, after that I revved it a bit to 3000rpm for a couple of times. Finally when the engine was warm I pushed the pedal 100% down for a fraction on second gaining almost 4000rpm, immediately after that I got rough idle and noticed that some cylinder(s) are not firing. Loss of power / throttle was noticeable too. After 10 seconds I got knocking (around 5 per second) + CEL, then after 10 seconds CEL flashing and decided to stop the engine. Durametric shows cyl 4 misfire. After that I took coils and plugs away and grabbed my borescope. I was not happy what I discovered from cyl #4 :-( Any opinions is the engine done or are there any viable options to try out? 911 Carrera 4, cabrio, 3.6L, 2004 Updated picture link here: https://www.dropbox.com/sh/rlzlul4q7n58ui6/-tP8T4hMey/Paper-inside-engine
-
Ahsai, FYI, the part number for that o-ring is 999-707-154-40-M127, it goes to 996-107-047-51-M100.
-
I suspect the same, disconnected the air hose connection to the oil separator, noticed I has some slack and the connection does not seem to secure tightly. The connection from AOS to TB had a small pool of oil. I cleaned up the surroundings, took throttle body away and cleaned some more. Now that it is clean, I'll drive now some more and hope to see where the leak is coming from. The adapter / rubber sleeves behind throttle body looked very clean, it had only a small amount of oil there.
-
My engine room is pretty clean apart from the fact that either the famous IMS or RMS is dropping few drops of oil. Not much, never seen drops of oil on my garage, but it begins to be noticeable after engine cleanup if I drive around 500 miles or so. Engine drop along clutch + RMS / IMS work etc. will follow a few months later.. Today I noticed a considerable amount of dirty stuff which rests way behind the intake air housing, right next to the throttle housing. Actually it is behind the throttle housing on front intake distributor (both on the left side and on the right side), especially the clamps there have accumulated plenty of dirt. Any ideas what's the cause? 2004 Carrera 4, 85k, oil consumption is good, car runs great and Durametric is happy too. Thanks in advance, people in these forums are simply amazing, so much information and passion!! PS. First post done, not a virgin anymore :thumbup: