Welcome to RennTech.org Community, Guest
There are many great features available to you once you register at RennTech.org
You are free to view posts here, but you must log in to reply to existing posts, or to start your own new topic. Like most online communities, there are costs involved to maintain a site like this - so we encourage our members to subscribe or donate. All subscriptions and donations go to the costs operating and maintaining this site. We prefer that guests take part in our community and we offer a lot in return to those willing to join our corner of the Porsche world. This site is 99 percent member supported (less than 1 percent comes from advertising) - so please consider an annual subscription or donation to keep this site running.
Here are some of the features available - once you subscribe RennTech.org
- View Classified Ads
- DIY Tutorials
- Porsche TSB Listings (limited)
- VIN Decoder
- Special Offers
- Paint Codes
- Registry
- Videos System
- View Reviews
- and get rid of this welcome message
It takes just a few minutes to register, and it's quality Porsche information at a low cost.
Contributing Members also get these additional benefits:
(you become a Contributing Member by subscribing or donating money to the operation of this site)
- No ads - advertisements are removed
- Access the Contributors Only Forum
- Contributing Members Only Downloads
- Send attachments with PMs
- All image/file storage limits are substantially increased for all Contributing Members
- Option Codes Lookup
- VIN Option Lookups (limited)


KevinH90
-
Posts
254 -
Joined
-
Last visited
Content Type
Profiles
Events
Forums
Exterior Paint Colors
Downloads
Tutorials
Links Directory
Collections
Classifieds
Store
Everything posted by KevinH90
-
How do I remove the gauge cluster cover?
KevinH90 replied to 2000GotBoxS's topic in 986 Series (Boxster, Boxster S)
This may help. http://www.pelicanparts.com/techarticles/Boxster_Tech/90-ELEC-996_Cluster/90-ELEC-996_Cluster.htm If I recall correctly, once you have the cluster out of the car you need to remove several torx fasteners to separate the parts. Please post pictures of the refurbishment process. -
Oil Sending unit
KevinH90 replied to moosey's topic in 996 Series (Carrera, Carrera 4, Carrera 4S, Targa)
I added a 996 oil pressure sensor to my 2000 986 Boxster when I installed a Carrera gauge cluster. The first unit I installed worked fine for about 2 years and then started to give erratic readings. I replaced the sensor and it worked fine for about two weeks. Now I'm getting erratic readings again. Is something causing the sensors to fail or is it just bad luck that I bought a replacement sensor that failed prematurely? I've done some searches and it appears that these are a known weakness in the 996's. -
Start here: https://sites.google.com/site/mikefocke2/mikesporscheboxsterwebpages Good luck with your search for a good car.
-
On the 996 turbos the oil pressure sending unit is a known weak point: http://www.6speedonline.com/forums/996-turbo-gt2/222395-oil-failure-indicator-pressure-gauge.html It would be interesting see if they use the same part on your Panamera.
-
Battery going flat after a couple of days standing
KevinH90 replied to Dais3's topic in 986 Series (Boxster, Boxster S)
I read your post more closely and I see that I misunderstood you. I still think that the original poster should look at his head unit wiring to determine whether it was done correctly. When dealing with the work of previous owners, you should never rule out the possibility that someone made a mistake. -
Battery going flat after a couple of days standing
KevinH90 replied to Dais3's topic in 986 Series (Boxster, Boxster S)
Are you positive that the amp is supposed to be on all the time? I installed an aftermarket 2 DIN system in my 2000 Boxster, and if I recall correctly there was a wire that was "hot" all the time so that the radio could retain all the presets. There was another wire that turned on the amp and the antenna but only when the head unit sent it a signal to switch on.. Is it possible that the person who installed the aftermarket head unit hooked up the amp so that it was turned on all the time? You can find wiring instructions here: http://www.renntech.org/forums/topic/19616-porsche-boxster-avic-d3-installation-instructions/ (Scroll down to the second post in the thread.) You can compare this to the wiring that is in your car. Good luck. -
Radio Replacement Double DIN
KevinH90 replied to greg0078's topic in 996 Series (Carrera, Carrera 4, Carrera 4S, Targa)
i bought a refurb unit for my Boxster for about $500. It is a Pioneer Avic Z140 BH. http://www.pioneerelectronics.com/PUSA/Car/GPS-Navigation/AVIC-Z140BH?tab=firmware It is an older unit and is probably no longer available. Going with a refurb resulted in a substantial cost savings. You can see pictures of the installation here: http://986forum.com/forums/general-discussions/51283-does-anyone-know-vss-wire-02-bose.html There are also several useful links in that thread. The Boxster and the 996 are similar in terms of the layout and wiring of the audio systems. -
I polished a set of litronic headlights that were in pretty rough shape and they came out looking almost like new. You can read the details here: http://986forum.com/forums/general-discussions/54697-advice-used-litronics.html The plastic covers stand up well to sanding and polishing. Since you can take the headlight units off the car to polish them, you can find a comfortable position and place to work. It will take about 2 hours for each headlight.
-
Litronic retrofit question
KevinH90 replied to steve20186's topic in 996 Series (Carrera, Carrera 4, Carrera 4S, Targa)
Thanks - That is good to know. I've only used the local dealer for service once - I needed them to certify that the brake fluid had been changed before a DE. So, I doubt that they would consider me a good repeat customer. I also doubt that the independent shop I go to has a PIWIS. He does not specialize in Porsches. (Although he does a fair amount of work on them. When my car was in for wheel bearing replacement he was putting an engine in a 996.) I'm really comfortable with this shop and I guess I'll just need to deal with this relatively minor downside of using an independent. There are a couple of Porsche specialists in the area. If one of them were to have a PIWIS and would be willing to activate the diagnostic system for me, what is the best approach? Should I hook up the diagnostic system and drive the car over to them? I'm assuming this would cause the CEL to illuminate, but that the car would be drivable. I'm also assuming that I would need to connect the ESO wire to pin 11. Does an hour of labor seem reasonable for the job? I'm still not sure that this is working correctly and given that the sensors I used are off a wreck it would be nice to be able to test the system for signs of a problem. I am planning to keep the car long term and components could fail over time even if they are good now. -
Litronic retrofit question
KevinH90 replied to steve20186's topic in 996 Series (Carrera, Carrera 4, Carrera 4S, Targa)
So, I would have to take it to the dealer. I may ask, but I will probably find that they are either (1) unwilling to do it or (2) will want more money than I think it is worth. Here's a video of my lights in operation: In sequence I do the following: 1. Turn on the lights with the ignition switch on - the lights go through their self-leveling routine 2. Switch on the high beams and the Xenon low beams swivel up 3. Switch off the high beams 4. Slightly raise the front of the car using a jack It seems that the beams swivel down slightly, but not as much as I expected. It also seems that after a relatively short range, the lights don't adjust at all. I'd appreciate hearing whether others think this is proper operation. -
Litronic retrofit question
KevinH90 replied to steve20186's topic in 996 Series (Carrera, Carrera 4, Carrera 4S, Targa)
I'm giving some thought to hooking up the diagnostic system. I found your thread on Boxa.net: http://www.boxa.net/forum/index.php?showtopic=57618&hl=litronicin which someone responded to your question: As I thought, the diagnosis lines from the Litronics, AC, ABS, PSM, etc, join at a common point before going to the 16-pin diagnostic socket, pin 3. You could attach the Og/Bu wire to any of these, or directly to pin 3. So, it doesn't sound difficult. I guess I would also need to hook up the engine speed output to the connector. I know that folks have stated that the system will "throw codes", but I have a Durametric and I expect to be able to clear them. If something were to go wrong with the system it would be nice to be able to have the ability to troubleshoot. -
Litronic retrofit question
KevinH90 replied to steve20186's topic in 996 Series (Carrera, Carrera 4, Carrera 4S, Targa)
According to the MY 2000 Boxster sales brochure, "Porsche's dynamic headlight leveling system focuses light in the ideal spot by automatically raising or lowering the beams to compensate for changes in vehicle attitude. As a result, the blinding of oncoming vehicles under acceleration is reduced significantly and illumination under braking is greatly improved." Based on that, I may have overestimated the impact the system would have on hills. Also it is my understanding that this type of system is required by EU law, so it may have been engineered to meet certain regulatory requirements. Thanks again for your patience with my "measure twice cut once" approach to this project. I guess I could have just jumped in and started working, but I don't think my mechanical skills are quite as high as yours. -
Variable Intermittent Wiper Hack
KevinH90 replied to rick3000's topic in DIY Articles - Boxster (986) - Mods
It has been a while since I did this modification, but if I recall correctly the 996 relay has more pins in it the than the 986 relay and one of those is the one that you are soldering a wire to. I cannot say for sure why the 986 relay is the only one shown in the PET. It may be that the wiring harness in cars with the intermittent wipers is different than the ones without. So, using the 986 relay works with the cars wired for intermittent wipers from the factory but you would need to come up with some kind of work around for the cars with the non-intermittent harness. I've noticed that one difference between German and Japanese cars (if my experience with a 1996 Infiniti G20 and a Boxster can be used to draw a very general conclusion) is that the Japanese have one wiring harness for all cars of the same model while the Germans engineer a harness specifically for the options that will be put in the car. For example, when I added fog lights to my G20, the harness and connectors were already behind the dash and front bumper. All I had to do was add the hardware, a relay and a switch and I was in business. On the other hand, when I added heated seats to my Boxster, I had to create and run a wiring harness for them. The German approach saves material and is a more "green" process. The Japanese method cuts down on mistakes. Maybe that is one reason that Japanese cars are less trouble prone in general. -
Litronic retrofit question
KevinH90 replied to steve20186's topic in 996 Series (Carrera, Carrera 4, Carrera 4S, Targa)
I don't have much time tonight, but I was able to perform one test and it appears to confirm that the system is working. I put a jack under the left rear jacking point with the headlights on. While raising the car, I observed the "cut off" line of the headlights. It did not appear to move when I jacked up the car. (If the system was not working, I would have expected the cut off line to move slowly down the wall as the rear of the car went up.) I also observed the white piece of plastic that looks like a ruler located next to the low beam. When the car was level with low beams on, I could make out 2 lines and the third was just emerging from the housing. When I turned on the high beam, I could see one line. When I jacked up the car, I could see one line and the second was just emerging from the housing. So that appears to confirm Duffy's observation that the rotation controlled by the sensors is less than the rotation that results from turning on the high beams. I hope to do some more testing later on in the week. I have attached updated instructions in the event that anyone wants to benefit from my experience and Duffy's guidance. Thanks again to Duffy for his help. Litronic Retrofit with Automatic Dynamic Headlight Beam Adjustment - Standard.pdf -
Litronic retrofit question
KevinH90 replied to steve20186's topic in 996 Series (Carrera, Carrera 4, Carrera 4S, Targa)
I finished the installation except for reinstalling the amplifier, spare tire, tools and carpets in the the front trunk. I took the car out for a drive and unfortunately I'm not sure that the dynamic adjustment function is working. If it is, it is a subtle effect. This is how the system operates: When I turn the car on with the low beams on, the lights dip and then reach a level position. When I turn on the high beams, the low beams rotate up. Here's what makes me think something may be wrong: The route I picked for tonight's drive included some roads with hills. I was expecting the lights to rotate up slightly when I went down a hill and rotate down slightly when I went up a hill. I didn't see much of a change. When I was testing the sensors before I put them on the car, it appeared that moving them did cause the lights to rotate. When I hooked them up to the car, before installing them on the suspension, the self test would work, but it would leave the lights rotated up instead of level. So, I believe all of my components work. If I have some time tomorrow night I may take the car for a drive with the electronic control module disconnected and then with the module connected. That way I may be able to see whether I can tell a difference. I may also try jacking up the rear of the car with the lights on and see what happens. Maybe I was expecting a more dramatic effect similar to the high beam rotation. -
Litronic retrofit question
KevinH90 replied to steve20186's topic in 996 Series (Carrera, Carrera 4, Carrera 4S, Targa)
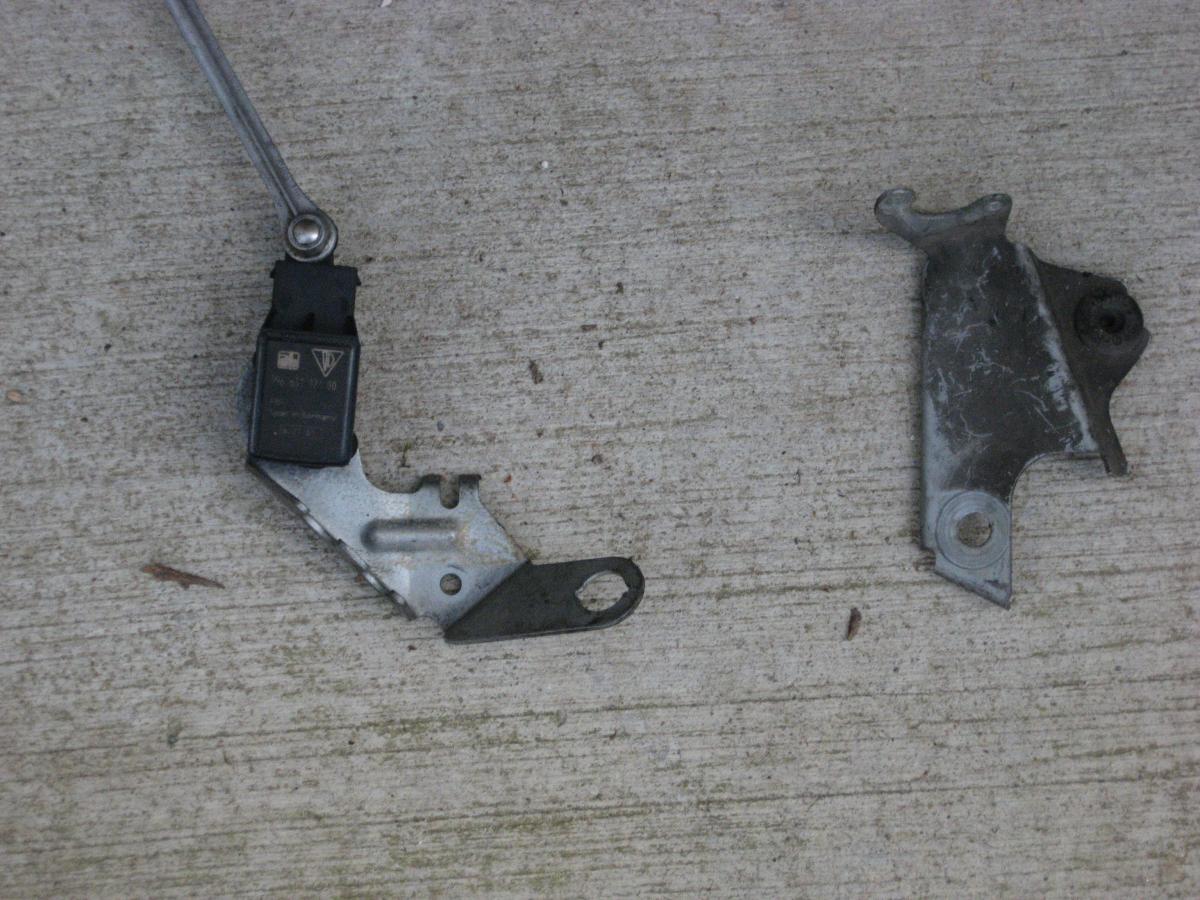
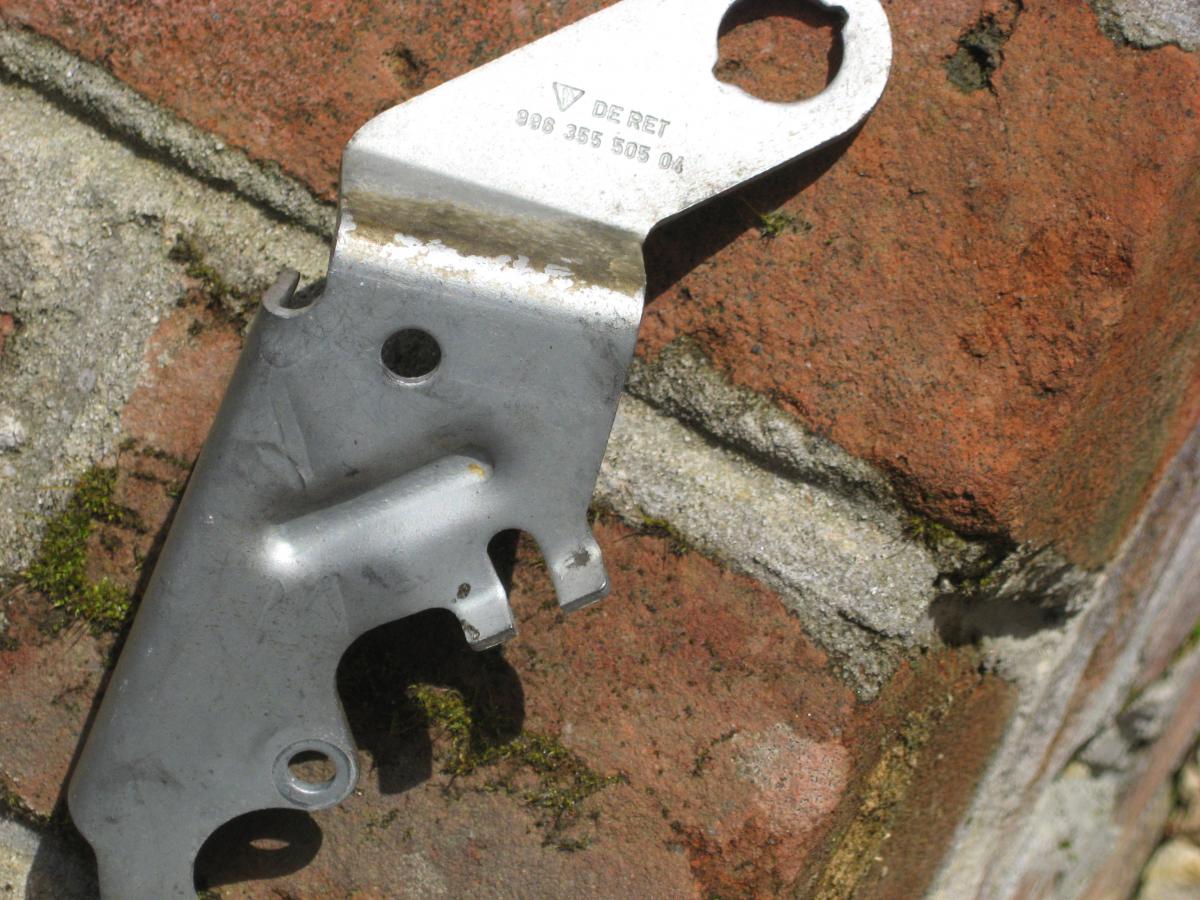
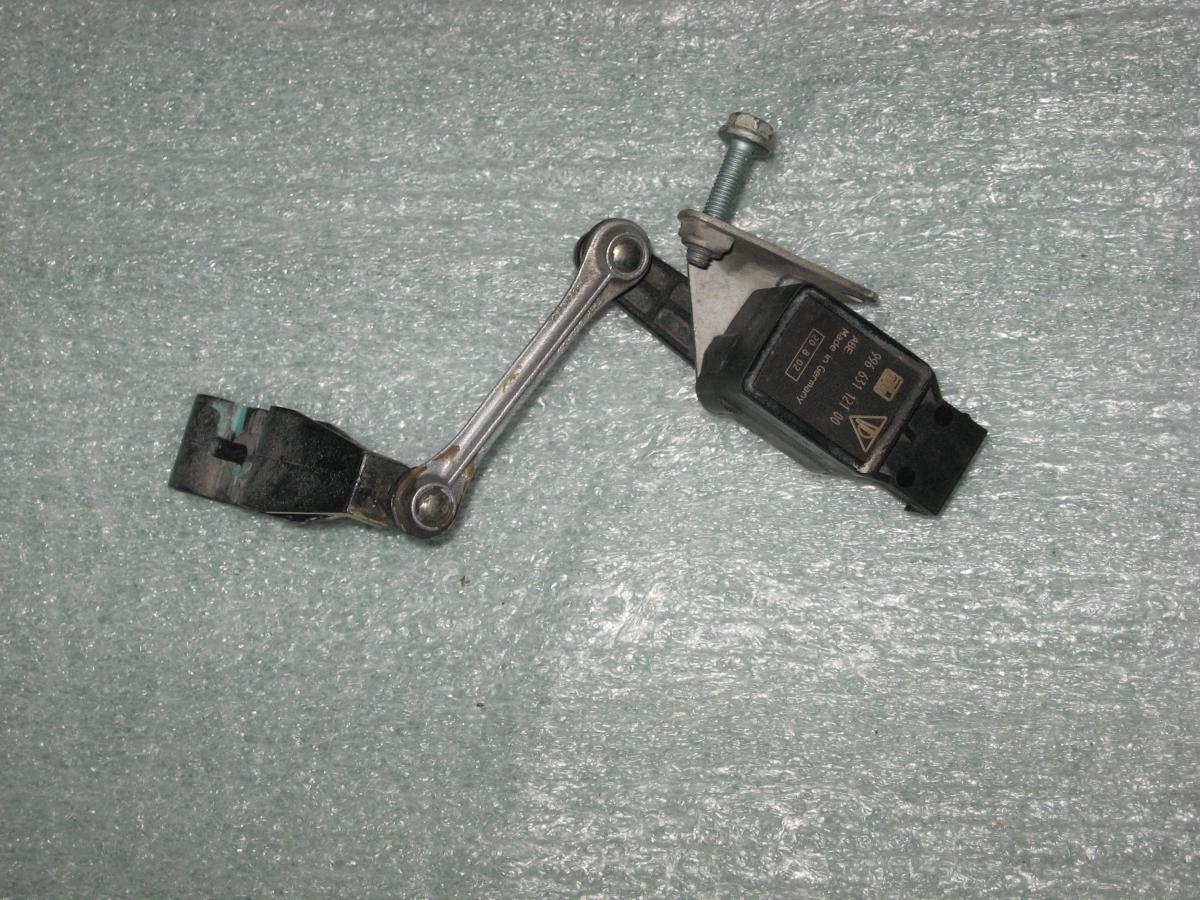
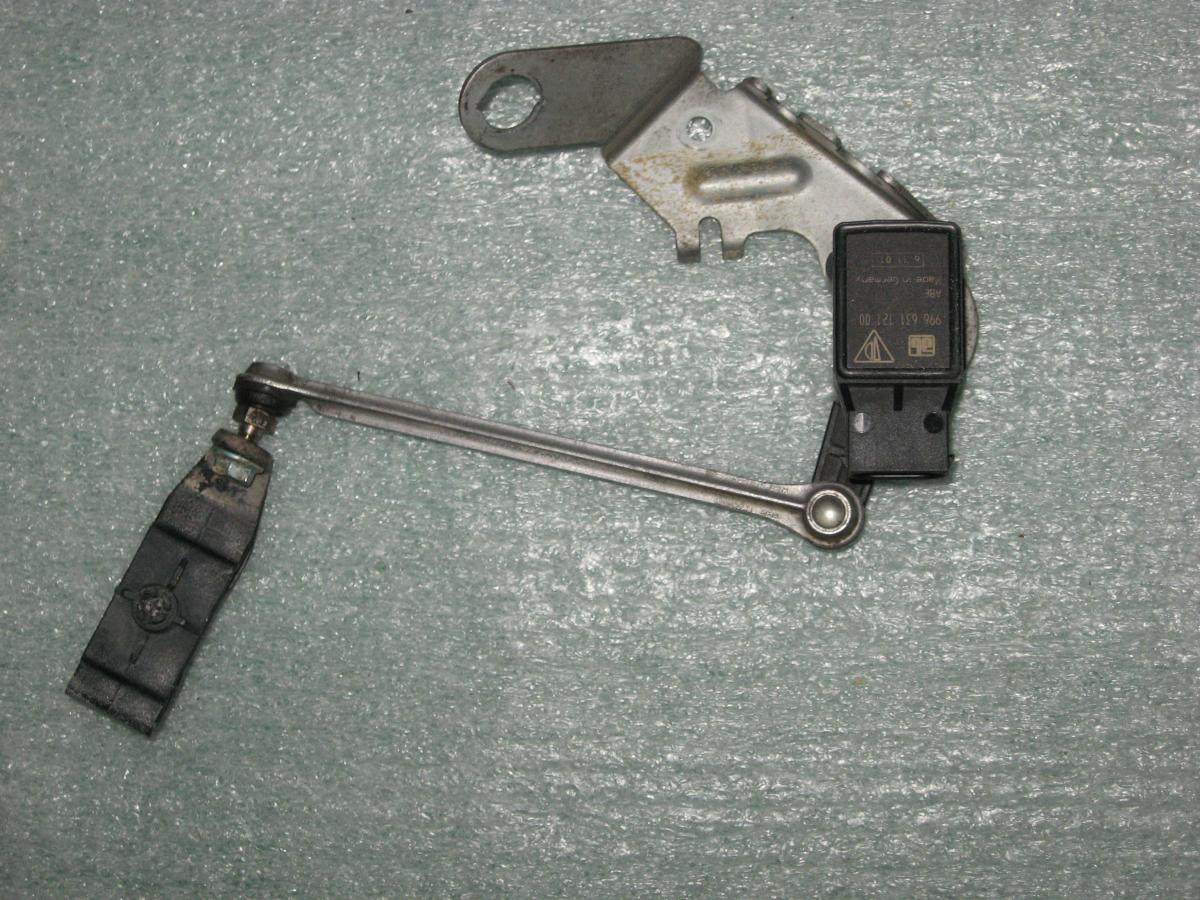
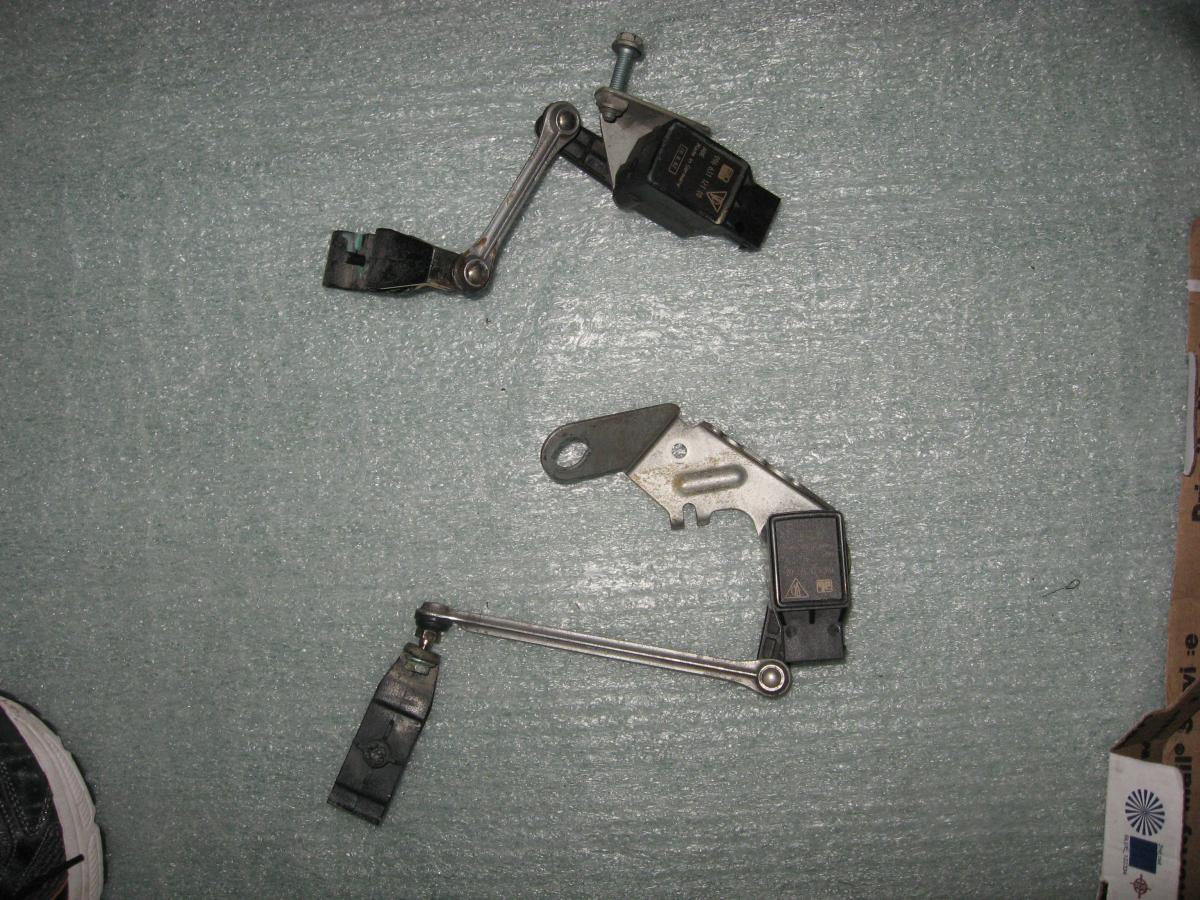
Well, I feel like something of a "thick bar steward" even though I'm not exactly sure what that is. I put the car up on a set of ramps so that I could look at the mounting point from directly below. After looking at the mounting point and studying the diagrams that I added to the instructions, I finally determined the problem. The mounting bracket I had was from a 996 not a 986. As we all know, many parts are used on both a Boxster and a Carrera and the cars are almost identical from the doors forward. For example the mounting bracket for the front litronic leveling sensor is identical on both cars. However, the rear bracket is different as the attached pictures show. The bracket for the Boxster is part number 986 331 611 03. The Carrera part is 996 355 503 04. The person who sold the brackets and sensors to me advertised them as fitting both the Boxster and Carrera. I should have double checked instead of blindly marching forward. Fortunately, the gentleman who sold me the connectors and other bits of wiring included the mounting brackets as part of the deal. So, I had the 986 part readily available. After swapping the sensor to the 986 bracket, it fit perfectly. (It attaches to the upper bolt on the assembly that Duffy included in the immediately preceding post. Just unfasten the 15 mm bolt, fit the bracket, reinstall the bolt and tighten it.) I put a couple of zip ties around the plastic push in arm to make sure it didn't move. I ran the wire harness (or loom) from the back sensor to the front of the car. I used zip ties to keep it away from anything that might rub against it. I still need to install the front sensor and then run the wires up behind the headlight. I have some family obligations on Saturday, but I'm hoping to finish this project by the end of the weekend.
-
Litronic retrofit question
KevinH90 replied to steve20186's topic in 996 Series (Carrera, Carrera 4, Carrera 4S, Targa)
Thanks I tried to install the sensors last weekend and couldn't figure out how to install the rear sensors. I'm working with the car on jack stands (axle stands in the UK) and that may be causing access problems. I took it to my mechanic who put it up on a lift. He thinks that we need to remove the rear brake caliper and perhaps some other parts to get the sensor in. He wants 6 hours of labor for the job, and that is a little more than I want to spend. I'm planning to look at it again this weekend and see if I can figure out an installation process. The front looks less complicated. It looks like you were working on several other projects when you installed your sensors, so perhaps you had more components off the car when you did your installation. I'll continue to persevere, but any hints would again be appreciated. -
2001 996 TT Oil Level Measurer failure
KevinH90 replied to richardc2cab's topic in 996 TT, 996 TT S, 996 GT2
Which model year is your vehicle? On cars with the later style gauge clusters (2001 and later for the Boxster and 2002 and later on 996's have a modular design.) I've seen that people with the later style clusters have had success in swapping parts in the cluster, but I'm not sure if that would help with your problem. I would also try to be absolutely sure that it is not the oil measuring sensor on the engine that is causing the problem. -
Litronic retrofit question
KevinH90 replied to steve20186's topic in 996 Series (Carrera, Carrera 4, Carrera 4S, Targa)
I won't have a chance to finish the work until next weekend. The weather forecast is for snow later in the week, so I'm leaving the "frunk" disassembled and driving my other car. Right now, my plan is to tap into the yellow wire for the on signal to the headlamps and start soldering my wire harnesses (or looms) in a few spare hours after work this week. I previously thought that the yellow/white wire was a good on signal, but on further review the yellow/white wire powers the fog lamps. I did some more tinkering tonight, but I couldn't get the lights to adjust up and down again by changing the relative height of the sensors. I suspect that some of my temporary wiring may have worked itself loose. I have attached updated DIY Instructions. Litronic Retrofit with Automatic Dynamic Headlight Beam Adjustment.pdf -
Litronic retrofit question
KevinH90 replied to steve20186's topic in 996 Series (Carrera, Carrera 4, Carrera 4S, Targa)
I hooked it up and it all works with the gray wire jumped to the red/black wire. When I turn the headlight switch on and then turn the ignition on, the lights go through the self-leveling routine. I can experiment with the relative heights of the sensors (they aren't installed on the car) and the beams will adjust. Also, the high beam rotation works if the beams are in the low position and I flip the high beams on. However, the system is always on. If I leave the lights off and turn the ignition on, I can hear the lights go through their self-leveling routine. That seems to tell me that if I leave it this way, the lights will be adjusting whenever the car is on. That seems like it will cause extra wear on the components in the system. I think that I need to either run a jumper all the way to the gray wire on the ignition switch or find something else that will trigger the system only when the headlights are on. As I mentioned in post 47 above, there is a yellow/white wire that seems like it would be energized when the low beams are on. I need to do some research and make sure that powering the gray wire from the yellow/white wire will not cause any other problems. I think I need to check the amperage that the red/black wire (the one to which the gray wire is currently connected) is carrying and then compare that to the yellow/white. If they are connected to the same size fuse I think I will be OK. -
Litronic retrofit question
KevinH90 replied to steve20186's topic in 996 Series (Carrera, Carrera 4, Carrera 4S, Targa)
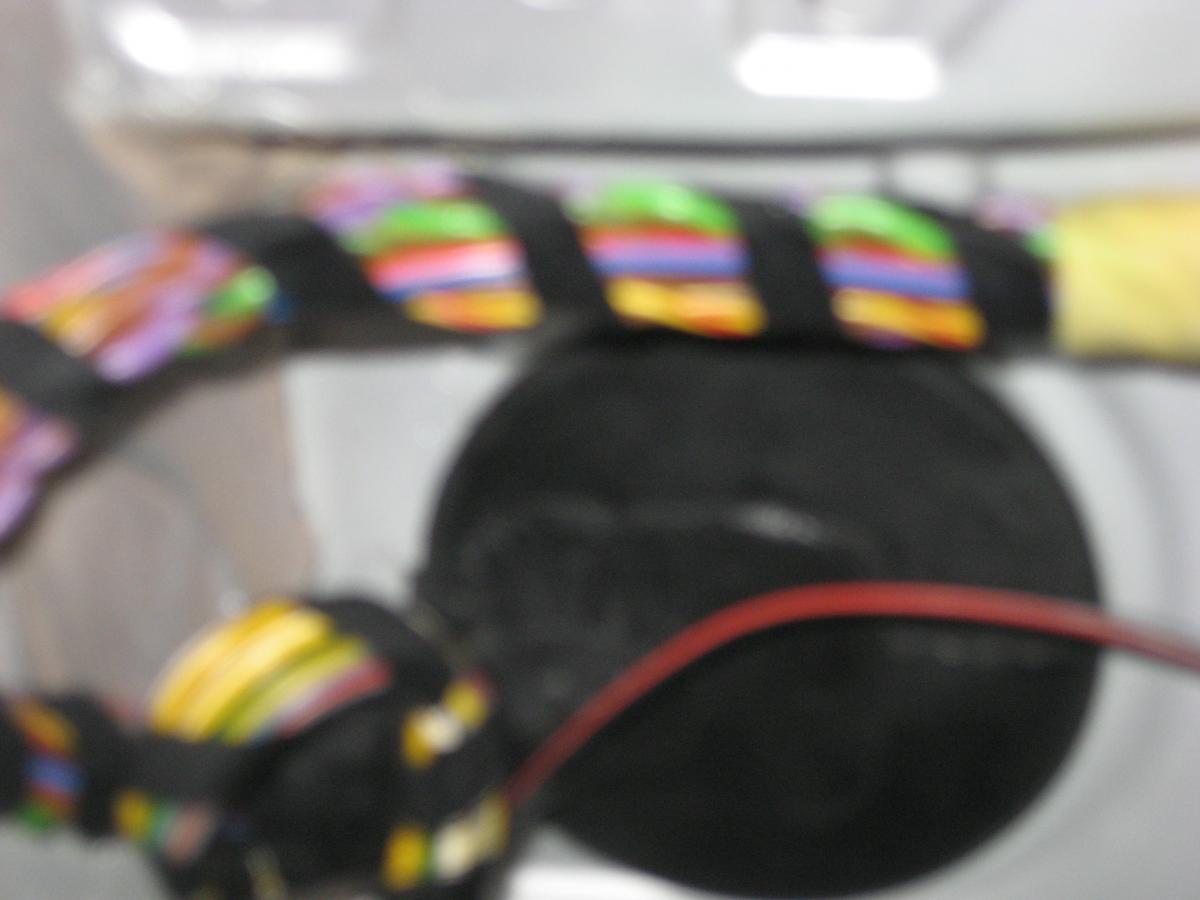
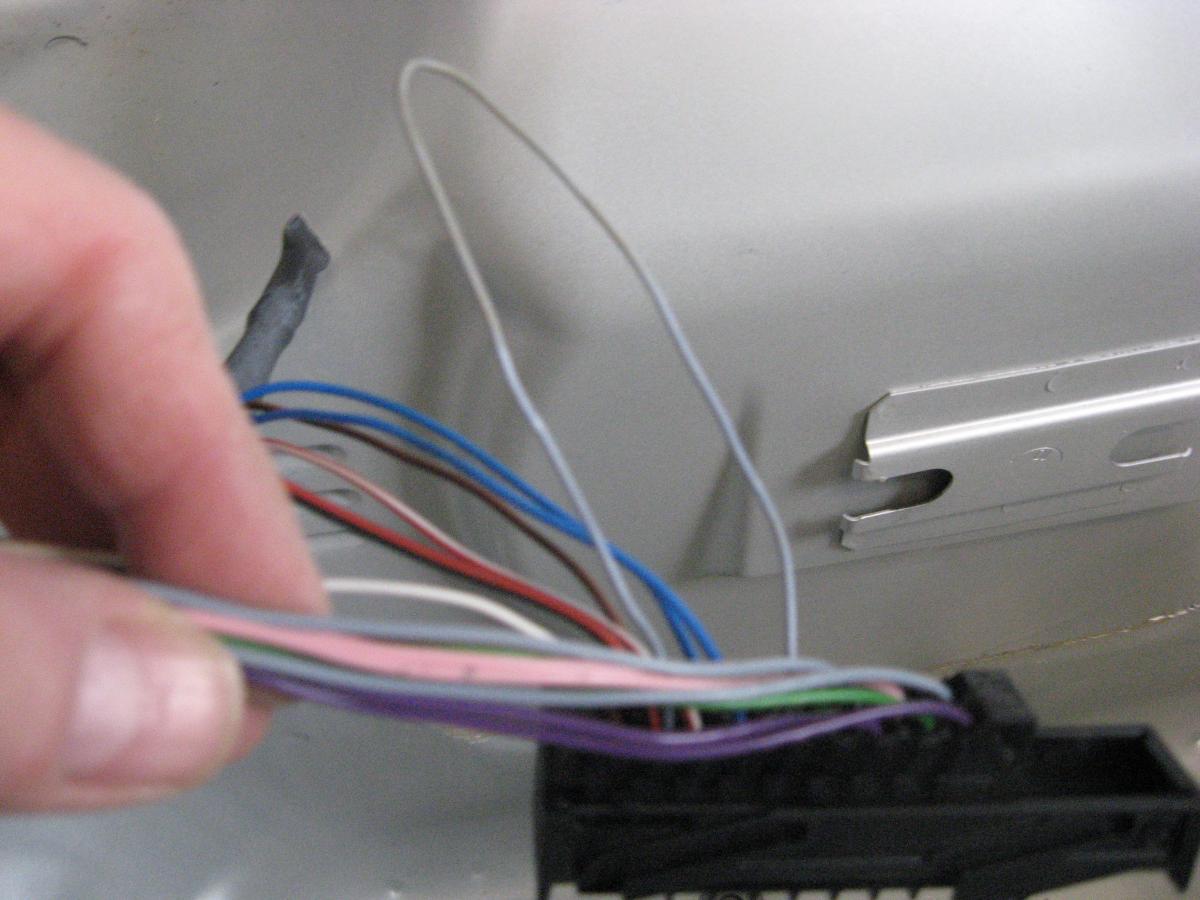
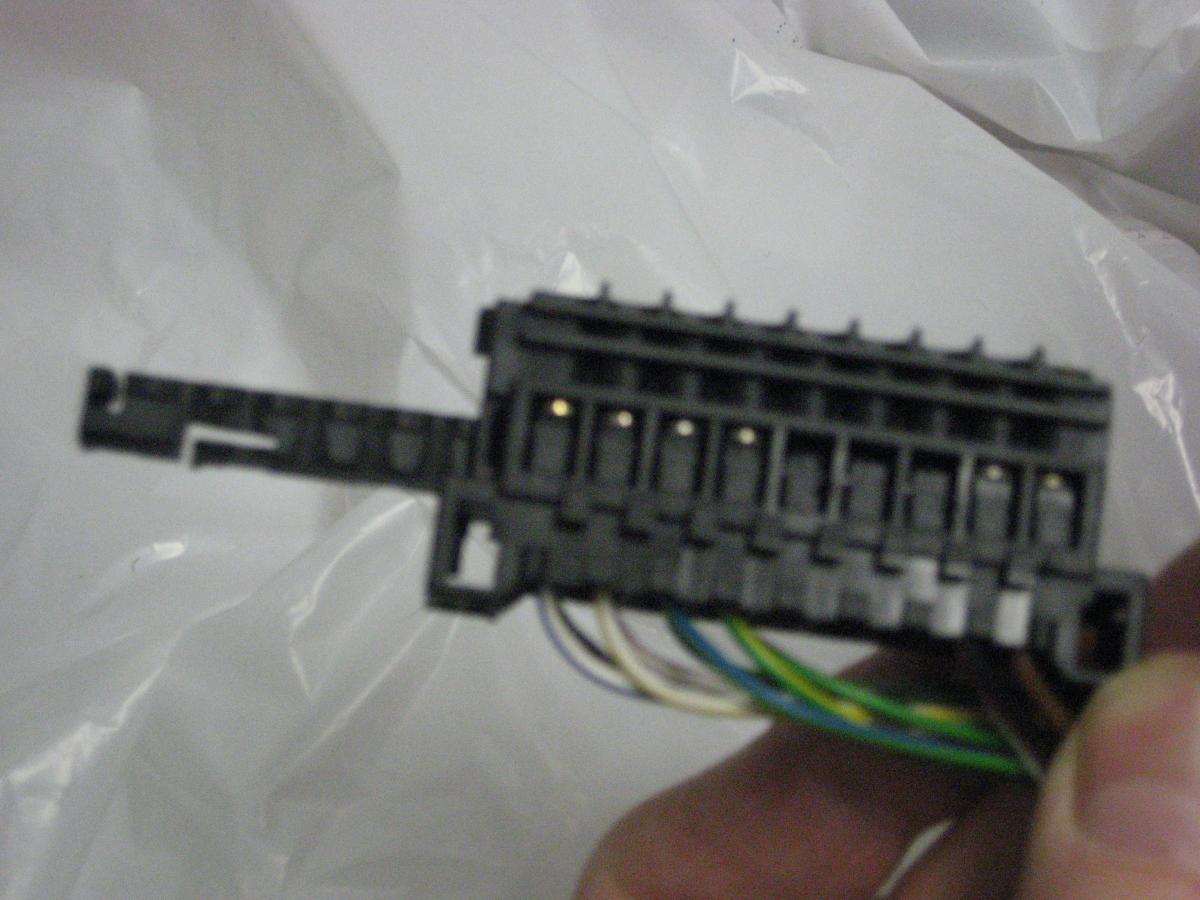
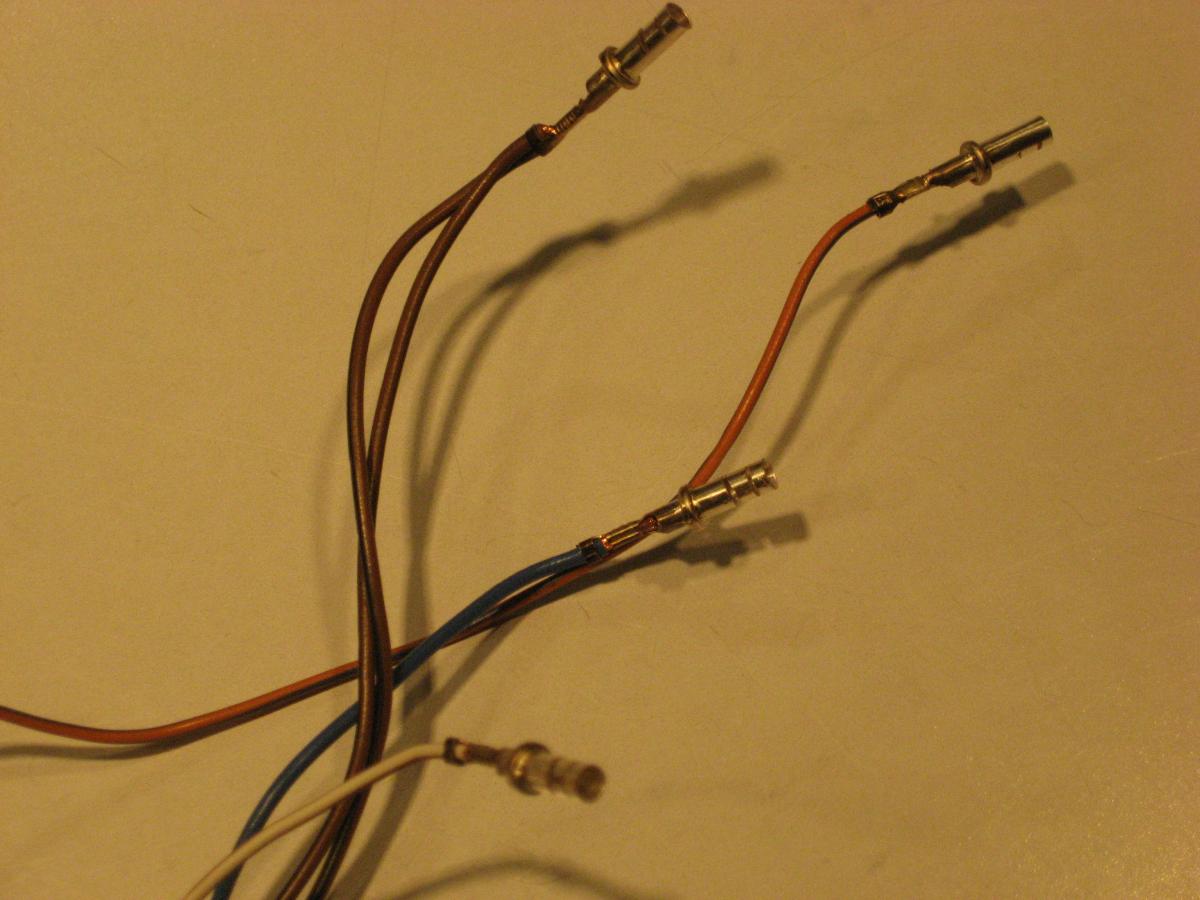
Duffy, I ran into something I didn't expect. I had previously installed the retrofit wiring and I had assumed that pins 9, through 14 and 17 would be empty. It turns out that only pins 9 (diagnostic) and 11 (Engine Speed Output) are empty. The others do have the wires installed and they are the correct colors. However, the gray wire in pin 10 is jumped the red/black power wire in pin 16. Also, I cannot find a gray wire to tap into in any of the wiring bundles. I'm wondering what harm would occur if I just left the gray wire jumped to the red/black wire. It seems that the system would then always be on when the car was on and the headlights would be constantly adjusting. However, that would make installation much easier since I cannot seem to locate the gray wire. Can you either give me some clues as to the location of the gray wire or comment on the issue of leaving the system on all the time. I have attached some pictures of the connector and the wire bundles nearby in the hope that that will help you point me in the right direction. Thanks
-
It turns out that this put me on the right path. There is a locking piece that slides down the long axis of the connector. To slide it out, you need to gently pry off the sliding lock first. I have attached pictures of the partially disassembled connector and the pins that are in it case it is helpful to someone in the future.
-
Litronic retrofit question
KevinH90 replied to steve20186's topic in 996 Series (Carrera, Carrera 4, Carrera 4S, Targa)
I updated the DIY file slightly, so you may want to check the updated version. I had the pin assignments on the litronic headlight control plugs (the ones that fit in the back of the headlight) reversed. I had the wires meant for the left going to the right headlight and vice versa. I'm not sure it makes a big difference, but it's better not to leave a possibility for error. Thanks for the clarification on "thick bar steward", -
Litronic retrofit question
KevinH90 replied to steve20186's topic in 996 Series (Carrera, Carrera 4, Carrera 4S, Targa)
Thanks Duffy. I have attached an Adobe portable document file (pdf) with all of the information I collected from you and a few other sources. Please let me know if you see any mistakes. I'll be testing these instructions and taking some photos while I'm working. I plan to update the document in a couple of weeks and ultimately post them in the DIY area. I'm hoping that someone else can add information about connecting to the diagnostic port and the purpose of the speed sensor connection. Because I already installed the retrofit kit that rotates the high beams, I need to remove some connectors from the car so that I can sell the retrofit components on to someone else who might need them. I don't like to waste things. I ordered an electrical pin removal tool for this purpose, and it won't arrive until mid week. By the way I want to make sure that nothing is lost in translation between two people divided by a common language. You refer to yourself as a "thick bar steward" in one of your Boxa.net posts. That is not an expression I'm familiar with. I did find "wobble" in a UK English dictionary and of course "WTF" is a universally recognized term among people who work on their cars. Again, thanks for all your help. Litronic Retrofit with Automatic Dynamic Headlight Beam Adjustment.pdf -
Litronic retrofit question
KevinH90 replied to steve20186's topic in 996 Series (Carrera, Carrera 4, Carrera 4S, Targa)
Duffy, I received my sensors. It appears that the smaller assembly goes on the front cross member and the larger one on the rear. Right now I'm waiting for the delivery of a pin-removal tool before I start installing my kit. I have reviewed all of the information that you provided, but I have a few remaining questions: What size hole did you drill to mount the sensor to the front cross member? How did you determine exactly where to drill that hole? Do you have any pictures of the installation on the rear cross member? How did you run the wires from the sensors into the front trunk? If you are willing to send me a PM with your e-mail address, I would like to send you a document that I prepared showing the installation procedure. I would appreciate your corrections and additions. When I am finished with my work, I plan to post it in the DIY section to make it available to other members. Regards,