Welcome to RennTech.org Community, Guest
There are many great features available to you once you register at RennTech.org
You are free to view posts here, but you must log in to reply to existing posts, or to start your own new topic. Like most online communities, there are costs involved to maintain a site like this - so we encourage our members to subscribe or donate. All subscriptions and donations go to the costs operating and maintaining this site. We prefer that guests take part in our community and we offer a lot in return to those willing to join our corner of the Porsche world. This site is 99 percent member supported (less than 1 percent comes from advertising) - so please consider an annual subscription or donation to keep this site running.
Here are some of the features available - once you subscribe RennTech.org
- View Classified Ads
- DIY Tutorials
- Porsche TSB Listings (limited)
- VIN Decoder
- Special Offers
- Paint Codes
- Registry
- Videos System
- View Reviews
- and get rid of this welcome message
It takes just a few minutes to register, and it's quality Porsche information at a low cost.
Contributing Members also get these additional benefits:
(you become a Contributing Member by subscribing or donating money to the operation of this site)
- No ads - advertisements are removed
- Access the Contributors Only Forum
- Contributing Members Only Downloads
- Send attachments with PMs
- All image/file storage limits are substantially increased for all Contributing Members
- Option Codes Lookup
- VIN Option Lookups (limited)


SPR
-
Posts
256 -
Joined
-
Last visited
Content Type
Profiles
Events
Forums
External Paint Colors
Downloads
Tutorials
Links Directory
Collections
Classifieds
Store
Everything posted by SPR
-
HELP I didn't use the liquid wrench and the header bolts broke!!! 6 broke on he head luckily just snapping the head of the bolt off adn leaving ample thread, but the collector ones did the same and appear pressed in???? What would be the best way to remove the threaded remains of the bolts in the head? I have smacked them lightly with a hammer per the instructions of liquid wrench after soaking them. Should I use a pair of vice grips and try to remove them that way or what? Are the studs pressed in on the cats? will a simple press be ok????
-
hub removal instructions?
SPR replied to SPR's topic in 996 Series (Carrera, Carrera 4, Carrera 4S, Targa)
BTW Hey Loren, sorry for the *** posts in the past I didn't realize that profanity was not tolerated and monitored - making it more work for you Thanks again Sean -
BTW I figured I would comment since I have done the mod and noticed some important additions needed If you take off the vents and work from the passenger vent with a flat head screwdriver prying off it will pop out and or break. Then you can push the screws back through the holes and pry in that groove and break along the way till you're done. Follow this process from the passenger side as you have removed the center trim and then from the drivers side on the last piece by the drivers vent NOW the most important part. PUSH all the areas around the holes back down as they create ridges around the holes and will not let the piece fit flush. Then use clear silicone with a Q tip to spread the silicone along the grove and insert the new pieces The result :)
-
hub removal instructions?
SPR replied to SPR's topic in 996 Series (Carrera, Carrera 4, Carrera 4S, Targa)
I do have all the tools and have done the rears on a 993tt before but farmed out the pressing. I just wanted to know the torque on the bolts as well as any specific removal process to make things quicker and reduce the risk of any damage etc. :) -
Hey Loren do you have instructions on how to remove the hubs f and rear? I am mainly concerned with the torque settings, as well as the priority of removal of some pieces as I removed the rear hub on my dad's 993tt and it required a lot of prying the aluminum arms to clear out of the holes, :help: which makes me nervious. Thanks Sean
-
nice that's actually a decent way to do it, however that farrel has to be for that express purpose. I am going to try and adjust it with the farrel, and if it doesn't work I will try the zip tie solution. Thanks. Sean
-
Great thanks Loren, I was trying to figure out if there was anything different or other references to consider any other brands but it appears that the mobile 1 is really the only proven oil. Thanks again. Sean
-
Hey Loren can I use the normal Mobile 1 75/90 at auto stores considering I have limited slip, i.e. do I need to add any friction modifier, and is that mobile 1 the same as the ptx?
-
header remval and install
SPR replied to karlooz's topic in 996 Series (Carrera, Carrera 4, Carrera 4S, Targa)
Good stuff. Hopefully I will have the lift together in time to make the plug change, tranny fluid change, and header install easier on the back ;) -
Sport Seat bollster wear
SPR replied to fourtaylor's topic in 996 Series (Carrera, Carrera 4, Carrera 4S, Targa)
Use leatherique. It is the best product I have used. Hands down better than lexol. I have the gt3 seats and had a couple of pairs of shorts with button fly buttons on the pockets that scratched the hell out of them. I used the product and it made it hardly noticeable. Then I ripped off the buttons! -
Brake weirdness
SPR replied to C4S Surgeon's topic in 996 Series (Carrera, Carrera 4, Carrera 4S, Targa)
sounds like maybe corrosion on the piston at the caliper causing drag maybe? -
No one? well I guess I will experiment hapzardly and pray not to break anything. The weird part is that the top nut above the farrel is already loose and I doubt it should be. I would guess that if I loosen the farrel to the bottom nut I can adjust then lock it down with both nuts.
-
header remval and install
SPR replied to karlooz's topic in 996 Series (Carrera, Carrera 4, Carrera 4S, Targa)
PTEC, I was originally going to press them myself, but I forgot that the press is in storage and will be too much of a PITA to get out, so I will send them to the machine shop I used last time. While that is going on I will be doing the work on the other parts- :) -
header remval and install
SPR replied to karlooz's topic in 996 Series (Carrera, Carrera 4, Carrera 4S, Targa)
I can do it in less. And I have done it before on my father's 993tt when I had to redo it after he stuffed it. I have full snapon, lift, and air tools :) -
header remval and install
SPR replied to karlooz's topic in 996 Series (Carrera, Carrera 4, Carrera 4S, Targa)
I am sending them out and they take almost no time to do at the machine shop :) -
Another Brake Pad Sensor Question
SPR replied to RayGT3's topic in 996 Series (Carrera, Carrera 4, Carrera 4S, Targa)
I don't see how the gt3 sensors would work that way as I believe it was mentioned that the sensors are the same 996 and gt3? -
I looked and it doesn't seem to directly address where my rattle is - the front middle of the sunroof trim panel when closed only. How can I adjust my throttle cable without breaking the accel. pedal? thanks.
-
Clutch pedal effort (1999/c2)
SPR replied to gavinmead's topic in 996 Series (Carrera, Carrera 4, Carrera 4S, Targa)
As the clutch is hydrolic unless you get lucky that you got air in the system, it's the wearing of the disc. It might also be a faulty slave cylinder. -
Cool I will check into it. Basically from my diagnosis the sunroof panel is tight everywhere but right at the front center and that is where the rattle is coming from. I installed a suede headliner some time ago, and maybe I unglued it or something? I will check that tsb to get a better idea of what you're talking about Anyone have instructions on how to adjust the throttle? thanks!
-
header remval and install
SPR replied to karlooz's topic in 996 Series (Carrera, Carrera 4, Carrera 4S, Targa)
Too bad you're in the bay area, I am going to install a set on my car this upcoming weekend as well as a plethora of other things, and my father has a lift and full snapon and air tools! hehe. I can't wait, I am going to do 14" stoptech's front new rotors rear, with pagid orange and stainless lines all around. gt3rs brake ducts, srf fluid, installing a custom braided clutch line, B&B headers, changing tranny fluid, changing plugs, and maybe replacing the boots and coil packs if bad (will be testing). I think I will also install screens in my front bumper and clean the radiators, and possibly modifiy the mount on the 3rd on as well. Oh, and I am going to change out the wheel bearings at all 4 corners. I should be able to knock it all out in a full day, yes I am that good or stupid :) -
OH also I forgot to ask, I have the dreaded rattle from the sunroof. However, when I push on the cover for the sunroof it stops. I can actually push the cover up and down is this normal or did it come unglued or undone? The rattle is really annoying should I glue it or insert foam or something? thanks Sean
-
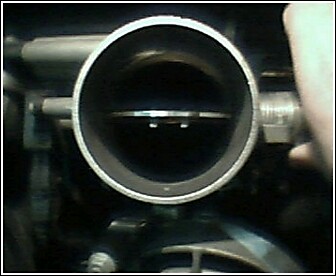
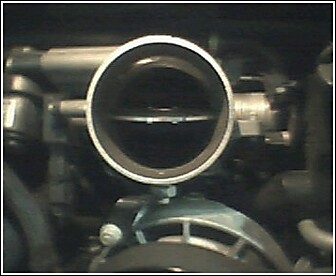
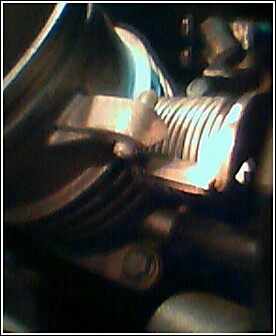
When I was cleaing the throttle body, I noticed that it wasn't opening all the way. Also if I push on the cable there is some slack in it. I went under and looked at the accelerator and noticed there is a threaded farrel which appears to be there for this adjustment howevever I couldn't see how to turn it without possibly breaking the plastic where it goes into the body of the pedal. There are two nuts on either side of the threaded farrel do these need to be turned? I also noticed a screw which holds the plate to the floor and a covered panel which I could not pry out just below it behind the accelerator pedal, what is the panel for or hiding? I also had my girlfriend floor the pedal and there was a bit of play between the stop and the arm of the level which I would assume it hits when fully open. Any thoughts?

-
Another Brake Pad Sensor Question
SPR replied to RayGT3's topic in 996 Series (Carrera, Carrera 4, Carrera 4S, Targa)
Pagids don't have holes. I guaged the size of the hole off the stock pads by sticking in a drill bit and then drilled the pads to accept the sensors. However use super glue or silicone to secured the sensors to the backing plate as mine didn't hold and it marred the inside of my rim by the time I noticed it :(. It is just as easy to make a jumper off the old ones, especially if they're already wasted. -
front wheel bearing install?
SPR replied to SPR's topic in 996 Series (Carrera, Carrera 4, Carrera 4S, Targa)
Thanks Loren! -
front wheel bearing install?
SPR replied to SPR's topic in 996 Series (Carrera, Carrera 4, Carrera 4S, Targa)
Is this something that I can do by myself btw? By looking at the PET it appears that it could be. Let me know what you think as I am not about paying 850 bucks for the dealer to do it and saving on the machine shop might be nice too. Do I need to remove the hub completely? I just had the alignment done so it would be great if not. Thanks Loren. Sean