Welcome to RennTech.org Community, Guest
There are many great features available to you once you register at RennTech.org
You are free to view posts here, but you must log in to reply to existing posts, or to start your own new topic. Like most online communities, there are costs involved to maintain a site like this - so we encourage our members to donate. All donations go to the costs operating and maintaining this site. We prefer that guests take part in our community and we offer a lot in return to those willing to join our corner of the Porsche world. This site is 99 percent member supported (less than 1 percent comes from advertising) - so please consider an annual donation to keep this site running.
Here are some of the features available - once you register at RennTech.org
- View Classified Ads
- DIY Tutorials
- Porsche TSB Listings (limited)
- VIN Decoder
- Special Offers
-
OBD II P-Codes - Paint Codes
- Registry
- Videos System
- View Reviews
- and get rid of this welcome message
It takes just a few minutes to register, and it's FREE
Contributing Members also get these additional benefits:
(you become a Contributing Member by donating money to the operation of this site)
- No ads - advertisements are removed
- Access the Contributors Only Forum
- Contributing Members Only Downloads
- Send attachments with PMs
- All image/file storage limits are substantially increased for all Contributing Members
- Option Codes Lookup
- VIN Option Lookups (limited)


atmorris
-
Posts
271 -
Joined
-
Last visited
Content Type
Profiles
Events
Forums
External Paint Colors
Downloads
Tutorials
Links Directory
Collections
Classifieds
Store
Everything posted by atmorris
-
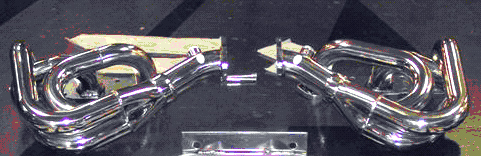
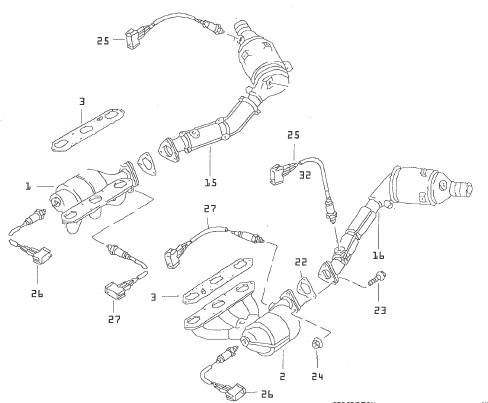
I'm installing headers on my '03 and the main cats do not have any capped bungs for relocating the post cat O2 sensor to. The parts diagrams show them located in the angled end face of the cat on the stock main cats that have them. Can anyone tell me: 1) Where can I get weld on receivers(fittings) for the O2 sensors? Pellican lists a weld on receiver PN PEL-SW85-21688 for a K&N Air/Fuel Monitor. Does anyone know if this fitting would work? 2) Should the fittings be installed into the angled end face of the cat or onto the pipe exiting the cat ? Would one location be preferrable over the other? 3) Failing all else, does anyone know what the size/tpi size of the stock O2 sensor is ? I could always just weld a nut on there....... Andy
-
Anyone know if it matters where the O2 sensor is put in the main cat, other than on the outflow side? The stock location appears to be in the angled endface of the cat rather than in the outlet pipe itself. My inclination would be to follow that example.
-
The main cat has a bung near its outlet. It's on top so may be hard to see just looking underneath the car. Take a look at the very top of the diagram in your earlier posting & you can see where the sensor screws in to the bung. I see it. Now I just hope that there isn't already another O2 sensor that I didn't see stuck in that bung that I didn't see........if not, I'm all set ! :clapping: Well, that would have been too easy. The MY03 main cat apparently has no such bung for an O2 sensor. I felt all around the outlet side - nothing there. I guess I will have to take the midpipe all the way out and have someone open a hole and weld a bung to it for the sensor. Anyone know where I might be able to buy a couple of weld on bungs for O2 sensors ? I think I remember seeing something on the Pellican website once...... What are they 18mm ?
-
The main cat has a bung near its outlet. It's on top so may be hard to see just looking underneath the car. Take a look at the very top of the diagram in your earlier posting & you can see where the sensor screws in to the bung. I see it. Now I just hope that there isn't already another O2 sensor that I didn't see stuck in that bung that I didn't see........if not, I'm all set ! :clapping:
-
I lengthened my cables and had no "timing" problems. The problem I did have was getting good, durable splices. I'd seen conflicting info on whether solder or crimping was best, so soldered two extensions and crimped the other two. I searched for but never found any pluggable extensions. If you use copper extensions, as I did, then crimping is the way to go. The problem with soldering is that the OEM wiring is stainless steel, which doesn't solder well to copper -- at least not with the Radio Shack solder I was using. I've done a lot of soldering over the years and never had this problem before, but had never tried to solder these two metals together either. Several of the soldered joints failed resulting in CELs. So I redid all the soldered joints with crimps last October, and nary a CEL since then. Good luck, Mick Yea, I checked with our EE this morning and he said that timing of the signal wouldn't be a concern. He was a little puzzled as to why soldering would not be the preferred method because generally there would be less loss, but I didn't know at the time that the stock witing was stainless. Did your main cats have O2 bungs in them already? Or did you have to add one to the outlet pipe from the main cats? I didn't see any in mine, although I didn't look at them thouroughly yet. Maybe there are knockouts or bungs I didn't see. Toolpants?...MY03 main cats ...do they have some provision for O2 sensors that I can take advantage of? If not are their specific dimensions that the sensor mounting bungs would have to be made to? (height, thread, etc..)
-
OK, I jacked her up and crawled underneath last night. The stock stuff looks as Toolpants said it should: one O2 sensor at the front of the pre cat, one at the exit of the pre cat, none in the mid pipe with the main cat. The headers have a bung for an O2 sensor, that's great, only problem is the stock header with the pre cats has 2 sensors. So I would assume that this means the frontmost sensor needs to get installed in the header bung, and the output side sensor would have to move to the output side of the main cat. The problem with that is there is no way the front O2 sensor cable is going to reach the O2 sensor socket on the header collector, and there is no way the other sensor cable is reaching all the way back by the muffler to pickup the exit side of the main cat. I think I recall reading somewhere that you can't lengthen these sensor cables because it changes the timing of the signal and it won't work. Are there other Porsche cables that can be used? Does someone make aftermarket cables, that are extended for this purpose? So for anyone who has put headers on a MY03 2.7L base Boxster before, and kept the main cats, how did you do this? Even if I bought the sport cats (which I can't), I'd still have the cable problem wouldn't I ? :help:
-
Yea, I see that both of your posts show 2 O2 sensors in the pre cats. The headers I have contain only one bung for an O2 sensor: and the diagram shows 2 in the pre-cat and one in the mid pipe. I was under the impression that there were 4 O2 sensors total, and that if I bought headers that would accept the front sensor, and retained use of the mid pipe with the main cat and O2 sensor, I'd be OK and have no CEL problems. Also, Jeremy from iA told me these headers would not produce CEL. I don't see how that will be the case, if the stock header and pre cat has 2 sensors. Also, the only sensor that looks like it can be installed into the bung on the headers is the one at the rear of the pre cat, the front sensor cable isn't long enough to reach. Wouldn't it be the front one that would need to be installed in the header collector ? So, what's the solution then, assuming I want to use the headers with the stock main cat pipes ? What would I have to do with the extra sensor ?

-
M030: A Comprehensive Write-Up
atmorris replied to insite's topic in 986 Series (Boxster, Boxster S)
Y'know, I keep thinking about this......doesn't the zero front toe make the car touchy at very high speeds Insight ? -
I kind of like the Suttgart design myself. It doesn't try to make the Boxster look like a Cayman, but it has more style than the stock HT. It fits the car well, and sits on the car well. It looks like a stylish Boxster HT, not a piece of bodywork stuck on to make a Boxster into a Cayman. I was enamored with the Zeintec design when I first saw it, but the more I thought about it, the more I didn't like it. For one, it attempts to make the Boxster look like a Cayman. If you want a Cayman, trade your Boxster in on one. Don't demean it by making it a Cayman wannabe. Second, it is overpriced and hard to get. Finally, and most importantly, I don't like the way it sits on the car. It looks exactly like what it is - an afterthought. It doesn't look like it belongs there. If you price out the Stuttgart top, let me know what kind of price they quote you. Just my $.02 :P
-
The shop manual and diagrams I have access to are a little confusing, and I haven't crawled underneath yet. Can someone tell me if an '03 base Boxster has 1 O2 sensor on the precat or 2 ? I have a set of headers to put on that are set up for an O2 sensor on the collector. I am going to retain the stock mid pipes with the main cats and O2 sensors, but if there are 2 on the precats..... I don't know what to do with the second one !
-
M030: A Comprehensive Write-Up
atmorris replied to insite's topic in 986 Series (Boxster, Boxster S)
Thanks for all the info insite. Much appreciated. :cheers: I'll let you know where I end up. I have a lot of wrench turning to do on my car (lots of goodies to put on) over the next few evenings and weekends. I thought the bad weather here in NJ was going to last a lot longer than it appears it has. I still have some time though. Still need a couple of real good rains to wash all that **** calcium off from the winter. :) -
M030: A Comprehensive Write-Up
atmorris replied to insite's topic in 986 Series (Boxster, Boxster S)
Insight, so if I am reading your progression of camber settings here, I take it you wound up at F = -1.6 R= -2.0 Pressures 32 psi all around - cold. I am doing a full ROW M030 kit (from Suncoast) update to my '03 base Boxster right now, so I have a couple of questions for you. First some background: I am a decent driver, new to Porsches, but it sounds like you may be more skilled than I. Rubber on my car is stock size F&R on the optional 18" Carrera rims, and tires are Pirelli P-Zero's. There are a lot of twisty back roads in my neck of the woods and I like to drive them pretty aggressively now and then. So here are my questions: 1) Are the camber settings I mentioned above correct, and how "streetable" do you find these settings? 2) You didn't mention the toe-in settings you use F and R, what are those settings on your car? (I was advised F=0, R=1/8" or less) -
ROW M030 ordered yesterday from Suncoast. Can't wait ! Why I do these things I don't know....like it doesn't go fast enough, or handle better than anything else I've ever owned to begin with.... :P
-
Find someone who will do custom alignments. You do not want the "it's within factory specs" kind of cr@p. Front: Toe - as close to 0 as you can get. Camber - Max negative, but matched left to right. Probably around -1 degrees is all you'll get with the ROW suspension. If you find your front tires wearing heavily on the inside edge, try flipping them on the rims before the tread has totally gone. If you still find they wear too fast, reduce the camber. Rear: Toe - 1/8" total toe-in a Camber - 0.5 degrees more camber than you got up front. eg, if you get -0.8 degrees up front, set the rears to -1.3. This is a nice aggressive street setting. If you find the car tramlining badly - ie following the ruts in the road left by heavy traffic - try adding a little toe-in. Good Luck, Graeme Thanks Graeme.
-
What is your tolerance for buckboard stiff suspensions and replacing tires? The only reason to get a coilover suspension is to gain the camber we need to the track and to stiffen everything up so it improves the handling. To run adequate camber for track or autocross (-2-2.5 degrees), you will go through a set of tires in less than 5k miles! For a predominantly street driven car that sees the track and Ax course only occasionally, it's hard to recommend anything other than the ROW M030. Even "spirited" runs in the canyons would be more than satisfied with the ROW setup. Of course, as always, this is IMHO. Graeme I could tolerate the stiff suspension, but not the set of tires every 5000 miles. 10K, ok...but not 5k. I do make frequent "Spirited" runs. OK, so ROW M030 it is. Any thoughts on the alignment specs once I get the new suspension installed? Strictly by book, or is there a better set of street/track settings ? Andy
-
Any idea how either of you guys would compare this setup to ROW M030 ? Pss2 ? I'm deciding on a route to take with this right now, and was all set on ROW M030 until I read this. I don't track my car regularly, but I bought it to "play" with and fully expect to do some track time and/or autox with it this year. On the other hand, we do like to take weekend runs in it as well. I try to stay away from highway hauls (b-o-r-i-n-g) but sometimes you just can't. Andy
-
Anyone know the weight on these MY03 optional wheels ? I believe they are 8"F and 9.5"R Option 411 18" Lt Alloy Carrera Wheel My car has them, I never see these for sale anywhere, and can't seem to find weight data on them either.
-
Anyone know the weight on these MY03 optional wheels ? I believe they are 8"F and 9.5"R Option 411 18" Lt Alloy Carrera Wheel My car has them, I never see these for sale anywhere, and can't seem to find weight data on them either.
-
Never mind, guys on the other list told me to just use grade 8 standard hardware. Spent $50 for a box M8x28 bolts for the headers, a box of M8x35 bolts for the flanges, a box of M8 washers, all grade 8, and a box of oil drain plug gaskets. A box = 50. :thumbup: Instead of $90 + tax for 12 header bolts, 6 flange bolts, and 6 washers from the local Porsche dealer. :o ...anybody want to buy some header or flange bolts ? Got 'em cheap, 1/2 the Porsche price...just $2.00 each. :lol:
-
Anyone have an idea who I might be able to get header bolts for an '03 986 2.7L from online ? Someone who would have them in stock that is... Locally, everyone says they need to order them.
-
Short Throw Shift Kit on Ebay
atmorris replied to machster's topic in 986 Series (Boxster, Boxster S)
Delrin rod stock is about 3x more expensive than Nylon, and a little bit harder to machine. It yields a better bushing though: more durable, more dimensionally stable. If these are truely B&M knockoffs, and they have been reverse engineered from a B&M unit, then you could always buy a set of replacement bushings from B&M to get the Delrin ones. I'm going to try that route before I have someone machine a set. -
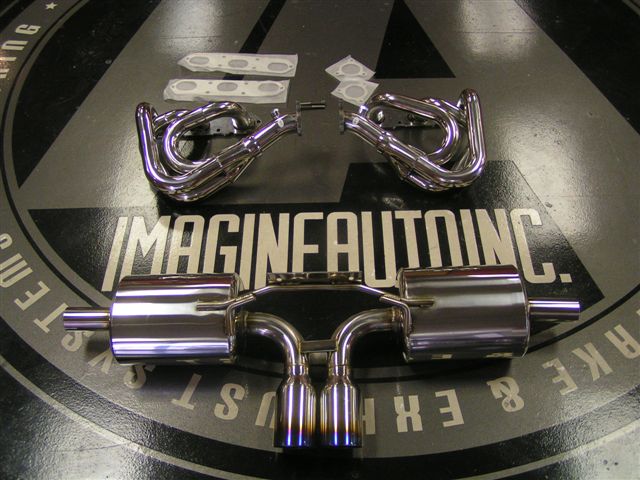
Trackday Friendly Exhaust Recommendations
atmorris replied to MannyA's topic in 986 Series (Boxster, Boxster S)
I just bought a unit from ImagineAuto Imagine Auto that I believe is below 100db. This is it....
-
Short Throw Shift Kit on Ebay
atmorris replied to machster's topic in 986 Series (Boxster, Boxster S)
I just bought one from iA, and I was told it is a B&M. However, given the fact that it came in a bag rather than carded, that there were no installation instructions included, and that the bushings are made of nylon, I think it may actually be a knockoff. B&M uses Delrin for the bushings. The bushings in this kit both measure at 0.617" ID, and do not appear to have any appreciable taper or concentricity issues. However, I do know that there is a difference between nylon and Delrin that may affect shifter performance. Nylon is hygroscopic, and is not nearly as dimensionally stable as Delrin. Simply put, this is to say that nylon will absorb moisture and change size in response to that, Delrin will not. -
Yea...that would definately suck. As in torch heat them, or heat the engine up ?
-
I just bought a set of headers (with O2 sensor bungs) and an exhaust for my '04 Boxster. Before I put her up on stands, roll under her and dig in, I have a couple of questions for those who have installed a set of headers already: 1) My car is an '04 2.7L with 20k miles. It has never seen winter or salt and calcium. I have heard about header bolts having a tendancy to snap off in the head unless heated, but perhaps those were on cars with more miles or abuse. Anyone care to comment on your own experiences ? Given the angle of the bolts, I can't see how penetrant would help much so what is the usual process then..will I need to torch heat each bolt, or warm the engine, or what ? 2) Is there a particular way (other than to use the jack insert and jacking points) that the car has to be put up on jack stands ? 3) What are the torque settings for the header bolts ? Flange bolts? What is the correct torquing order for the header bolts ? Would you advise using all new ones? All input will be appreciated..