Welcome to RennTech.org Community, Guest
There are many great features available to you once you register at RennTech.org
You are free to view posts here, but you must log in to reply to existing posts, or to start your own new topic. Like most online communities, there are costs involved to maintain a site like this - so we encourage our members to subscribe or donate. All subscriptions and donations go to the costs operating and maintaining this site. We prefer that guests take part in our community and we offer a lot in return to those willing to join our corner of the Porsche world. This site is 99 percent member supported (less than 1 percent comes from advertising) - so please consider an annual subscription or donation to keep this site running.
Here are some of the features available - once you subscribe RennTech.org
- View Classified Ads
- DIY Tutorials
- Porsche TSB Listings (limited)
- VIN Decoder
- Special Offers
- Paint Codes
- Registry
- Videos System
- View Reviews
- and get rid of this welcome message
It takes just a few minutes to register, and it's quality Porsche information at a low cost.
Contributing Members also get these additional benefits:
(you become a Contributing Member by subscribing or donating money to the operation of this site)
- No ads - advertisements are removed
- Access the Contributors Only Forum
- Contributing Members Only Downloads
- Send attachments with PMs
- All image/file storage limits are substantially increased for all Contributing Members
- Option Codes Lookup
- VIN Option Lookups (limited)


51.50
-
Posts
21 -
Joined
-
Last visited
Content Type
Profiles
Events
Forums
Exterior Paint Colors
Downloads
Tutorials
Links Directory
Collections
Classifieds
Store
Everything posted by 51.50
-
VIN decoding question
51.50 replied to 51.50's topic in 9PA, 9PA1 (Cayenne, Cayenne S, Cayenne Turbo, Cayenne Turbo S)
Thank you for your response. I was aware of the option list, and what they represent, but I am not provided any pictures of that and was wondering if there was a way to determine if the vehicle is a Turbo S exclusively by the VIN. I doubt there is, but it may be possible. -
Gas Mileage
51.50 replied to Fruitypuddinpops's topic in 9PA, 9PA1 (Cayenne, Cayenne S, Cayenne Turbo, Cayenne Turbo S)
It is not accurate on my Cayenne. I have the correct tire size from the factory and the cluster still shows a higher MPG than actual. Try doing the math yourself after you fill up your gas tank and see if it is accurate for you. I would like to know if others experience an inaccurate MPG figure on their cluster. -
I often purchase vehicles from auctions relying on pictures alone. I have been looking for a Turbo S for myself. I know how to determine if the Cayenne is a Turbo or non-Turbo by looking at the 5th digit of the VIN. Is there a way to determine if a Cayenne is a standard Turbo or Turbo S by looking at the VIN as well? I was thinking that possibly the Turbo S's were only manufactured at a particular plant, or they may have been dedicated to a certain block of VINs that are grouped together by the last 5 digits. Buying vehicles relying on pictures alone has become a bit disappointing, as some people will put badges on vehicles that don't belong on there. I would hate to purchase a Turbo, thinking it is a Turbo S, just because someone put an "S" badge after the "Turbo" badge on the rear hatch.
-
Gas Mileage
51.50 replied to Fruitypuddinpops's topic in 9PA, 9PA1 (Cayenne, Cayenne S, Cayenne Turbo, Cayenne Turbo S)
04 CTT with 90k miles. My actual MPG is between 10.7 - 11.2. The fancy cluster states 11.5 - 12.2. (Usually about .8 MPG higher than actual) Only mod I have at the moment is a Sprint Booster. I drive mostly around town semi aggressive. -
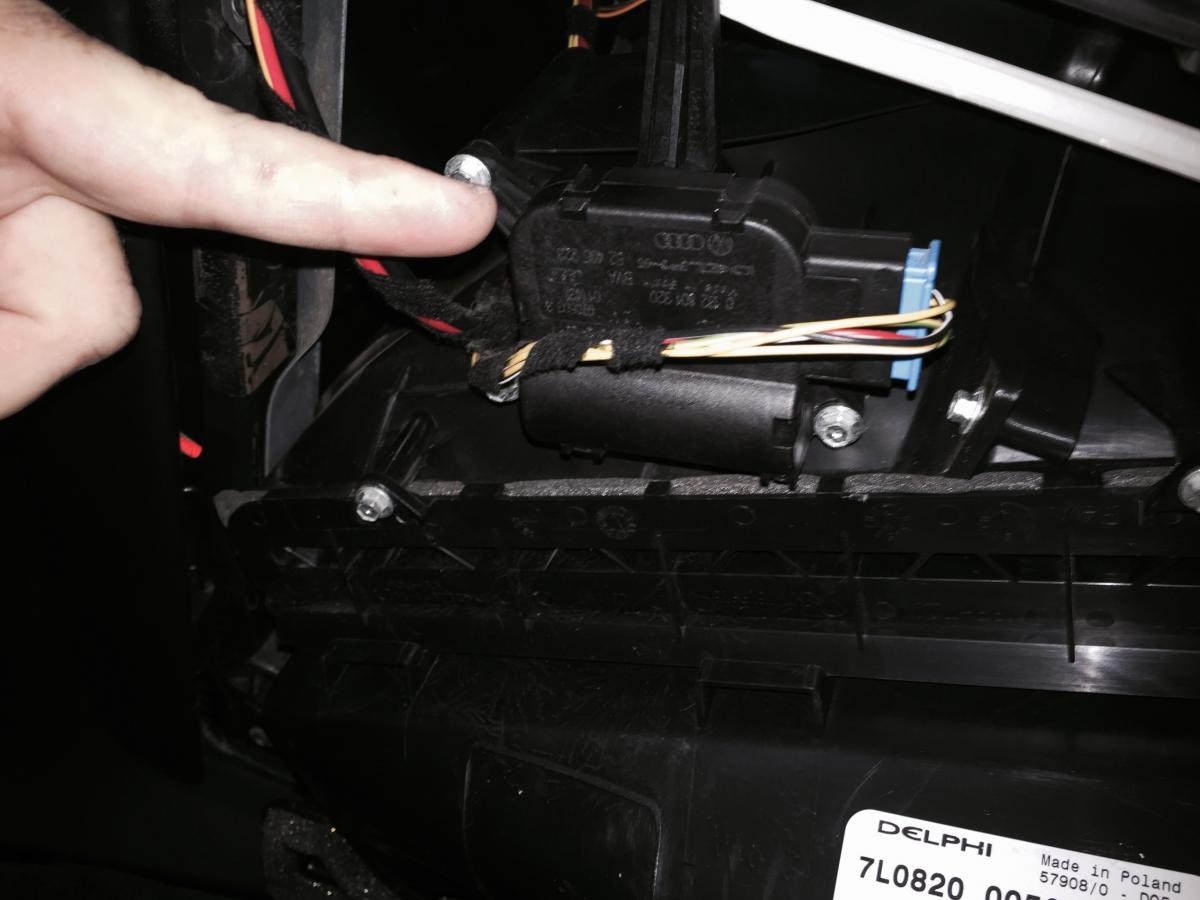
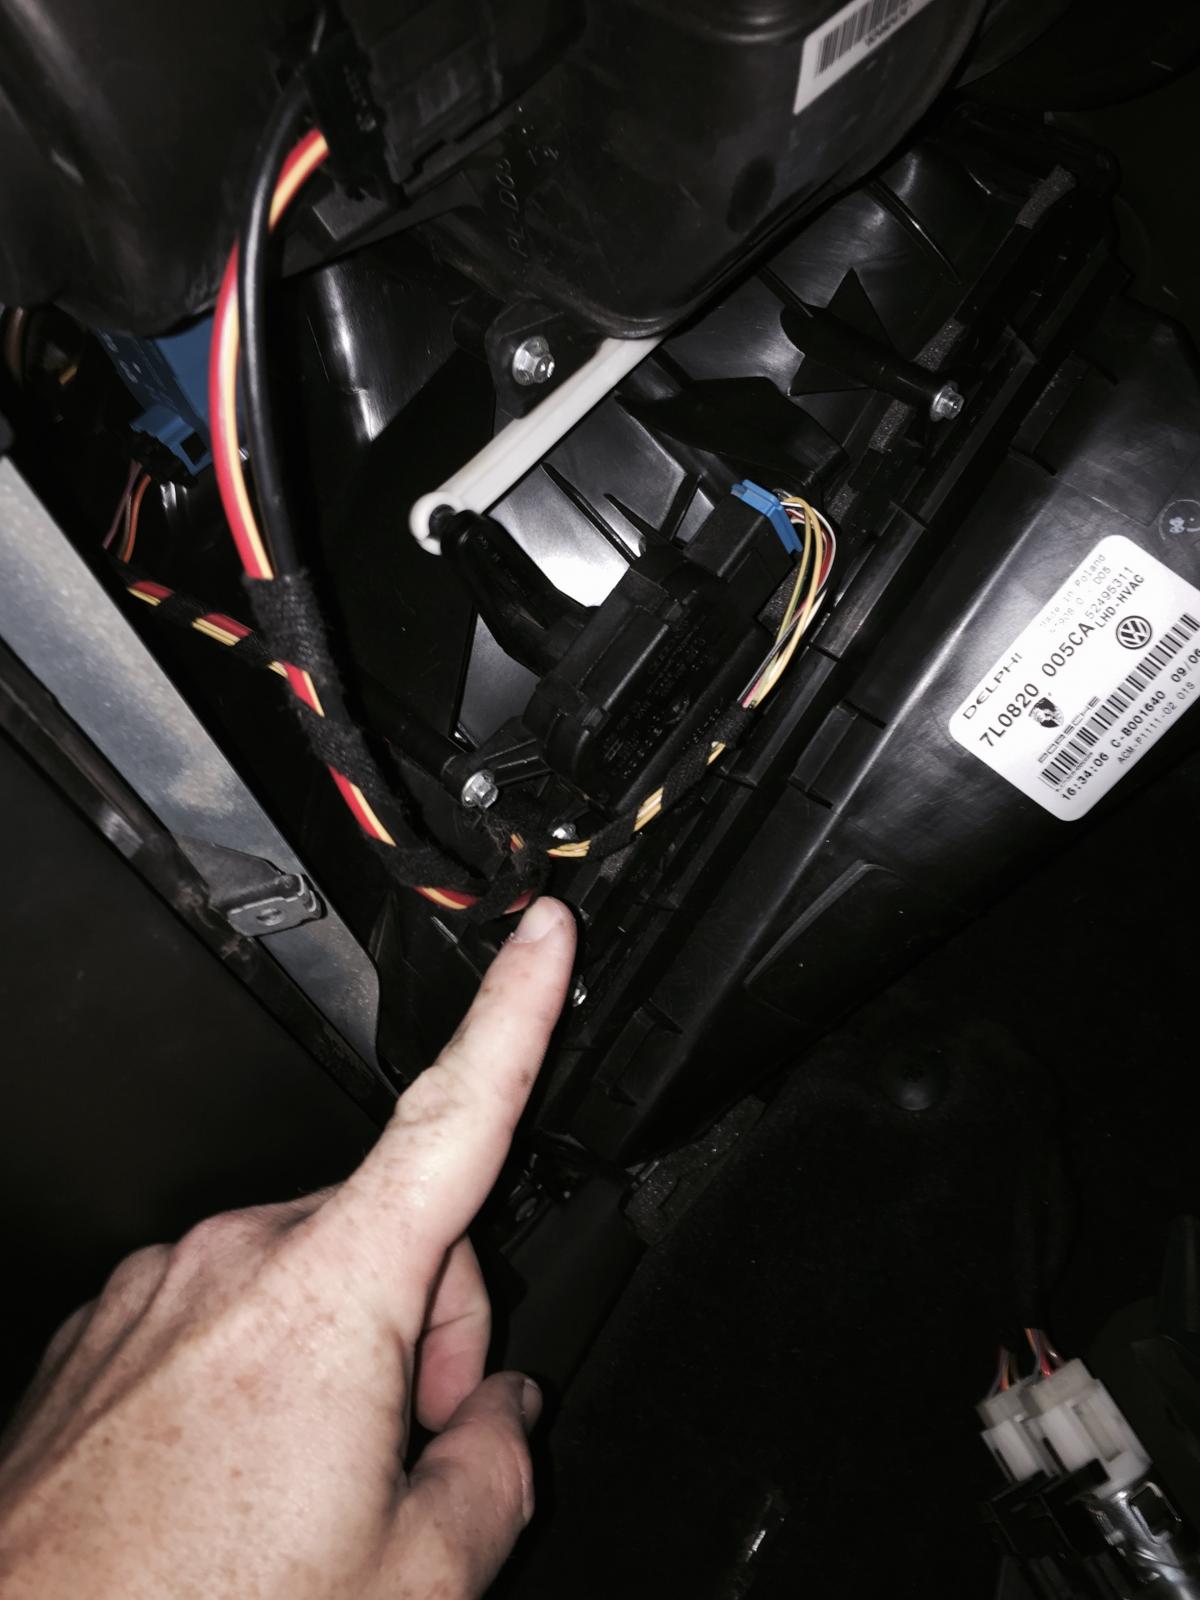
I believe my explanation caused a little misinterpretation. The blower motor seems to work fine. Here is a picture of what I would like to test. This is the electric motor that constantly keeps moving back and forth. Or maybe someone can simply say, "Yes, if it is moving back and forth it is indeed broke." My reasoning for not automatically replacing it is that I am not sure if this is the actual problem, or if it works fine and just receiving an incorrect signal from something else that may be bad.
-
Let me start by saying I'm not a mechanic, so I do not know the names of certain parts. This is of a 2004 Porsche Cayenne Turbo w/ 4-Zone Climate However, what I do know is, the A/C electric motor (955.624.915.01) under passenger side dash is steadily going back and forth regardless of A/C or Heat On/Off, High Low, Dash,Floor, Etc. It connects to a flap on the passenger side firewall. Pictures are of the same part, just different angles. My question is this. How do I test this electric motor to determine if it is bad? Or could something else be bad causing the motor to constantly move? Any response will be appreciated.

-
The diagram provided confirmed what I had thought. Thank you very much.
-
I am replacing my Parking Brake Release Cable, and I am not sure how it is routed exactly. It appears it may be routed in a loop, but I want to make sure. Does anyone have any pictures, or a diagram, of the cable going from the Parking Brake Release Lever to the Parking Brake Foot Pedal? It would be greatly appreciated.
-
CTEK Comfort Indicator Panel Installation in Cayenne w/images Here is how I installed my CTEK Comfort Indicator Panel. I decided to install it under the driver's side dash for convenience, aesthetics, and to prevent possible damage if I were to forget it was plugged in. There are two different lengths of this type of plug; one is 4.9', the other is 10.8'. I installed the 10.8' cord because I wanted more options of where I could install it. In this mod, I used the following: Small Flat Screwdriver T-20 Torx Driver 6mm, 8mm & 10mm Sockets w/ Ra Author 51.50 Category Cayenne (9PA, 9PA1) - Mods Submitted 06/17/2015 06:18 PM
-
CTEK Comfort Indicator Panel Installation in Cayenne w/images
51.50 posted a tutorial in Cayenne (9PA, 9PA1) - Mods
Here is how I installed my CTEK Comfort Indicator Panel. I decided to install it under the driver's side dash for convenience, aesthetics, and to prevent possible damage if I were to forget it was plugged in. There are two different lengths of this type of plug; one is 4.9', the other is 10.8'. I installed the 10.8' cord because I wanted more options of where I could install it. In this mod, I used the following: Small Flat Screwdriver T-20 Torx Driver 6mm, 8mm & 10mm Sockets w/ Ratchet 4 Zip-Ties Razor Blade Sharpie Marker Small Ruler I used my ruler to measure the backside of the Indicator Panel, then marked the demesions on the OBD2 panel under the dash on the driver's side. I then used a razor blade to cut the insulation and panel so the Indicator Panel would have a tight fit. I then used a small flat screwdriver to pop up the SS Door Sills. I then used a T-20 Torx driver to remove the plastic Door Sills. With the Door Sills removed, I pulled the carpet back just far enough to route the cable alongside existing wires from the OBD2 area, to the rats nest of wires located under the driver's seat. I then pushed the new cable through the hole in the battery tray. I then unbolted the positive battery cable removed the battery tray grommet to slide the cable through it. I had to remove the fuse in order to do that. I then reinstalled the battery cable through the grommet alongside the new cable. There is no need to cut the grommet as it will fit with a little patience. I made sure to leave just enough cable to mount the rings onto the battery. I then unbolted 3 different cable to route the new cable underneath to give it a professional look. I then zip-tied the excess under the dash while using zip-ties in various locations to secure it. I then bolted the rings onto the battery posts to make sure it was working properly before I put everything back together. I hope you enjoyed my DIY tutorial. Do not hesitate to PM if there are any questions. I am happy to help. -
I appreciate your response. Thank you.
-
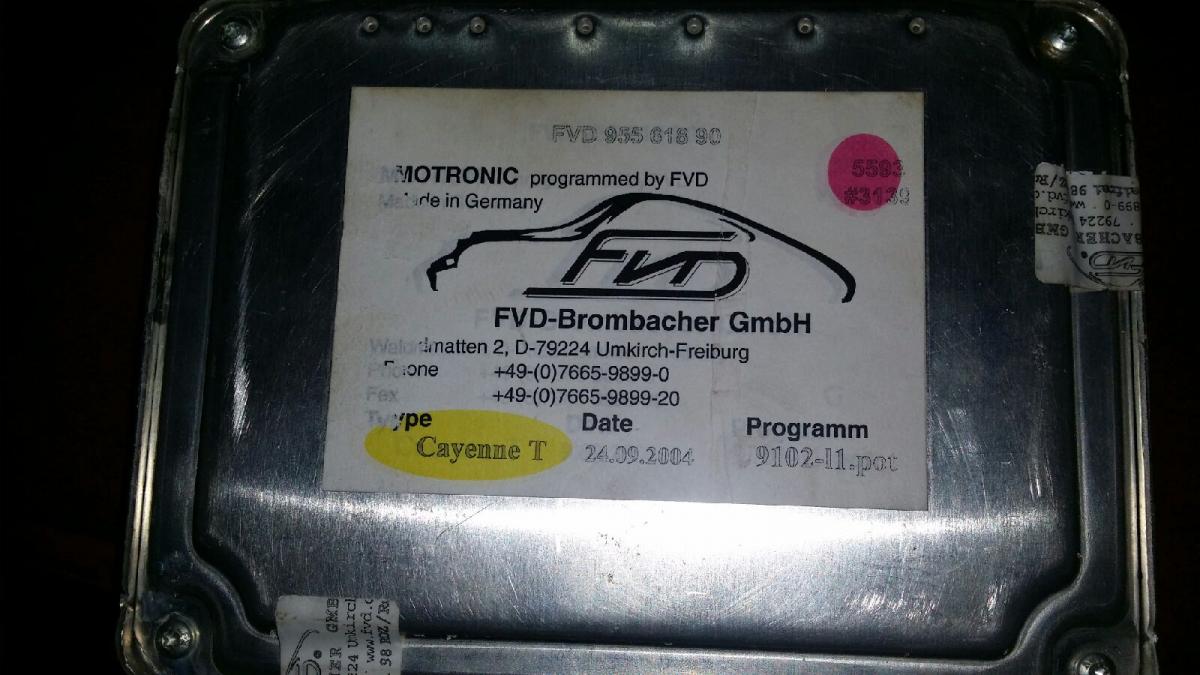
I have a chance to buy a used FVD ECU, but I know nothing about it. Will anyone clue me in to what I am looking at here? I am aware of what it does, but I am not aware of the compatibility to my vehicle. These are my questions: Keep in mind this unit is a older unit that plugs into the vehicle permanently, and is not software installed through the OBDII by a flash tool. Are these units married to a single VIN? Are they plug and play? Would it have came with a flash tool (cable/scanner) to make adjustments parameters myself? Any other info that can be provided would be greatly appreciated. Thank you
-
I have a "Steering Faulty" code on the gauge cluster. I have the same problem as described in this http://www.renntech.org/forums/index.php?act=findpost&pid=108429 thread.
-
Does anyone have an idea?
-
I have an '04 Cayenne TT and am trying to do some troubleshooting. Will someone tell me where part # 95561802700 is physically located? It is called "Control Unit Vehicle Electric System" on the parts sheet, but no diagram of location. For reference, it is #14 on illustration 901-03 of the 9PA_USA_KATALOG.pdf. Thank you.
-
Cayenne Turbo - Removing and installing drive belt
51.50 replied to Loren's topic in DIY Articles - Cayenne - Maintenance
What are the part #'s for pulleys 5 & 8? -
2004 Cayenne Turbo Front Bumper Cover "Brace"
51.50 replied to 51.50's topic in 9PA, 9PA1 (Cayenne) Part Number Requests
The part is not in that diagram. However, maybe it is not in that diagram because mine is a turbo. I believe the piece I am looking for is sold separately because I have found it for later model years as seen in the diagram below. The part I need is the part numbered 12, but again for a 2004 turbo. I also attached pictures of my actual broken piece. -
2004 Cayenne Turbo Front Bumper Cover "Brace"
51.50 replied to 51.50's topic in 9PA, 9PA1 (Cayenne) Part Number Requests
The following link describes the above part number as #6 in their diagram, a different part than what I am looking for. http://www.jimellisporscheparts.com/showAssembly.aspx?ukey_product=3771312&ukey_assembly=471322 What I am looking for is plastic and about 3 feet wide spanning the width of the front bumper. It looks very similar to the picture above. It is possible the piece I am referring comes attached to the front bumper cover when purchased from a dealer. The reason why I thought this piece was not included with the front bumper cover is because I see them for sale for other model years. Thanks again for your time. -
I am having difficulty finding a part number for the plastic center "brace or support" that is mounted to the front bumper cover of a 2004 Porsche Cayenne Turbo. It is mounted out of sight directly behind, and to, the bumper cover. The top of this piece wraps around the top of the bumper cover and helps secure it and the bumper cover to the radiator support. I included a picture of an 07-09 piece I am referring to. Again, I am looking for the part number for this piece to fit a 2004 Cayenne Turbo. Any help will be appreciated. Thank you.