Welcome to RennTech.org Community, Guest
There are many great features available to you once you register at RennTech.org
You are free to view posts here, but you must log in to reply to existing posts, or to start your own new topic. Like most online communities, there are costs involved to maintain a site like this - so we encourage our members to subscribe or donate. All subscriptions and donations go to the costs operating and maintaining this site. We prefer that guests take part in our community and we offer a lot in return to those willing to join our corner of the Porsche world. This site is 99 percent member supported (less than 1 percent comes from advertising) - so please consider an annual subscription or donation to keep this site running.
Here are some of the features available - once you subscribe RennTech.org
- View Classified Ads
- DIY Tutorials
- Porsche TSB Listings (limited)
- VIN Decoder
- Special Offers
- Paint Codes
- Registry
- Videos System
- View Reviews
- and get rid of this welcome message
It takes just a few minutes to register, and it's quality Porsche information at a low cost.
Contributing Members also get these additional benefits:
(you become a Contributing Member by subscribing or donating money to the operation of this site)
- No ads - advertisements are removed
- Access the Contributors Only Forum
- Contributing Members Only Downloads
- Send attachments with PMs
- All image/file storage limits are substantially increased for all Contributing Members
- Option Codes Lookup
- VIN Option Lookups (limited)


John White
-
Posts
20 -
Joined
-
Last visited
Content Type
Profiles
Events
Forums
Exterior Paint Colors
Downloads
Tutorials
Links Directory
Collections
Classifieds
Store
Everything posted by John White
-
 Rob sold out after apparently having some trouble filling orders. All his designs and more now are being produced by Hanksville Hot Rods. Hank is a great guy to deal with and they make a great product. I've got the bypass pipes and one of these days am going to upgrade to a full 3" exhaust from the turbo back. I think he's also selling a cold air intake set up now too. I did secondary bypass pipes and a magnaflow exhaust from there back. It opened it up some but it doesn't sound anywhere as good as ciaka's set up.
 -
Great info!! I'm still learning how this whole system works!!
-
Once again, did I mention how much I hate electrical issues? I FINALLY figured this out tonight. Went back inside the headlight and was going to test the ground wire coming off the cornering light. Turns out it was a bit frayed at the connector. I fixed that and it seems to have solved the issue. I think I have an idea what happened to cause all this. One of the bulbs went out awhile back and I grabbed new ones at the local parts place. I threw them out when I replaced them when all this trouble started so I can't check, but I have a sneaking suspicion they may have been a higher wattage bulb and caused the problems with the wire shedding the insulator like it was. Maybe, maybe not. Supposed to be 55w bulbs which is what I have now but I'd be willing to bet the ones I had last time were 100w. Did I mention how much I hate electrical issues? I've been chasing my tail for way too long on this issue only to have it be a simple fix right back at the light. Thanks for all the help and ideas though!!!
-
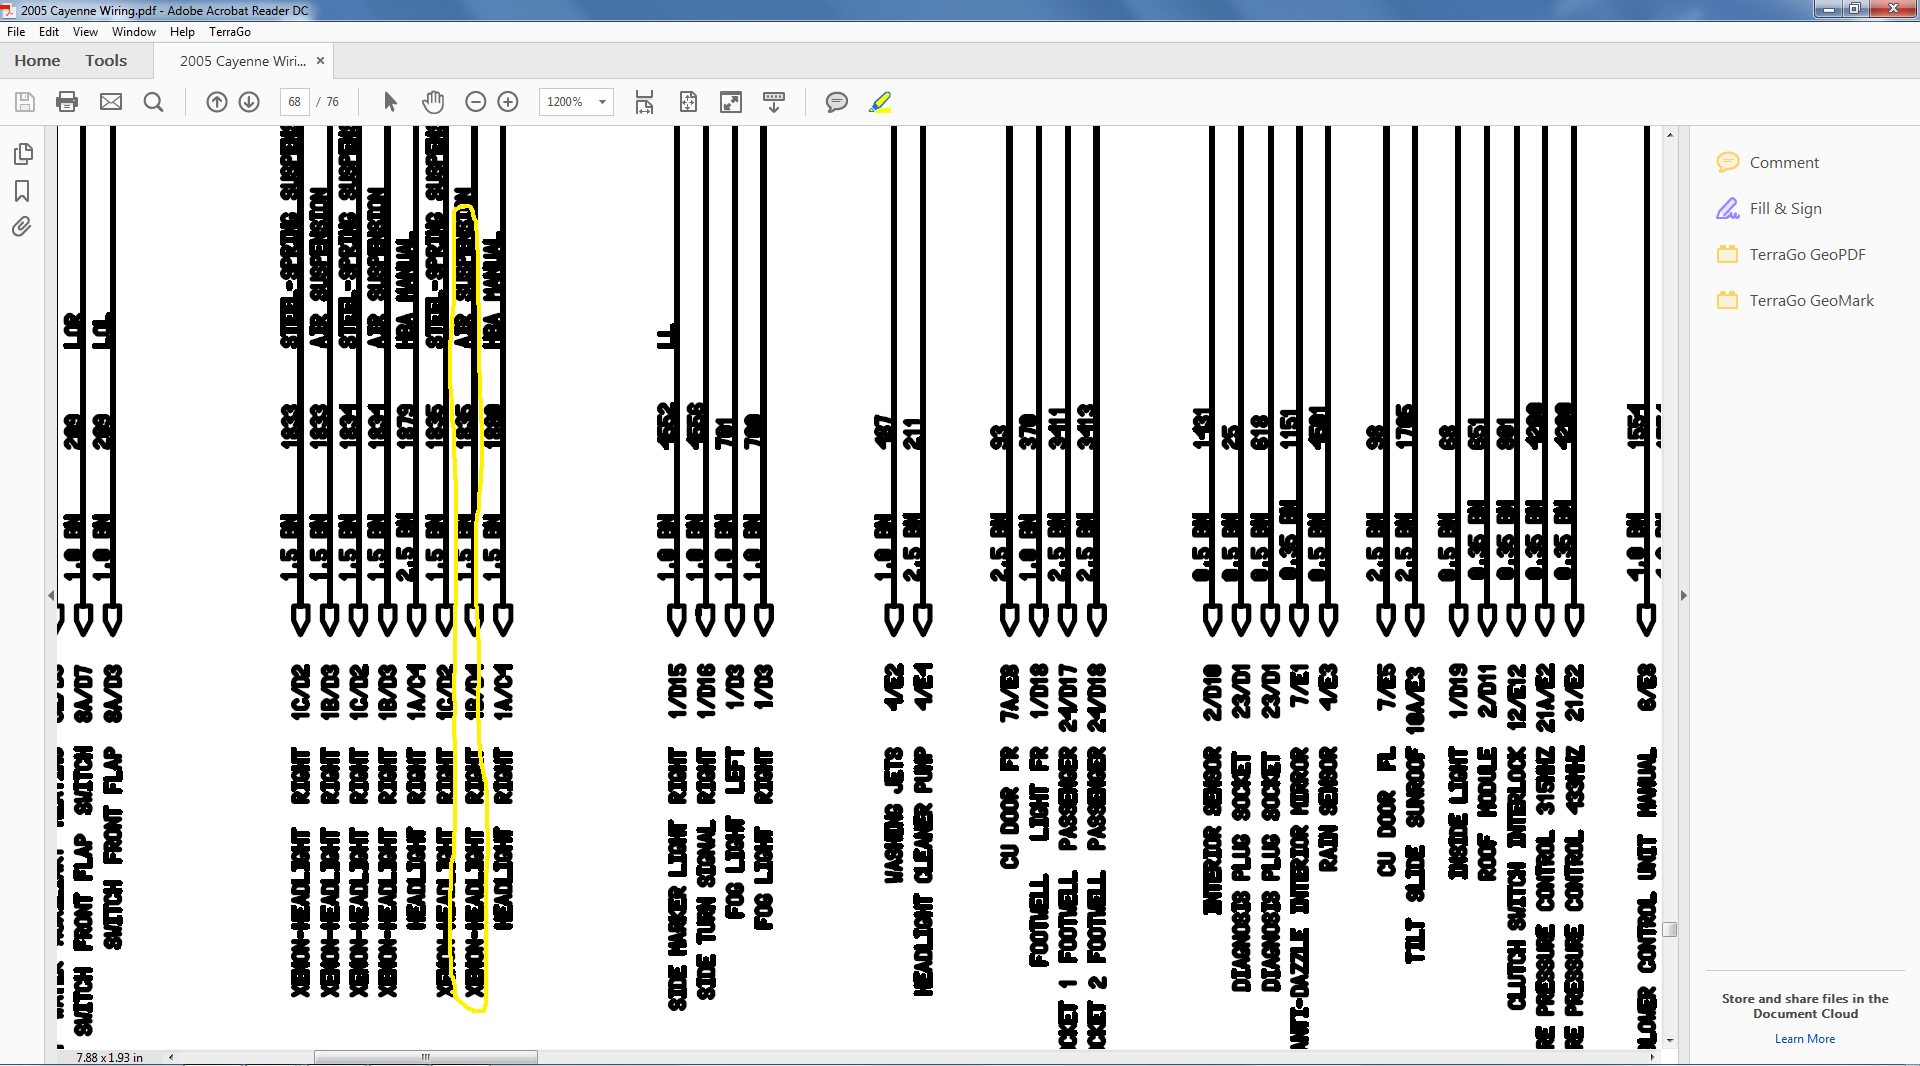
Actually looking back at the diagrams (I'm slowing learning how to trace a wire from page to page) there is a ground for the cornering light that goes to MB6. But on the MB6 diagram it's only listed as xenon headlight and on the headlight diagram it's listed as turn signal/parking light . I'm going to pull the headlight back out and start from the ground wire at the socket and work back from there.

-
For power I have checked at the plug for the headlight and at the plug on the backside of the pigtail. No power on either right or left sides. For continuity I ran a wire from the left hand fuse #21 to the plug pin #9 at the headlight. I get continuity on the driver's side but not the passenger side. Now that I know what MB6 is I doubt that's the one. Headlights, high beams, turn signals, etc. all work fine. It's only the cornering light that is out. I was just looking at grounds in the vicinity. But I also don't see the cornering lights listed anywhere else and now looking again it seems MB2 is for the secondary air pump. Looking at the diagram for the plug to the headlight it looks like pins 9 and 10 are for the cornering light. Is 10 the ground coming back out? I might look tonight at where 10 goes once inside the headlight. Couldn't be that I knocked something loose inside there could it?? I'm gonna be pissed if it turns out to be something that stupid.
-
Cool thanks! I just had that cover half off to replace the burned out side marker bulb. But it's not hard to do. I might have some time tonight or tomorrow to look at it. The side markers are still working so I got that goin for me at least!! :) The other MB6 must be up back under the headlight bracket or down low somewhere. I'll have to root around for that one too. Thanks again for the help!!
-
I had seen that before but I missed the idea of putting a temp ground on the pin for the cornering light. I might try that. I have thought it could be a ground issue too but I simply can't find the darned things. Both MB2 and MB6 could be the culprit but I can't find where they are. Mark sent me a BUNCH of docs and one has a chart that looks like it shows the location on a gridded pic of the car. But I can't blow it up enough to read it. I think I'll try the temp ground and if that fixes it I might have to get the car up in the air and totally remove the passenger side wheel liner. I've looked from on top, in front, with a mirror, with a flashlight.......the good part is I put in a CAI and it's really easy to pull that out instead of the stock airbox. Lots of room to see in behind there but I can't find those darn grounds. Thanks for another tip though, I'll try the temp ground next.
-
Did I mention I HATE electrical issues?! I should have mentioned it many times by now.
-
Well I am about at the end of my electrical expertise on this one. Looking over the diagrams and info Mark sent me it seems the only logical answer is a short in the wire somewhere between the fuse panel on the drivers side and the right side cornering light socket. I tried swapping out an old headlight switch, no go. I know I have continuity from the fuse to the left side headlight but not to the right side. There is supposed to be a ground somewhere around the headlight on the passenger side but I'll be darned if I could find it. Unless it's actually underneath the headlight tray?!? What's weird is a couple times I also got a warning about the side markers being out. I took a look at them yesterday and sure enough they were both not working. I pulled the bulbs and both were burned out. Seems an odd coincidence that both were burned out and both happened while I'm having issues with the right hand cornering light. I'll see if they are still working tonight otherwise it may be the short is taking them out too.
-
I just went through this after a penny fell into my shifter assembly. I found this and replaced the "sunshade" (the black rubber part with the magnets) and it works fine again now. http://www.pelicanparts.com/techarticles/Porsche-Cayenne/11-BODY-Shift_Gate_Trim_Replacement/11-BODY-Shift_Gate_Trim_Replacement.htm#Customer_Comments_Bookmark It is part #95555226500 for the 955's. Not sure if it changed for later models or not. Mine didn't seem to be broken, but it sure didn't work properly. I think it may only take a little bit for the magnets to get out of line with the circuit board and that is how it senses what position it "should be" in. Also make sure you get the circuit board snapped back into the plastic liner above it securely. Otherwise it's going to droop down and get hung up on the magnets.
-
Thanks for the info Mark!!
-
Yeah, I know about the latch, that was actually my first thought was the plug wasn't seating fully. Not the case though. I get no power at the plug itself. I'm going to try a few more things. The side markers were out at one point but then started working again. I also have another headlight switch, I'll swap that out to see if it could possibly be the culprit. And yeah these cars are just about too smart aren't they!? :)
-
I'm having issues with my cornering lights, specifically the right side isn't getting any power. I pulled the pigtail and it checks out fine, there is power at the fuse, and I get continuity between the fuse and the left light socket but not the right side. No power at either headlight socket for the cornering light though. So it seems to me there almost has to be short somewhere between the fuse and the right hand socket. But the way it winds through the dash and engine compartment I'm not sure how to track it down now. If someone has a diagram of the wiring it would help a lot. Or if anyone has any other ideas they would be greatly appreciated too. Thanks, John
-
Thanks. Any tips other than how to get at it? From the link I posted above one important one that I hadn't thought of was to loosen the pulley bolts BEFORE taking off the belt. Makes a lot of sense!
-
Yeah it doesn't look like fun. After my last post I did some more searching and did find this that should be helpful....http://workshop-manuals.com/porsche/cayenne_turbo_s_(9pa)/v8-4.5l_turbo/steering_and_suspension/steering/power_steering/power_steering_pump/component_information/service_and_repair/ I still don't think I'll have time this weekend. Saturday I am going to see a tech session with a 918 that should be fun!! If I'm feeling really brave I might attempt it Friday night. I've already got the lower and upper covers off the engine bay from previous work so that will save me some time. (edit) I have also become very proficient at removing the filter airbox since I spent some time chasing boost leaks. A tip here is to make sure you only turn the plastic screws that fasten the pipe to the box until they line up with the opposite mark. I broke the ones on the intake plenum the first time I took it apart.
-
Same with me. Pump is gone. Loosing Fluid and making unusual noises. I guess this part has to be replaced. You did it by yourself? I have the pump, new supply and return lines, o-rings, and serpentine belt but haven't tackled this project yet. Yes I plan on doing it myself. It doesn't look too complicated except getting to the pump itself. It's up above the AC compressor. I'm afraid the steering pump won't come out without removing the compressor but I'm hoping it will. My CTT is my daily driver so this will have to be a weekend project and this coming weekend doesn't look good, too much other stuff going on.I'll try to remember to come back an update when I do get it done though.
-
I really don't want to admit this publicly but I did on another forum anyway so, I pulled a REAL bonehead move when doing my brakes and pumped my power steering full of brake fluid. What can I say, it was late at night after a full weekend of working on the brakes and I just wanted to get done. I figured out what I had done a couple days later and cleaned it out and replaced with new PS fluid but I think the damage was already done. Now the pump makes noise and is getting notchy. Looks like either the pump or the hose lines are leaking now too so am replacing them at the same time. The rest of the parts are supposed to be here Thursday so I may tackle it this weekend. I just replaced most of the presure hoses too but am still having issues with boost loss so I need to look at getting all the vacuum lines done too. One thing after another!!
-
Long story short my power steeing pump is heading south. I have a new one on hand and hoses and o-rings on the way. So has anyone had to do this yet? It doesn't look very easy to do as it's situated above the aircon compressor. Any tips or tricks would be greatly appreciated. Thanks, John
-
Well I wish I had paid somenone to do my brakes. I spent way too long getting things done this weekend. Didn't have the right size socket for the front caliper bolts or the right size torx for the rotors. And I don't know what they put the front rotor mount bolts in with but I had one helluva hard time getting them out. But it's done and breaking it all in now. I went with the EBC red stuff pads and so far I like them. They say the rotors will last longer and there will be less dust. The amount of dust the old ones put out was pretty ridiculous,
-
I'm going to be doing all four cormers this weekend on my '05CTT. I spent $2,200+ just for pads, rotors and misc hardware/sensors. ~$800, 45-frickin-pound rotors in the front!! iE81 power kit upgrade woo-hooo.