Welcome to RennTech.org Community, Guest
There are many great features available to you once you register at RennTech.org
You are free to view posts here, but you must log in to reply to existing posts, or to start your own new topic. Like most online communities, there are costs involved to maintain a site like this - so we encourage our members to donate. All donations go to the costs operating and maintaining this site. We prefer that guests take part in our community and we offer a lot in return to those willing to join our corner of the Porsche world. This site is 99 percent member supported (less than 1 percent comes from advertising) - so please consider an annual donation to keep this site running.
Here are some of the features available - once you register at RennTech.org
- View Classified Ads
- DIY Tutorials
- Porsche TSB Listings (limited)
- VIN Decoder
- Special Offers
-
OBD II P-Codes - Paint Codes
- Registry
- Videos System
- View Reviews
- and get rid of this welcome message
It takes just a few minutes to register, and it's FREE
Contributing Members also get these additional benefits:
(you become a Contributing Member by donating money to the operation of this site)
- No ads - advertisements are removed
- Access the Contributors Only Forum
- Contributing Members Only Downloads
- Send attachments with PMs
- All image/file storage limits are substantially increased for all Contributing Members
- Option Codes Lookup
- VIN Option Lookups (limited)


ciaka
-
Posts
469 -
Joined
-
Last visited
-
Days Won
14


ciaka's Achievements
Member (1/1)
56
Reputation
-
I have a diy with 8mages for pdk service on ptt. I'll try to post up here if didntbyed do.
-
The air suspension failure with replacing front sur shocks, related work, at dealer will cost about $10,000- $11,000. You will get a nice rental though. Lol I made some threads, which specifically address the air suspension failures. One thread talks about diagnosis, and serves as an informational thread (what can happen, where, how to diagnose, etc). Another thread shows actual sir suspension front shocks replacement. This includes all tools and work related to doing both front shocks yourself. It can be done as diy, at a fraction of the cost. I suggest either search based on my username or search for air suspension, then find threads I created I urge you to read them both fully, before you get off the chair. Know what to do. Before you attempt. Hope this will be a good starter for you. Let us know how you progress. One point to make is, things will look terrifying until you actually start doing them. After finish, you will be extatic that you did it. If you cannot find the threads, let me know and I will help locate. Tx.
-
if you do not know when plugs were done, do them all together. I have a diy for it too, not hard, get plugs, coils and it will last you 40k miles.
-
To update, my transmission fault turned out to be the shift rod sensors. Bought new part, took apart the trannie bottom (easy) replaced, recalibrated (need PIWIS2), and car as good as new. Been done for about 8 months now with no issues. I havea. detailed DIY for it as well if anyone is getting very similar issue.
-
I suspect it is your door actuator, needs replacing. I did the front driver side door. Not too hard, takes time. Even wrote a DIY for it. Maybe can get to it and post on here in DIY section.
-
Does anyone on here have experience with changing height of sensors for each wheel separately? I have been trying all day and cannot get them to adjust just the way I want to. The height is measured from center of wheel to bottom lip of wheel well fender (straight line from center of wheel). It is so for all 4 wheels. The default height for front wheels is 404mm +/- 10mm (variation in height left to right) The default height for rear wheels is 406mm +/- 10mm (variation in height left to right) The closest I get is have one side perfect, and the other about 5mm too low or too high. As soon as I get into PIWIS2, and make the changes, the sides misalign again, and one side goes too low, while other side goes too high. Frickin frustrating. What I use is the LEVEL/PASM main menu in PIWIS2. Then enter Maintenance Repair sub menu. Then select the height sensor calibration sub menu. While in there, the screen shows all 4 corners, FL, FR, RL, RR, each on separate line. To make the change, one is supposed to measure from center cap to bottom of fender lip (as stated above). Then you enter value in mm for each corner, then click WRITE, to set the settings into ECU. Then you turn ignition off, then on, then press F12 on screen to finalize the setting. Clicking on write performs write of all values, all at once. I changed the valve block and refreshed one shock (that was leaking internally). With the new parts in, wanted to make sure all corners are just perfect before I do alignment again. But this thing is testing my patience. Some of the questions I have are: 1. Am I even supposed to be using the sensor height calibration menu to set height of each corner separately, or is there different menu where I would code the setting of one wheel for example (the above sets all 4 settings together, with click of the write button). 2. To lower a corner, say by 10mm, I have to be in the menu with all measurements, then I add 10mm to existing number (i.e, if setting for FL is 400, I calculate 400+10 = 410 mm, which is supposed to lower that FL corner by 10mm). AM I doing this correctly? 3. Is there a specific process for the calibration, meaning I have to set the height to predefined height to store in ECU, then make adjustments? What am I missing? I have been going up and down and cannot get the thing right and hope one of you folks have done this. I dont get any errors at all, even when doing component test before doing sensor calibration. So all my hardware is working properly. Thanks for help.
-
I have been trying to find that out too, but was not able to. So far, I know folks take the car to be done at a shop, about $1500 job. I still hope that someone chimes in about it, sure would be nice to know how to.
-
Agree. What I love about my ptt (besides handling, power, braking, interior finish), is the way I can control tire spin with throttle. Very predictable and repeatable. You can go into a corner, scrub speed before hand, and accelerate into the curve while controlling the spin. That's the kind of control which puts a huge grin on my mug.
-
Good to see they responded well. Not changing gears, unable to go to drive gear, car not moving while in gear, are all symptoms of the pdk gear shift sensors failure. Hope you have your car working well asap.
-
I resolved my issue bu replacing gear shift sensors in pdk. I made detailed diy on it too. Should be on this forum. Not too difficult, but long to replace. Saves you thousands though.
-
Forgot to make final update. The car is up and running well. To summarize, had to replace multiple parts: broken plastic pipes that the splintered serpentine belt broke (3 of them by radiator) Repair coolant leak at back of engine (where the coolant vent Y line connects to the rubber hose) Replace power steering pulley (cracked when I installed replacement belt, you guessed it, ruined the belt too) Belt tensioner Belt tentioner pulley Replace serpentine belt itself, twice (first replacement split once power steering pulley broke Replaced valve cover seals Replaced cracked coolant splitter pipe (going into front of engine) Replace oil cooler pipe (since it came with part #6 already) Repaired a cracked wiring harness for injector #2 (was damaged during the job - brittle and one wire frayed, shorting the wire to other side of injector harness - bad thing - battery short) Most of it was very easy, just time consuming to get to, as cayenne turbo is famous for stuffing all sorts of ungodly wires all in a tiny space. Hardest part was waiting for the parts to arrive, after issues diagnosed. After I repaired everything, car would not start. Thought it was battery, but turned out to be injector wire shorting. Once I rewrapped harness, issue went away and all great. Battery was also leaking slightly so I had it replaced with new one under warranty. DONE. Now, have few small sensor things to replace and it will be better than new.
-
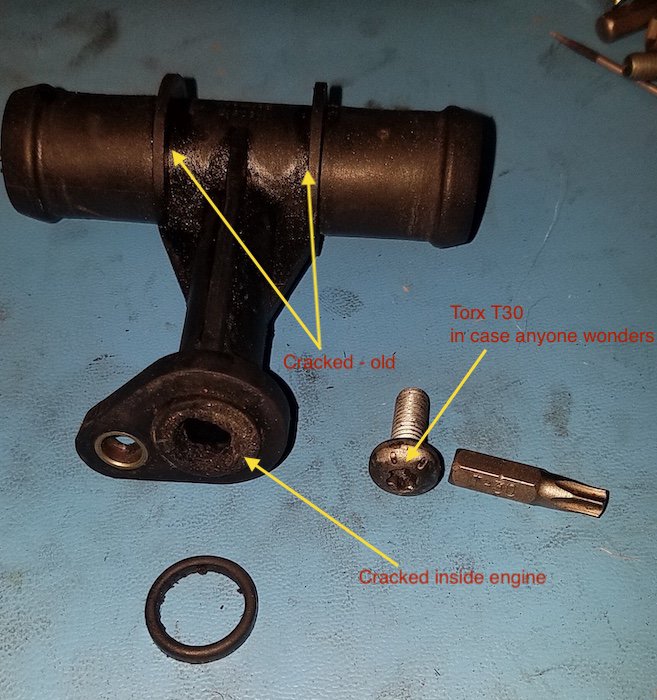
OK. Got more work on the car. The oil cooler line (hose with plastic T that goes into the engine block on passenger side), is leaking. Got the plastic T out and it is cracked along the T junctions both lower and upper, PLUS the plastic that goes into the engine with a small washer, is broken as well. When i took the plastic piece out, the o ring with rest of the plastic remained in the engine. Had to dig out with small pry 90 degree tool. So now for sure have to order the oil cooler line. Unfortunately the plastic T does not come separately and you have to get the entire cooler line to get the T. I have not detached the rubber hoses from oil cooler, the hose looks fine, and leak was along the plastic. When part comes in, taking the T and will install into place. Guess job not tone. Still to do, install coolant vent line (Y pipe in valley - tomorrow), line to driver turbo wastegate (after coolant sorted out and install drive belt, probably next weekend), drive belt, put intake back on and connect all the hoses/connectors, injectors, put secondary pump brackets on, pumps, and plastic engine covers. I am certain the hardest parts are done and now I am waiting again. Will update once more work done. Below pic shows the oil cooler line T connector, and where it was broken. TIP: Having a camera videoscope is a HUGE help...you can see the screw to remove, to be able to remove the T. Without it, you will be trying blind for long time.

-
Got time to work on car today. Some new parts came in Friday (tension roller and tension shock). New tensioner in. New tensioner roller in. All pulleys checked and cleaned. Done. New pipe, #15, in. Was going to start putting together, wanted to do pressure test on coolant. Discovered the oil cooler line at the T connector is leaking very slowly (very slow leak, I assume plastic T is crap now. So off I go buy the line now and wait some more. The Coolant vent line for engine banks has not arrived yet, so doing this slowly. Guess good thing coronavirus thing still going on. Talk about turning negative into positive. Hoping these are all the parts. Checked, do not see anything else wrong, but wont know til car started. Trying to be extra gentle with all the vacuum lines - old and small crack = engine light. Looks like if I get a chance to work on this car tomorrow, I will be draining coolant (what is left), and removing the oil cooler line. TBC.
-
Found out that the line was broken at the point labeled #1 in blue in diagram. That part of line between #1 and #2, is hard plastic, and the ending at #1 goes onto another plastic piece, looks like it is hot pressed onto it. When belt slid off, it took that line out, so that the connection at #1 slipped of the rest of the line, and connection at #2 is still intact, and can be reconnected. However the part at #1 will have to be glued or something. The new piece for that part #5 in diagram, is about $250. I am thinking to get some heater hose that will be just large enough to slip onto the ending behind #1 location, and I can use metal clamp to secure in place. Then use the original pipe to put into the other end of the heater hose, and use another metal clamp to secure. Then, maybe leave connection at #2 as is, or get another piece of heater hose, and using 2 clamps, join the lower pipe to the upper pipe. Anyone have opinions on this? Given the purpose of the line? What is exact purpose of that line? Anyway, appreciate any feedback. Thanks. This will be a slow job, when I have time. Here is the pic.
-
I had time to work on the car today. Coolant leak: Discovered that because the drive belt broke, water pump stopped spinning, making engine hot and under higher pressure. This resulted in one of the hoses coming out of the coolant tank resevoir (cap), that goes to what I presume is the back of the cooling pipes somewhere, slid off and is now dangling down behind the engine. That is where the coolant is coming from, that hose slid off. Checked water pump visually after removing remains of belt, and there is no evidence of coolant leaking from the pump area, pulley seems solid spinning freely. So looks fine. Belt: Removed the belt, man that thing got chewed up. Looks like the tensioner pulley shock is not working well. I removed the pulley and all sort of rubber were on it from the rubbing. Also, I can move the pulley shock with hand by pushing/pulling, about 8th of an inch or so. So looks like adjuster shock is fubar. The tensioner pulley was coated in all sorts of rubber from the belt grinding against the pulley. I was able to clean off but the grooves look like they were all ground down. See below pic and let me know if that looks used up. I think pulley plus tensioner is in order to be bought. The belt did not seem to exhibit excessive age (cracking, etc). I bent it and did not see typical old belt cracks. But did see multiple flat spots on one side (evidence of not enough tension? grinding as belt was sliding off?, etc?). Hoses beneath valve cover: The thicker one, I was able to get off with hands. Hallelujah. Had to cut insulation with blade, then came off. New one has its own new insulation, so looks like will be fine. Hope I dont have isues installing, we will see. The thinner hose - well, this is a part of vent system that comes from the other side of engine. Thin line, comes out beneath valve cover for cyl 1-4, goes to front of engine, climbs up to top, crosses over engine in area of throttle body, then goes diagonally down near radiator. On the way down, the hose has a clip connection (one you press both sides to pull out), then seems to have a plastic ending, which is held to the thinner insulated pipe (beneath valve cover of cyl 5-8), with a metal band. The plastic piece seems to have been snapped and the section of hose fell down to bottom of engine covers. Have it, the piece near band looks like broke off. My options are: use jbweld to weld piece together, re use the piece. Another option is to get thick rad hose, enough to put onto pipe going below valve covers (cyl 5-8) and use metal clamp on it. Then other end of the short hose, clamp to the section of pipe that still remains. One end of it would clamp into rubber hose, the other still fits into the pipe section going to cyl 1-4. Anyway, here are some pics. Slow going but its because I have work Mon-Fri and dont have as much time as I imagined I would have. Maybe I should get me some covid19, so I can isolate myself in garage. Hmmmm. So far, cleaned up pulleys, removed old belt, cleaned area, removed the thick hose beneath valve covers, now gotta order pulley and tensioner, then assemble. Then can move to take intake out and repair the blown off hose in back of engine. Man, I should pring me out a mechanic school certificate after this job. Tension pulley with tensioner...the belt just coated the pulley. Thats same pulley but cleaned up. Tensioner pulley, seems like grooves are gone. Tension pulley clean but showing grooves. Are they supposed to be like this? Did not think so. Belt, dont see cracking... ...but see flat spots on one side.. Remains of entire belt...seems to have been cut length wise, not across..symptom of thrown off pulley I assume, likey because tensioner, my assumption. What do you think? This is the other idle pulley before cleaning.