Welcome to RennTech.org Community, Guest
There are many great features available to you once you register at RennTech.org
You are free to view posts here, but you must log in to reply to existing posts, or to start your own new topic. Like most online communities, there are costs involved to maintain a site like this - so we encourage our members to donate. All donations go to the costs operating and maintaining this site. We prefer that guests take part in our community and we offer a lot in return to those willing to join our corner of the Porsche world. This site is 99 percent member supported (less than 1 percent comes from advertising) - so please consider an annual donation to keep this site running.
Here are some of the features available - once you register at RennTech.org
- View Classified Ads
- DIY Tutorials
- Porsche TSB Listings (limited)
- VIN Decoder
- Special Offers
-
OBD II P-Codes - Paint Codes
- Registry
- Videos System
- View Reviews
- and get rid of this welcome message
It takes just a few minutes to register, and it's FREE
Contributing Members also get these additional benefits:
(you become a Contributing Member by donating money to the operation of this site)
- No ads - advertisements are removed
- Access the Contributors Only Forum
- Contributing Members Only Downloads
- Send attachments with PMs
- All image/file storage limits are substantially increased for all Contributing Members
- Option Codes Lookup
- VIN Option Lookups (limited)

-0001-0001.png.112c13ee97acfad0cb1e70d195cc9a0e.png)
Loren
-
Posts
37,346 -
Joined
-
Days Won
536
Content Type
Profiles
Events
Forums
External Paint Colors
Downloads
Tutorials
Links Directory
Collections
Classifieds
Store
Posts posted by Loren
-
-
Most auto parts store have it. Just look or ask for Lotite for fasteners. I think Permatex owns Lotite now.
-
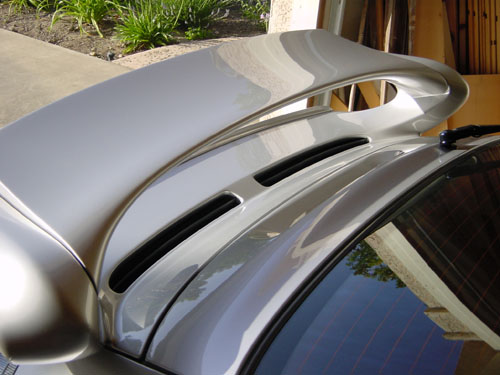
There are 3 positions for the spoiler. The only one "officially" approved by Porsche for street use is the default (flat position).
To change the spoiler position you need to remove the two allen screws (on each side) and carefully lift the spoiler to move the positioning bracket (again one on each side). On some cars you will need to remove (and save) two more allen head screws to allow the bracket to be moved. At that point it can be adjusted to a mid and high position. When you put the screws back in be sure a put a drop of Loctite on each one so they will not vibrate out.
... my aerokit spoiler is in the middle position ;)
(not the best pic but you get the idea)

-
You've already got steel hinges then.... that makes it easy.
I will private email you instructions...
-
I have done a few of these and its pretty easy. You will only need a couple of tools (Torx drivers and screwdrivers). Much of it is the same process for installing a B&M Short Shifter and/or handbrake... so if you wanted to add one of these you can save some time by doing them all at the same time.
You will need to transfer the oddments tray (center glovebox) from the old console to the new one. Depending on the year of your car you could need the center console steel hinge upgrade kit. (Older cars had plastic hinges that have now been replaced with steel hinges).
Tell me what year your car is (so I know whether to send the hinge TSB) and I'll send you the other info.
-
Removing the knob is easy... but I am not sure that will solve your problem... unless you want to change the knob.
Most of the standard gear shift knobs just pull off (very hard) and most of the optional knobs have a set screw. To check lift the leather boot coving the shifter lever all the way up over the knob. If there is no 5 mm set screw near the bottom of the knob then it just pulls off. Take care and perhaps even open the sunroof as the pull on - off knobs come off with a snap.
-
1) Probably. You may need to re-route the wires through the bundle ties.
2) Probably. You may need to re-route the wires through the bundle ties.
3) The MY02 and newer cars center console is one piece (older cars were 3 piece). You will need to insert a plastic spatula into each lower side of the cover and gently press out. Then work you way up the side (bottom to top) to the central vent. Inside the center vent is a metal clip. Press in on the clip using a small screwdriver. Press and hold screwdriver upwards and simultaneously pull out the central vent with the cover.
-
Ahh... my DSL ISP went bankrupt this last week... so I moved everything to a new site/provider.
You can find it at: http://www.garlic.com/~ljcook/indexDIY.html
I do plan to move all of the content from my DIY site to the forum here in the DIY section... when I get time ;)
-
Try calling or emailing Larry Reynolds at Car Care Specialties. He usually has really great advice and has right products to solve almost any difficult paint problem.
-
Andy,
Thank you very much for the donation! :clapping:
Your support will help keep this board running as we grow.
Please not your title now says "Contributing Member" signifying to other your commitment to this site and the activities here.
THANKS AGAIN! :D
-
Paul,
Thanks for the contribution! :clapping:
Donations like yours will help keep the site running as it grows and uses more bandwidth and disk space.
This site is not much about titles (or stars for that matter) and for the most part they are turned off. But the moderating team and I have decided on a couple of exceptions so... please note your title now says "Contributing Member". Hopefully, this will signify to others your personal commitment to the board and the activities here. Once again -- THANK YOU!
On the second subject my DSL ISP (DSLDesigns) went bankrupt so my service had to be changed over to another ISP. Verizon was pretty good and the switch only took 24 hours... the bad news was that I was down for 4 days not knowing my ISP had gone out of business :eek:
Anyway, I'm back and so are my DIY pages (and email). I plan to bring all the content from my DIY site into RennTech.org but in the mean time you can find it here: My DIY stuff
-
I've yet to confirm this in the MY03 schematics (since they are not published yet) but a number of owners have mentioned that this works. I did find this obscure comment in the MY03 Owners Manual:
"The convertible top may only be actuated during driving on even surfaces and at wind speeds of less than 50 mph (80 km/h)."
-
VERRRRY NIIIIICCE!!! :D :D :D
-
If you mean item 8 in the diagram... the part number is: 999 591 712 40 Rivet 6.0 x 12.0
-
I am not a big fan of changing one suspension componnet without change the other affected parts (i.e shocks, bumpstops, etc.). So, perhaps you want someone elses opinion? ;)
If you want to lower the car that can be done with just spring changes but anything lower than 3/4 to 1 inch will make the engine block more vunerable to damage (high curbs, rocks, etc.) and you may have some problems with fairly normal driveways.
Porsche sells and recommends two wheel spacer combinations. The first combo is four 5 mm spacers on all four wheels. This is sold as a kit that includes longer wheel bolts and longer wheels locks. All GT3's use these spacers. The second option is 5 mm spacers on the front and 17 mm spacers on the rear. If you ever have to run the spare tire the 17 mm spacer must be removed to mount the spare (the 5 mm are ok).
5 mm spacer kit
-
Hey, thanks to all... but remember that it's all of you that make this forum successful.
I just lit the fire :cheers:
-
Thanks!
Spring spacers or wheel spacers?
If I may, there is a greart article on Porsche tuned suspension in PCA Panorama. IMHO I think it is kind of a required reading before making any major decisions on suspension changes. You can find the article at: 996 Standard and Sport Suspensions Analyzed
-
As long as it is DOT 4 (not DOT 3 or synthetic DOT 5) it should be okay. Porsche does not recommend synthetic brake fluids (I do not know why).
I change back and forth with ATE Gold (Type200) and ATE Super Blue. This is great for street and pretty good for light track useage. Both have a high dry boiling point (536 degrees) and a high wet boiling point (392 degrees), but without being excessively hygroscopic (these fluids do not readily absorb moisture like most high performance fluids).
They are the same fluid with the same properties one is yellowish gold and the other is blue. This allows easy viewing when bleeding to see when the new fluid is through the system. The are other higher temp fluids that are available... but for the most part if you are changing every 3-4 DE's then you should be okay. About $12 liter and you will need about 1 liter per change.
Other good fluids are:
Castrol SRF Brake Fluid (dry boiling point is at 590 degrees, wet boiling point of 518 degrees) -- Do not mix with any other fluids. You must do a complete flush with this fluid. About $65 liter :eek:
Motul 600 (dry boiling point 585 degrees and a wet boiling point 421 degrees) -- Synthetic. Do not mix with any other fluids. You must do a complete flush with this fluid. About $12 liter
AP-600 (dry boiling point 590 degrees, wet boiling point 410 degrees) -- Do not mix with any other fluids. You must do a complete flush with this fluid. About $18 liter
-
Is your car a Targa? I see an extra piece for the Targa (911 511 127 00) but not listed for coupe.
I don't remember this on my 76 911S coupe...
-
Factory spacers should be balanced. They are screwed onto the hub so they become part of it and should maintain the balance. If you are using aftermarket spacers I would be tempted to have the wheel balanced on the car (good shops can still do this when needed). That way the wheel weight would offset any balance issues. All JMHO... as I've never seen one out of balance. ;)
-
Mike,
The Porsche 5 mm spacer kit uses 5 mm longer wheel bolts (911 GT3, P/N: 996 361 203 90). These GT3 wheel bolts are marked with GT or with a red color on the head surface of the bolt head, or the rotating spherical cap is galvanized in red. The distance from the bolt head flange (not the rounded washer) to the bolt tip is approx. 50 mm. The standard wheel bolts, P/N: 996 361 203 00 are approx. 45 mm. I'm sure you can order them separately.
5 mm spacer kit
-
If you click on either donate button, then when the PayPal page comes up click on the "If you have never paid through PayPal, Click Here" button and it will allow you to use VISA or MasterCard.
THANKS!
:cheers:
-
If you put the car in neutral and press the clutch in and out, do you still hear it?
If so, it is likely the clutch throw out bearing.
-
Fuel pressure line? or vacuum line?
I emailed you some info on the fuel pressure lines.


REAR CENTER CONSOLE
in 996 Series (Carrera, Carrera 4, Carrera 4S, Targa)
Posted
Yeah, I forgot to mention the trick to getting the console out easily is to lower one of the seat backs as far as it will go. That will let you lift it over the seat.