Welcome to RennTech.org Community, Guest
There are many great features available to you once you register at RennTech.org
You are free to view posts here, but you must log in to reply to existing posts, or to start your own new topic. Like most online communities, there are costs involved to maintain a site like this - so we encourage our members to donate. All donations go to the costs operating and maintaining this site. We prefer that guests take part in our community and we offer a lot in return to those willing to join our corner of the Porsche world. This site is 99 percent member supported (less than 1 percent comes from advertising) - so please consider an annual donation to keep this site running.
Here are some of the features available - once you register at RennTech.org
- View Classified Ads
- DIY Tutorials
- Porsche TSB Listings (limited)
- VIN Decoder
- Special Offers
-
OBD II P-Codes - Paint Codes
- Registry
- Videos System
- View Reviews
- and get rid of this welcome message
It takes just a few minutes to register, and it's FREE
Contributing Members also get these additional benefits:
(you become a Contributing Member by donating money to the operation of this site)
- No ads - advertisements are removed
- Access the Contributors Only Forum
- Contributing Members Only Downloads
- Send attachments with PMs
- All image/file storage limits are substantially increased for all Contributing Members
- Option Codes Lookup
- VIN Option Lookups (limited)

-0001-0001.png.112c13ee97acfad0cb1e70d195cc9a0e.png)
Loren
-
Posts
37,307 -
Joined
-
Days Won
530
Content Type
Profiles
Events
Forums
External Paint Colors
Downloads
Tutorials
Links Directory
Collections
Store
Posts posted by Loren
-
-
Yes.
964 505 103 00 G2X Cap (unpainted) - retail $8.63
-
Almost all the parts are different from blower motors to air distribution ducts to AC lines.
-
I don't think you can get it past the vent without removing it (I didn't try). But who knows it might be worth a try. Removing the vent and switch is not very hard maybe 2 minutes (see the switch knob removal elsewhere on the site).
-
It is just running the wire down the A pillar, replacing the existing relay with a new relay and doing the initial adjustment. Maybe less than an hour.
Your original switch is still used. Here is how it works:
Turning the rain sensor on or off.
1. To turn on rain sensor: Turn the wiper switch to position 3 (interval).
2. To turn off rain sensor: Turn the wiper switch to position 0.
There are are three ways to turn on the rain sensor if the switch is left in position 3 (rain sensor - on) when restarting the vehicle.
1. Turn the wiper switch to position 0 then back to position 3
2. Actuate windshield washer system
3. Change the rain sensor sensitivity using the wiper interval adjuster.
Changing the rain sensor sensitivity. Sensitivity can be set to 6 different levels using the wiper interval adjuster.
Turn interval adjuster counter-clockwise: Low sensitivity.
Turn interval adjuster clockwise: High sensitivity.
-
You don't need to remove the engine - just the gearbox. Usually 4-5 hours labor. They should check and fix any other leaks (they see) while they are in there (i.e. intermediate shaft seal, exhaust gasket, cam cover leaks, etc.). Also they should change the case half bolts to the sealed type if they are not already.
-
All Porsche (Carrera and Boxster) amps are mounted in the front trunk between the battery and the spare tire.
-
Well, most of the relays I have opened were not really relays in the traditional sense - they were digitial switching circuits. So, you may have to swap it out with another relay with the same part number - from someone else's car to be sure.
-
Check relay 4 (top row fourth relay from the left).
-
C00 - ? likely specifies catalytic converter (based on country)
XSJ - six point seat belts
XSM - safety racing cage
XSX - seat belts in guards red
003 - ?
424 - CD compartment
441 - prepared for radio
567 - windshield tinted, upper part darker color
581 - center console front
695 - cd-radio, Porsche CDR 22
722 - ?
990 - seat covers front, cloth/cloth/leatherette
-
Do a search as this has been covered many times here - with a number of pics.
-
The sport springs are different than standard springs in both length and stiffness.
Correct, the compensation spacers just adjust for small differences in spring height.
-
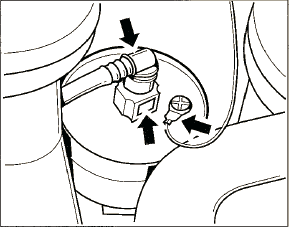
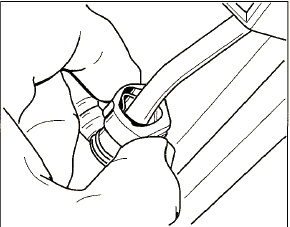
The fuel filter is located in the tunnel area facing the center unit above the coolant pipes.Anyone have instructions on replacing the fuel filter and where it's located? I can't find anything on Renntech DIY.1. Remove cover for rear and center underbody.
2. Pull off ground cable on filter. Then release the rapid-action couplings by pressing on the grey surfaces and remove the fuel lines. Collect emerging fuel.
3. Loosen the large hose clamp on the filter and remove the filter element.
4. Re-install a new filter element and tighten the hose clamp.
5. Join the rapid-action couplings of the fuel lines. The plug connections must engage audibly. Then push the ground cable onto the filter element.

-
Changed anything in the dash recently (like the radio etc.)? If so, you may have knocked a wire off - if not, you could have a bad control unit.
-
11 J x 18 ET 45
-
Does the light on the switch go on when you push it?
They all share a control unit for power and control.
-
996's also swivel to the side - sounds like a 996 type. Got a pic?
-
Porsche uses different spring rates for different transmissions - so all springs are characterized in the parts list by transmission (and body style). So a 5 speed transmission has different spring rates that a Tiptronic or 6 speed.
The compensation spacers used are dependant on the over all height of the spring to bring it back into ride height compliance. Springs are always sold in matched pairs and the compensation spacers are always used to match those springs to the proper ride height.
-
Front blue/yellow, white = standard suspension RoW with 3.0 compensation spacer.
Rear blue/yellow, green = 5 speed standard suspension RoW with 4.0 compensation spacer.
-
I haven't looked closely at the 997 visors yet, but if they are like the 996/Boxster visors then they have a plastic cover that pops off at the attach point... or an easier way is to slide them off the directional rod. Just maneuver the visor so you can gently pull it off the rod.
-
No headlight washer?
If so, then the part number is: 996 631 035 00
-
RennTech.org members get a discount. Go here for details.where is the website for smart top?plus what is the cost for it?
-
The Trailer Hitch TSB is 6690 - on page 4 of the default listing.
-
Yes.Are these short tire lives due to softer compounds used to improve ride quality, enhance grip, etc.?? -
Read the color code on the front and rear springs and post them here. We also need, MY and transmission type.
Where do subwoofer cables end in 996
in 996 Series (Carrera, Carrera 4, Carrera 4S, Targa)
Posted
I sent you a PM...