Welcome to RennTech.org Community, Guest
There are many great features available to you once you register at RennTech.org
You are free to view posts here, but you must log in to reply to existing posts, or to start your own new topic. Like most online communities, there are costs involved to maintain a site like this - so we encourage our members to donate. All donations go to the costs operating and maintaining this site. We prefer that guests take part in our community and we offer a lot in return to those willing to join our corner of the Porsche world. This site is 99 percent member supported (less than 1 percent comes from advertising) - so please consider an annual donation to keep this site running.
Here are some of the features available - once you register at RennTech.org
- View Classified Ads
- DIY Tutorials
- Porsche TSB Listings (limited)
- VIN Decoder
- Special Offers
-
OBD II P-Codes - Paint Codes
- Registry
- Videos System
- View Reviews
- and get rid of this welcome message
It takes just a few minutes to register, and it's FREE
Contributing Members also get these additional benefits:
(you become a Contributing Member by donating money to the operation of this site)
- No ads - advertisements are removed
- Access the Contributors Only Forum
- Contributing Members Only Downloads
- Send attachments with PMs
- All image/file storage limits are substantially increased for all Contributing Members
- Option Codes Lookup
- VIN Option Lookups (limited)

-0001-0001.png.112c13ee97acfad0cb1e70d195cc9a0e.png)
Loren
-
Posts
37,309 -
Joined
-
Days Won
531
Content Type
Profiles
Events
Forums
External Paint Colors
Downloads
Tutorials
Links Directory
Collections
Store
Posts posted by Loren
-
-
Some thoughts...
Same tank of gas? How many miles on the car?
When was the fuel filter changed last?
Have you cleaned the throttle body (inside) with carb cleaner?
-
Good Luck - I had one of those and after several calls to the manufacturer we could never get it to stop throwing CELs. I am sure it was the problem because I could put the stock (BMC so almost stock) air intake back on, reset the CEL and it would not come on again.
-
Same grease and sealer for a 4WD Carrera.
-
Use the plugs Porsche recommends and save your self a lot of hassle. For MY98-01 use 999 170 207 91. The street markings are Beru 14 FGR 6 KQU.
-
That is the grease the parts list calls out. They also call out a sealing compound for the driveshaft 000 043 205 36.
-
If you are replacing the calipers too then nothing changes from the rotor process. You will need to bleed the new calipers well though. See the brake replacement DIY and the brake bleeding DIY. Then let me know what questions you have.
-
Depending on your RSS reader this is fairly easy to do now. Here is an example:
http://www.renntech.org/forums/ssi.php?a=out&f=2,21,53,3,4,23&show=10&type=rss
This would give you all the Carrera forums, with GT3 and TT/GT2. "f" is the forum number (mouse over a forum title and you can see that). The show 10 would show the last 10 articles.
I'll also try and get the KlipFolio RSS feed updated also. (more on that here)
-
My advice is to buy two. Okay, I'm not quite out of my mind - here is why. Buy a good quality one for changing wheels - where the wrench is likely going to be dropped and where a few ft/lbs won't make a difference. I have a Sears for changing wheels and Proto for engine work. Then if you plan on doing engine or suspension work buy the higher end wrench that has more precision (and don't drop it). If you do drop it then the higher end wrenches can usually be sent out for re-calibration. Just my 2 cents...
Also, I think it is a good idea to release the tension (set to 0 torque) on your wrench when it is not is use.
-
Look at the sticker on the drivers door and tell us what month and year the car was made. Some of the very early MY99's needed some updates. Not to worry as I have a MY99 also.
Looks like you have a partial aerokit too (front bumper, side skirts and rear fender skirts) - but no rear wing?
:welcome:
-
Did you try using the key to unlock the door? The remote alarm shuts down after 5 days to save battery life.
-
For a 2000 C2 Coupe in Black it is: 996 555 557 05 A03 Cover, interior light
-
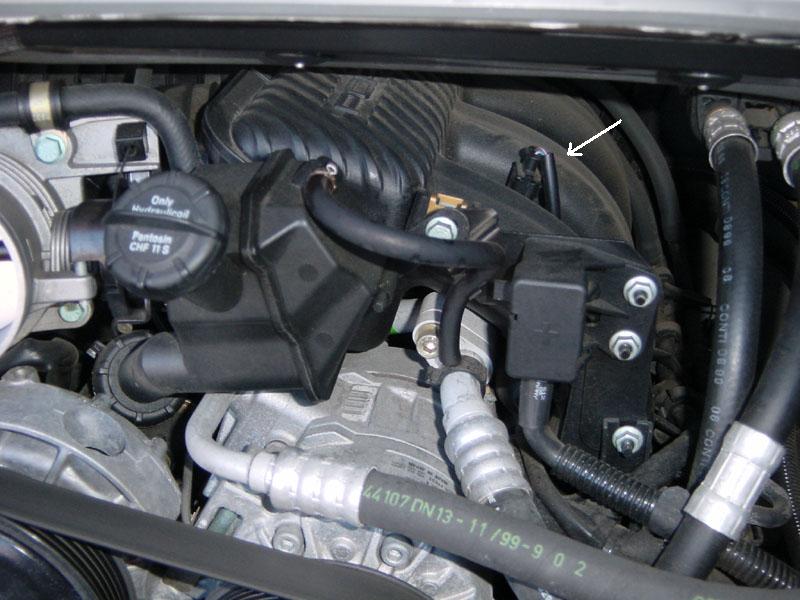
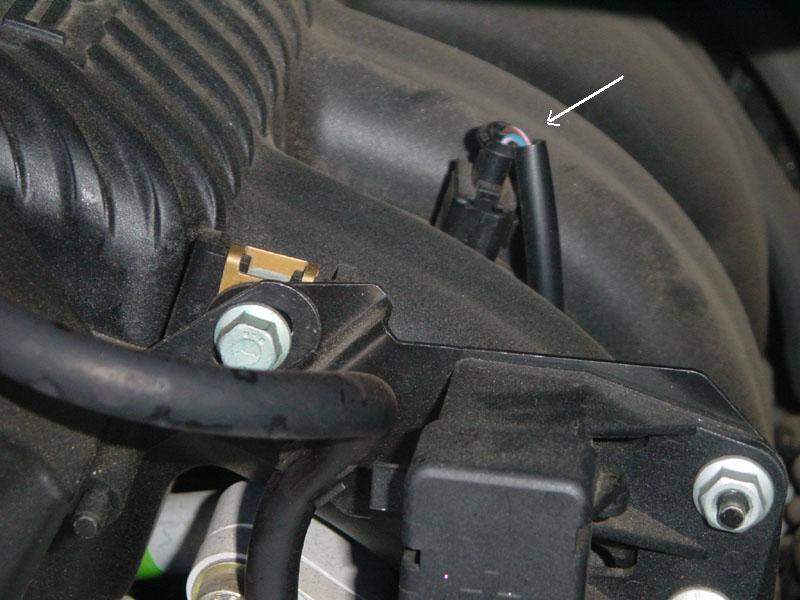
Not very easy to see since it is behind one of the intake pipes on the right side of the engine. It mounts on a little plate and has a short probe that sticks out into the air.Thanks Loren,But where is the sensor placed ?

-
It's kind of hard to describe. I'll see if I can get a pic tomorrow when there is more light.
-
Removing the console takes about 20 minutes your first time (without scratching or damaging anything). Once the console is off it's pretty easy to change out the handbrake - maybe 5 minutes. A good time to put in a short shifter if you want one too since the console is already out.Thank-you Loren and toolpants. This looks pretty long is it that hard or is it me?Neil
-
The fan only runs for a few seconds when it does run which is likely why you have never heard it. Here is the criteria:Could somebody tell me where the Temp sensor is. I have newer heard or seen the fan running on my car ??Switch-on conditions for engine compartment fan (this fan pulls air into the engine compartment) - The engine compartment fan is switched on when the engine compartment temperature is > 176 degrees F (80 degrees C) or the coolant temperature is > 216 degrees F (102 degrees C).
If the ignition is switched off and the engine compartment temperature is more than 140 degrees F (60 degrees C), the DME control module remains in readiness for another 20 minutes. During this time, the engine compartment temperature is retrieved every 10 seconds. If the engine compartment temperature is > 185 degrees F (85 degrees C), the engine compartment fan is switched on for 20 seconds. If the engine compartment temperature is still > 185 degrees F (85 degrees C) after this time, the fan remains on for a further 30 seconds.
-
Look at the instructions here too.Can somebody on this site post the directions to replace a e brake handle on my 03 911 cab please?I did a search and came up empty.
Thanks in advance.
Neil
-
Just a reminder... this is Porsche forum, where we talk about Porsches. Please re-read the Board Guidelines/Rules if this is unclear. Please make sure your posts stay on topic. Thanks! :D
-
There is now a TSB 3/04 3730 Hard Shifting In Range First to Second (dated 11-18-2004) that may be of some help. It is in the Cayenne TSB section.
-
Porsche does not recommend the use of anti-seize compound on spark plugs being installed in aluminum cylinder heads. The reason is that spark plug torque may not be correctly measured and the plugs will be tightened too much, damaging the threads in the cylinder head.
-
It's pretty straightforward.
For the fronts:
Just remove the two caliper bolts and carefully hang the caliper out of the way. Then remove the two phillips screws that hold the rotor in place.
Put the new rotor on (making sure that you have the Left on the Left and the Right on the Right). Fasten the screws on the new rotor. Carefully slide the caliper back on the rotor (you may have to press the pads in a little to make it easier to slide on). Put the bolts in the caliper and torque them to 63 ft/lbs. (85 Nm). Porsche recommends that you use new bolts.
For the rears:
Important - Release the parking brake fully.
The process is the same but you may need to back-off the parking brake drums with a screw driver. Then after you are done adjust the parking brake through the threaded wheel bolt hole until the wheel can no longer be turned. Then, turn back the adjustment 5 notches again (release approx. 3 notches until the wheel can be turned freely, then release another 2 notches).
-
999 507 427 40 Expansion rivet (11 per car). They were about $0.20 each last time I checked.
-
Should be the same as the Carrera. Have a look at this thread.
-
We have added a new feature for our Contributing Members - Blogs!
(see the link at the top right...)
Contributing Members can create their own weblog here. Blogs can be Private or Public and outside (non RennTech.org members) can view Blogs using a "friendly" URL (http://www.renntech.org/forums/blog/your_blog_name).
Blogs can be Porsche related - or personal - or practically anything you want.
At this time ONLY Contributing Members can create a Blog here. Regular members can view public blogs and make comments (if they allowed that in your preferences). Guests can only view public blogs.
Blogs are not certainly required and not everyone will want or have one but we wanted to make this feature available to all Contributing Members that want it.
Enjoy and and thank you again for your contributions to RennTech.org!
-
Nope, just the four bolts to existing points.
Engine stalling problem
in 996 Series (Carrera, Carrera 4, Carrera 4S, Targa)
Posted
Well, if it were mine I would take off the air cleaner from the throttle body and see if there is black carbon build up. If so, I would use some carb cleaner on the inside of the throttle body until it is clean. Since your car is egas you will need to move the butterfly with your finger to get inside the throttle body. It's okay to use a rag as long as it is lint and deposit free.