Welcome to RennTech.org Community, Guest
There are many great features available to you once you register at RennTech.org
You are free to view posts here, but you must log in to reply to existing posts, or to start your own new topic. Like most online communities, there are costs involved to maintain a site like this - so we encourage our members to donate. All donations go to the costs operating and maintaining this site. We prefer that guests take part in our community and we offer a lot in return to those willing to join our corner of the Porsche world. This site is 99 percent member supported (less than 1 percent comes from advertising) - so please consider an annual donation to keep this site running.
Here are some of the features available - once you register at RennTech.org
- View Classified Ads
- DIY Tutorials
- Porsche TSB Listings (limited)
- VIN Decoder
- Special Offers
-
OBD II P-Codes - Paint Codes
- Registry
- Videos System
- View Reviews
- and get rid of this welcome message
It takes just a few minutes to register, and it's FREE
Contributing Members also get these additional benefits:
(you become a Contributing Member by donating money to the operation of this site)
- No ads - advertisements are removed
- Access the Contributors Only Forum
- Contributing Members Only Downloads
- Send attachments with PMs
- All image/file storage limits are substantially increased for all Contributing Members
- Option Codes Lookup
- VIN Option Lookups (limited)

-0001-0001.png.112c13ee97acfad0cb1e70d195cc9a0e.png)
Loren
-
Posts
37,313 -
Joined
-
Days Won
531
Content Type
Profiles
Events
Forums
External Paint Colors
Downloads
Tutorials
Links Directory
Collections
Store
Posts posted by Loren
-
-
There is a 15 page TSB for installing the CDC4 on a Cayenne. There are two possible kits depending on your cars original options. Again depending on your original options there are 8 possible installation scenarios. Four involve routing a wire from the rear of the car to the the dash and four that don't. The TSB says 4.2 hours or 2.5 hours again depending on the options.
-
Have a look at the thread here.I have 2004 Cayenne S & I have a problem with it, sometimes when I change a gear from park to drive or rivers my transmission kicks. :drive: Sometimes when I slow down to stop I can feel the kick when it’s downshifting. My local dealer tried four times to find the problem, no luck. (Dealer tells me that’s a normal thing) :censored: . I don’t think that makes sense. I’ve check with some other cayenne S, TT & V6 owners; they don’t have such a problem. Has anyone heard this kind of problem or have? What should I do? Thank you. :help: -
Depending on your model and DME version - most are the same.
The one listed is for DME 5.2 and later DME revisions added more codes. I wanted to get the later manuals until Porsche raised the prices by more than 4X :eek:
-
Have your dealer perform the fixes in TSB 5/01 6028 Noises from the New Style Sunroof Frame (dated 10-5-2001).
-
Maybe try the Carrera spoiler harness for the Cabriolet - it has a stop light in the spoiler.Loren,Thanks, looks too complicated for me, I'll go with the 51 harness. Still not clear on the 04 harness, don't think it supports a break light.
Chris
996 612 070 10 Wiring harness in spoiler
-
The only schematic I have is for a 996 but it should be the same as a Boxster.
The schematic shows connections to 6 speakers - 4 front and two rear.
-
Links to Porsche 996 paint colors?
-
There were two options that year. Is this option M490 or M680?
-
Pop out a few of the empty cassette holders and grab them firmly - then pull. It just pops out.How does the cassette holder come out? I dont use mine and I could use the space. -
TSB 2/97 6692 Installing Roof Transport System (RTS) (dated 12-22-2000) in the TSB section. The main part number is likely changed but the fundementals of the kit should be the same.
-
They don't actually list one for the TT but they do for a 996 coupe.
I don't know why they don't list one for the TT unless they think you never ski or surf ;)
-
Model and year?
-
Not if it is a CDR23.No kidding did not know that, I could of sworn I read about someone with a 2004 needing a code.Thanks TP
From the TSB (0201 9120 Radio CDR23/PCM2: Security Code-Card dated 10-11-2002)...
Security Code-card deleted for radio CDR23 and PCM2.Information: As from model '03 (3), the security code-card is no longer necessary. It has been deleted because the radio or PCM communicates to the vehicle electronics to determine if it should operate. This affects all vehicles which are delivered with the radio CDR23 or PCM2 equipment. Further information can be found in the Technical Manual and the Service Information Technik, Model 2003.
-
Porsche use BMC for racing but K&N is also good.
Just be sure you DO NOT oil the new filter as excessive oil can get on the MAF sensor and ruin it. I like to take a new filter and wrap it in newspaper overnight to absorb any excess oil (before putting it in a car).
-
Looks to me like you want to jumper pin 2 to pin 5 to turn the spoiler dash light off. And, you will need to use pin 8 for stoplight power and pin 5 for stop light ground.Loren,What do I have to do to jump the pin on the existing harness?
I checked with the dealer they are stumped as to which harness to use to maintain a breaklight.

-
Well, it's going to be a bit tricky. You will need to remove the visor to an area where you can work on it - just pull to slide it off the mounting rod.
Then remove the light cover (pic 1). The with two butter knives carefully pry the holding tray out (pic 2 - but hinges are on the other side of the tray). Now you will be able to see the plastic hinges (even on the leather visors). if you are lucky one of the spring clips is off or broken. If not the one of the plastic hinge pins may be broken (that was my case). If so, your choices are to buy a new (or used visor) or do what I did and use a dremel tool to carefully drill out the old plastic pin and replace it with a steel pin (made from a large paperclip and epoxied into place). Just use the epoxy sparingly as you need this move easily.
Mine ended up as good as new and you don't see the pin so who would know - and it's likely stronger than the original ;)
-
Did you have a look at TSB 1/00 7018 Noises In The Dashboard Area (dated 6-30-2000). It has 8 pages of noise fixes...
-
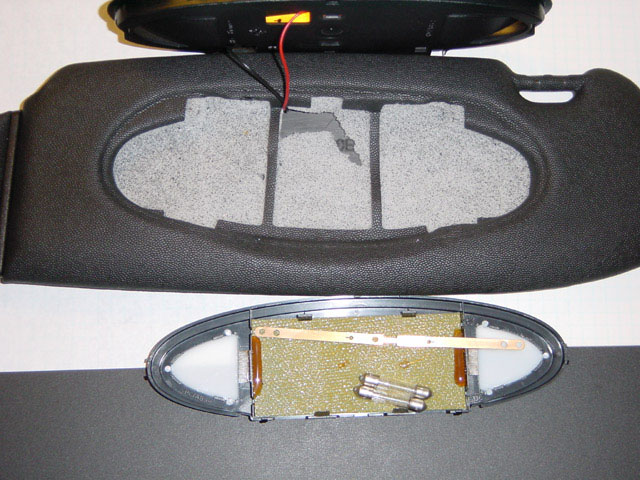
He got you guys again... :lol: :lol: :lol:
(Hint - Look closely at the pic)
:lol: :lol: :lol: :lol: :lol: :lol: :lol: :lol: :lol: :lol: :lol: :lol: :lol: :lol: :lol: :lol:
-
It is done by VIN so I would just ask that they check for any outstanding service actions against your VIN. The memo was sent to service managers only.
-
Pull forward the control button -25- of the light switch -31- as far as it will go -direction of the arrow- towards the front. Press in the locking device at the lower side using a small screwdriver and remove the control button towards the front. Undo the fastening screws -21- at the side, remove the side vent towards the front. Disconnect the plug connection -30- of the main light switch -31-. In order to disassemble the side vent, the covering cap -28-, the fastening nut -26- and the inner race -27- of the main light switch -31- can be removed. Remove light switch -31- from the side vent by turning it slightly in clockwise direction.Need experts to assist!OK so I bought these nice Silver painted AC vent's at a swap meet for $5 ea. now I want to to install them. They dont match my all black trim but I wanted to see what they would look like installed. Hey $5 you cant go wrong. I tried removing the passenger AC vet and it was easy three screws and its out. The last screw is under the cover.
The problem side is the AC vent on the driver side has the Headlight switch installed and I have no idea how to remove the switch inorder to get to the inside screw.
Anyone got the trick on this?
Thanks
D Man
-
 2
2
-
-
Yes, there is a footnote on the Summer Tires and Wheels TSB (4/04 4440)- 18" wheel/tire options that states:
Only for vehicles from M.Y. 1998 (W). -
Are you talking about the radio or the housing it goes in?Got a CDR220 to replace my CR210.Having trouble pulling out the metal housing for the CR210. Any tricks you want to share?
To my knowledge you just slide out the old radio and slide in the new one (assuming you have the radio keys).
-
Dealers now have a list "Cayenne Quality-Improvement Workshop Campaign Fall/Winter 2004" that indicated models/VINs that have potential problems that need to be corrected. There are 18 campaign checks on the list and VINs varying from just a few cars to over 6000 affected.
Make sure your dealer verifies that all the campaign updates are done for your VIN.
-
There is a TSB (6603 9610 Aero Kits dated 10-03-1996) that states:
On vehicles with a retractable rear spoiler the following steps must be done to disable the spoiler warning system:- Remove fuse #37 from the CEB.
- Remove the spoiler warning bulb in the clock.
- Remove the spoiler switch from the center console and install a blank switch cover.
- Secure and insulate all disconnected wiring.


Live Chat
in News, Information, Rumors
Posted
We have added Live Chat to the site!
Now you can have a "live" chat with someone else on the board. You can use a public room (Lobby) or create a private room for your chat.
It can be accessed by clicking in the Live Chat at the top right of any page.
We will give this a try for a while and see if everyone likes it and uses it. If it seems useful we'll keep it -- if not then we will drop the service.
Enjoy! :D