Welcome to RennTech.org Community, Guest
There are many great features available to you once you register at RennTech.org
You are free to view posts here, but you must log in to reply to existing posts, or to start your own new topic. Like most online communities, there are costs involved to maintain a site like this - so we encourage our members to donate. All donations go to the costs operating and maintaining this site. We prefer that guests take part in our community and we offer a lot in return to those willing to join our corner of the Porsche world. This site is 99 percent member supported (less than 1 percent comes from advertising) - so please consider an annual donation to keep this site running.
Here are some of the features available - once you register at RennTech.org
- View Classified Ads
- DIY Tutorials
- Porsche TSB Listings (limited)
- VIN Decoder
- Special Offers
-
OBD II P-Codes - Paint Codes
- Registry
- Videos System
- View Reviews
- and get rid of this welcome message
It takes just a few minutes to register, and it's FREE
Contributing Members also get these additional benefits:
(you become a Contributing Member by donating money to the operation of this site)
- No ads - advertisements are removed
- Access the Contributors Only Forum
- Contributing Members Only Downloads
- Send attachments with PMs
- All image/file storage limits are substantially increased for all Contributing Members
- Option Codes Lookup
- VIN Option Lookups (limited)

-0001-0001.png.112c13ee97acfad0cb1e70d195cc9a0e.png)
Loren
-
Posts
37,298 -
Joined
-
Days Won
530
Content Type
Profiles
Events
Forums
External Paint Colors
Downloads
Tutorials
Links Directory
Collections
Store
Posts posted by Loren
-
-
I've pinned this topic after today's experience with an unnamed dealer -- we are now 2 for 2 with dealers suggesting the wrong part number for the cable needed to retrofit the CDC-4 (MOST CD Changer). That last dealer told me they didn't have a list -- then I told him they did and the list is in the MY03 schematics section of the Service Manual (supplement 73 to be exact - as posted above).
Sorry for the rant, let the buyer beware and do your homework here first! :soapbox:
-
There have been a number of cases of broken welds in the mufflers. That would be my first guess.
-
the part number is.. 000 044 801 02
Ok, I sent you the instructions (via private email) for the early epoxy type sideskirts. These will need to set up overnight - hold them in position with duct tape or the like until the epoxy drys.
-
I've seen GT3 bumpers on Boxsters but never a Boxster Aerokit bumper on a Carrera. Not that you couldn't - but I think most folks think the GT3 bumper looks better/more aggressive.
-
Yes, and they are different part numbers.Is the Boxster Aerokit front bumper the same as the Gt3 front bumper ???
The size and shape of the radiator openings (all 3 in the case of the GT3 bumper) and the Boxster aerokit bumper does not have the GT3 lower lip spoiler.What about the 996 aerokit bumper, is it different again??? -
what do you mean? are you suppose to use double sided tape on it? in the inside of the side skirt it has a plastic piece that is suppose to latch onto the metal piece you screw onto your body... thinking about using double sided tape jsut to keep it as close to the body as possible. would you think thta would work?
As alter_schwede said there are two types of kits. The older kit that used epoxy and the newer kit that uses double sided tape. I have instructions for both. Do you know the part number of your kit?
-
Do you have the double sticky tape type or the epoxy type (older)?
-
1. The Motive should be at about 20 psi. Also, if the tubing on the outlet (bleed nipple) is not tight you might see some air bubbles move back after the valve is closed. When the valve is opened the flow should be one way (out) only.
2. If you follow my clutch bleed instructions then you should not get air trapped in the slave cylinder. Again you need about 20 psi at the motive bleeder. here are my instructions from the DIY:
1. Push the clutch pedal in by hand and use a long piece of wood to hold the pedal down. I wedged the other end (of the wood) between the seat and door frame -- with plenty of soft padding to avoid scratches. A second option is to have a 2nd person sit in the car and keep the clutch pedal FULLY depressed.2. Open the clutch bleeder valve until clear, bubble free brake fluid emerges. Then carefully tighten the bleed screw. Wipe off the area and replace the rubber protective cap over the bleed screw.
3. Remove the wood and the first thing you will notice is that the clutch pedal did not return... so carefully pull it up (slowly) to it's normal position. Try depressing it a few times (slowly). In a few cycles the feel should return.
-
Your car is a MY99 right?
There was a TSB# 4/99 6420 Noises at the Windshield and Rear Window (dated 7-13-99) that says to replace:
996 541 903 00 New/Foam rubber cord (6 mm x 6 m, enough for one window)
996 541 531 01 New/Outer seal for windshield
The procedure does not require removing the glass just replacing the seal and should take less than 1 hour. Sometimes only the new foam rubber cord is needed.
-
Great idea! You never cease to amaze me... :notworthy:
I was talking with Sean at Pioneer in SD and he said that there are two adj screws under the door that control up/down and tilt in/out...
Are you familiar with these????
Paul
Here are the instructions - do it at your own risk...
From the service manual:
Adjusting the door window height1. Adjust the upper limit stops of the drivers by screwing the Torx screw no in or out with socket E6 in or against the direction of travel. Adjustment range approx. 15 mm
2. Adjust the drivers so that they meet the upper limit stops at the same time.
Note!
The adjusting screws of the drivers for the upper limit stops for the door window height are accessible through 2 holes at the bottom of the door.
Adjustment procedure:
1. Open the doors
2. Lock door lock with a screwdriver.
3. Move the power window regulator into its upper position.
4. Adjust door window height at the drivers so that the door window evenly projects approx. 2 mm above the roof strip.
Checking the adjustment
1. Close the doors.
2. Use a wax marker to mark the door window along the roof strip.
3. Actuate the door handle until the window lowering function is activated.
Adjustment valve for window lowering function approx. 13 mm
Note!
The wax marking along the door window should be uniformly approx. 4 mm.
Adjustment of the door window pressing force on the door seal at the top and sides
1. Move the power window unit rails by approx. 10 mm outwards or inwards.
Note!
The adjusting nuts of the power window unit rails for the pressing force of the door window upper edge against the convertible top are accessible through two holes at the bottom of the door.
Adjustment procedure:
1. Open the doors.
2. Movethe power window regulator into its upper position and undo the combination nuts M6 of the power window rails.
3. Adjust the power window unit so that the upper edge of the door window is sufficiently pressed against the door seal at the side Tightening torque: 10 Nm (7.5 ftlb.)
Checking the adjustment:
- Clamp a sheet of paper between the door window and door seal.
Note!
It must not be possible to pull out the sheet of paper.
-
I would try retraining it first.
Press and hold down the button for at least 10 seconds after the windows has fully opened. Then do the same for fully closed.
If that does not work then you may need to take the door apart to adjust the door window height - (not for the faint of heart).
-
There are small changes/improvements made every year.
Was there something you were specifically interested in?
-
Porsche sells these only in a set. There was a new part number in 2002 and it is now the only one available.
996 628 901 08
-
Here is the info from TSB 17/03 9662 Replacing The Key Remote Control Battery (dated 6-25-2004).
This procedure is for the Boxster, Carrera and TT.
Porsche battery part number: 999 611 108 00 Battery For Key Remote
Tools: Flat Screwdriver (small)
Failure of remote control due to replacing battery improperly.Replacing the battery improperly can cause the processor in the remote control to operate incorrectly so that the remote control no longer functions. For this reason, please inform your customers who purchase a battery for their remote control to not replace the battery themselves.
Replace the battery for the customer as described in the following work procedure to avoid a malfunction of the processor and thus a remote control failure.
- Work Procedure page 2, Step 1, "Replacing the remote-control battery"
After replacing the battery, check if the remote control functions. If the remote control does not function, the processor could have stopped. If this is the case, the LED of the remote control either does not light when the button is pressed or it lights continuously, i.e., longer than length of time the button is pressed. The processor must be restarted.
- Work Procedure page 3, Step 2, "Restarting the processor"
The newly printed editions of the vehicle Owner's Manuals will contain a note that the battery for the remote control should be changed by the Porsche dealer.
1. Replacing the remote-control battery.1.1 Take a new battery out of the package and set it aside.
1.2 Removing the battery.
Caution!
Damage to the processor due to voltage drops or voltage peaks!
Do not press any button of the remote control directly before replacing the battery and during the replacement.
1.2.1 Carefully lift off the cover of the key head with a finger
nail or a small screwdriver.
1.2.2 Unclip battery on the recess of the top of the battery
(Figure 1) arrow 1) with a finger nail upwards out of
the holder.
1.2.3 Pullout battery from the tab (Figure 1, arrow 2).

1.3 Installing a new battery.
Caution!
Damage to the processor due to voltage drops or voltage peaks!
When installing the battery, do not press any button on the remote control and avoid repeated contact betvveen battery and contact pins.
1.3.1 Slide new battery with the positive terminal upwards under the tab (Figure 1) arrow 2).
1.3.2 Clip new battery downward into the holder.
1.3.3 Put the cover on the key head.
1.3.4 Press together the key head and cover tightly until the cover engages audibly.
1.4 Check the function of the remote control.Note:
If the remote control does not function after replacing the battery, the processor could have stopped. If this is the case, the LED of the remote control either does not light when the button is pressed or it lights continuously, i.e., longer than length of time the button is pressed. The processor must be restarted. In this case, proceed as is described under Step 2.
2. Restarting the processor.
2.1 Remove battery as described under Step 1.2.
2.2 Inserting battery briefly with polarity reversed.
2.2.1 After a waiting time of at least 10 seconds, slide battery with the polarity of the battery reversed (positive terminal downwards) under the tab (Figure 1, arrow 2).
2.2.2 Clip battery downward into the holder.
2.2.3 After a waiting time of approx. 3 seconds, remove this incorrectly polarized battery again.
2.3 Install battery as described under Step 1.3.
2.4 Check the function of the remote control.
-
Updated Sep 20, 2005
Here is a list of the most popular Porsche shop and technical publications:
Model -- Title -- supplements -- volumes -- part number
Boxster / Boxster S -- Workshop Manual -- 78 supplements -- 15 volumes -- WKD-483-521
Carrera (1999 on) -- Workshop Manual -- 95 supplements -- 17 volumes -- WKD-483-721
Carrera GT (2004 on) -- Workshop Manual -- 4 supplements -- 10 volumes -- WKD-484-521
996 Turbo / GT2 (2001 on) -- Workshop Manual -- 51 supplements -- 13 volumes -- WKD-484-021
Cayenne -- Workshop Manual -- 56 supplements -- 16 volumes -- WKD-484-221
Individual supplements are numbered by manual number plus supplement number. (i.e. WKD-483-721-88 would order supplement 88 for the Carrera Workshop Manuals).
Now for the bad news. Paper manuals/supplements will be discontinued. Here is June 16, 2005 the statement from Porsche:
Note on Repair Manual publishing / PIWIS Information System:The PIWIS Information System being piloted at this time will soon provide electronic access to all repair manuals required by your dealership. The supply of paper supplements for this and other repair manuals will therefore taper off during CY2005. Consult your dealership’s “PIWIS Dealer Launch Information” binder for further details about the PIWIS Information System.
-
Updated July 5, 2006
Here is a list of the most popular Porsche shop and technical publications:
Model -- Title -- supplements -- volumes -- part number
Boxster / Boxster S -- Workshop Manual -- 82 supplements -- 15 volumes -- WKD-483-521
Carrera (1999 on) -- Workshop Manual -- 99 supplements -- 17 volumes -- WKD-483-721
Carrera GT (2004 on) -- Workshop Manual -- 4 supplements -- 10 volumes -- WKD-484-521
996 Turbo / GT2 (2001 on) -- Workshop Manual -- 55 supplements -- 13 volumes -- WKD-484-021
Cayenne -- Workshop Manual -- 56 supplements -- 16 volumes -- WKD-484-221
Individual supplements are numbered by manual number plus supplement number. (i.e. WKD-483-721-88 would order supplement 88 for the Carrera Workshop Manuals).
Now for the bad news. Paper manuals/supplements will be discontinued. Here is May 24, 2006 the statement from Porsche:
Note on Repair Manual Publishfng / PIWIS Informatlon System:The PIWS lnformation System now being implemented provides electronic access to the technical bulletins and other technical information required by your dealership, including most repair manuals.
The PWIS lnformation System covers repair manuals previously in POSES. Repair manual updates, additions and corrections will be available electronically via PIWIS in real-time, with the publishing process shortened dramatically.
During CY2006, all repair manual supplement distributions on paper will taper off and be replaced by the PlWlS lnformation System. Once fully implemented, all Porsche repair manuals from CY1984 up to and including the present models will be Included in the PIWIS lnformatlon System.
-
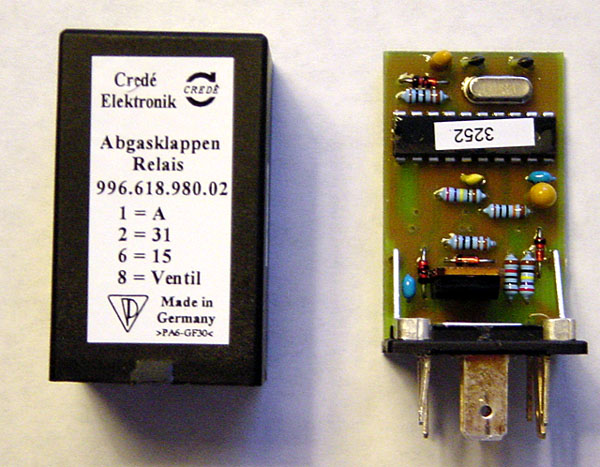
Just figured it out. My relay number was 996.618.980.03. I took it out and the exhaust didn't silence however my PSE switch no longer worked. Based on what I read, I would need to open the relay, remove the four prong jumper and insert the relay back into the panel. The PSE switch should now work without the auto mute between 3-5000 RPMs. Is this the correct procedure?
Thanks.
You do not open the relay the jumper is on the back of the relay panel.
If you want the switch to work then you need to do as original instructions said. Then find and disconnect the Speedometer A grey/pink wire for the PSE so that your PCM will not be affected.
-
If we are talking about the Cardan flange to transmission shaft...
Then:
If the bolt is an M20 (older version) then it get 74 ftlb.
If the bolt is am M26 (newer version) then it gets 118 ftlb.
-
Just got a new TSB on replacing the battery in the remote - 3 pages!
I will try to get it to ToolPants or post it here later today.
-
Loren,
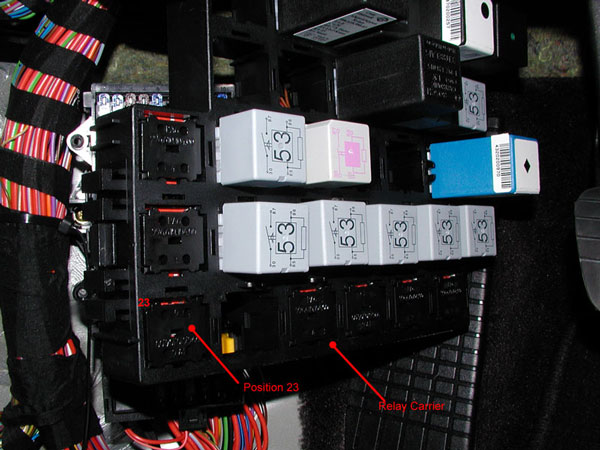
Where do I find the PSE relay and the instructions to remove it? Thanks!
DFC.
The relay should be in position 23 (lower left most relay position) and it should be labeled "Abgasklappen Relais". The part number may be different. Just pull it out to unlpug it.
-
I have to figure out where to get some clay as well.
Believe it or not I found clay bars at Orchard Supply Hardware. And, less expensive than online shops!
-
First, they were not my instructions - I simply helped someone find the right wires. There are several grey/pink wires used for the Speedometer A connections. These are used to control the PSE cutout, trigger the PCM to vehicle speed and inhibit for the cab top (so you don't try to raise or lower at too high a speed).
If you want your PSE open all the time the solution is simple - remove the PSE relay (without removing the jumper bar). No other functions will be affected.
If you want the switch to work then you need to disconnect the right grey/pink wire while leaving the others connected. I don't know a good way to find the right one other than trial and error.
(oops... edited bad typo PCM was PSM)

Publications
in 986 Series (Boxster, Boxster S)
Posted
You can also download the 210 manual here by clicking on "Porsche Manuals" at the top of the page and choosing Becker.