Welcome to RennTech.org Community, Guest
There are many great features available to you once you register at RennTech.org
You are free to view posts here, but you must log in to reply to existing posts, or to start your own new topic. Like most online communities, there are costs involved to maintain a site like this - so we encourage our members to donate. All donations go to the costs operating and maintaining this site. We prefer that guests take part in our community and we offer a lot in return to those willing to join our corner of the Porsche world. This site is 99 percent member supported (less than 1 percent comes from advertising) - so please consider an annual donation to keep this site running.
Here are some of the features available - once you register at RennTech.org
- View Classified Ads
- DIY Tutorials
- Porsche TSB Listings (limited)
- VIN Decoder
- Special Offers
-
OBD II P-Codes - Paint Codes
- Registry
- Videos System
- View Reviews
- and get rid of this welcome message
It takes just a few minutes to register, and it's FREE
Contributing Members also get these additional benefits:
(you become a Contributing Member by donating money to the operation of this site)
- No ads - advertisements are removed
- Access the Contributors Only Forum
- Contributing Members Only Downloads
- Send attachments with PMs
- All image/file storage limits are substantially increased for all Contributing Members
- Option Codes Lookup
- VIN Option Lookups (limited)

-0001-0001.png.112c13ee97acfad0cb1e70d195cc9a0e.png)
Loren
-
Posts
37,298 -
Joined
-
Days Won
530
Content Type
Profiles
Events
Forums
External Paint Colors
Downloads
Tutorials
Links Directory
Collections
Store
Posts posted by Loren
-
-
986 513 153 01 Nut Lock
-
I doubt you can order these since they are no longer on the US parts list. Perhaps from Germany though...
996 551 511 03 V01 Front Handle in Silver (LHD cars)
996 551 512 05 V01 Rear Handle in Silver (LHD cars)
or
(I think these are black only)
996 551 511 07 Front Handle (LHD cars)
996 551 512 07 Rear Handle (LHD cars)
Some folks have had success paiting them with Wurth Silver and then several coats of Wurth Clear cloat. You will lose the silkscreen though.
-
In order to reset the ce light you will need a scan tool or disconnect the battery for 5 minutes. If you do the later then you will need the radio code and also need to reset the clock.
If after a reset the light comes on again then you have not solved the problem and likely need to use a scan to readout the "Pcode". From that you should be able to zoom in on potential causes.
-
If you have access to a hoist or pit and a second set of strong hands it is likely doable.
Here is the tool (actually a brace) and how it is used. I would think a well place jack would work well too - except that you have the risk of knocking it when removing the transmission.

-
996 537 075 03 Gasket Left Coupe (drivers side)
996 537 076 03 Gasket Right Coupe (passenger side)
-
In order to use an 11" rear wheel on a narrow body car you will need to get the offset to 63 mm. Some tires will still rub but you are likely safe with the GT3 recommended tires as they are know by the factory to work on narrow body (GT3s) without rubbing.
Current recommended tires for the GT3 are:
235/40 Z 18 & 295/30 ZR 18 Michelin Pilot Sport TL N2 (Directional)
235/40 Z 18 & 295/30 ZR 18 Pirelli P-ZERO Rosso N5 (Directional)
235/40 Z 18 Pirelli P-ZERO Corsa N6 (Directional)
295/30 Z 18 Pirelli P-ZERO Corsa N6 (Directional & For Specified Side Only)
-
You will need the proper tools, hoists and jack supports.
The engine MUST be supported when removing the transmission.
From the manual:
1. Remove underbody panels (middle and rear).
2. Remove cross member.
3. Support engine with special tool retaining device No. 9624/1 (e.g. engine supporting jack). To do so remove the stabilizer installation and pivot stabilizer forwards.
4. Assemble special tool retaining device No. 9624/1 on the body with the stabilizer fastening screws and adjust pressure screw so that the pressure disc is aligned with the crankcase.
5. Remove drive shaft on transmission side.
6. Separate electrical connection from the reversing light switch.
7. Unclip the hydraulic line for the clutch slave cylinder at the side
transmission case cover.
8. Unscrew clutch slave cylinder suspend on side. Do not remove
hydraulic line.
9. Remove switch cable from the transmission and pull it off the
transmission switch and selector lever.
10. Place transmission jack under the transmission and fasten fixing
strap.
11. Remove transmission container.
12. Remove transmission support.
Note: The transmission can be lower by a maximum of 25 mm to improve
accessibility.
13. Unscrew fastening screws (8) between engine and transmission.
14. Pull transmission to the front and lower.
-
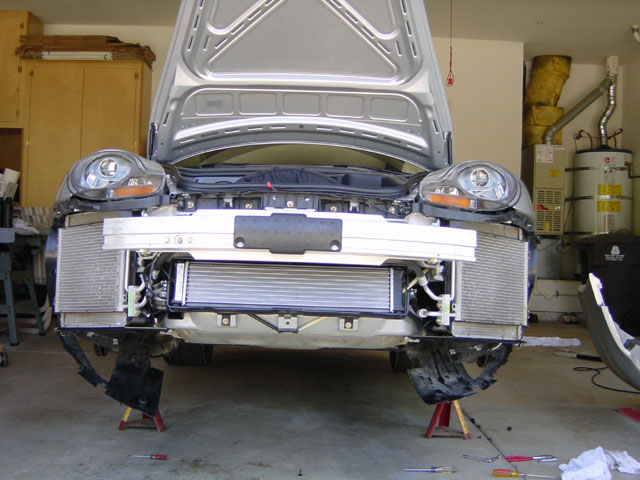
One radiator in front of each front wheel (2). There is also an A/C condenser in front of each radiator. Exceptions with three are: Tiptronic cars, X51 cars, GT3, and cars like mine that have the third radiator added on.How many radiators does an C2 have? two or three?Third radiator (only on some cars)
-
Most likely road debris caught in the front radiator (warm side). Clean the radiator well (as the manual recommends). Worst case remove the front bumper and do a complete cleaning.
-
Very Nice Loren.. great Idea... are you going to go to Laguna Seca this weekend?
I'll be there Sunday with www.coastaldriving.org
I may get to Laguna Seca Sunday... I have a god-daughter event on Saturday.
-
-
You are just changing out the calipers - nothing else. So, if your old sensors and pads are okay then just transfer them. You will need a good pressure brake bleeder (like the Motive) and about 1 liter of brake fluid.
Porsche recommends new caliper bolts - but I don't know many folks that do that.
-
Loren,
What are the part numbers for the BoxsterS red brakes. I think I am going to order them for my 996. They are a direct fit correct? All I need to order is the 2 front and 2 rear calipers correct???
Thanks again for all your help!
Dell
Here are the part numbers:
Fronts
996 351 425 11
996 351 426 11
Rears
996 352 421 13
996 352 422 13
-
It found my 1997 Boxter. Seems like it is missing the "s" in Boxster in 3 different places. ;)
Insurance companies must have something like this. When I bought my car the first thing they asked for was the VIN and they knew what it was.
On the Boxster Porsche did not start with 0000. Mine ends in 1404 but it is not the 1404th unit produced. They also used a different numbering system for different countries.
Ok, I fixed a couple little typos for Scouser ;)
-
Engine in or out of car? I don't know how easy or if it can be done with the engine in the car.
The cam covers do not use a gasket they use Drei Bond silicone - Type 1209 and Loctite 5900 to seal the sealing surface on the cylinder head cover. There are 23 bolts that need to be tightened in sequence to 10 ft-lbs. The micro-encapsulated hexagon-head bolt at the oil pressure duct should always be replaced too.
-
Use a small amount of anti-seize on the wheel bolts threads and wheel hub only. Do not put anti-seize on the wheel bolt washers.
-
Removing:
Lever the locking button A off with a suitable tool or finger. The locking button must be pressed so that the tool can be inserted between the selector lever B and locking button. (The ignition key must be in position 1 before the locking button can be pressed.)
2. Remove compression spring A and pull spring clip B off toward the rear.
3. Pull selector lever up and off.
Installing:
1. Assemble the selector knob with spring clip, compression spring and locking button. Fit conical compression spring with the small diameter facing the guide peg.)
2. Press the complete selector knob onto the shift lever until it bottoms. The spring clip must fully engage in the slot on the selector lever.
3. Check function of locking button.
-
 3
3
-
-
Do you have a link to the site?
Decals/Racing Numbers at the top of the page ;)
-
If it's a factory aerokit bumper then the holes will be there. You will need both the spoiler and 11 plastic rivets.Loren, I have the factory aerokit on my 99 C2 but do not have the lip spoiler you highlighted. Do you have a part number for that? I haven't looked but should there already be holes in my bumper to accomodate the spoiler?996 505 986 00 Spoiler $76.16 (prices as of Nov 2003)
999 507 427 40 Plastic Rivet $0.19 each
-
Hey Guys,
For a 1999 996, what is the right wattage and socket configuration for the following lights:
High Beam:
Low Beam:
Fog Light:
I just checked out the Hoen website and I'm definitely going to order new lamps today. Very cool.
Thanks,
Mark
Did you look on page 174 of your MY99 Owners Manual? ;)
-
It does not come with any sport exhaust it is always a separate order.
The choices are:
996 613 987 10 A05 Switch, sports exhaust system; installation location right of radio
996 613 988 10 A05 Switch, sports exhaust system; installation location left of radio
Your dealer has a TSB that shows them how to install the both PSE and switch.
-
Thanks for the feedback. Couple of questions, I currently have the chrome four-tube sports tailpipes. Do this attached to the new sports exhaust system or do they put on different tips? I was also told that because the exhaust system was an add on that I they could not install the on-off switch on the dash to turn the exhaust on-off for loudness. Is this true or can the switch be installed? I'm an fine with not have the switch but wanted to know what is possible.
Yes the stock tailpipes are used on the PSE. No changes.
You can add the switch to any sport exhaust new or old. You just have to wire it up.
-
Loren,
The instructions were great, and I spent about 1 1/2 hours going through the process but . . . it did not work. If I turn on the Nav unit, it correctly registers my location. However, when I drive away from that location, the arrow correctly rotates to show direction but never moves. This leads me to believe that one or more of the sensors is faulty or disconnected from the unit? Does the service manual have a plug diagram so that I can trace the wires for the sensor?
Thanks,
Todd
You've got (more) mail...
-
Usually that means that a critical zone is open. A switch or sensor is not telling the alarm system that something is not latched. Since you took the door apart that would be a good place to start - along with fuses.


MY2005 Order Guides
in News, Information, Rumors
Posted
June 27th update:
All MY2005 Cayenne order guides have been updated and Cayenne V6 Tiptronic has been added.
Turbo S Coupe and Turbo S Cabriolet have also been added today.
(Thanks again Viken!)
MY2005 Order Guides