Welcome to RennTech.org Community, Guest
There are many great features available to you once you register at RennTech.org
You are free to view posts here, but you must log in to reply to existing posts, or to start your own new topic. Like most online communities, there are costs involved to maintain a site like this - so we encourage our members to donate. All donations go to the costs operating and maintaining this site. We prefer that guests take part in our community and we offer a lot in return to those willing to join our corner of the Porsche world. This site is 99 percent member supported (less than 1 percent comes from advertising) - so please consider an annual donation to keep this site running.
Here are some of the features available - once you register at RennTech.org
- View Classified Ads
- DIY Tutorials
- Porsche TSB Listings (limited)
- VIN Decoder
- Special Offers
-
OBD II P-Codes - Paint Codes
- Registry
- Videos System
- View Reviews
- and get rid of this welcome message
It takes just a few minutes to register, and it's FREE
Contributing Members also get these additional benefits:
(you become a Contributing Member by donating money to the operation of this site)
- No ads - advertisements are removed
- Access the Contributors Only Forum
- Contributing Members Only Downloads
- Send attachments with PMs
- All image/file storage limits are substantially increased for all Contributing Members
- Option Codes Lookup
- VIN Option Lookups (limited)

-0001-0001.png.112c13ee97acfad0cb1e70d195cc9a0e.png)
Loren
-
Posts
37,298 -
Joined
-
Days Won
530
Content Type
Profiles
Events
Forums
External Paint Colors
Downloads
Tutorials
Links Directory
Collections
Store
Posts posted by Loren
-
-
is it the same for the boxster?
i put on a fixed lip and the light goes on at 70mph
i can deal with it till i turn off the engine but if its as easy as swapping a harness.
i'll do it
thanks
ric
From TSB 2a/98 6315 Aerokit - Deactivating the Rear Spoiler Warning Light on MY’01 (dated 8-31-01)
"Vehicle Type: Boxster / Boxster S
Model Year: MY 2001 (1)
Concern: Deactivating the rear spoiler warning light.
Information: As of MY ’01, a new instrument cluster has been installed in Boxster and Boxster S vehicles. The display of the warning and indicator lights is now performed by light-emitting diodes (previously bulbs). The LEDs are soldered into the circuit board of the cluster, and are not removable. When installing an Aerokit in one of these vehicles, the spoiler warning light must be deactivated in a different manor than previously described in step 4.0 of bulletin 2/98.
Note: It is no longer necessary to remove the instrument cluster, skip steps 4.0 to 4.3 in bulletin
2/98.
Tools: Porsche press-out tool for electrical plug connections, number 87050
Work Procedure: 1.0 This procedure is be performed with step 3.1.2 (in bulletin 2/98), after the spoiler adjusting elements have been retracted.
1.1 Remove the rear luggage compartment lining and remove the relay carrier.
1.2 Remove brown relay 3 (extend spoiler relay) and brown relay 9 (retract spoiler relay) from relay carrier 2. Discard the relays. They are no longer required.
1.3 Disengage the 6-pin plug (only 5 are utilized) connection for the drive motor of the rear spoiler. It is located under the support of the rear spoiler assembly.
1.4 Using the connection diagram below, remove pin 1 and insulate. Remove pins 2 and 4 and swap locations with each other.
----------------------------------------------------------------------------------------------------------------------------------------------------------------------------------------------------------------
Pin Color Cross Function Instruction
Section
1 Blue/Green 1.00 Spoiler drive power Remove and insulate. Secure back on harness
2 Gray/Brown 0.35 Spoiler top position Remove and install in position 4
4 Gray/Green 0.35 Spoiler bottom position Remove and install in position 2
----------------------------------------------------------------------------------------------------------------------------------------------------------------------------------------------------------------
1.5 Reconnect the 6-pin plug, and install it back on the spoiler support.
Note: Do not leave the plug disconnected as noted in bold type in step 3.1.2."
-
Thanks to all that have contributed! Your donations help keep this site running and banner free.
Also, the Polyrib Belt DIY has been updated (to 24 mm).
-
On 996 and Boxster a dealer must use a PST2 (Porsche System Tester) to program keys.
-
With the right tools it should take 5 to 8 hours. Nothing special here just change the springs, shocks and rebound springs. Re-torque everything and get a quality alignment.
-
Just FYI for anyone doing this, the tension pulley in my car (2002 c2 coupe) takes a 24mm tool instead of a 27mm tool. I used a 15/16" combination wrench (which works out to 23.8mm) and it worked fine.
b-man
I'll have to double check the Carrera. I got the number from the service manual (wouldn't be the first time it was wrong). I don't remember what I used last time - just grabbed a wrench that fit :lol:
-
My experience is that MB manuals and TSBs are almost impossible to get. I use AllDataDIY.com for my CLK55.
-
If you change them before they wear through the sensors you will not need new sensors.
New pads are approx 12 mm front and 10.5 rear so I would personally change at 5 mm. YMMV...
-
No, you cannot have LSD with tiptronic.
;) unless you have a Turbo...
-
Try Sunset Imports in Oregon. (see link at the top of the pages here - Porsche Parts at Dealer Cost).
Obviously some dealers have raised the prices based on demand. :welcome:
-
When you replace the brake pads on a 2002 C2, what is the correct procedure to bed in the pads to assure maximum stopping performance?
According to the Porsche Service manual...
"New brake pads require a bedding-in period of approx. 200 km. Not until then do they achieve their best friction and wear coefficient. During this period, the brakes should be subjected to full stress when travelling at high speed only in emergencies."
-
Has anyone installed the mesh grilles from the Cup cars? I would think that these might keep the radiators mostly clean?

Viken,
See KarlS's DIY here
-
For those that have now seen this new accessory here is a PDF download version of the article (from a local dealers Porsche Talk mailer).
I do not have part numbers or pricing yet...
-
Factory spec for idle speed on both 6 speed and Tiptronic is 700 RPM.
-
TSB 4/02 1701 Engine Oils Approved by Porsche (dated 5-23-2003) is eight pages of approved oils. In all those pages there is no approved oil that is 10W30.
Approved Mobil oils are:
EXXON MOBIL CORPORATION
Mobil 1 0W-40 ncp GL
Mobil 1 5W-40 ncp GL
Mobil 1 5W-50 ncp GL
Mobil 1 Tri-Synthetic Formula 0W-40 ncp GL
Mobil 1 Rally Formula 5W-50 ncp GL
Mobil Syst S 5W-40 ncp GL
Mobil Super 10W-40 pnp GL
BTW... changing your own oil is easy. Maybe 15 minutes - see my Oil Change DIY here
-
On most of the Becker Radios you use the following procedure to adjust the speed dependent volume:
1. Select the User menu by pressing the down arrow button for longer than 8 seconds. Immediately (within 4 seconds).
2. Rotate the right knob until you come to the GAL display. Use the arrow keys to set the GAL. Settings are Off, and 1 to 7. Default is 3 or 4 (on some radios).
3. Rotate the right knob until END is displayed. The unit will revert to normal use in about 4 seconds.
-
hey Loren,
can't find the DIY for this, the Link just takes me to the DIY Forum?
cheers,
Tony
All are located in the DIY section at the top of each page (Loren's DIY pages).
-
Tanks are fairly common but a hose is easily damaged also. Could be a leaking hose but a pressure test should show for sure.
-
That is a Tiptronic steering wheel -- is your car a Tip?
If so, the part numbers are correct.
-
hey Loren,
is there DIY for changing this?
cheers,
Tony
-
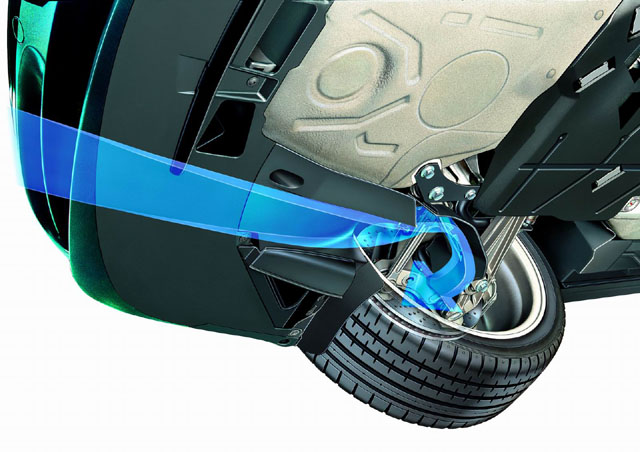
On the front suspension lower arm (see the curved arrow in this pic).Thanks, Loren. I'll try to very careful at driveways. Where are the front brake ducts located? -
Yes, the MY04 GT3 spec is very close to the X74 specs so it should be ok. You are a little low in the front as the spec is 115 mm so expect some scraping on driveways etc. Also, expect that the front brake ducts are going to scrape or be ripped off.
-
Loren,
Does your car have the black plastic "air guides" that normally sit behind a standard front bumper? I'm replacing my damaged std '99 front bumper with the GT3 one and I'm wondering whether there's any point replacing the cracked air guides or just leaving them out. The middle section of the new GT3 bumper won't be cut out if that makes any difference.
Thanks.
Yes. Have a look at the pics in the 3rd radiator DIY.
-
Any time you change the ride height you are changing the camber - so, yes an alignment is always needed.
Any good quality shop that can to a four wheel alignment and corner balance should be able to handle a coilover suspension.
Why did you choose GT3 specs? What model and year car? 6 speed or Tip? Coupe or Cab? All of these make a difference in what suspension tuning you use.
-
Yes. The Kit 996 512 903 00 G2X should fit any MY99 - MY01 car.


Unichip Group Buy
in 996 Series (Carrera, Carrera 4, Carrera 4S, Targa)
Posted
I think Don is asking for some specs. Dyno/performance. Thx.