Welcome to RennTech.org Community, Guest
There are many great features available to you once you register at RennTech.org
You are free to view posts here, but you must log in to reply to existing posts, or to start your own new topic. Like most online communities, there are costs involved to maintain a site like this - so we encourage our members to donate. All donations go to the costs operating and maintaining this site. We prefer that guests take part in our community and we offer a lot in return to those willing to join our corner of the Porsche world. This site is 99 percent member supported (less than 1 percent comes from advertising) - so please consider an annual donation to keep this site running.
Here are some of the features available - once you register at RennTech.org
- View Classified Ads
- DIY Tutorials
- Porsche TSB Listings (limited)
- VIN Decoder
- Special Offers
-
OBD II P-Codes - Paint Codes
- Registry
- Videos System
- View Reviews
- and get rid of this welcome message
It takes just a few minutes to register, and it's FREE
Contributing Members also get these additional benefits:
(you become a Contributing Member by donating money to the operation of this site)
- No ads - advertisements are removed
- Access the Contributors Only Forum
- Contributing Members Only Downloads
- Send attachments with PMs
- All image/file storage limits are substantially increased for all Contributing Members
- Option Codes Lookup
- VIN Option Lookups (limited)

-0001-0001.png.112c13ee97acfad0cb1e70d195cc9a0e.png)
Loren
-
Posts
37,316 -
Joined
-
Days Won
532
Content Type
Profiles
Events
Forums
External Paint Colors
Downloads
Tutorials
Links Directory
Collections
Store
Posts posted by Loren
-
-
Jonathan,
If you look at his pictures... the original (Porsche) battery has the positive terminal on the passenger side of the car closest to the windshield. When the guy in the article mounted the Optima Red Top battery the positive post was still on the passenger side but to the trunk side. So, my point is that if you got the Orange Top Reverse Post battery the posts would be in the original postion (passenger side - closest to the windshield)... perhaps allowing you to use the existing cable. Or maybe it is still too short... we won't know till we try ;)
BTW... I agree with the centering of the battery on the plate.
-
Updated August 18, 2003
Here is an updated list of TSBs for the Cayenne:
03.. 2/03 Control Unit Replacement/Software Update 5-23-03
0335 2/02 Voltage Supply During Diagnosis 2-28-03
0335 0305 Creation of OBD II Reports 6-27-03
9660 4/02 Battery Disconnect Switch 2-28-03
1001 2/02 Engine Repairs 2-28-03
1701 3/02 Engine Oils Approved by Porsche 5-23-03
2706 2/02 Battery Charging During Workshop Visits 2-28-03
2706 3/02 Battery Maintenance Checklist 3-7-03
2706 1/03 Auxiliary Battery For The Cayenne 2-28-03
2706 2/03 Auxiliary Battery Omitted 6-27-03
3735 2/02 Tiptronic Repairs 6-27-03
3965 3/02 Transmission Repairs 2-28-03
3965 2/03 Approved Oils - Final Drives and Transfer Case 5-23-03
4316 1/03 Level Control System Control Unit 2-28-03
4316 2/03 Level Control System Calibration 2-28-03
4440 2/02 Summer Tires and Wheels 2-28-03
4440 3/02 Winter Tires and Wheels 2-28-03
4464 7/03 Spare Wheel Cover Installation Instructions 7-25-03 *
6331 7/03 Cleaning Rear Bumper Stainless Steel Protective Strip 5-23-03
6692 3/02 Roof Box For Transport System 2-28-03
6692 5/03 Surfboard Rack For RTS System 6-27-03
6692 6/03 Bike Rack For RTS System 6-27-03
6832 4/03 Cool-Bag Installation and Use Instructions 2-28-03
6845 3/03 Luggage Partition Grill 2-28-03
6845 1/03 Cayenne Cargo Organizer System Installation Instructions 5-23-03
9110 3/02 PCM2: Start Screen Visible For A Long Time 2-28-03
9112 2/02 PCM2: No Destination Input Possible 2-28-03
9294 7/03 Rear Window Washing System Spray Nozzle Drip 7-25-03 *
9666 3/03 Entry & Drive System Fault Types 5-23-03
9666 5/03 Remote Control For Central Locking System Not Functioning - Engine Shutdown Not Possible 6-27-03
* New this month
** Updated this month
-
Well, there is are two TSBs for this so your dealer may still do it for free. Certainly worth asking about.
If you want the TSBs with the part numbers and instructions, email me or join the forum so I can email you.
Thanks and welcome to RennTech!
-
Specs on the 34R Reverse Post Orange Top (identical to the 34/78 Red Top):
Volts: 12
Amp Hours: 55
CCA @ 0° F: 750
CCA @ 32° F: 980
J240 Life Cycle: 10-12,000
Deep Cycles: ~50
Reserve Minutes: 104
Physical Size L" x W" x H": 10 x 6.8 x 7.8
Weight Lbs.: 38.8
-
Ok, your oil change page is ready for testing... Gt3/TT/GT2 Oil Change page
I am not sure on the engine drain plug part number -- please verify with your dealer (and let me know).
Also, let me know the wrench sizes if you can...
-
I think the one to try would be the Optima Model 34R Orange Top Reverse Post Battery (same specs as the 34/78 used in the article). It seems like it might solve the cable issue since the posts are on the correct side. You would still need to make a mounting plate though.

-
Ok. I don't know if this is true or not, but I was told (by a paint guy) that "L" stands for laquer, or an "A" would stand for acrylic. He went on to say that Porsche does not use anything but laquer.
-
On pre MY02 cars they used a separate color code for water based paint vs. conventional paint.
For Ocean Blue Metallic -- 3AZ is water based paint and 3AY is conventional paint.
-
The OEM clutches are good. I don't see any reason to go with a sport type clutch unless you are changing the flywheel too. The dual mass flywheels on these cars make them very "driveable". A lighter single mass flywheel and HD clutch will make the car need a lot of revs to get off the line -- kinda like a race car.
Porsche introduced a new clutch pressure plate in MY02. The driven plate has also changed (from 996 116 013 05 to 996 116 013 06). I don't have details on why or when but they changed the (MY02) pressure plate. But... the part number (for MY02 and newer) has changed from 996 116 027 05 to 996 116 027 06. So I would make sure your dealer does not use old stock -- get the newer pressure plate (996 116 027 06) and the newer driven plate (996 116 013 06).
p.s. THANKS! Glad to have you here
-
According to the Porsche Tech Manual... Yes, they can be machined.
Here are the specs (Carrera only, GT3 specs are different):
Brake disc thickness, new -- front 28 mm, rear 24 mm
Minimum brake disc thickness after machining* -- front 26.6 mm, rear 22.6 mm (* The brake disc must only be reworked symmetrically, i.e. from both sides evenly.)
Brake disc wear limit -- front 26.0 mm, rear 22.0 mm
Peak-to-valley surface roughness of the brake disc after machining, max. -- 0.006 mm
Thickness tolerance of the brake discs, max. -- 0.02 mm
Lateral runout of the brake disc, max. -- 0.03 mm
Lateral runout of the wheel hub, max. -- 0.03 mm
Lateral runout of the brake disc when installed, max. -- 0.06 mm
-
The Optima battery is a good one IMHO. Lighter and gel filled. I have seen them in Costco here for $99 (USD).
Now the bad news -- it only comes in one size -- which means you will need to make a mounting plate to secure the battery in your car. I am attaching below a PDF from a guy that wrote up his experience in the San Diego Region PCA newsletter. He made a mounting plate and changed the cable (as the old one was too short). I wonder if the longer cable would be needed if the mounting plate were made to more center the Optima in the original battery position? --- Ah, another project I haven't gotten to yet...
-
SPR -
If your temperature needle is slightly over 180 then that is normal operating temp (usually the needle is straight up). The 3rd radiator will not affect normal temps. Where it comes into play is when the outside temp is high (say 90 plus degrees) and you are driving hard (like a DE or a spirited drive). Instead of temps well over 220 you should be running 180 or 190.
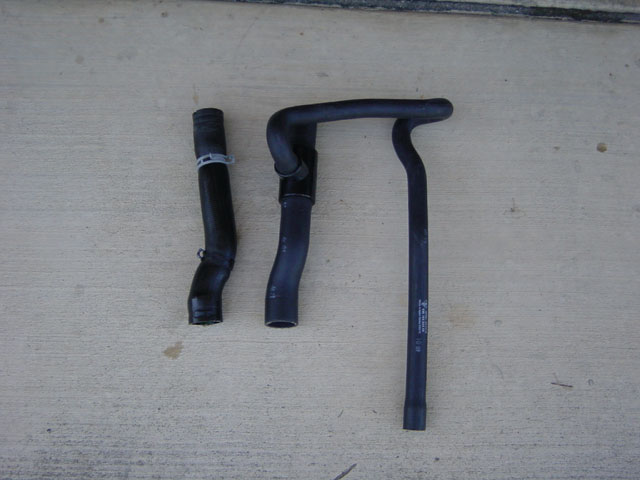
Porsche's recommended flush procedure requires removing some hoses and clamps to completely drain the system. After reattaching they use a special tool to fill and pressurize the system to remove trapped air (much like a power brake bleeder).
Nevada996 -
Yes the hose with the longer small hose goes on the drivers side top.
(upper hose drivers side - old hose left new hose right)
-
Tap water is fine. If it's safe for you to drink then it's safe for your car.
-
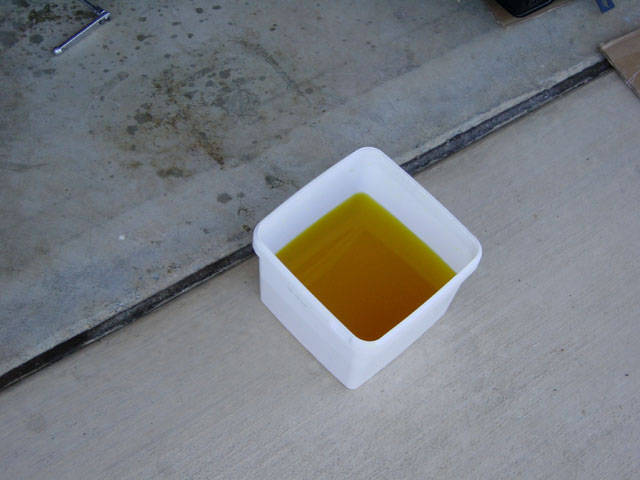
Doug,
I reused my coolant... no waste. If you are careful and use clean catch pans and don't get dirt in it... it's just fine.
(it's actually a little greener than the image shows it)
-
Just an FYI...
The NEW o-ring part numbers are:
Small o-ring 999 707 343 40
Large o-ring 999 707 215 40
-
Here is an image from the aerokit install TSB...
-
Make sure the car is cool and you have plenty of time to do the work. Just take it slow and make sure you are doing the obvious correctly. If a hose doesn't seem to fit make sure you have the right one as they are very different for each side. Make sure you preassemble the 3rd radiator per the instructions -- the tabs to the top and the radiator sits at a slight angle up. Expect to spill some coolant. If this is your first time expect 4-6 hours. It is not terribly difficult it just takes some time. :D
-
Brian,
You've got mail...
-
-
Yeah, I forgot to mention the trick to getting the console out easily is to lower one of the seat backs as far as it will go. That will let you lift it over the seat.
-
Most auto parts store have it. Just look or ask for Lotite for fasteners. I think Permatex owns Lotite now.
-
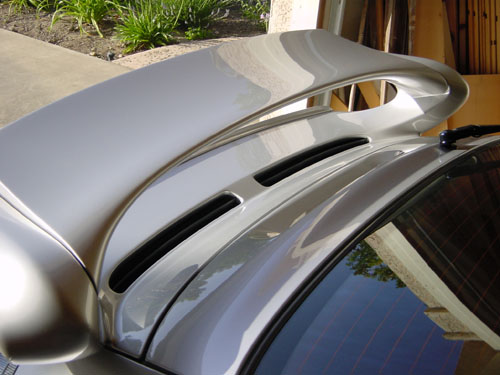
There are 3 positions for the spoiler. The only one "officially" approved by Porsche for street use is the default (flat position).
To change the spoiler position you need to remove the two allen screws (on each side) and carefully lift the spoiler to move the positioning bracket (again one on each side). On some cars you will need to remove (and save) two more allen head screws to allow the bracket to be moved. At that point it can be adjusted to a mid and high position. When you put the screws back in be sure a put a drop of Loctite on each one so they will not vibrate out.
... my aerokit spoiler is in the middle position ;)
(not the best pic but you get the idea)
-
You've already got steel hinges then.... that makes it easy.
I will private email you instructions...
-
I have done a few of these and its pretty easy. You will only need a couple of tools (Torx drivers and screwdrivers). Much of it is the same process for installing a B&M Short Shifter and/or handbrake... so if you wanted to add one of these you can save some time by doing them all at the same time.
You will need to transfer the oddments tray (center glovebox) from the old console to the new one. Depending on the year of your car you could need the center console steel hinge upgrade kit. (Older cars had plastic hinges that have now been replaced with steel hinges).
Tell me what year your car is (so I know whether to send the hinge TSB) and I'll send you the other info.


Optima Battery
in 996 Series (Carrera, Carrera 4, Carrera 4S, Targa)
Posted
Jonathan,
Here is an online source I found. Not the least expensive but they do have stock and free shipping.
1st Optima Battery Sales