Welcome to RennTech.org Community, Guest
There are many great features available to you once you register at RennTech.org
You are free to view posts here, but you must log in to reply to existing posts, or to start your own new topic. Like most online communities, there are costs involved to maintain a site like this - so we encourage our members to donate. All donations go to the costs operating and maintaining this site. We prefer that guests take part in our community and we offer a lot in return to those willing to join our corner of the Porsche world. This site is 99 percent member supported (less than 1 percent comes from advertising) - so please consider an annual donation to keep this site running.
Here are some of the features available - once you register at RennTech.org
- View Classified Ads
- DIY Tutorials
- Porsche TSB Listings (limited)
- VIN Decoder
- Special Offers
-
OBD II P-Codes - Paint Codes
- Registry
- Videos System
- View Reviews
- and get rid of this welcome message
It takes just a few minutes to register, and it's FREE
Contributing Members also get these additional benefits:
(you become a Contributing Member by donating money to the operation of this site)
- No ads - advertisements are removed
- Access the Contributors Only Forum
- Contributing Members Only Downloads
- Send attachments with PMs
- All image/file storage limits are substantially increased for all Contributing Members
- Option Codes Lookup
- VIN Option Lookups (limited)

-0001-0001.png.112c13ee97acfad0cb1e70d195cc9a0e.png)
Loren
-
Posts
37,298 -
Joined
-
Days Won
530
Content Type
Profiles
Events
Forums
External Paint Colors
Downloads
Tutorials
Links Directory
Collections
Store
Posts posted by Loren
-
-
Thanks for the site comments... :D
IMHO... It's not about bleeding it about changing the brake fluid. High temps can cause brake fluid to break down and absorb moisture. When the moisture in the fluid gets hot it vaporizes and become a gas... not good for braking performance. Depending on the number of hot laps at a DE I would suggest every 2-4 events and DE's are the toughest on brakes. Brake fluid is cheap (about $12 liter) and changing it is only about an hour once you get the hang of it. A lot of folks go back and forth with the ATE Gold and ATE Super Blue that way they can easily tell when they have bleed through the system. Both ATE Gold and ATE Super Blue have the same chemical properties so there is no advantage to one over the other (a misconception by some since ATE call Super Blue "Racing" fluid). There are several other brake fluids on the market so use what you feel comfortable with. If you want to protect your warranty then make sure use a DOT 4 brake fluid (not DOT 3 or DOT 5 synthetics).
You won't need a lift (although if you had access to one it would make it faster). You just need to jack up each corner at a time. See my DIY for the exact bleeding sequence and don't forget there are 2 bleed screws on each caliper (total of 8 per car).
-
Whoohoo! Looks great Don! :clapping: :clapping: :clapping:
The crests and silver on the backs of the seats is a super look too!
-
I agree with Jeff that if the system has not been drained then you don't need to do anything special for PSM or Traction Control. You may want to bleed the clutch though. It is not very hard and you can find details at this link: Brake/Clutch Fluid Change and Bleeding Instructions
-
Home Curb-Rash Repair
Courtesy of Nasa Racer Pete (used with his permission) - posted by Loren Well, there I was...backing into a parking space against a curb and I was in a hurry and I heard it...SCRAPE! One fraction of a second...barely moving. Got out and looked at the rim...OOOOOOWWWWW! Well, no need to fear...I've done this enough times to have a easy way to do home repairs with a few simple items. Note that this ONLY covers light scuffs, this isn't meant to be used to repair a DAMAGED wheel or one where the
-
Author
-
Category
-
Submitted06/27/2003 10:09 PM
-
-
Cool! Thanks Don :clapping:
I can build all of my former Porsches there.
-
Duane,
Well the board just opened publicly last weekend so it's not quite a week old. We have a few TT members but not a lot yet. Feel free to tell your TT friends. We are also looking for a good moderator for this forum preferably someone with a lot of TT experience.
Here is my 2 cents on turbo cool down time...
When you drive hard on the track or just a spirited drive through the mountain passes it is always best to bring the car back to "normal" operating temps. This goes for engine oil, coolant, brakes and of course turbos. The last thing you want to do to your car is park it, shut it off and crank the handbrake on. All of these can lead to premature failures caused by excessive heat that parts were not designed for. So it is always best to drive "normally" for a few miles or park and idle the car for 2-10 minutes. How long depends on your cars current temps. For instance after running 20 or hot laps at the track it usually takes my (normally aspirated) car about 5 minutes to reach normal temps.
As to turbo timers... that is your call. If you really don't have time cool your car down then I guess they could be useful. I (personally) just have a problem walking away from car with it still running.
Hope this helps some... :D
-
Sure! 914's, 914-6's, 356's, etc., etc., etc. All Porsches are welcome here.
If the interest is high enough then we'll give you your forum.
Some of us actually owned (and mod'ed) a 914 :D
-
Thanks to Sandy for this great DIY...
(I've done this on my car and it is not very hard to do. The instructions are very detailed.)
-
 1
1
-
-
I haven't seen one that looked like it would hit anything. I wonder if it wasn't seated all the way down on the cable connector?
-
They are the older GT3 swaybars... but I don't have part numbers for the new ones yet so they could be they same.When Gert lists the adjustable GT3 sway bars on his site, is he referring to the "old" GT3 bars or the new '04 bars?
My misunderstanding, I read "coilovers" in the last line and assumed H&R coilovers... my bad. You are correct on the PSS-9 starting at RoW Standard height. So you will likely go at least to RoW M030 height (20 mm front and 10 mm rear).Also, as I understand it, unlike the H&R coilover kit which starts 30mm lower than stock in front, the Bilstein PSS-9 lowers the car from 0-35mm front and from 0-30 mm rear, relative to the European standard suspension which is 10mm lower than our standard setup. So at it's minimum setting the PSS-9 would be only 10mm lower than U.S. stock front and rear, which is actually higher than my ROW M030. That's what I got from the Carnewal site. Am I missing something?Yeah, no hurry on the radiator... i was just teasing :jump:
-
Thanks Mike!
The RoW M030 swaybars are:
Front: 23.6 mm
Rear: 19.6 mm
The GT3 (old GT3 not MY04)
Front: 26.7 mm
Rear: 20.8 mm
Just remember that the coilovers lower the car (from stock) about 1 inch. That is the at the highest setting. So if that is okay for your driving then there is no other problem I am aware of. You can always go down from there but not up (higher).
p.s. Ready for that 3rd radiator yet? :unsure:
-
Teaching
1. With the ignition switched on, press the "lift" button and move the lifting/sliding roof drive to the "raised" limit position.
2. Press "lift" button again and keep depressed. After around 10 seconds, a complete cycle takes place from the "raised" limit position to the positions "lower - open - close".
3. Teaching of the characteristics has been completed after this process.
Note:
The "raise" button must not be released during the entire process. In the event of a restart, the lifting/sliding roof must always be moved to the raised limit position first.
4. If the lifting/sliding roof drive should move back in Item 1, then the closing force limitation function has responded (lifting/sliding force drive was taught). The "open" button must be re-taught in this case.
Re-Teaching
1. Press the "open" button until the sliding roof stops. Then release the button. Press again until the lifting/sliding roof drive stops again. Then release the button.
2. Press "open" button again and keep depressed. The entire process takes place after approx. 10 seconds: "close - lift - lower - open - close"
-
Porsche has redesigned the oil seal, the installation tools and re-trained the dealers on proper replacement of the RMS. According to a recent TSB (Technical Support Bulletin) Porsche dealers are now supposed to perform a test prior to replacing the oil seal. The test involves checking the mating surface for the seal. If the fit of the special tool is not tight enough... you get a new engine.
-
Thanks Darren!
Feel free tell others about the site.
They don't need to be technical to post here... this site is for both questions and answers
:D
-
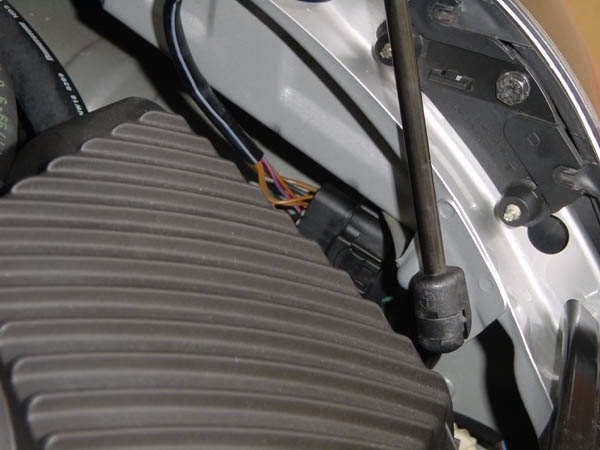
When a fixed factory (Porsche) spoiler is added there is a change to the wiring harness to disable that warning. You need to purchase and install (5 min max) the following new harness: 996 612 070 51 Wiring Harness.
Technical Details:
Check whether there is a jumper connecting pin 2 (which is already jumped from pin 1) to pin 5 on plug X23 of the new wiring harness (connection to the vehicle). If this is the case, the spoiler extended signal will be constantly present at the control module and the warning light of the retractable rear spoiler will not light. (at speeds above 74mph).
Connect the plug connection of the new wiring harness to the vehicle. Route the wiring harness along the hood shock to the fan housing and attach it on the rear lid with two (2) fastening clips. Connect the fan and interior lamp plugs. Done.

-
The kit part number is: 000 044 801 63. It is a kit that normally comes with the Porsche Tequipment Sport Roll Bar to cover up holes after you've removed the seats to install the bar. It includes a couple of nicely made silver painted caps, two large vinyl covered plugs, and a mini version of the pin that secures the center of the seatbacks so that you can reinstall the cap over the center mounting point. About $55 I think.
-
Here is what I've heard 3rd hand...
You will need the ball that fits your trailer.
It also has a connection for the trailer brakes and it has left and right combo brake and signal lights like on most trailers. Should work perfectly for any standard trailer.
and someone else told me that you will need a plug adapter for your trailer wiring. You will also need a male plug for the brake controller. Supposedly dealers have these.
On the driver side, right above the brake pedal, remove a screw and then remove the black plastic cover. On the left side, you'll find a 4 wire plug which is for the brake controller.
pin 1 is ground
pin 2 is permanent power
pin 3 is the break signal for the controller
pin 4 is the break output (goes to the tow bar socket)
Most hitch shops or your dealer should be able to take it from there.
I'll try to get more (and better) info if I can...
-
They don't look like the old ones to me. I think they might be Bose.
Can you find a part number?
Bose are:
996 645 561 00 Left door speaker
996 645 562 00 Right door speaker
For Bose I think you would have to change your door panels also (or perhaps have someone custom cut them).
FYI...
Standard Speakers (-MY00):
996 645 011 01 Left door speaker
996 645 012 01 Right door speaker
Sound System System (former HPAS) (-MY02 non-Bose):
996 645 551 00 Left door speaker
996 645 552 00 Right door speaker
-
Standard Wheels are 18"
Front: 8.5 J x 18 H2, 40.0 mm offset, p/n 996 362 136 05
Rear: 11 J x 18 H2, 63.0 mm offset, p/n 996 362 142 04
Approved Tire Sizes and Manufacturer
Front: 235/40 ZR18
Rear: 295/30 ZR 18
Michelin Pilot Sport2, N2, Directional
Pirelli P-ZERO ROSSO, N4, For specified side only
Hmmm.... I wonder if this wheel/tire combination will fit other narrow body 996's? ;)
-
Thanks Jay!
How about a DIY for removing the rear wiper (and plugging)? including pics if you have them?
-
Ok, do this at your own risk...
Here is what we did on a MY 99 Cab:
(courtesy of Bob H in Las Vegas (1st guinea pig) ;)
"Thanks Loren, It worked I now can raise and lower my top while moving, just click the e-brake to the 1st click and it works!
Now, as for how it was done:
1. Park your car and set the e brake. With the convertible top down start raising the convertible top. First thing that happens is the convertible top compartment lid lifts and moves all the way rearward, keep raising the top until the convertible top compartment lid just starts to move forward. Then interrupt the closing operation.
2. Remove key from ignition THE CONVERTIBLE TOP MUST NO LONGER BE ELECTRICALLY OPERATED IN THIS POSITION.
3. There are right and a left tension cables that goes from the rear of the convertiblt top on the right and left sides to the right and left sides of the deck under the rear of the convertible top. These 2 cables are 4 inches long and they keep the rear of the convertible top from flipping up. They snap off where they connect to the deck, just push to the side and they will pop off the ball.
4. Lift the rear of the convertible top (the window part) all the way up until it is vertical and have someone hold it there. Now the deck is exposed. You will see 4 black plastic rivets that you just pull out (you can use a small screw driver) and then you can pull the panel rearward to expose the convertible top control module. its the large silver box on the left side of the car mounted on the vertical wall just behind the pop up roll bar, with the 3 seperate connectors going into the bottom of it.
5. The connector all the way to the left with all the small wires going in it is the one that you want.
6. Do not disconect the connector from the control unit, just find the GREY/ PINK wire and cut it 1 inch before it goes into the connector and put a small piece of black tape on each end and then put a piece of black tape around all the wires.
7. Put the panel back up and push the 4 plastic rivets in and lower the rear of the convertible top that someone was holding and attach the 2 cables to the deck.
8. Now put the key in the ignition and raise the top all the way.
9. All done, now take out for a test drive. While moving at 10mph raise the e brake 1 click so the e brake light comes on and lower the top. When done release e brake all the way.
Please note, This is something I did to my car because I wanted to. I can not be responsible for anything that happens if you do this to your car and don't ever put your top up or down while going over 20 MPH."
Note: If you want to do this and have a different model year you should post a message (and someone will check for you) as some wire colors have changed over time.
-
2
-
-
Welcome - Please Read and tell your friends about RennTech.org
These forums are the place for Technical Porsche Discussion. The goal here is not to replace other Porsche boards but to offer folks a place where the content is primarily technical. If you need technical information about Porsche's (whether you own one or not), or would like to ask questions related to Porsche's this is the right place. We do ask that you register here in order to post or reply to a message. We do this so that moderators and others answering questions are not confused by several people with the "Guest" name. If you have information to share like a DIY or tech tip please feel free to add it to the site. All Porsche related posts are welcome!
So go ahead -- ask your questions :thumbup: and invite your friends :cheers:
... and of course of you would like to help by contributing to RennTech.org (to help cover the cost of server leasing, bandwidth, software licenses, and disk space). Just click on one of the donate buttons at the top or bottom of any page. Thanks for your support! :clapping:
-
Once you have the instrument cluster out (you didn't say whether you are that far yet).
The cluster itself is 3 pieces - front frame (glass and frames), display unit (needles and gauge faces) and electronics unit.
You need to open the cluster by:
1. Pull off the buttons for the clock and trip mileage counter.
2. Remove the metal springs from the left and right mounting points.
3. Place the unit on a flat level surface preferably on a soft towel.
4. Unclip the center of the electronic unit at the bottom. Then hold the press the green guide rails outwards with a screwdriver to release the latch. Take the electronic unit upwards out of the display by carefully pulling alternate sides (evenly).
5. Undo the clips (on some newer version clusters) in the indicator light housing and carefully take the display unit out of the front frame
6. You should now be able to change the glass.
Reverse the steps to re-assemble.
Jeff, you are welcome to add anythnig here since you have taken quite a number of these apart. (not mine thank God) ;)
-
C4S and TT share the same rear bumperettes.
996 505 425 01 Left Bumperette
996 505 426 01 Right Bumperette
Vacuum line needed
in 996 TT, 996 TT S, 996 GT2
Posted
Fuel pressure line? or vacuum line?
I emailed you some info on the fuel pressure lines.