Welcome to RennTech.org Community, Guest
There are many great features available to you once you register at RennTech.org
You are free to view posts here, but you must log in to reply to existing posts, or to start your own new topic. Like most online communities, there are costs involved to maintain a site like this - so we encourage our members to donate. All donations go to the costs operating and maintaining this site. We prefer that guests take part in our community and we offer a lot in return to those willing to join our corner of the Porsche world. This site is 99 percent member supported (less than 1 percent comes from advertising) - so please consider an annual donation to keep this site running.
Here are some of the features available - once you register at RennTech.org
- View Classified Ads
- DIY Tutorials
- Porsche TSB Listings (limited)
- VIN Decoder
- Special Offers
-
OBD II P-Codes - Paint Codes
- Registry
- Videos System
- View Reviews
- and get rid of this welcome message
It takes just a few minutes to register, and it's FREE
Contributing Members also get these additional benefits:
(you become a Contributing Member by donating money to the operation of this site)
- No ads - advertisements are removed
- Access the Contributors Only Forum
- Contributing Members Only Downloads
- Send attachments with PMs
- All image/file storage limits are substantially increased for all Contributing Members
- Option Codes Lookup
- VIN Option Lookups (limited)

-0001-0001.png.112c13ee97acfad0cb1e70d195cc9a0e.png)
Loren
-
Posts
37,302 -
Joined
-
Days Won
530
Content Type
Profiles
Events
Forums
External Paint Colors
Downloads
Tutorials
Links Directory
Collections
Store
Posts posted by Loren
-
-
Welcome - Please Read and tell your friends about RennTech.org
These forums are the place for Technical Porsche Discussion. The goal here is not to replace other Porsche boards but to offer folks a place where the content is primarily technical. If you need technical information about Porsche's (whether you own one or not), or would like to ask questions related to Porsche's this is the right place. We do ask that you register here in order to post or reply to a message. We do this so that moderators and others answering questions are not confused by several people with the "Guest" name. If you have information to share like a DIY or tech tip please feel free to add it to the site. All Porsche related posts are welcome!
So go ahead -- ask your questions :thumbup: and invite your friends :cheers:
... and of course of you would like to help by contributing to RennTech.org (to help cover the cost of server leasing, bandwidth, software licenses, and disk space). Just click on one of the donate buttons at the top or bottom of any page. Thanks for your support! :clapping:
-
Once you have the instrument cluster out (you didn't say whether you are that far yet).
The cluster itself is 3 pieces - front frame (glass and frames), display unit (needles and gauge faces) and electronics unit.
You need to open the cluster by:
1. Pull off the buttons for the clock and trip mileage counter.
2. Remove the metal springs from the left and right mounting points.
3. Place the unit on a flat level surface preferably on a soft towel.
4. Unclip the center of the electronic unit at the bottom. Then hold the press the green guide rails outwards with a screwdriver to release the latch. Take the electronic unit upwards out of the display by carefully pulling alternate sides (evenly).
5. Undo the clips (on some newer version clusters) in the indicator light housing and carefully take the display unit out of the front frame
6. You should now be able to change the glass.
Reverse the steps to re-assemble.
Jeff, you are welcome to add anythnig here since you have taken quite a number of these apart. (not mine thank God) ;)
-
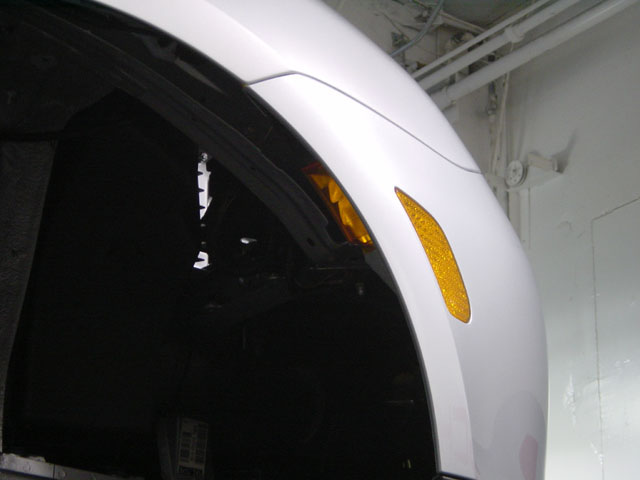
C4S and TT share the same rear bumperettes.
996 505 425 01 Left Bumperette
996 505 426 01 Right Bumperette
-
Here is a photo I took at a tech session. I recall one of guys told me that you do need to move the wheelwell liner back (as shown) but I don't think you need to remove the wheel (even though it's removed in this photo). Unless you have the 20" wheels I think you might have enough room to get these in and out. Let us know!

-
First your numbers:
996 333 051 14 -- US M030 Rear Shock
996 343 041 17 -- US M030 Front Shock
MY99 Cab -- 2 wheel drive -- 6 speed RoW Parts:
Front
996 343 041 16 -- Shock
996 343 531 12 -- Coil Spring (color coded Yellow/White)
996 343 701 04 -- Stabilizer (swaybar) (same as US M030)
Rear
996 333 051 13 -- Shock
996 333 531 12 -- Coil Spring (color coded Green/Red)
from VIN --
>>991S6 41090
>>991S6 00548
>>991S6 40407
>>991S6 40432
or
996 333 531 40 -- Coil Spring (color coded Green/Red)
from VIN ---
991S6 41091>>
991S6 00549>>
991S6 40408>>
991S6 40433>>
996 333 105 107 Additional Spring
996 333 701 17 -- Stabilizer (swaybar) (19.6 mm) (same as US M030)
-
Yes, the coupe and cab are different (because of the weight). I'll look up the cab parts later today and post them here.
There is an excellent article in Panorama about US Stock vs US M030 vs RoW M030 (coupe only!). Here is a link
-
I already have GT3 TSBs before they have delivered any to the US!
Remember some are instructions for installing options so they have to have the manual for the dealers (and training).
-
Yes, the Boxster S calipers are the same size and specs as the 996 stock calipers only they are RED.
Here are the part numbers:
Fronts
996 351 425 11
996 351 426 11
Rears
996 352 421 13
996 352 422 13
-
Installing the Third (center) Radiator
(updated July 19, 2003)
-
Don,
You should have been notified that I sent you a private message on the board. So it should have said "1 new message" and I think a popup also notifies you of a message.
-
-
-
You can download the Becker radio manuals in PDF format here .
-
Don, Check your messages... top right
-
PSE (Porsche Sport Exhaust) Install
Covers all Carrera, and GT3 cars Removal -- 1. You will need to lift the car high enough that you can safely get underneath (you do not need to remove the rear wheels on most cars but most folks find it easier with the rear wheels off). 2. Loosen the 2 bolts (each side) on the sleeve that connects to the cats and then slide it towards the cat. (You might want to spray these nuts with WD40 first so they will loosen easier -- just don't spray the O2 sensors). 3. Crawl und
-
Author
-
Category
-
Submitted06/19/2003 10:05 AM
-
Updated04/24/2012 09:12 AM
-
-
Covers all Carrera (996), GT3, TT / GT2 and Boxster (986) cars
Here is the long explanation from the service manual on the flashing coolant light.
"Four functions of the coolant warning light:
1. Engine coolant level too low -- light flashes slowly (0.5 Hz)
2. Engine compartment temperature too high -- light flashes slowly (0.5 Hz) (engine compartment blower might be faulty)
3. Engine coolant temperature too high -- light is lit; pointer on the right
4. Temperature sensor at water outlet faulty -- light flashes rapidly (1 Hz) ; pointer on the right
Note: The temperature warning in point three is indicated if the conditions "engine coolant temperature too high" and "engine coolant level too low" are present simultaneously."
How to raise the Cab top while moving
in 996 Series (Carrera, Carrera 4, Carrera 4S, Targa)
Posted
Ok, do this at your own risk...
Here is what we did on a MY 99 Cab:
(courtesy of Bob H in Las Vegas (1st guinea pig) ;)
"Thanks Loren, It worked I now can raise and lower my top while moving, just click the e-brake to the 1st click and it works!
Now, as for how it was done:
1. Park your car and set the e brake. With the convertible top down start raising the convertible top. First thing that happens is the convertible top compartment lid lifts and moves all the way rearward, keep raising the top until the convertible top compartment lid just starts to move forward. Then interrupt the closing operation.
2. Remove key from ignition THE CONVERTIBLE TOP MUST NO LONGER BE ELECTRICALLY OPERATED IN THIS POSITION.
3. There are right and a left tension cables that goes from the rear of the convertiblt top on the right and left sides to the right and left sides of the deck under the rear of the convertible top. These 2 cables are 4 inches long and they keep the rear of the convertible top from flipping up. They snap off where they connect to the deck, just push to the side and they will pop off the ball.
4. Lift the rear of the convertible top (the window part) all the way up until it is vertical and have someone hold it there. Now the deck is exposed. You will see 4 black plastic rivets that you just pull out (you can use a small screw driver) and then you can pull the panel rearward to expose the convertible top control module. its the large silver box on the left side of the car mounted on the vertical wall just behind the pop up roll bar, with the 3 seperate connectors going into the bottom of it.
5. The connector all the way to the left with all the small wires going in it is the one that you want.
6. Do not disconect the connector from the control unit, just find the GREY/ PINK wire and cut it 1 inch before it goes into the connector and put a small piece of black tape on each end and then put a piece of black tape around all the wires.
7. Put the panel back up and push the 4 plastic rivets in and lower the rear of the convertible top that someone was holding and attach the 2 cables to the deck.
8. Now put the key in the ignition and raise the top all the way.
9. All done, now take out for a test drive. While moving at 10mph raise the e brake 1 click so the e brake light comes on and lower the top. When done release e brake all the way.
Please note, This is something I did to my car because I wanted to. I can not be responsible for anything that happens if you do this to your car and don't ever put your top up or down while going over 20 MPH."
Note: If you want to do this and have a different model year you should post a message (and someone will check for you) as some wire colors have changed over time.