Welcome to RennTech.org Community, Guest
There are many great features available to you once you register at RennTech.org
You are free to view posts here, but you must log in to reply to existing posts, or to start your own new topic. Like most online communities, there are costs involved to maintain a site like this - so we encourage our members to subscribe or donate. All subscriptions and donations go to the costs operating and maintaining this site. We prefer that guests take part in our community and we offer a lot in return to those willing to join our corner of the Porsche world. This site is 99 percent member supported (less than 1 percent comes from advertising) - so please consider an annual subscription or donation to keep this site running.
Here are some of the features available - once you subscribe RennTech.org
- View Classified Ads
- DIY Tutorials
- Porsche TSB Listings (limited)
- VIN Decoder
- Special Offers
- Paint Codes
- Registry
- Videos System
- View Reviews
- and get rid of this welcome message
It takes just a few minutes to register, and it's quality Porsche information at a low cost.
Contributing Members also get these additional benefits:
(you become a Contributing Member by subscribing or donating money to the operation of this site)
- No ads - advertisements are removed
- Access the Contributors Only Forum
- Contributing Members Only Downloads
- Send attachments with PMs
- All image/file storage limits are substantially increased for all Contributing Members
- Option Codes Lookup
- VIN Option Lookups (limited)


poobha
-
Posts
27 -
Joined
-
Last visited
Content Type
Profiles
Events
Forums
Exterior Paint Colors
Downloads
Tutorials
Links Directory
Collections
Classifieds
Store
Everything posted by poobha
-
AIRBAG Codes cant be ereased...
poobha replied to SimonPBS's topic in 986 Series (Boxster, Boxster S)
I can tell you what caused your light to come on, because I did the same thing. You must have had the ignition on when you took the seat out. I was working on my car too as soon as I turned the iginition on the air baglight came on. That's the cause of the light coming on. :censored: -
Air Conditioning went out Boxster 2000
poobha replied to oracle10g's topic in 986 Series (Boxster, Boxster S)
It sounds like you have a freon leak in you system. You should take it to an A/C shop or dealer and have them do a leak down test. If you have a leak you'll obviously have to fix that before you can refill the system. Good luck! -
FYI the system takes 850 grams, approximately 30 oz, of 134a freon. I used PAG 46 oil. System takes between 6.1 and 7.1 oz of oil. We are blowing nice cold air! :thumbup:
-
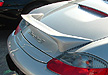
I'm not a big fan of aftermarket spoilers etc, but a friend who bought my 98 986 put this spoiler on it and I have to admit it looked good. Having said that I don't think I would add one on, but it does look good not tacky. He bought it from Suncoast Porsche, Florida. It came prepainted. Marco

-
Hey guys, Does anyone know what the line pressure should be in the a/c system? Also does the system come with PAG 46 oil or the heavier PAG 150 viscosity? Thanks
-
Well we might be on to something here as my cruise control isn't working either. It worked well last year when I put the car in storage but when I brought the car out this year it wasn't working. I have the same problem my cruise light comes on in the dash but the cruise doesn't work. I have checked my system and all seems in order. I wonder if it is in the actual arm on the column? Any thoughts? Tool pants have you ever replaced any cruise components? Marco
-
I change my oil with Mobil 1 15W- 50 every 3-5000 Kilometers or last year I hardly put any KMs on my car I changed it this spring. Of course a fresh filter every time. It never hurts to change the oil.
-
yet another convertible top stuck...
poobha replied to shojitsu's topic in 986 Boxster Convertible Top Issues and Solutions
Hi Guys, Shojitsu sorry to hear you are still having troubles with your top. The switch I found that wasn't operating properly in my fix is located behind the carpeted side panel that covers the seat belt mechanism. The connection you see on that same side is for the rear defrost on a hardtop installation. The side panel is held in place by a 10mm bolt up top at the roll bar and a phillips screw below. Once you remove this panel you will see the switch near the pivot point. it is a small microswitch that is feed power through a two wire up from the bottom wiring harness. Good luck. Marco -
Once again thanks for the photos. Now I heard you shouldn't reuse the caliper bolts. What are your thoughts?
-
Hey Doug, Usually education cost money, but in this repair it just a few skinned knuckles. Believe me I shared your frustration when my top did the same thing. Marco
-
Hi Doug, That is a microswitch that tells the motor to stop. I just went through this repair. See the other article under top repairs, started by me, poobha. Mark and Toolpants offer very good advice. You will have to disconnect the push bar and thrust rods from the transmission drive levers, retime your transmissions and put it together. All your info is in the top Issues and solutions. Read all recent post as they are very helpful in getting this corrected. You have essentially run the gears off the transmissions because the top wasn't registering itself in up position. Good luck. Marco
-
Hi all, I am just about ready to tackle my front brakes. I am going to replace the front rotors and pads with factory Porsche parts. They look straight forward. Are there any tips or obstacles to look for? I see toolpants that you were going to film a brake job for DVD. See if you came to Canada you could have done a top adjustment and brake DVD at the same time. thanks Marco
-
yet another convertible top stuck...
poobha replied to shojitsu's topic in 986 Boxster Convertible Top Issues and Solutions
Hey Tool Pants That is exactly right. It is a whole lot easier to do it that way. Marco -
yet another convertible top stuck...
poobha replied to shojitsu's topic in 986 Boxster Convertible Top Issues and Solutions
Hey Guys, I love the use of the pictures it makes it so much easier to describe. In your first picture Tool Pants it looks like the pivot point on the clamshell arm was taken off, I took the clip above that off the one that connects the thrust arm. If you take that on off you can raise and lower the clam shell in it's normal operating range. I found it difficult to work in such a confined area trying to pull off the ball sockets. Once I had access to the back area you can remove the 'v' levers and secure it in a bench vise and pop off the thrust rods. I just left the front half of the push bar connected through my adjusting. Marco -
yet another convertible top stuck...
poobha replied to shojitsu's topic in 986 Boxster Convertible Top Issues and Solutions
Wow that sounds a lot like my problem at least the noises it was making. I bet when you disconnect the arms you'll find that the gears have run off the transmission. I found it easier to remove the metal clips that hold the thrust rods to the clam shell then to pull the ball sockets. You are working blind through the roll bar. Use a small screwdriver to assist in pulling it off, you won't be able to pull it off by hand. Once you pull those clips off you can push the trust rod out and raise the clam shell by hand and get full access to the the back area. Once you get the top in the service position you can release the front arms by undoing the 10mm bolt. Mark the bolt so you know the original position. Have you tried this way of disconnecting Toolpants or Mark? I became a pro at doing it when I was fixing my top. Good luck. I would be interested to see if the gears are off once you disconnect the arms. Marco -
convertible top
poobha replied to poobha's topic in 986 Boxster Convertible Top Issues and Solutions
Hi Toolpants, From my experience the switch tells the motor that the top is up and stops the downward motion of the motor. It must work in conjunction with the clamshell microswitch in determining the closed position. I just went in the garage and removed the micro switch located on the B pilar. There is no part number on it. By the picture on ebay it definitely looks like the switch. To access the switch you have to remove the side panel that covers the seat belt assembly on the drivers side (left), I did this with the top up. The switch is secured with one torx screw. I removed it, followed the wiring to the main harness running down the inner sill and disconnected it. It is a two wire terminal, I checked for continuity between the two by manually operating the lever. The lever that works the switch by making contact to the convertible top frame when it comes up, is made of very thin flexible metal. My lever was tweaked back so when the top went up it never operated the switch. The funny part about this, I say funny now because it's working but then I was ready to pay money at the dealership to fix it, was I was getting my top to work fine up and down, but as soon as I put the tension cables on the back of the top it would start to torque itself off the gears when the clamshell was closing (raising the top). The tension from those cables was probably just enough to keep the convertible top frame from making contact with the the microswitch. For others that may encounter top problems, there are four microswitches that work on top. 1. the lock/ unlock microswitch, located behind the lock lever hook holder above the rearview mirror. 2. the parking brake microswitch, located below parking brake lever. 3. B pilar microswitch, located behind the left side panel that cover the seat belt assembly. 4. The compartment lid microswitch, attached to the top motor frame. -
convertible top
poobha replied to poobha's topic in 986 Boxster Convertible Top Issues and Solutions
:clapping: I got it........ I had set it up again and still ran into difficulties. If we were filming the repair it definitely would have come with a 'R' rating :censored: I finally started to check my micro switches with an ohm meter to see if they were working. I found the switch on the B pilar was working but not making contact with the convertible frame. I fixed that went through the set up and low and behold I had a working top!!!! I want to thank you and toolpants for the help. Marco -
convertible top
poobha replied to poobha's topic in 986 Boxster Convertible Top Issues and Solutions
Sorry Mark I meant levers 180 not arms. If you lower your top check the position of the levers, is the v down or up. -
convertible top
poobha replied to poobha's topic in 986 Boxster Convertible Top Issues and Solutions
Hello Mark, I have the drive levers on the right sides. They are actually marked on the back L and R. They are installed just like the tool pants photo (v of the lever downwards). If you look at that photo, the convertible arms will only attach with the top in the up position. When you say have I tried installing the arms 180 do you mean lining up the arms the same way, running off the gears to determine the down position, line them up with the transmission, then remove and reinstall the arms 180 degrees that may work as this would closer resemble the location of the convertible arms (red socket) in the down position. I can try this tonight. I am about ready to fly to California. If you make a video on this subject I will be your first customer. -
convertible top
poobha replied to poobha's topic in 986 Boxster Convertible Top Issues and Solutions
Hello Mark, I must be missing something. I run both gears off the transmissions while pressing down, then hold the the drive lever the opposite direction to get them to catch going in the up direction. I then line up the drive lever to the marks on the transmission. I do this one side at a time to make sure they are both perfectly lined up. When I do this the push lever that works the top (red socket) and the thrust rod that connects to the clam shell will only connect with the top in the up position (closed). If I put the top down there is no way that I can connect them with the levers in this position. Sorry to be a pest but I can not make sense of this, unless I reverse the directions lining everything up with the top up. So run the gears off going up then reverse the direction of the arm, lining it up with the transmission. But this way doesn't work. Please tell me where I am going wrong. Thanks Marco -
convertible top
poobha replied to poobha's topic in 986 Boxster Convertible Top Issues and Solutions
Hi Mark, My car is a 98. It appears the cables have been changed, as the part numbers match the numbers on the links you supplied and they are reinforced. When I originally line up my top, I just started the gears on both sides and then attached the arms. My top would work great but then I would put it up and it would get stuck in that position. Now last year I only put around, and I'm embarrassed to say, 400-500 miles on the car. So the top wasn't used that much but it did get stuck a few times. I lined it up the same every time. The movement of the top was fine, no noises etc. When it would get stuck it would be in the up position, never in the down position. I haven't had a chance to work on the car this week and align with the top in the down position but will this weekend for sure. Looking forward to a smooth working top. -
convertible top
poobha replied to poobha's topic in 986 Boxster Convertible Top Issues and Solutions
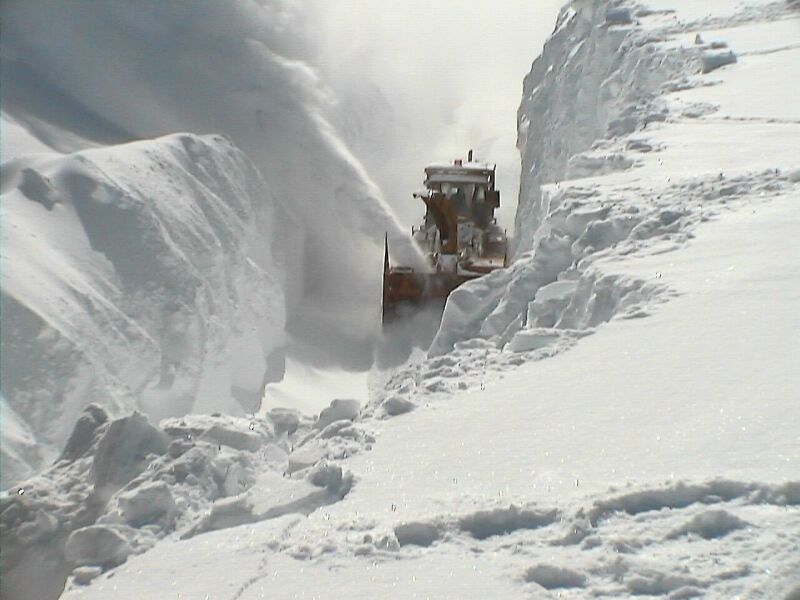
Hi Mark, That's a real picture. Here is another one. They get whacked with snow every winter. My car was in an accident. So to do the repair properly we had the top out. I must have been out by a little because it would work fine and then it would act up. When I put it away for the winter I wanted to get it adjusted properly so I didn't run into problems in the good weather. I will keep you informed on the progress. I have always adjusted the top in the up position. I will try and adjusted tonight. thanks Marco
-
convertible top
poobha replied to poobha's topic in 986 Boxster Convertible Top Issues and Solutions
sorry here's the picture of the Newfoundland Highway, my Boxster barely made it through!!!
-
Sorry here's the photo of Newfoundland!!!
-
convertible top
poobha replied to poobha's topic in 986 Boxster Convertible Top Issues and Solutions
; ; ; ; , I can tell you that it sure doesn't look like that now. In January we had over 4 feet of snow....uuuughhh. Now come here in the summer months and the weather will be like yours. I tried to attach a picture of Newfoundland Canada this winter. This is one of the major highways. Hopefully I have attached it properly. On another note I will try the top again. Thanks. Marco