Jump to content

Welcome to RennTech.org Community, Guest

There are many great features available to you once you register at RennTech.org
You are free to view posts here, but you must log in to reply to existing posts, or to start your own new topic. Like most online communities, there are costs involved to maintain a site like this - so we encourage our members to donate. All donations go to the costs operating and maintaining this site. We prefer that guests take part in our community and we offer a lot in return to those willing to join our corner of the Porsche world. This site is 99 percent member supported (less than 1 percent comes from advertising) - so please consider an annual donation to keep this site running.

Here are some of the features available - once you register at RennTech.org

  • View Classified Ads
  • DIY Tutorials
  • Porsche TSB Listings (limited)
  • VIN Decoder
  • Special Offers
  • OBD II P-Codes
  • Paint Codes
  • Registry
  • Videos System
  • View Reviews
  • and get rid of this welcome message

It takes just a few minutes to register, and it's FREE

Contributing Members also get these additional benefits:
(you become a Contributing Member by donating money to the operation of this site)

  • No ads - advertisements are removed
  • Access the Contributors Only Forum
  • Contributing Members Only Downloads
  • Send attachments with PMs
  • All image/file storage limits are substantially increased for all Contributing Members
  • Option Codes Lookup
  • VIN Option Lookups (limited)

Rod Croskery

Contributing Members
  • Posts

    31
  • Joined

  • Last visited

  • Days Won

    2

Everything posted by Rod Croskery

  1. My wife helped me with a Jimi Fix on our 2004 Cayenne S on October 5th of this year. The "twenty-minute job" took a bit over two hours, but the driveshaft operation has been butter smooth ever since. I popped the plate off to inspect the zip ties recently and there was no evidence of movement or wear. https://rodcroskery.wordpress.com/2016/10/05/where-does-it-hurt-ruby/
  2. This is a well illustrated and helpful set of instructions. The trick with the shop towel and the impact socket is useful.
  3. Thanks to Spawny Whippet for the instructions on axle removal. Over the last week I accumulated the parts and tools, and today I removed and serviced the right half-shaft on my 2004 Cayenne S. I'll update the report when I have re-installed the axle. https://rodcroskery.wordpress.com/2016/12/02/new-cv-boots-for-ruby/
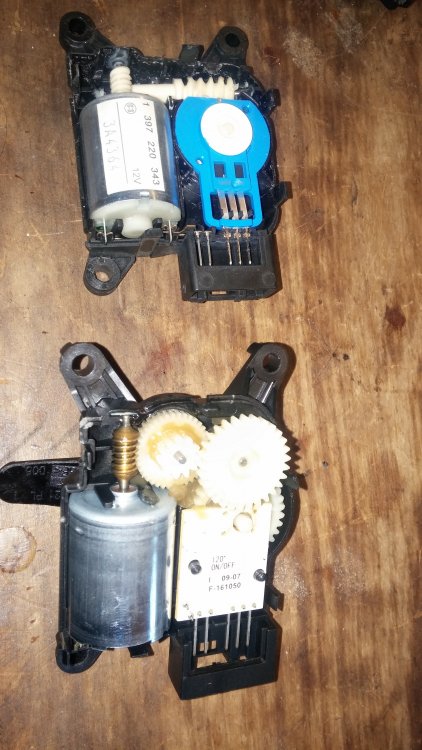
  4. I bought a set of actuators off a 2008 before I dug into the left side. Four days later after replacing five of them, my air and heat all work on the left side, but my left arm doesn't. Two sessions of physio for a mildly compressed neck vertebrae and things are improving. Anyway, I learned a few things: 1. The 2008 actuators (below) seem better engineered than the '04s, seen above. So I switched them all on my LHD '04 S. When I removed the originals, one actuator, "D", the one closest to the driver's seat on the bottom plate, had its plastic shaft broken off. This might have accounted for the annoying and constant clicking which persisted on the left (if the heat setting was anything but LO) after I'd fixed the click on the right in an earlier adventure. 2. Don't disconnect the KESSY. It can rattle around under the gas pedal until the job is finished. The instruction in the manual to remove the plastic housing over heater pipes on the driver's side -- that's a cruel practical joke. Ignore it. 3. I connected hose-clamping vice grips to the little ratchet and the T20 bit. Along with a long T20 screwdriver, that worked to get the two plates out, but then the problem came up in getting the screws back in. Eventually I learned to dip the bit in Gorilla Glue (woodworking variety), push the screw on firmly, and then cook it into place with wooden matches. These welds held well enough to start the screws, especially with leverage from a small paint-stirring stick. The brittle glue broke free easily after the screws had started in their holes. 4. Do not under any conditions neglect to attach the wiring harness to D before you push the lower plate into position. 5. Setting the arms for installation is tedious, but easy. With a small 12V supply, the pinout is 1,2 to move the arm one way, and 2,1 for the other. 1,2 are off by themselves. Line the arms up with the diagram on your computer screen. Grease them. The old ones on my car had hardened grease impeding their operation. 6. This was a hellish job, but it's great to have the climate control working. Winter is coming. https://rodcroskery.wordpress.com/category/2004-porsche-cayenne-review/
  5. 777: I must specify that I haven't road tested the car at this point, but in the case of the actuator attached to the white plastic rod, I removed it and discovered it was jammed at one end of its travel, so I pried the case apart with a couple of fine screw drivers. While newer models I saw on eBay seemed to have the two halves of the case fused together, mine opened up like a lunch box, revealing contents in good condition. Because of the triple-reduction worm gears I couldn't wiggle anything, so I popped the gears out and played with a tiny 12V battery and fine telephone wires, laying the bare contacts along the two poles attached to the end of the motor. This worked, so I added a couple of dabs of white grease to the gears and sent motor power along to the complex part at the other end whose gears also appeared to be intact. Reversed polarity moved the arm back, so it seemed that the mystery part would still function. Of course the touches of 12V were very brief, as the travel of the actuator is short, so I simply turned over my pair of wires to reverse the motor to complete each cycle. After I had played with the thing enough to get the grease worked around the gears, I popped the top half of the case back on and put it back on the car. When I turned on the key and experimented with heater buttons, the "recirculate" and "fresh-air" buttons caused the device to open and close the flap by alternately pushing and pulling on the rod. My harassment of the other actuator more properly falls into the burnt-fingers-methodology classification. I could hear the thing trying to cycle, but I could only see the top of its white arm, or lever, or whatever one calls it. Let's use arm for now. It appeared to be stuck, with a wire or spring over the top of it. I could just see one end, so I grabbed the scope and started probing, seeing if I could get a better idea of how it worked. Wary of short circuits, I attempted to put tension on the spring with the lens of the scope, but opted for a forked green twig about ten inches long. It moved the spring around in a satisfying manner, and it eventually settled in what looked like an appropriate slot from my perspective. Further examination with the scope revealed a dark something connected to the white arm. At first I had thought the arm wasn't working because it had become disconnected from whatever it was supposed to push, but there was something dark and plastic moving around, enclosed by the white nylon. So I bumped into the assembly a couple of times with the scope. Didn't seem to hurt anything. I cycled the temperature selector from low to high. The assembly seemed to be moving both ways now, and began to complete cycles. I cycled it to halfway, 16 degrees, and called it a day. I had unwisely taken the lower half of the dash off the driver's side and would need to re-assemble it before any further testing, so I did that and then called it a day. After breakfast I'll take the Cayenne for a test drive and report further. UPDATE There is still no warm air in the driver's footwell. The mystery right actuator still clicks occasionally at mid-ranges. At HI and up to 16.5 it remains still. I guess I'll have to figure out how to remove and examine it. More fun to be had. UPDATE II Much fun had this afternoon in the removal of two of the screws which held the plate the right-side mixing actuator occupied.. Easily revived actuator, but re-installing it and its plate are beyond my current tool supply. Somewhere I saw a photo of offset 1/4" mini ratchets. Now I understand why they're essential for this job. I think I need a long, size 20 Torx screwdriver. With the right side likely to function when reassembled, I must next look to the left and figure out which one is making the clicking sound and keeping all warm air from the driver's side.
  6. Two of the actuators were making noise unless the system was set to LOW. In Eastern Ontario we will soon need heat, so it was time to set things right. The one I found behind the glove box pushed a white plastic rod to what I suspected was the fresh air baffle. It was jammed, but after some time on the bench and a little grease, I put it back to work opening the fresh air flow. Delicate touches from 12V, alternately reversing the polarity, soon loosened the device to where it would reliably cycle, so I snapped its little ball joint into the cup of the plastic rod, and it worked when I switched on the fresh air. The other actuator I found with the shop "laproscope," reattached a floppy spring with a forked twig, and nudged it with the scope lens until it started making full orbits. Don't know what it does, but I suspect it mixes air. Still have to test drive and put the glovebox back in, but I called it a win for the day.
×
×
  • Create New...

Important Information

We have placed cookies on your device to help make this website better. You can adjust your cookie settings, otherwise we'll assume you're okay to continue.