Welcome to RennTech.org Community, Guest
There are many great features available to you once you register at RennTech.org
You are free to view posts here, but you must log in to reply to existing posts, or to start your own new topic. Like most online communities, there are costs involved to maintain a site like this - so we encourage our members to subscribe or donate. All subscriptions and donations go to the costs operating and maintaining this site. We prefer that guests take part in our community and we offer a lot in return to those willing to join our corner of the Porsche world. This site is 99 percent member supported (less than 1 percent comes from advertising) - so please consider an annual subscription or donation to keep this site running.
Here are some of the features available - once you subscribe RennTech.org
- View Classified Ads
- DIY Tutorials
- Porsche TSB Listings (limited)
- VIN Decoder
- Special Offers
- Paint Codes
- Registry
- Videos System
- View Reviews
- and get rid of this welcome message
It takes just a few minutes to register, and it's quality Porsche information at a low cost.
Contributing Members also get these additional benefits:
(you become a Contributing Member by subscribing or donating money to the operation of this site)
- No ads - advertisements are removed
- Access the Contributors Only Forum
- Contributing Members Only Downloads
- Send attachments with PMs
- All image/file storage limits are substantially increased for all Contributing Members
- Option Codes Lookup
- VIN Option Lookups (limited)


rhkwon
-
Posts
27 -
Joined
-
Last visited
rhkwon's Achievements
Member (1/1)
0
Reputation
-
 rhkwon changed their profile photo
 -
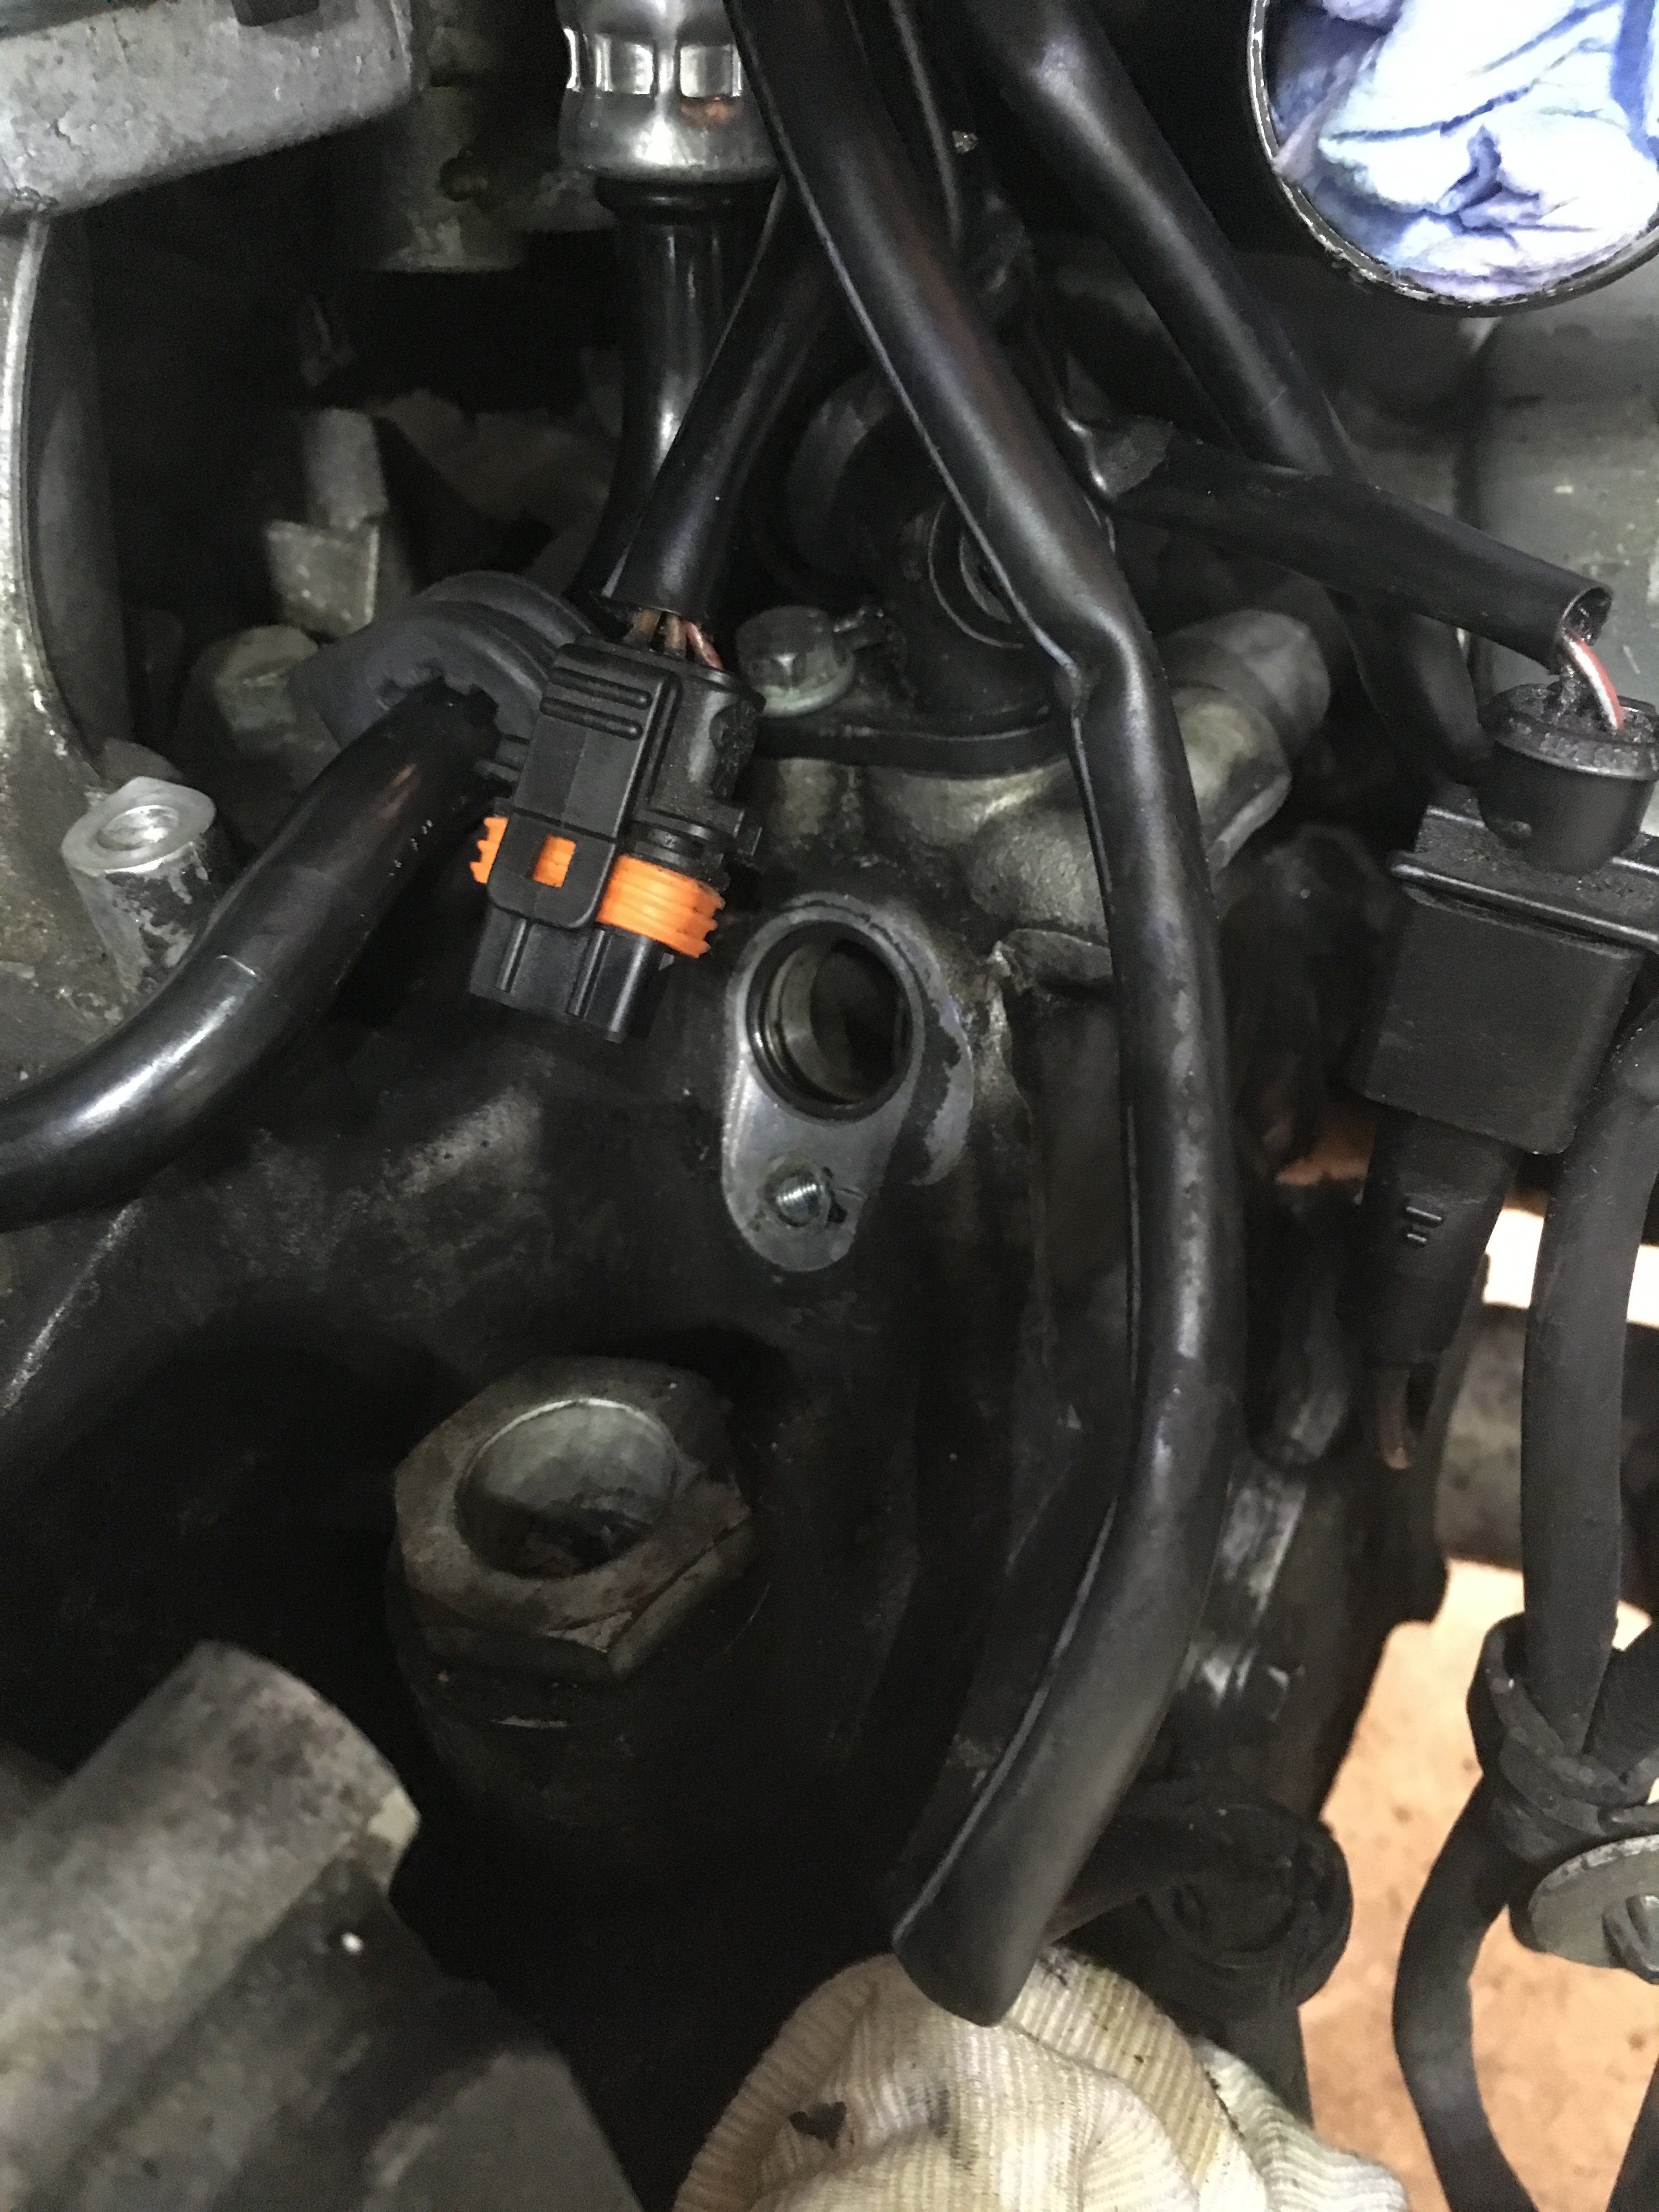
Here is a pic of the passenger side with the sensor removed. The sensor is located on the passenger side at the rear corner of the engine and is difficult to access. I had no codes but decided to replace both hall sensors while I had an easy opportunity to do so. I have already removed the entire top end so removal was very easy. Use a 5mm hex socket with a 1/4" ratchet. Just be careful of the 5mm hex bolt and do not strip it and go at it from the correct angle. I almost stripped the inside of the hex bolt because I was going at it at a 180 degree angle. I replaced the bolt with a new one as the hex was a little mangled. The sensor is located under a bunch of wires. Press down on the clip and disconnect the connector after the bolt is removed and the sensor is loose. Trust me, much easier this way rather than breaking the connector. There just is not enough room to get a good grip and torque on the connector with both hands. The PS high pressure line hose and the PS support bracket it attaches to can get it the way so try to remove the bracket. Of course, the only way to get at this is to remove the large coolant hose at a minimum. Don't forget to replace the O-ring with a new one. Wipe down and clean up the area in general. Use blue Loctite and torque to 7.5 ft/lbs. Pic of the sensor location with O-ring:

-
OK I figured this one out. The hall or camshaft position sensor has 2 locations on the 1999 C4. The one I was having trouble locating is located right next to the AOS. So if you have removed your AOS, now is a good time to replace the sensor. It is located on the drivers side to the left of the bottom AOS bellows metal tube. If you follow the long AOS breather tube as shown in the picture, you will find it. Just simultaneously push down on the tab and up to disconnect the electrical connector. Then use a 5mm hex to remove the bolt with a socket and then pull the sensor out. If you have removed your AOS, this can be done from above the engine. You will need a 5mm hex head and 1/4" ratchet with a 10" or so extension. You will have to remove the entire thing blindly using your right hand. Or it can also be done from underneath the car if it is jacked up and the AOS is removed. Attached pic is rear of engine on driver side. Looking from the passenger side to the driver side. Part number is 996-606-106-02 and is the same for both sides. Bosch is the original OEM part and much cheaper than Porsche labeled part. Make sure to buy new O-rings 999-707-404-40 and new bolts 999-218-005-01.
-
Guys, I'm trying to replace both of my hall camshaft position sensors on my 1999 C4. I am very confused. I found the one on the passenger side that is towards the back of the car as shown in the Pelican pic as posted by JFP which I have already replaced. But the other 2 pics posted by Ahsai of the other second sensor shows that it is on the drivers side at an 8 oclock position to the alternator (which I could not locate anything on my car) and another pic showing that is on the passenger side at the front of the engine near the heat exchanger (which I have not been able to get under the car yet). I also saw another post showing that it is right next to the AOS Does the 1999 have a different location? I am assuming the driver side sensor for my car would be either the one near the heat exchanger pic or the AOS pic. If so, best removed working from underneath the car? I already have the passenger side upper intake manifold off if it helps.
-
Here is my AOS replacement experience. AOS DIY 1999 Porsche 996 Cabriolet C4 Manual Transmission Before I get into the nitty gritty of the actual AOS replacement, let me give you some background on my car. I bought this car about a year ago from California with about 127,000 miles on it and it now has 133,000 miles on it. Car drove perfectly all the way to Texas but we all know that perfection never lasts. After a couple of days, the code for a faulty spark plug coil pack came on and the engine ran rough. So, I changed all 6 coils with the updated 997 Beru coils and new Bosch spark plugs. I also changed the motor mounts. Ran great for a few thousand miles. I noticed every once in a while, that the temperature gauge would fluctuate up just a tad but nothing to worry about. Then last September my daughter stole my car while I was away on vacation in Cancun with the wife (Risky Business) and drove it to Tyler TX and the lower 3-way splitter hose failed. So, got the car towed to a pretty good European mechanic and he replaced the splitter hose and the coolant hard line pipe and flushed the coolant. After a couple of months of enjoyable and care free driving I noticed the smell of coolant and find out that the top of the coolant expansion tank is leaking. I figured it was the bleed valve and so I tightened the bleed valve bolts (after much cursing to get to the 2 bolts covered by the side of the engine). This did not work so decided to go cheap and replace with a Uro brand bleeder valve. The bleeder valve would not seal correctly so I decided what the hell, rather than chance it and try to buy an OEM bleeder valve and then the real cause being a cracked expansion tank, why not replace the entire cooling system? I bought every single coolant hose from front to back, a new water pump, new thermostat/housing, gaskets and new bolts. After cleaning the front radiators of debris (which I highly recommend every few years), I decided that I would leave the front end of the cooling system alone for another time. This will be Phase II when I decide to replace the radiators. Although the hoses are 20 years old, I honestly think that the main front and the 2 heater hoses under the middle of the car could last quite a few more years. Since I already had everything out and apart, I decided I might as well change out the AOS. Hearing horror stories about this procedure did not inspire any confidence in me. I have never had the white smoke symptom but an occasional faint lumpy idle (which could mean a million things) caused me to think the AOS could be the culprit. The clincher for me was not having any documentation that the AOS was ever replaced (which I later found out that it had indeed been replaced) along with not wanting to have to remove everything again in order to replace it if it did actually fail. I don’t know about you guys but I am lazy as hell and I hate doing things twice. Kill 2 birds with one stone. Measure twice cut once, etc. I think I went overboard on this project but I can never leave well enough alone. Most of the parts I replaced could easily have lasted much longer but again I am very lazy and I’d rather just do it and not have to worry about should I have replaced that part while I had the chance or when it was much easier to do? Besides, the labor I saved doing this by myself basically made all the new parts and beer free! The DIY guide on Renntech https://www.renntech.org/topic/37442-air-oil-separator-replacement-aos/ proved invaluable and if you have a 1999 – 2001 manual transmission this should be your guide and you should be fine. This is the ultimate guide and my details are just ancillary with a little bit more detail. I did notice that there are some minor vacuum hose differences between 1999 and 2000-2001. Pelican also has a good DIY. I did not have to lower the engine. There were no special tricks or unusual surprises where I got stuck. Take lots of pictures and bag each set of bolts for each particular part that is removed. Human nature is to forget things and you will forget how a part went and a picture is invaluable. When putting back everything, I did get lost a couple of times. After having completed this job, I have come to the conclusion that the AOS replacement is not difficult at all. Keep in mind the later model year 996 may much more difficult but for the 1999 it is very easy. What is makes this job appear so difficult is the totality of having to methodically remove so many different parts to get to the AOS makes it look so daunting. Removal of each separate part is not difficult at all. Don’t be intimidated. Be confident in your abilities. I’m an idiot. If I can do it, you surely can. Take your time. Go slow. Take lots of pictures and/or videos. Write down notes. Bag your bolts and parts and label them. Buy your parts before hand. Even if you buy all the parts you think you will need, you will probably order more parts later on because something broke or looked old. Here is a summary of the steps in the order I used to get to the AOS. Note that these steps are after having jacked up the car, draining the coolant and replacing the water pump/thermostat: 1. Remove air box. Disconnect the electrical connector. 2. Remove engine coolant hoses. You do not have to do this but I had every single coolant hose removed as these were all being replaced anyway. I would rather replace a hose on any car when given the opportunity as opposed to being stranded out in the middle of nowhere. Gives you a ton more room to work and prevents snagging. I even replaced the 2 heater hoses that are located below in the middle of the car fore of the engine. In order to keep track of which hose went were, I took a lot of photos and even left a few dangling so that I would know how to put them back together. 3. Remove air pump, associated hoses, and disconnect/loosen the air check valve of which I believe there are a total of 3. The first is just to the left top of the alternator which I left unbolted from its bracket and later replaced. There is one under the driver side intake manifold which I also replaced and the last one under the passenger side intake manifold which I left alone for obvious reasons. The part number is the same for all 3. I replaced mine with Pierburg brand 7PP906270. 4. Remove fuel filter along with the rectangular shaped fuel line. Use a 19mm crow foot and a 17mm wrench. Although my fuel filter had only 12,000 miles on it, I decided to replace it along with a new fuel line as some of the fuel line rubber had cracks in it maybe from me pulling on it when I removed it. 5. Remove coolant expansion tank – easily removed once the fuel filter and fuel line are removed. Slides right out from the holding bracket to the right towards the engine. Just be careful to disconnect the coolant level sensor electrical connector first. Now is also a great time to buy a brand new expansion tank with a new sensor, cap, bleed valve and overflow hose. These stupid tanks are so badly designed that any time is probably a good time to replace these. My Toyota Land Cruiser has 300K on it and the coolant tank has never been replaced. Why anyone would engineer a split tank somehow glued together and capable of splitting at these very seams is beyond me. Well, to make money on replacing of course. 6. Disconnect all the electrical connectors, vacuum hoses, throttle body valve and hose connectors that go to the AOS. 7. Remove the alternator. Removing the alternator gives you a ton more room to work under the intake manifold when accessing that last intake manifold bolt in the back. I also noticed that the pulley was making a slight grinding sound and with no documentation that the alternator was ever replaced, I decided to replace the alternator anyway. Secret tip: rather than pounding on that god **** bushing for hours and putting hammer marks and dents all over your car and weakening your tensioner bolt and the lower bolt, just remove the engine block cap 997-101-021-00 that is held on with 6 10mm bolts. This cap attaches to the coolant hose that goes to the joint support connector that cools the AOS and attaches to the 3-way splitter hose. Removing this made alternator removal a breeze. And make sure to replace the gasket with a new one 996-101-331-50. Gasket only costs $5 which is well worth it as opposed to hours of pounding. Another reason to go this method is that it looks like significant pounding of the long tensioner bolt could cause strain on the hole of the cap where the lower bolt goes through which could then cause a coolant leak. Torque back the bolts to 7.5ft/lbs. Now would also be a great time to replace the coolant hose and the joint support bracket. Once the alternator is removed, you can see the “sunflower face” of the AOS in the back! Be patient, you are getting really close now. 8. Remove the 6 upper intake manifold bolts. The first 5 are easy as hell. The 6th one is also fairly easy. I used a ¼” ratchet with a 4-inch wobbly extension and 10mm socket. There is a large dome shaped plastic 993-110-140-03 vacuum reservoir that can get in the way if you have X-large hands like me and can make getting your right hand into the right side of the manifold for ratchet guidance difficult. Secret tip: remove the Cut Off Valve for Air Injection (part# 993-113-245-01-M100) and the 2 associated air hoses connected to it (the longer hose attaches to the air pump and the shorter elbow hose attaches to another valve that is attached to the engine block). This will give you tons more room to get your right hand in there. Now is also the perfect time to replace both of these valves, the 2 air hoses and the dome shaped vacuum reservoir. Once the alternator is out, removing the last bolt is really easy. For me, removing just the longer air hose and the cut off valve gave me enough room. Don’t forget to undo the thin vacuum hose that is connected to the dome shaped vacuum reservoir. Removing the cut off valve gives you much more space to get your right hand to hold the bolt and guide the socket onto the bolt. You can also use a magnetic bolt pickup tool/stick as extra insurance so that you don’t lose or drop the bolts. For bolt number 6, I used a 4-inch extension and a ¼ socket wrench and went straight down from the top. On the 1999, there are 2 fuel lines that appear to run across and over the bolt but this is not the case. This just appears that way due to the angle that you are looking at it from. You will have a perfect straight shot down to the bolt. You can use your right hand to guide the socket on. Whatever feels comfortable for you. When I had the bolt loosened just enough, I used my left and right fingers to turn the bolt undone and carefully cradled the bolt out. You can also use a magnetic pickup tool/stick attached to the bolt as extra insurance so that it does not drop and get lost. I did notice that all the bolts had blue thread Loctite on them. 9. Remove the throttle body. Remember to disconnect the electrical connector and the AOS hose. Remove the 4 large hose clamps (use either a screwdriver or 5mm socket) of which there are 2 on each side to remove/slide off the rubber sleeve. Then remove 10mm hexagon nut from the throttle body housing mount (basically a rubber grommet that slides over a screw that bolts to a bracket that attaches to the engine block) located on the bottom left corner (right above the power steering pump pulley) that gives the throttle body extra bracing via a bracket. After 20 years, the rubber on mine broke apart. Just replace with a new one 999-703-265-00. Be careful not to drop the nut or the grommet! After the 2 left side clamps are undone slide the boot to the left and go on to the right side and undo the 2 right side clamps. At this point you can remove the throttle body. With the throttle body out, you will have lots of room to loosen/undo the 2 rear left sleeve clamps. Sliding the left sleeve to the left onto the intake manifold will allow for extra room to slide the throttle body to the left and out. Now is a good time to clean your throttle body and the rubber sleeves. The front left rubber sleeve has a thin plastic vacuum line that connects to it as well as the rear right rubber sleeve. I noticed some obvious heavy oil residue in the lower intakes as well as a nice oily sheen in the intake manifold and the rubber sleeves. Wipe clean and/or replace the rubber sleeves making sure which vacuum line goes to which rubber sleeve. 10. Remove the upper intake manifold. Just lift up the top hoses/electrical wires, etc. that are at the rear of the engine and the ones connected to the throttle body regeneration valve out of the way so that the manifold can slide right out towards you. Be careful not to snag on any wires or hoses and it should come out easily and cleanly. Wipe clean the inside of the intake manifold as best you can. Once the manifold is out, you will have a straight and easy shot/access to the AOS. That beautiful sunflower face stares right back at you. With the manifold on the engine, the AOS looks so far away and hidden. With the manifold off, the AOS is actually very close and access is easy! At this point, I contemplated removing the passenger side manifold but this looks like a far more involved process including removing the AC compressor and the power steering pump so I left it alone. I wiped clean the inside of the passenger manifold as much as I could. 11. Remove the AOS. Jack up the car on all 4 sides so that you can have plenty of room to work. Removal of the driver side rear tire is not necessary at all but doing so can give you some extra space. To give you a sense of direction, I slid underneath the car head first with my head directed towards the front of the car. Once your head is slightly past the AOS, you can shine a light onto the AOS. You should have decent access to the AOS with your left and right hand. First remove the AOS hard plastic hose connector on the right side with your right hand. I used my right hand to pinch down the 2 ribbed areas and was able to pull the connector off. The trick here is to slide yourself to the left a little bit and with your head facing towards the passenger side of the car you can manipulate your right hand by feel and disconnect the connector. I tried using my left hand at first but the angle and available torque was not good. There are a bunch of miscellaneous unrelated electrical wires right below the connector that look like they will get in the way but don’t worry about these. No need to undo or move them out o fthe way. Now you can either cut the bellow in half or just undo the bottom clamp. Whoever previously replaced the AOS on my car used a black zip tie! If you have an Oetiker clamp on the bottom of the bellow, use a plier cutter and then remove the final part of the bellow. If you bellow is attached via a spring clamp, I highly recommend using a coolant hose spring plier. Then unbolt the 2 10mm bolts that hold the AOS to the engine block. I used my right hand and a ¼” ratchet with a long 10mm socket. Take your time and the bolts will eventually come out. It got a little tiring because the bolts are fairly long. They also had blue Loctite on them. Use a big long flat tipped screwdriver to carefully pry the AOS to the drivers side out away from the engine block and then you will be able to pull the AOS out from above the engine. There was only a bit of oil that dripped out of the AOS on mine. Most of the inner passages of the various hoses and intake manifold/boots had a thin coat of oil on them. Not sure if this is normal but I would think that a thin mist will eventually turn into a heavy mist which in turn will become a heavy coating of oil. Some of the hoses had drops of oil running out/down so I think it was a good time to replace the AOS. The following are optional items that are readily and easily replaced now that you are in this deep: 12. Replace oil filler tube and cap. Driver side bolt easily removed. Easier to tackle the passenger side bolt from the right using your right hand. Use a 4” extension to get the 10mm bolts out. 13. Replace knock sensor. Using a 13mm wrench, undo the bolt and the connector and replace with Bosch 996 606 125 00. 14. Replace starter. First undo the ground and electrical connector. Then, using an extra-long extension or a combination of several long extensions, undo the 2 15mm bolts that attach the starter. 15. Replace Secondary Air Injection Check valve 964-110-950-02. 16. Replace all vacuum lines/hoses. Although you could leave well enough alone, I highly recommend replacing as many if not all the rubber vacuum lines as possible. This is the best chance with the easiest access to do this. Some of the lines are very thin plastic lines, standard 3.5mm rubber lines and several semi u (L) shaped rubber connectors known as L fittings 928-574-717-07 which help connect several of the valves’ hard nipples to the thin plastic lines. 17. Replace the regeneration valve from throttle body for fuel vapor system and the associated rubber vacuum hose. OEM Porsche costs $220 and the exact replacement from Bosch is $40. The only difference is the 5” hard plastic hose fitting attached to the valve. You can try to reuse or buy a similar type hose and heat it with a heat gun so that it seals. I went all out and just bought the OEM Porsche part. I believe this part was on its way out as I had begun to hear whistling sounds from the back when in 6th gear cruising on the highway I would tap the accelerator to gain speed. 18. Replace the power steering upper tank and/or O-ring. My tank was weeping so I replaced the O-ring and tightened the screw connector down. Siphon out the fluid first and wrap a towel around the connector to avoid spills. 19. Replace the engine mounts. Very easy and simple to do. Just jack up/support the engine and replacement is easy and cheap. Makes your muffler pipes look better too. 20. Replace both idler pulleys and the tensioner pulley. Al 3 pulleys were making a grinding sound when I spun them freely so I had the idler pulleys replaced with Dayco brand and the tensioner OEM. Good time to replace those bolts also as there is a lot of stress on these. 21. Replace plastic water line support (2) for large driver and passenger side coolant pipes 996-106-421-51. Easy to take off and replace, especially with all the hoses removed. And although not really necessary, I am very anal so I replaced mine just so that my engine bay looks cleaner. 22. Replace serpentine belt. Self-explanatory. 23. Replace air temperature sensor and rubber grommet. Again, not totally necessary and not made any easier as this is located on the passenger side intake manifold. But with the driver side manifold removed, replacement is a breeze. First disconnect the electrical connector and then remove the sensor and the grommet. (My grommet was a bit hardened from age and heat and the male part of the sensor was just loosely inserted into the hole and not seated fully into the grommet). Then remove the sensor and the grommet. Install the grommet first. The foundation for the grommet is a circlip shape and so if you first put the sensor into the grommet and then try to install these two together as one piece onto the manifold, it will not work. It took me forever to figure this out but you need to install the grommet first and then using some soapy water onto the grommet, push the sensor in to the grommet with your right hand while at the same time using your left hand to support the grommet from underneath (and made so much easier now that the driver side manifold has been removed). I had tried to install this prior to removing the driver side intake manifold and it took me forever to figure this out. I even lost the sensor and grommet down into the engine bay but was able to retrieve it after the driver side manifold was removed. 24. Replace the intake manifold gaskets. You could reuse the old ones but why? 25. Replace oil and filter. 26. Replace rear differential fluid. 27. Replace elbow vent valve and O-ring that connects to AOS air hose on the passenger side. See https://rennlist.com/forums/996-forum/1141866-what-is-this-part-on-the-passenger-side.html for details.
-
AOS coolant line leaks
rhkwon replied to B_Zerpersande's topic in 996 Series (Carrera, Carrera 4, Carrera 4S, Targa)
Guys, I just removed my AOS (detailed removal write up to follow later) and noticed that the 2 coolant lines located on the sunflower face area of the AOS have no hoses attached to them! Obviously the AOS was previously replaced but the original hoses were never connected. And these 2 nipples were not blocked off/bypassed or connected together as mentioned above. So my question is where do these 2 AOS coolant hoses go/connect to? When I was pulling the car apart, the thin coolant hose that goes from the engine block cap (right below the alternator and connected to the joining socket part Number 99610622652) was connected directly to the 3 way splitter hose (which connects to the water pump and the expansion tank). I'm thinking this is hose 13? I'm thinking this coolant hose should originally be going to the AOS (right side nipple of the face) and then the left side nipple of the AOS coolant hose (hose 12?) should be going to the connection on the 3 way splitter hose? I'm really confused now. Car is a 1999 manual cab C4. -
Trying to replace some vacuum hoses under the passenger side intake manifold. Is there a DIY any where? I’m taking off the driver side first. Would I need to remove the AC condenser and/or AC lines/hoses first or can I just leave them as is? And how do you remove the power steering tank? I read somewhere that it just twists off at the pipe?
-
Guys, I'm having a hell of a time getting my carrier to move away from the engine. I've followed the directions in this DIY: http://p-car.com/996/diy/waterpump/ I have the car off the ground on jackstands. Removed everything. Also drained the coolant, undone the thermostat and water pump hoses. I have loosened the 2 15mm nuts that attach to the carrier and have raised the engine with a piece of wood under the jack right under the engine pan but the carrier won't budge on the driver side bolt. The passenger side of the carrier moves freely away from the bolt. I raised the engine even higher and still the driver side won't move backwards. I even jacked up the engine to the point the rear jack point was off the jacks! What am I doing wrong? Should I take a hammer and try to bang out the carrier on drivers side toward the bumper? I'm afraid of stripping the bolt. The DIY indicated to put the jack under the "engine jack point" in front of the engine pan and slightly raise? The Pelican DIY indicates to just slightly raise the engine. I do remember last year after I replaced my engine mounts, the driver side tailpipe was hanging down a bit more than the passenger side but after awhile, it settled and everything is now even. Not sure if this has anything to do with it. I'm also struggling with the right lower 10mm water pump bolt. Can't get the thing out. Maybe with the carrier loosened it will come out easier? If I can't remove the carrier forward, can I still get the water pump out if I remove the thermostat housing and the hard coolant pipes? I'm replacing the thermostat housing and all the hoses anyway. Any suggestions? Been struggling all afternoon with this **** thing. I also posted on Rennlist and Pelican. That's how desperate I am.
-
It's a 1999 C4 manual
-
AOS leaking coolant
rhkwon replied to Sergio Oporto's topic in 996 Series (Carrera, Carrera 4, Carrera 4S, Targa)
I’m going to tackle my water pump, coolant expansion tank and coolant hoses and so also decided to replace the AOS. I know the AOS has several hoses attached to it. Not sure if these are coolant , oil and vacuum hoses. Just want to replace everything that is attached because I’m sure these parts are also old and brittle. Does anyone know which parts to replace and would replacing these be difficult? Any parts names and or numbers along with any tips would be great. I’m feeling a bit intimidated by the AOS procedure but while I have everything apart want to replace everything that could fail later because I don’t want to do this again for a long time. Car ar is a 1999 C4 manual. -
I’m going to tackle my water pump, coolant expansion tank and coolant hoses and so also decided to replace the AOS. I know the AOS has several hoses attached to it. Not sure if these are coolant , oil and vacuum hoses. Just want to replace everything that is attached because I’m sure these parts are also old and brittle. Does anyone know which parts to replace that attach to the AOS and would replacing these be difficult? Any parts names and or numbers along with any tips would be great. I’m feeling a bit intimidated by the AOS procedure but while I have everything apart want to replace everything that could fail later because I don’t want to do this again for a long time. Car ar is a 1999 C4 manual.
-
What is the part number of that smaller diameter hose that connects to the T and goes down into the middle of the engine area right by some of the pulleys? And is this hose connected by a plastic fitting? My car seems to have had this hose replaced long ago with non OEM parts by a novice mechanic.
-
AOS leaking coolant
rhkwon replied to Sergio Oporto's topic in 996 Series (Carrera, Carrera 4, Carrera 4S, Targa)
I am going to replace my AOS soon. I noticed on Pelican that they show an AOS and an "Internal Oil Separator"? Is this a completely different part and not related to the common AOS? Or is it an internal part of the AOS? I'm confused about this. I've never seen mention of an internal oil separator. -
Thanks Loren!
-
My rose guide is missing so I have ordered a new one. Since I don’t have one I can not tell in what order it is assembled in regards to the emergency pull line little circle loop thing that goes to the actuator stick. So is this order correct: 1. Attach rose guide 2. Place door actuator “stick” through the emergency pull ring and then through the rose guide So the little ring is actually behind the rose guide?
-
Does the charcoal (vapor) canister go out often on our cars?