Welcome to RennTech.org Community, Guest
There are many great features available to you once you register at RennTech.org
You are free to view posts here, but you must log in to reply to existing posts, or to start your own new topic. Like most online communities, there are costs involved to maintain a site like this - so we encourage our members to subscribe or donate. All subscriptions and donations go to the costs operating and maintaining this site. We prefer that guests take part in our community and we offer a lot in return to those willing to join our corner of the Porsche world. This site is 99 percent member supported (less than 1 percent comes from advertising) - so please consider an annual subscription or donation to keep this site running.
Here are some of the features available - once you subscribe RennTech.org
- View Classified Ads
- DIY Tutorials
- Porsche TSB Listings (limited)
- VIN Decoder
- Special Offers
- Paint Codes
- Registry
- Videos System
- View Reviews
- and get rid of this welcome message
It takes just a few minutes to register, and it's quality Porsche information at a low cost.
Contributing Members also get these additional benefits:
(you become a Contributing Member by subscribing or donating money to the operation of this site)
- No ads - advertisements are removed
- Access the Contributors Only Forum
- Contributing Members Only Downloads
- Send attachments with PMs
- All image/file storage limits are substantially increased for all Contributing Members
- Option Codes Lookup
- VIN Option Lookups (limited)


rsfeller
-
Posts
664 -
Joined
-
Last visited
Content Type
Profiles
Events
Forums
Exterior Paint Colors
Downloads
Tutorials
Links Directory
Collections
Classifieds
Store
Everything posted by rsfeller
-
The year might help and if you have changed the fluid at all. I would suspect a sticking caliper and time for a rebuild.
-
The best place to get tires in Miami
rsfeller replied to ivass's topic in 986 Series (Boxster, Boxster S)
I get all my cars done on Hunters... http://www.gsp9700.com/index.cfm use the find location link. -
Starter problem or battery issue?
rsfeller replied to CarreraLicious's topic in 986 Series (Boxster, Boxster S)
Kind of an interesting observation for sure. If the car starts then obviously the starter is cranking and all is well but start solenoids can stick causing the starter to stay attached to the flywheel. Although I have never experienced that with my car I had a Vw that did this and believe me, you knew there was something wrong! There is nothing wrong with your battery, so don't worry how it applies. Often you can here the high torque of the starter continue to spin after it disengages from the flywheel. Is this the sound that may be "missing" from normal operation for you? If so we may have a stuck starter and others may be able to comment from experience what symptoms that would show and how to confirm it. Shawn -
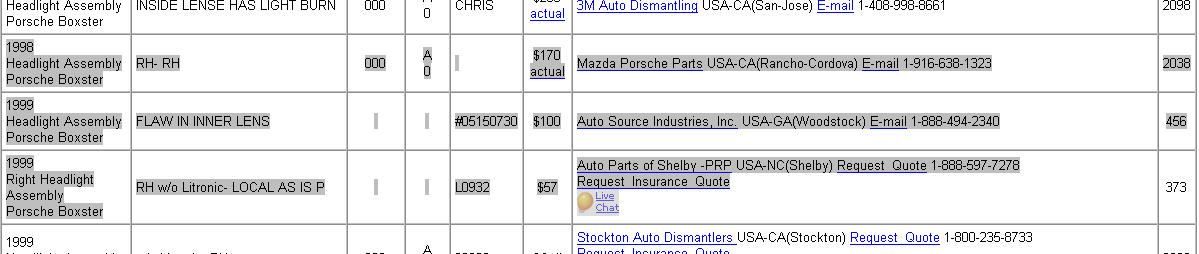
I maybe misunderstanding your need, I lost my amber lens before and was able to glue that back on...but I was getting from your post that the main clear lens is cracked...thus the whole assembly is usually the best solution. I didn't get what side you need but I simply the default right when filling out the question, here are the results I saw whenI put in 1997, boxster, headlight assembly, right and got this: Now I've had great luck with this website for my Saabs in the midwest. Often if I see the wrong color or side a simple call them result in more parts. About 1/2 the time they have an arbitrary formula for parts prices and have even asked what price it states! When I'm on a budget for my older cars I'll tell them my budget. FYI there is a Porsche dismantle in Oklahoma always on ebay. Very helpful guys to answer email and phone calls but their used parts prices are average to premium at times. Send me a PM if you need more input or help with a used alternative or let me know I'm way off base on your part need! I'm assuming you need one of the following assemblies: Shawn

-
Thanks, but i'd like to try do take care of this under 2-3 hundred dollars. That will however be my last resort if it comes down to that unfortunately. I've seen singles go for under $150 before and you would be surprised home many on these boards don't consider online resources for used. I doubt you are going to find a way to fix that with a substance that will not melt or show. I see several on car-part.com right now for under $100, one in woodstock with a bad inner lens...you could swap the two. I'll all about cheap to but at some point you need to slap and old part on a Porsche before a tube of whacky glue!
-
it takes 5 minutes to replace the headlight assembly with a used one from ebay, or many of the online used parts finders...saw several on ebay as I write this...
-
I see what you are referencing now. Not even sure why it changed but I'll update the link.
-
New 99 Boxster Owner, loss of engine power?
rsfeller replied to svt cobra's topic in 986 Series (Boxster, Boxster S)
Is this the car you picked up via the salvage yard you mentioned in another post? I'm curious why the engine was swapped? If you want to drive about 1.5 hours to Mansfield on a week day I most likly could assist you in the MAF cleaning and compare acceleration. Send me a PM and we can discuss. Shawn -
Can't get my windows to roll up all the way.
rsfeller replied to level9inc's topic in 986 Series (Boxster, Boxster S)
Are you sure it's 3" and both windows? The auto drop feature is about 3/4" on my windows. If it's in fact both windows and the distance of the auto drop I'm guessing the micro switch up there has failed. Although I have no experience with this failure there is much discussion on the boards about it. If you top can go down and all the way back up with the rear deck closing I believe your B-pillar micro switch and rear deck micro switch are working their correct logic. Thus the center one is most likely at fault. When it is unlatched (or thinks it's unlatched) then it is grounded according to Bentley. See this link: http://www.pca.org/tech/tech_qa_question.a...4-70F08095CD19} See the 2nd to last line. If it's only one window that will not go up you have a different problem most likely related to the window drive cables fraying... -
One key remote functions works great the other does not. New battery and tried the reset. What I noticed: Good key: when you hold the button the light continues to blink Bad Key: when you hold the button you get one flash and that is all What does the lack of repeated flash mean, ideas? Shawn
-
Check engine light question
rsfeller replied to mikes_box's topic in 986 Series (Boxster, Boxster S)
Not the answer you want but if you are a DIY guy and have a laptop this is a good time to invest in the Durametric software. I wouldn't leave home without! I keep the cables in my car so I can run diagnostics at home or work... Shawn Ohio -
To answer myself... Yes The roll bar doesn't need to come off to remove and bench the convertible top frame/canvas. There were three bolts and two screws on each side of the top and it lifts right out....took less then 10 minutes to remove and 10 minutes to install. My camera battery was dead so no good photos but the procedure goes something like this. 1. put in service mode with clamshell at 45 degrees, cables off back window and window up. You'll need to remove the arms from the transmission to the push bars. Mine were broken so I didn't have to remove them but the red (or white) end will pop off the ball joint or you can use a allen key to remove the head on the transmission. 2. remove lower B piller trim panel behind seats with the 8mm bolt at the top and the screw at the bottom which is hidden well in my black carpet. This removes the defroster hook up and gives access to the top microswitch on the drivers side. The small connection for the microswitch is near the floor. I had to cut one zip tie too holding the microswitch wire to the roll bar. 3. Take out 3 larger bolts on backside of top frame viewable under rear with glass in service mode position. The manual shows a box covering this with two screws for some type of water protection. My car didn't have this and it looked factory. So Three bolts and two phillips screws. They were very low torque and I found no torque spec for reinstall. The are self centering bolts so no worry about getting the top "just right" on reinstall. Your wife can help you remove or install as the tops weight is very low. 5. Slide top back one inch and lift straight up. NOTE: I highly recommend using a light clear spray grease (with straw) on all pivot points. After greasing my top I can put it up down with one finger in manual mode. There is no question that greasing a 10 year old top will help all the little aluminum and plastic parts live a long and happy life together. Installation is a reversal or removal, that simple. If you want to take your top off to get an bent "stuff" (like me) drop me a private message and I'll be happy to coach anyone. Shawn Ohio
-
snap, crackle, pop...my top broke?
rsfeller replied to rsfeller's topic in 986 Boxster Convertible Top Issues and Solutions
3/4" and they look in great shape, again others suggested they could be frayed inside but I'm not feeling it yet. At the moment a worn pin looks like the cause of my headaches. Everything measures and appears very synced but I will resync when the time comes to stall the new white knuckles. -
bent top parts...
rsfeller replied to rsfeller's topic in 986 Boxster Convertible Top Issues and Solutions
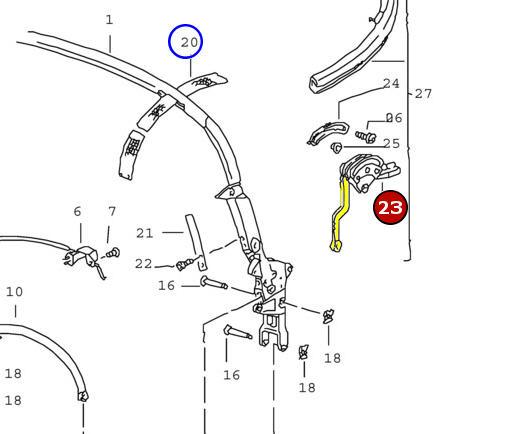
I went through this with a Saab and a sunroof and I am now the guru of sunroofs just like Chris is the guru of tops! As always thanks to Chris on his attentiveness to top issues. I have the luxury of working at a ski resort with a million dollar maintenance facility but even better a collection of mechanics that really are good and thinking before wrenching. We took our turn looking into the top components over the drivers shoulder and here is what we came up with. The yellow in the following image is bent inboard about 3-4cm and causes some binding for the rear bow assembly when the top is down or when trying to put it in service mode. What happened is the pin that allows this arm to rest into the cam assebly fell out. We found the pin and its got some wear marks on it but the cotter pin that held cannot be found. Additionally the plastic guides in the cam are missing on one side. To follow this you'd really have to be intimate with this area such as I am! I am quite sure that this pin fell out creating some uneven tensions which snapped the brittle (old) red knuckle push rods on both side, pop pop. I was able to get the top up and down at home manually and road to work this morning with the top down. I believe by putting the clam shell down 100% allowed additional movement and pressure to release the arm (yellow in first image) from being between the two cams, since the pin was MIA. It got in the wrong spot and when I put the top up it bent. I didn't use much pressure but with it being aluminum and the minimal pressure I created obviously translated to something greater through leverage. We have determined if we can get the arm out that we can put the right bend back into, reinsert the pin, find a new cotter pin and avoid the $500 cost for a whole new assembly marked as #23 in the first photo. The bent arm does have a Porsche part number on it but it doesn't show up in the parts lists...you have to buy the whole assembly. Not me I'm cheap and love a challenge! Each pivot point in the top mechanism is a pin held by an flat clip on the outboard side of the car. Most clips can be goten to accept the one I need, you can see nothing of the clip due to the foam drainage tray and close proximity to the inner body. Therefor we are going to pull the top frame and bench it to get the pin out to get to the offending arm. I will document this procedure out of curiosity for most as I doubt this happens often. Since many of us are approaching 10 years on these we are going to start seeing less common failure points other then the common cable failure. Stay tuned...we'll pull off the frame tomorrow and I should have posts tomorrow night. If all goes well we'll install the new white knuckles on Friday when they arrive and resync the top before pressing the button! Still looking for feedback if the roll bar must come off to remove the top frame. The Porsche Tech manual says yes, but me and a couple other mechanics think no!
-
snap, crackle, pop...my top broke?
rsfeller replied to rsfeller's topic in 986 Boxster Convertible Top Issues and Solutions
Chris, thanks again for the comments. I might have missed with some private conversations that I have checked the cables and they are not 3/4" in length but appear to be upgrades as they have the textured sheath on them. Others have suggested they may have frayed inside like the side windows do...but I'm doubtful of that. I appricate you comments on staying organized but I have started 3 different threads for three different concerns with the top each needing it's own unique perspective. I tend to get caught up each night with updates for each topic. Today I have determined a pin fell out of of the rear window pivot arm and did some damage. Thus I have two different top problems that are most likly related but may point away from cables and toward worn component failure. I am guessing this could have be the cause of uneven pressure and thus the dual failure of the worn red plastic knuckles. I believe we are pulling the top frame tomorrow to get to the bent part as I cannot access the pivot pin with the top on. We will bend it back into shape and fix the offending part. Post that I'll resync the top and install the new white knuckles push rod as it should be here by Friday. I'll be documenting with photos the pulling of the top frame, repair of bent part and such in detail. I am still awaiting input from this board if the roll bar must be infact pulled before the top can come off. The Porsche Tech Manual says yes but my eyes say know. Experienced oppinions needed! Thanks. Shawn -
looks like I need to pull the frame assembly to get to a pin to straighten out a bent cam arm. I looked at the P-tech manual and it shows having to remove the roll bar before pulling the top frame. I'm not seeing that need, yet! EDIT: Maybe it's not referencing "pulling the roll bar" but due to the fact the P-tech manual only shows drawing and not much wording it's a bit misleading. See my procedure below for the answer. Looks like a handful of bolts and maybe a couple torx once the push arms are off (and mine are broken!). Shawn
-
OK so there is more to my broken red push arm connectors then I thought. I have temporarly rulled out the cable being the cause because my cable is within spec and looks like the newer upgrade. I determined last night that the clamshell is working fine and my top goes up/down manually no problem. Did 101 times last night so I drove the car to work today... Guess what...top wouldn't go up manually! Got 1/2 way and something was binding then I heard a bolt or something fall upon inspection found a metal arm bent on the inside of the top mechanism. I believe this may be a cause of my red push rod issues as I don't believe having the push rods out of the car has cuased the bent part. Best I can tell from the rough schematic shown below it is the area in yellow that is damaged (but intact) with the arm the arrow points to having one hell of a bend in it. It appears the slider pin that holds it between the guide fell out and all hell broke loose. Anyone have any experience with this part? Part # 986 561 247 00 The good news I am replacing my top this month so I can take all the canvas off to facilitate getting to parts. I believe this metal part has to do with the back window frame folding up for service mode as it now is very hard to move up and creaks really bad. The list this whole assembly for $600 retail and I only need the arm so I will search ebay or bend this one back but will struggle to find the unquie pin that holds it. Any comments from experience or understanding would be appricated on what is going on here and how to deal with it!
-
Thanks James, good stuff!
-
snap, crackle, pop...my top broke?
rsfeller replied to rsfeller's topic in 986 Boxster Convertible Top Issues and Solutions
Good info, I'm re-read this a few times to absorb it. A few questions comments I'd love you to comment on. 1. After taking off the broken arms I tested the transmission for even movement and measured the distance the connecting pin was on each side. They are currently identical on each side and they both turn nicely, but of course they are not under load. Do you think destroyed cable inside the sheath would only show "out of sync" under load? I do know they can fray as that is what my drivers window did! 2. Do you think there is a chance they everything is good and the plastic ends just lived their life? It seems Chris in NH is pretty opinionated that the cable has to be at fault which I respect...but I'm not seeing it yet! Additionally they broke together and I never noticed anything acting "out of sync" or twisted from uneven pressure. 3. Would you recommend a re-sync via the drill method and moving them to full forward motion I've seen posted or is there something better? Shawn -
I'm going to replace my to this month. Not sold on a glass window but wouldn't mind one either. Since I bought a hard top for the fall/winter in Ohio and my car is a 3rd vehicle for my wife and I and resides in garage most days and nights. With that said what kind of life expectancy are most getting out of their plastic rear windows? I wouldn't mind saving a few bucks on a plastic, like the extra engine access room they provide plus the better rear visibility and cockpit light...but glass will live longer! So I guess the life expectancy may be the true test for me!
-
Jeff, Not sure if P owners are allowed to say git r done! Those rear sew-ins don't go so well. I had my boat canvas guy do mine and it looks poor and I think he's top notch. Whole tops are $325 on ebay with good instructions, I'm going to do mine this month...you should too!
-
Tom, Where I live a evac and refill of R134 is only about $120, I would expect to be under $200 in in NJ plus they can do the dye to check for leaks post repair if there is diminished cooling capacity. FYI temps of 190F are fine... Home kits are the best way to do this since you have had a full loss. You shouldn't still be able to buy 134a in quanity w/o a permit but the car stores have the little recharge cans.
-
TomC can you tell us who and what top you got? I'm doing mine this week with and ebay vendor in Cali and want some reviews from others!
-
snap, crackle, pop...my top broke?
rsfeller replied to rsfeller's topic in 986 Boxster Convertible Top Issues and Solutions
Yea I couldn't figure out how to change the post entry location when editing it. I think I'm committed to the general area. I'll re-read that post again as I found it before but failed to see how the cables interact with the push rods to shatter the ball end. If they changed them from red to white I figured they were the failure location. I may have upgraded cables as they have the texture look as listed in the post you reference and have at least 3/4" of cable sticking out, but that is in my cool garage tonight. I doubt they shrunk that much in the sun this weekend! Maybe mine is just weak plastic connectors on the rod unless you see another way the cable interact with the failure. Thanks! Shawn -
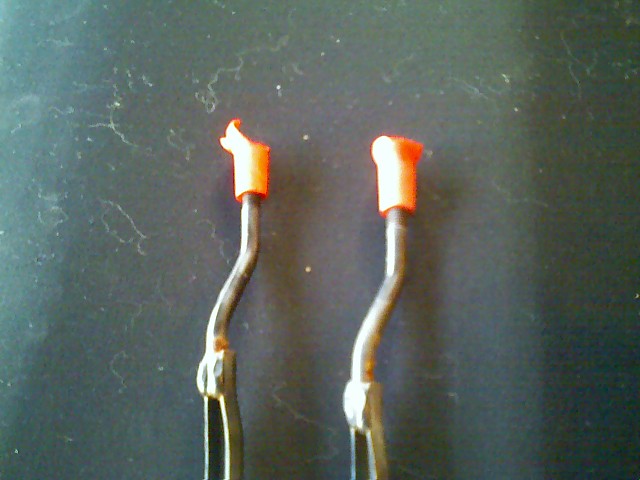
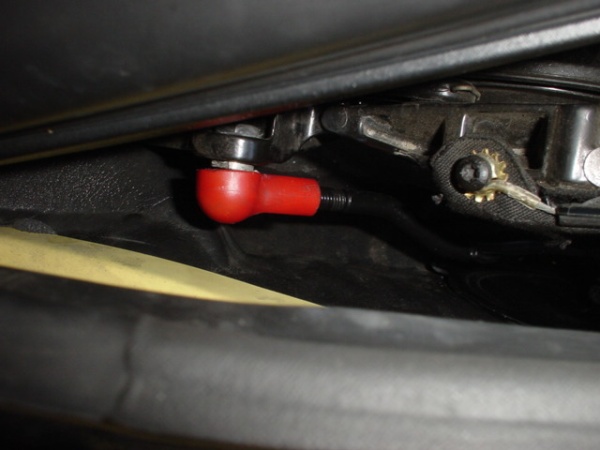
My car (1997) lives it's life in a garage or under a street at work, so little heat and sun. This weekend it sat in a parking lot in 90+ heat and when we went top the top down it made a horrible crack noise and the top never went down, I'm guessing plastic part failure. The clamshell opened fully but the roof never retracted. I didn't try to take it an further down but did manage to get the clamshell down w/o any concerns and drove the home a couple of hours home with the top up. I believe I stopped quickly before any major damage could have been done. Best I can tell from other posts these arms in the photo below with the red plastic things broke off from the ball attachment on both sides and that is what I found once at home. I'm confused by all the discussion about cables and transmissions, do they cause failures in this part or is this just localized due to plastic part failure? I was able to put down the top manually w/o any concerns back home today. I'm guessing it's just 10 year old plastic that failed in the hot summer heat. I also saw a note about a guy that made metal ends but I'm guessing the factory plastic design is for a reason (the failure point so other systems are not damaged) but would applicate any input on alternate solutions. Otherwise I'll order the arms with the white replacement linkage and move on! bad ones: good ones: Just curious if I have bigger problems at work here or it's as simple as it seems! Thanks. Shawn Ohio