Welcome to RennTech.org Community, Guest
There are many great features available to you once you register at RennTech.org
You are free to view posts here, but you must log in to reply to existing posts, or to start your own new topic. Like most online communities, there are costs involved to maintain a site like this - so we encourage our members to donate. All donations go to the costs operating and maintaining this site. We prefer that guests take part in our community and we offer a lot in return to those willing to join our corner of the Porsche world. This site is 99 percent member supported (less than 1 percent comes from advertising) - so please consider an annual donation to keep this site running.
Here are some of the features available - once you register at RennTech.org
- View Classified Ads
- DIY Tutorials
- Porsche TSB Listings (limited)
- VIN Decoder
- Special Offers
-
OBD II P-Codes - Paint Codes
- Registry
- Videos System
- View Reviews
- and get rid of this welcome message
It takes just a few minutes to register, and it's FREE
Contributing Members also get these additional benefits:
(you become a Contributing Member by donating money to the operation of this site)
- No ads - advertisements are removed
- Access the Contributors Only Forum
- Contributing Members Only Downloads
- Send attachments with PMs
- All image/file storage limits are substantially increased for all Contributing Members
- Option Codes Lookup
- VIN Option Lookups (limited)


PAULSPEED
-
Posts
1,401 -
Joined
-
Last visited
Content Type
Profiles
Events
Forums
External Paint Colors
Downloads
Tutorials
Links Directory
Collections
Store
Everything posted by PAULSPEED
-
Sunoco GT+
PAULSPEED replied to Skibum's topic in 997-1 Series (Carrera, Carrera 4, Carrera 2S, Carrera 4S)
Racing gas will not make your car go faster. It will burn all the junk out of the piston area. Always good to run a little racing gas. Paul -
gas overflowing
PAULSPEED replied to WTL's topic in 997-1 Series (Carrera, Carrera 4, Carrera 2S, Carrera 4S)
You may want to slow the speed down. Pump in eight gallons and then set the spped lower. Good luck. I would try another station. Paul -
Mobridge install help
PAULSPEED replied to allanb888's topic in 997-1 Series (Carrera, Carrera 4, Carrera 2S, Carrera 4S)
I think you need a cable. Here is the requirements. Requirements: PC running Windows XP, Vista, or Windows 7. Sorry, Mac hardware (or OSX running on x86 hardware) is not supported at this time.[*]If you would like to perform updates over Bluetooth: an already-working bluetooth dongle. Note: because of the diversity of Windows software, driver versions, and Bluetooth dongle hardware, mObridge CANNOT provide PC support for Windows Bluetooth and dongle issues. Installation Guide: Save the file to your computer, and double-click to open. Follow the installation wizard. Where it asks if you want to install the drivers, please accept. From your start menu, select "All Programs -> mObridge -> mObridge Update Wizard" to run. Software: Latest mObridge Update Wizard v.1.1.0User Guide: A User Guide for the Update Wizard can be found here.It probably does not like your bluetooth connection. Paul -
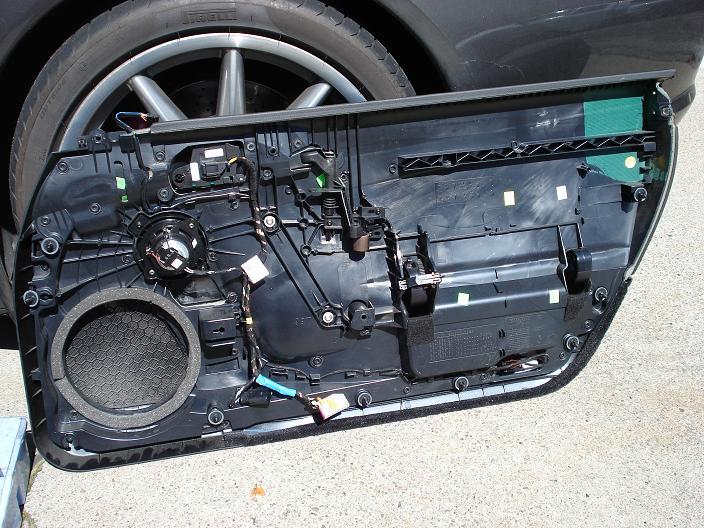
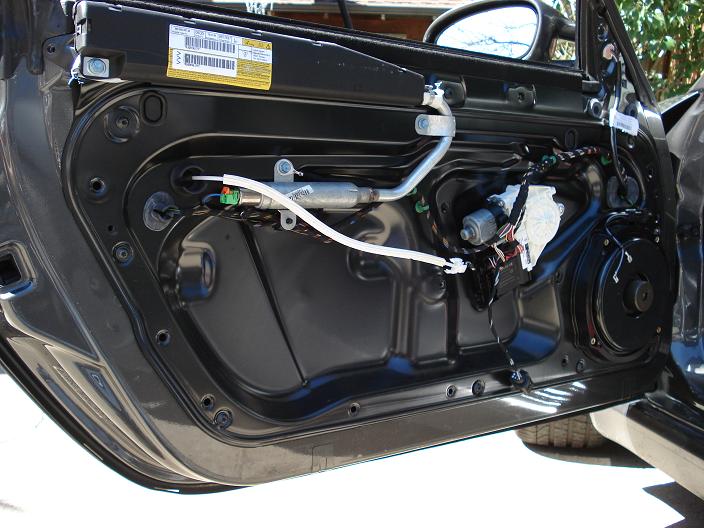
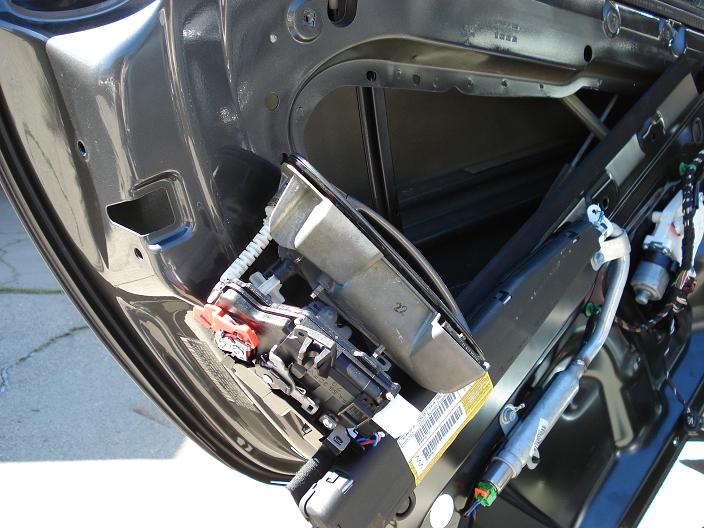
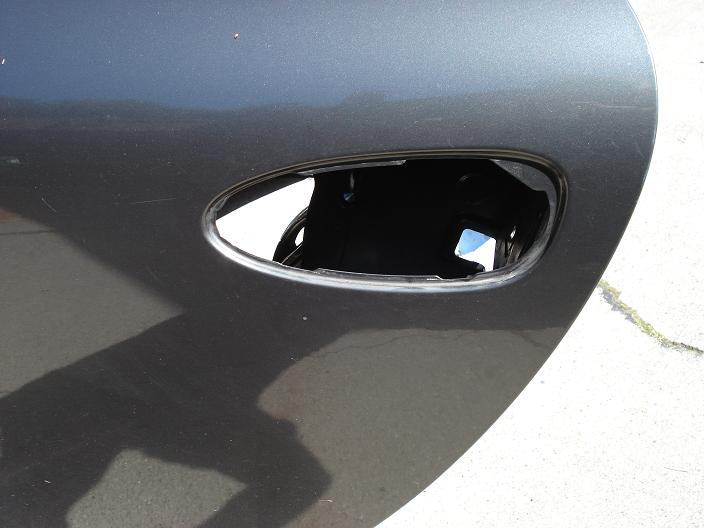
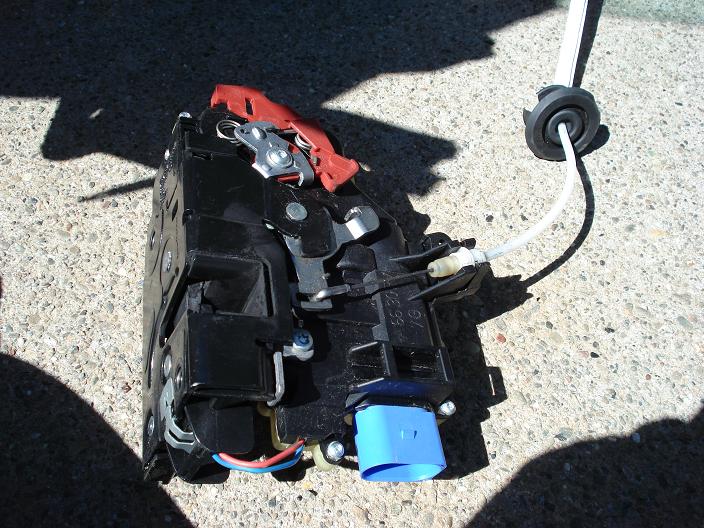
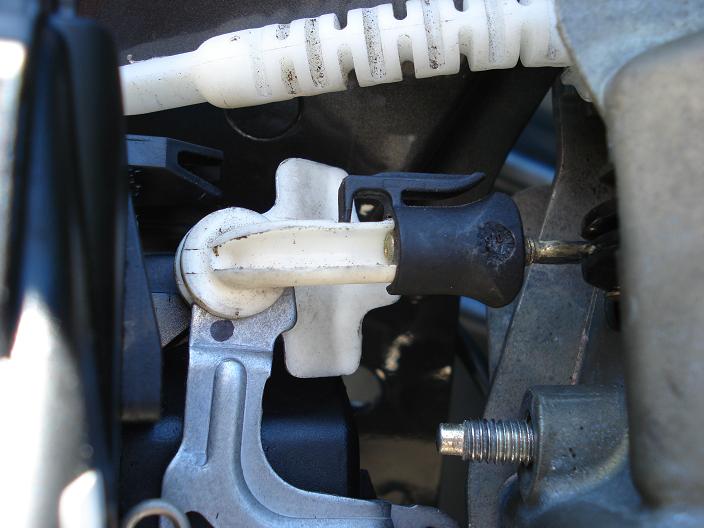
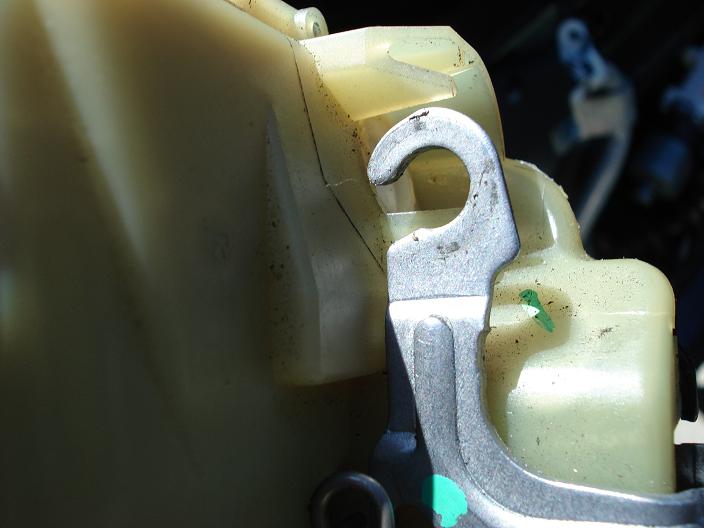
This is a DIY guide for replacing the door latch part. The part cost me $116 dollars from Sunset Imports. I could not start this project because I needed a 12-point torx socket to remove the latch. The socket is called an 8 mm Triple square socket. I bought a set of 4 at Tooland for $16 dollars (they were on sale). This first picture shows the door interior off. Look at the details under the Door Micro-Switch DIY for removing this piece. Here is the interior doorplate on. Here is the doorplate off. You do not need to remove it completely. You should now connect the battery to lift the window and dis-connect the battery. Reach into the door and remove two 10 mm nuts that hold the outside handle on. Also remove the two 8 mm Triple Square bolts that hold the latch on. With a lot of moving, the handle and the latch will come out of the door to work on. This picture shows the new latch connected to the existing door handle. Here is a picture of the door handle removed. Here is the old part. I quickly connected the new part to the door handle and here is a detail on that connection. Here is a close up of the old part where the door handle connection is made. Put the handle back in and torque the two 8 mm triple square bolts to 15 ft-lbs. I put a few drops of lock tite on the bolts because they looked like they had some blue lock tite on them originally. When you tighten the two 10 mm nuts, make sure to hold on to the exterior handle. This picture shows the flush door handle. This too is a relative hard job to do and I would not recommend it to some one who has not replaced a window in a car door. This task took me 1-½ hours to complete. The good news is the door works like new!!! It is fixed. Paul

-
Noise front wheel or tire
PAULSPEED replied to leocanto's topic in 997-1 Series (Carrera, Carrera 4, Carrera 2S, Carrera 4S)
Normal. Park the car with the wheel turned hard. Then look at the wheels. you will see why it makes noise. Paul -
Mobridge install help
PAULSPEED replied to allanb888's topic in 997-1 Series (Carrera, Carrera 4, Carrera 2S, Carrera 4S)
There is a requirement. PC running Windows XP, Vista, or Windows 7. What windows software are you running? Paul To clarify my software problem I downloaded the Mobridge install wizard, with the intention to to try to use my notebook over Bluetooth to configure Mobridge directly. This software would allow the unit to be reconfigured to Porsche from the original Mercedes setup. I can install the program OK on the computers, but when I run the program file on a number of computers, I get a Windows XP error message. I have downloaded the file a number of times using Mozilla and Internet Explorer. I have tried to run the program on a stand alone computer, and with a Bluetooth connection to the Mobridge in place. Program still gives a Windows error message when I try to run it. Any further suggestions? -
On my 2006 997 S I have 8.5" in the front and 11.5" in the rear. The rear tires are 305 x 30 x 19. I do not think a 1/4" will make much difference. I once put a 315 tire on the rear so I could drive home. Paul
-
You need to re-palce an $85.00 part. I hope to have done it this weekend but it was another weekend where I was to busy. I will post a DIU when I do it. You will need a special tool socket called an 8mm torque square socket (12 point torx). I got that last week. Paul
-
Send Pictures. Paul
-
Mobridge install help
PAULSPEED replied to allanb888's topic in 997-1 Series (Carrera, Carrera 4, Carrera 2S, Carrera 4S)
I would look at your computer. Did you download with a windows program or something like Modzilla? There is a guy who did your same install. Look int DIY. I would go to the dealer and have him connect up what you do not have installed in your Porsche account. Paul -
Failure Indicator
PAULSPEED replied to samuel.mercer's topic in 997-1 Series (Carrera, Carrera 4, Carrera 2S, Carrera 4S)
Post a new topic and put the error codes in the topic. Good luck and at least you know that you have a new sensor. These errors might be the air in the coolent lines. Lets hope it is a easy fix. Paul -
Here are the instructions for removing the side trim pieces. http://www.renntech.org/forums/index.php?/tutorials/article/10-mobridge-bluetooth-ipod-install-and-impressions/ Paul
-
Front Bumper - Hollow?
PAULSPEED replied to sullivas's topic in 997-1 Series (Carrera, Carrera 4, Carrera 2S, Carrera 4S)
I thought you might be interested in reading this web page: http://forums.rennlist.com/rennforums/showthread.php?t=537197&referrerid=47472 There is a big plastic block behind the bumper. You can drill up into it. Be carful drilling so you don't trigeer the air bags. Paul -
Oil Leak
PAULSPEED replied to georgie997's topic in 997-1 Series (Carrera, Carrera 4, Carrera 2S, Carrera 4S)
Your welcome. That is why the location is so important. I have seen leaks before around where they pour in the oil. Paul -
Oil Leak
PAULSPEED replied to georgie997's topic in 997-1 Series (Carrera, Carrera 4, Carrera 2S, Carrera 4S)
You may want to do some hard driving and then park the car. Take some pictures and post them. The location of the drip makes a big difference. The RMS seal is pulled out with a tool and pushed in with a tool. The engine has to be dropped from the frame. It takes about three hours to get the motor out. There is alot of things that need to be removed before you drop the motor. Paul -
Here are the instructions for taking the sides off. http://www.renntech.org/forums/index.php?/tutorials/article/10-mobridge-bluetooth-ipod-install-and-impressions/ Paul
-
Here is the 996 story. I forgot about the horse shoe for the 996 cars. Maybe someone else will chime in. http://www.renntech.org/forums/index.php?/tutorials/article/20-pcm-2-installation/ Paul
-
99 C2 Cab Tiptronic Fluid Change
PAULSPEED replied to goldgun's topic in 996 Series (Carrera, Carrera 4, Carrera 4S, Targa)
Once you get the new fluid in, you then need to run the car on jacks and change gears. I took mine to the dealer to do when I had 50,000 miles on it. It took them longer then the estimate but they charged me the estimate price. This is one thing I will have the dealer do. An independent has a real tuff time getting the fluid. It is special fluid and comes in 55 gallon drums. Paul -
Here is a picture. I think there is a detail instructions on removing the radio in the 996 section. This part looks like it slides out once you remove the consol sides. Paul
-
A friend of mine fixed so it works on his boxster. It is against the law in California but he did it anyway. You have to hack into it to get it to work. Good luck finding the hack. Paul
-
Need help with star bolt
PAULSPEED replied to PAULSPEED's topic in 997-1 Series (Carrera, Carrera 4, Carrera 2S, Carrera 4S)
Thanks Loren. I would of guess about 45 ft-lbs. Why would they go to all that work to add a high torq bolt. That sure isn't high when the wheels are torq to 95 ft-lbs. My friend has a cup car and we torq the nut that holds the wheel on at 250 ft-lbs. We use a 5 foot torq wrench to get it torq. Paul -
Excellent pictures!!! Paul
-
Need help with star bolt
PAULSPEED replied to PAULSPEED's topic in 997-1 Series (Carrera, Carrera 4, Carrera 2S, Carrera 4S)
The history of the triple square says that it is a high torq bolt. So the next question is, what are the torq value for the door latch part? Thanks again, Paul -
Need help with star bolt
PAULSPEED replied to PAULSPEED's topic in 997-1 Series (Carrera, Carrera 4, Carrera 2S, Carrera 4S)
Thanks guys. I head to the tool store tomorrow. Paul -
Maybe you could spray some electrical cleaner into the inginition switch. It sounds like a dirty ingnition switch not making a contact. Paul