Welcome to RennTech.org Community, Guest
There are many great features available to you once you register at RennTech.org
You are free to view posts here, but you must log in to reply to existing posts, or to start your own new topic. Like most online communities, there are costs involved to maintain a site like this - so we encourage our members to donate. All donations go to the costs operating and maintaining this site. We prefer that guests take part in our community and we offer a lot in return to those willing to join our corner of the Porsche world. This site is 99 percent member supported (less than 1 percent comes from advertising) - so please consider an annual donation to keep this site running.
Here are some of the features available - once you register at RennTech.org
- View Classified Ads
- DIY Tutorials
- Porsche TSB Listings (limited)
- VIN Decoder
- Special Offers
-
OBD II P-Codes - Paint Codes
- Registry
- Videos System
- View Reviews
- and get rid of this welcome message
It takes just a few minutes to register, and it's FREE
Contributing Members also get these additional benefits:
(you become a Contributing Member by donating money to the operation of this site)
- No ads - advertisements are removed
- Access the Contributors Only Forum
- Contributing Members Only Downloads
- Send attachments with PMs
- All image/file storage limits are substantially increased for all Contributing Members
- Option Codes Lookup
- VIN Option Lookups (limited)


alex222
-
Posts
41 -
Joined
-
Last visited
Content Type
Profiles
Events
Forums
External Paint Colors
Downloads
Tutorials
Links Directory
Collections
Store
Everything posted by alex222
-
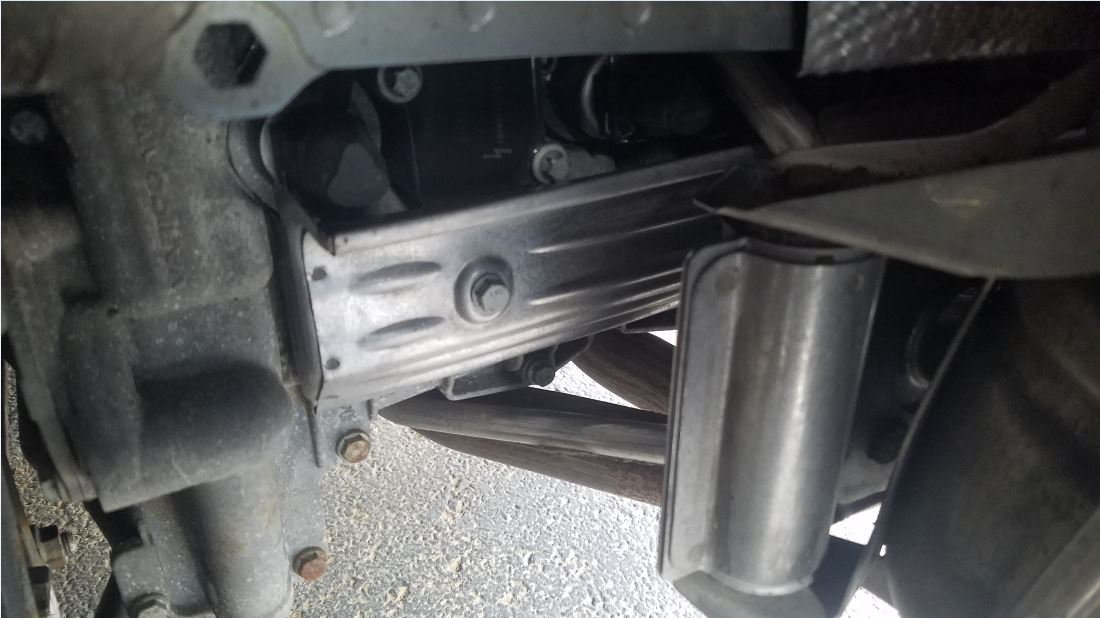
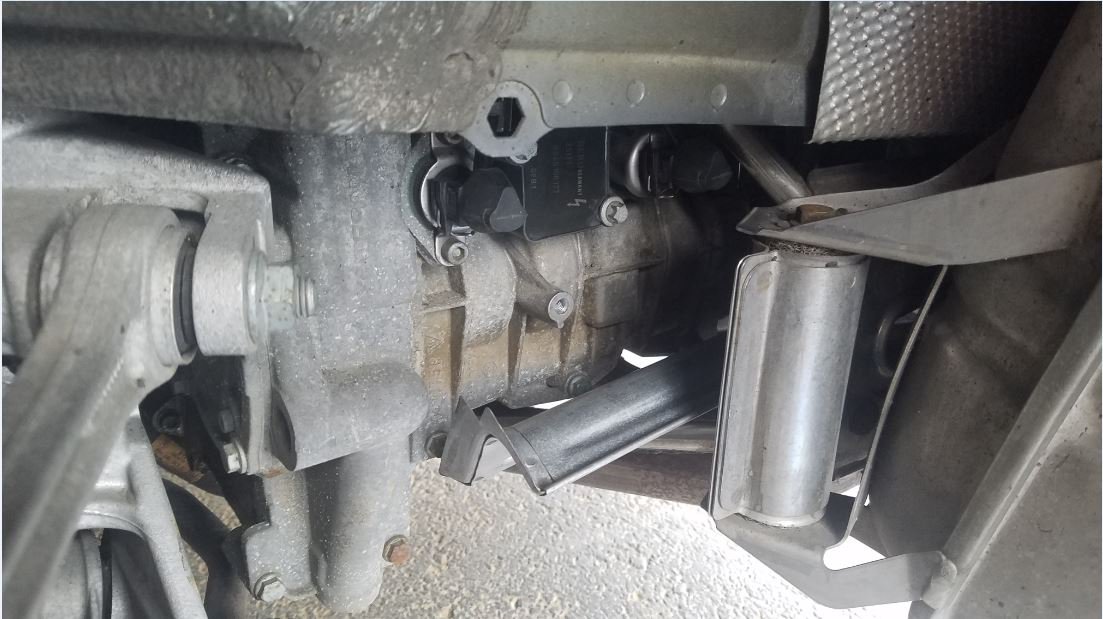
It was a cross-bar under the transmission pan got loose because I had overfilled a bit so the oil got to the mounting bolts + vibration.
-
I lifted up the pup in a body shop I had stopped by for something else and checked the final drives and CV joints both tight and the inner joints are tight to the gearbox flanges. Seems all good. Not seeing anything loose in rear suspension on neither side. I have a spare set of aftermarket rear brake rotors with the aftermarket set of the pads in my garage that I replaced with the factory ones a year ago after I got the pup. Will swap those one side at a time see if it anything w/ the stock brake disks/pads or also there is an aluminum screen on the inner side of the brake rotor if anything is with it?
-
Will do on the upcoming weekend but to my knowledge as I had replaced both inner CV boots on a 355 last Summer which was involving disassembly the inner CV joints with the ball bearing completely with reassembling; if it will be a wear in the CV caves on either shaft or the star and the CV joint is loose, it will be a push because of so at the beginning of the car movement from standing still but when clunk(s) happen are when the pup is few seconds already moving and during the clunking sound there is no any pushes or any movement distortion. As I looked the 996.2 and 987.1 final drives and the CV boots look very similar to 355. Probably the same or similar all made by Bosch. It is just the clunking sound. Or two. And, when driving somewhere say for about an hr, the sound is not getting repeating more often, etc. And I was driving at some times up to 60mph. All perfect. Shifting and everything.
-
Inner and outer CV boots look great on both sides. I jacked the RL wheel up and rotated it back and forth on Neutral. It has some gap when moving it back and forth but it's not making that clunking sound if rotated up in the air by hands. I jacked up and did same back and forth wheel rotation on 987 which is with ZF19 gearbox. It has similar but smaller and less noticeable gap when moving it back and forth. The weel hub bearing? The wheel hub bearing on 996 seems perfect. The wheel itself rotates with no any noise.
-
I got a single (sometimes 2 in a row) clunking sound on a MB 996.2 automatic transmission when the car starts moving from a complete stop. The sound comes after the car moved 2-3 feet forward (or in Reverse too). I changed the ATF oil 6 months ago topping it off on a running engine then added more after switching in-gears for 10sec for each. I a little bit overflown it as now on a few days @75F a few drops came out from the breather cap in the front of the transmission a month ago and then stopped and there are a few oil drops came down in a rear on the top of the torque converter drain plug (the MB transmission is having so). The car shifts absolutely perfectly otherwise. The clunking sounds started coming a week ago when weather got some noticeably warmer and it comes not after every full stop but often. Sometimes one, sometimes two clunks. Is it because of a possible oil overfill? What this clunking sound could be after the car starts moving? With a radio on it's hardly noticeable. The clunking sound is appearing coming from the RL wheel housing. I checked it's not coming from the pads nor the RL brake rotor is turning freely with a transmission in Neutral. No any scrubbing on the park brake pads which I adjusted exactly a year ago by the 996 workshop manual procedure.
-
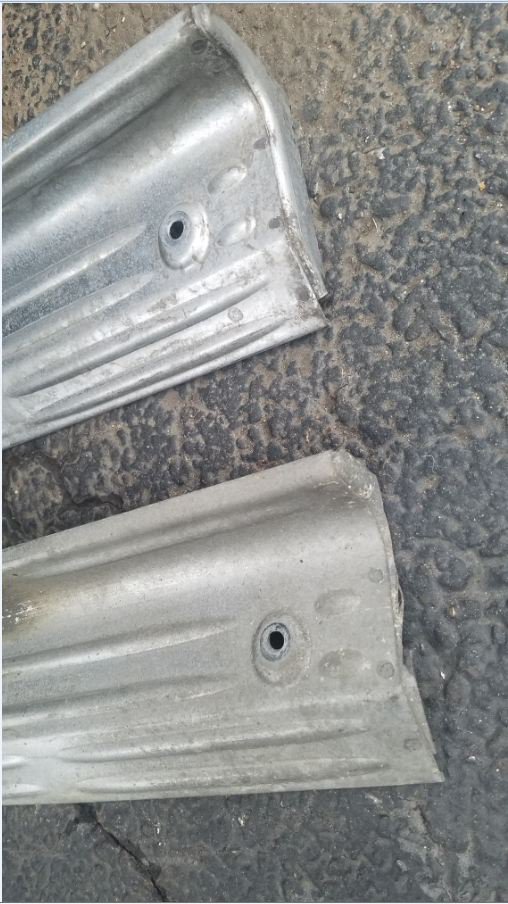
Clamp by the grearbox tray on 996.2
alex222 replied to alex222's topic in 996 Series (Carrera, Carrera 4, Carrera 4S, Targa)
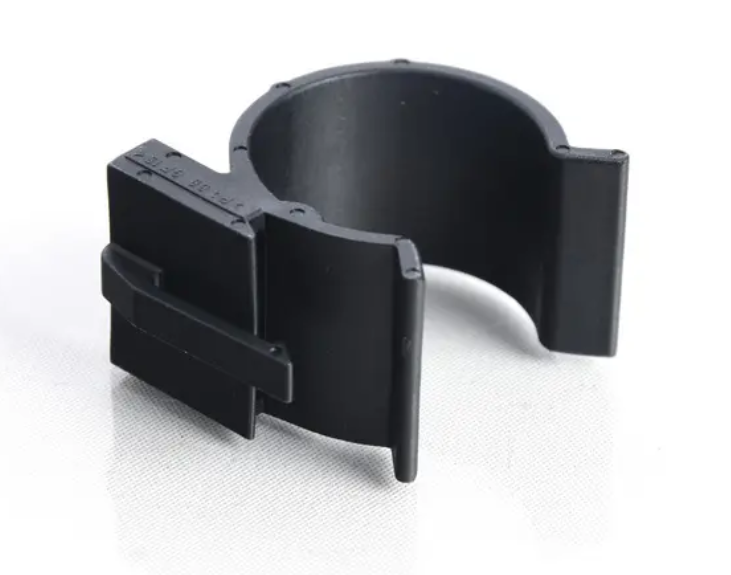
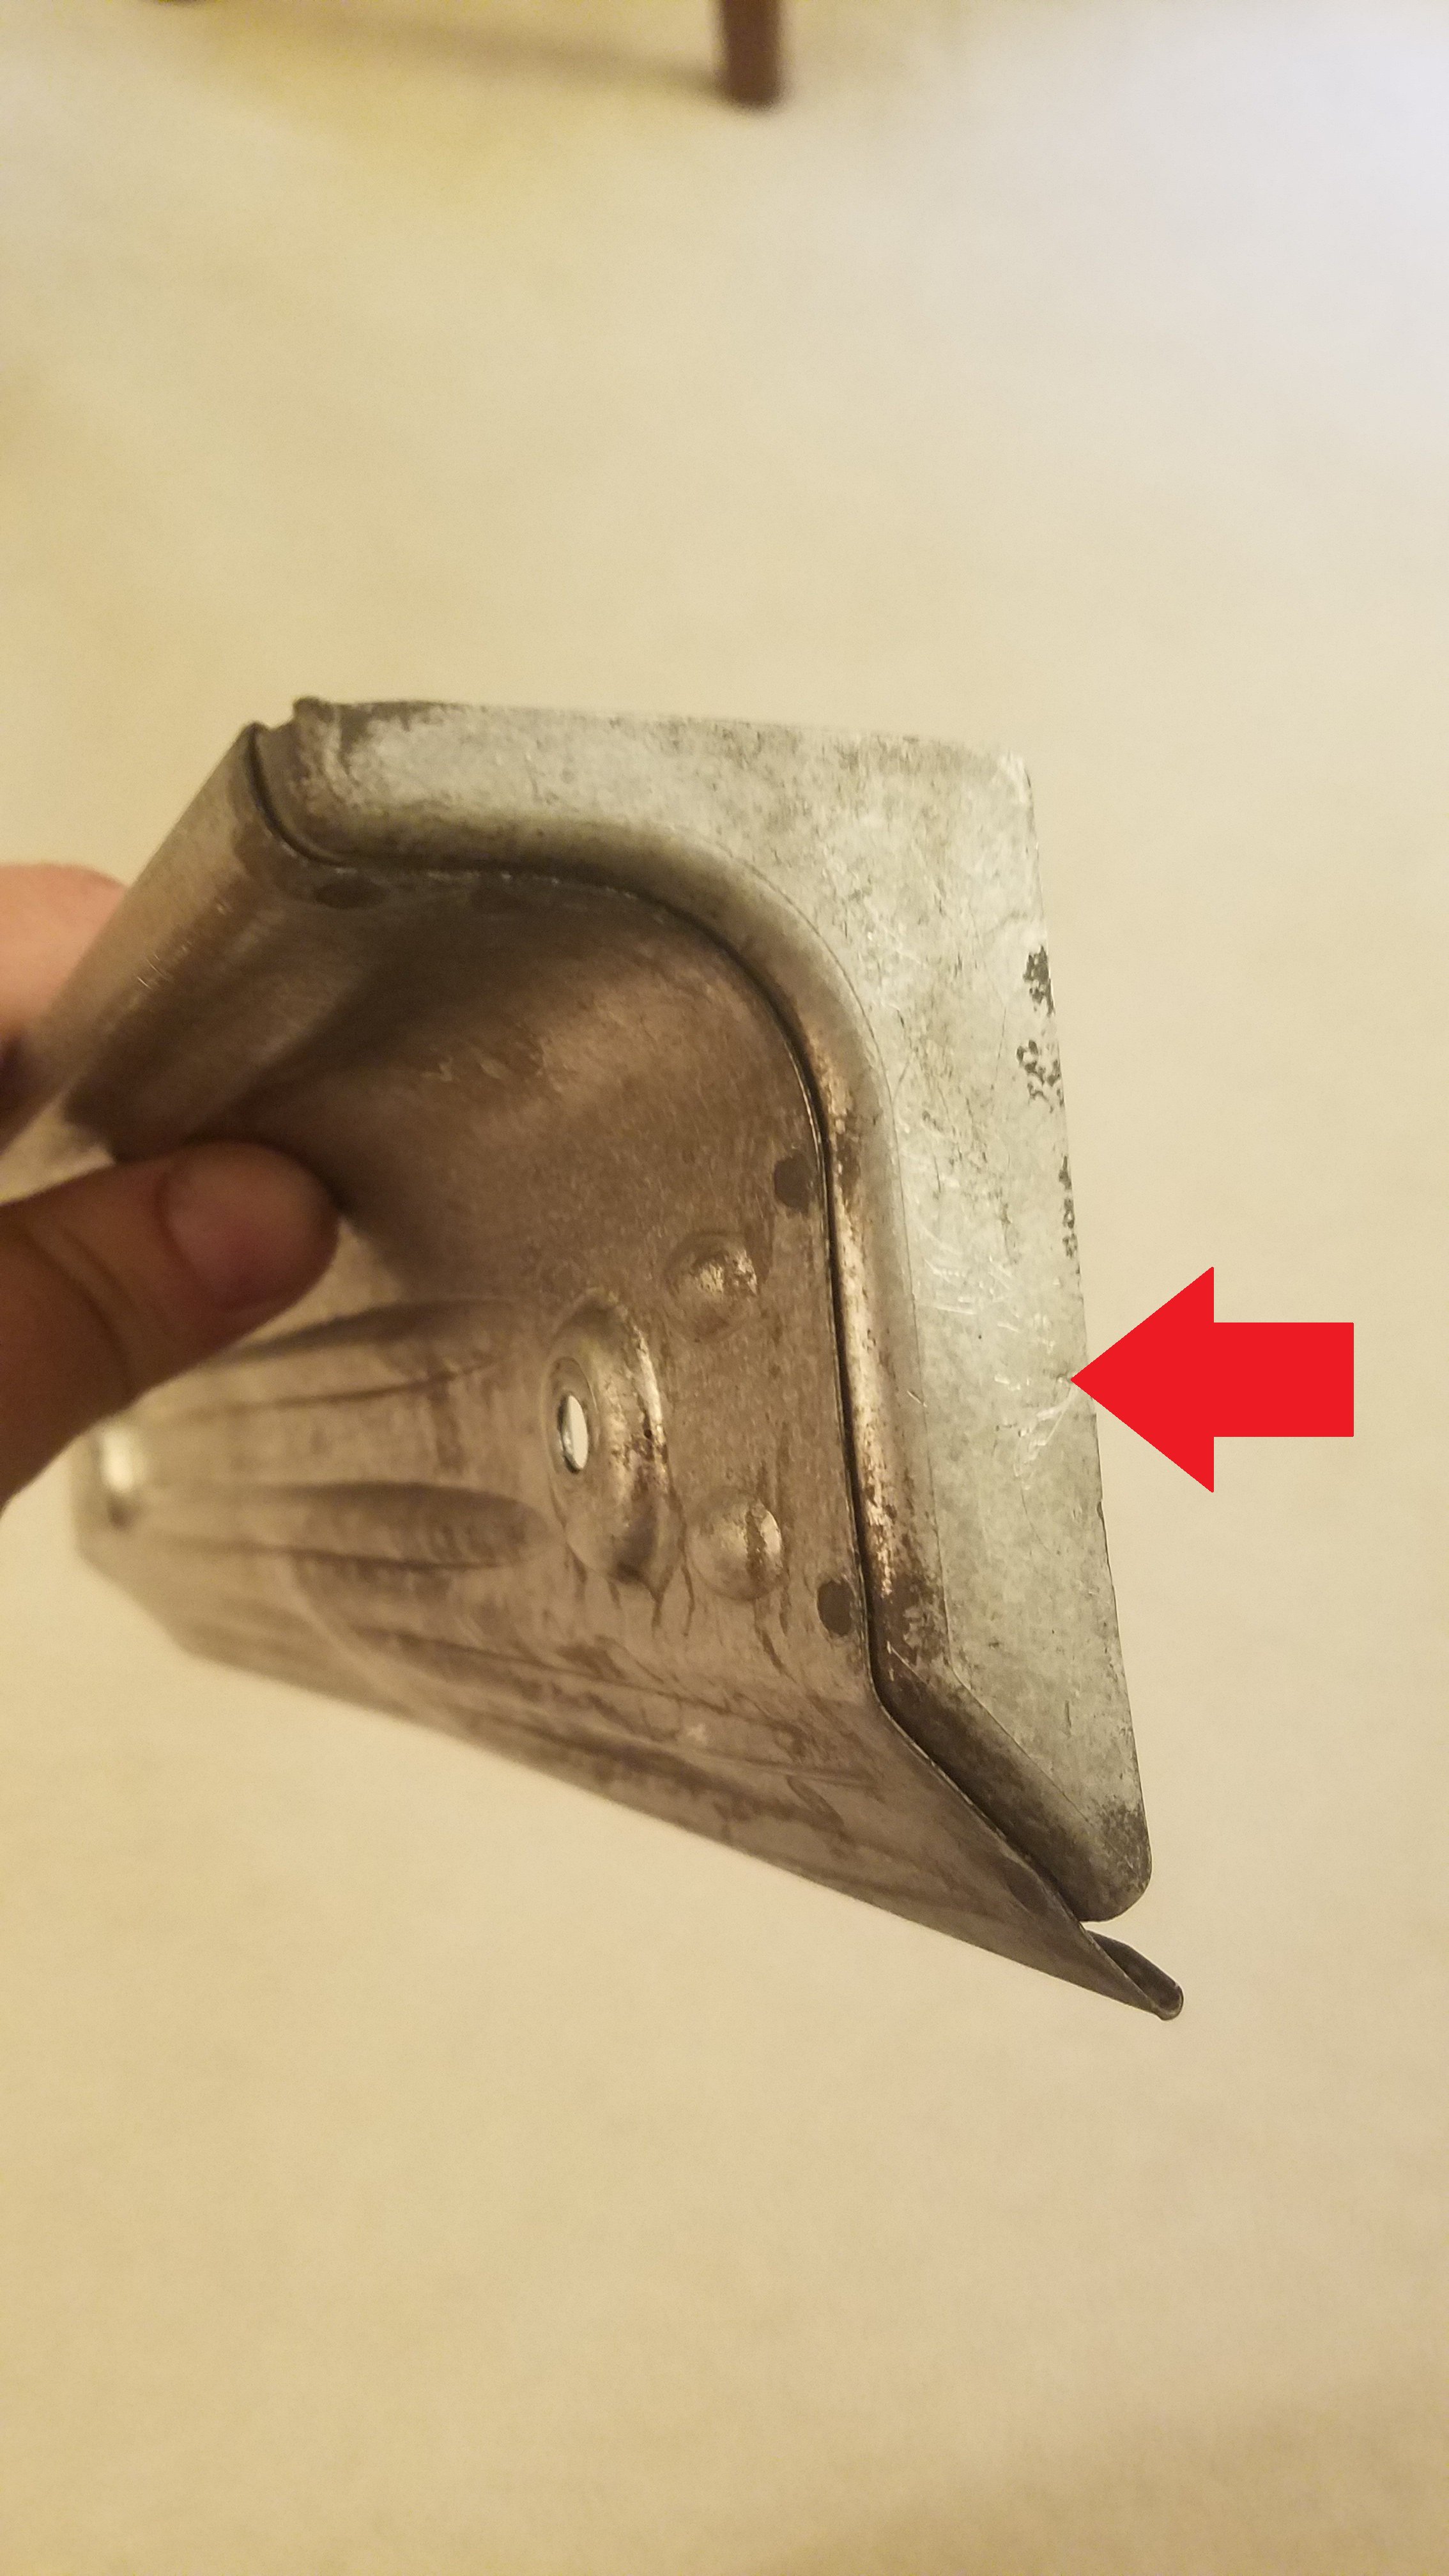
Turned out it is not. The clamp is 1" and the hose is 1/2" and the flat pin is twice thicker than the mounting hole on the clamp. That's all right. Maybe there is no clamp supposed to be in there? -
Clamp by the grearbox tray on 996.2
alex222 replied to alex222's topic in 996 Series (Carrera, Carrera 4, Carrera 4S, Targa)
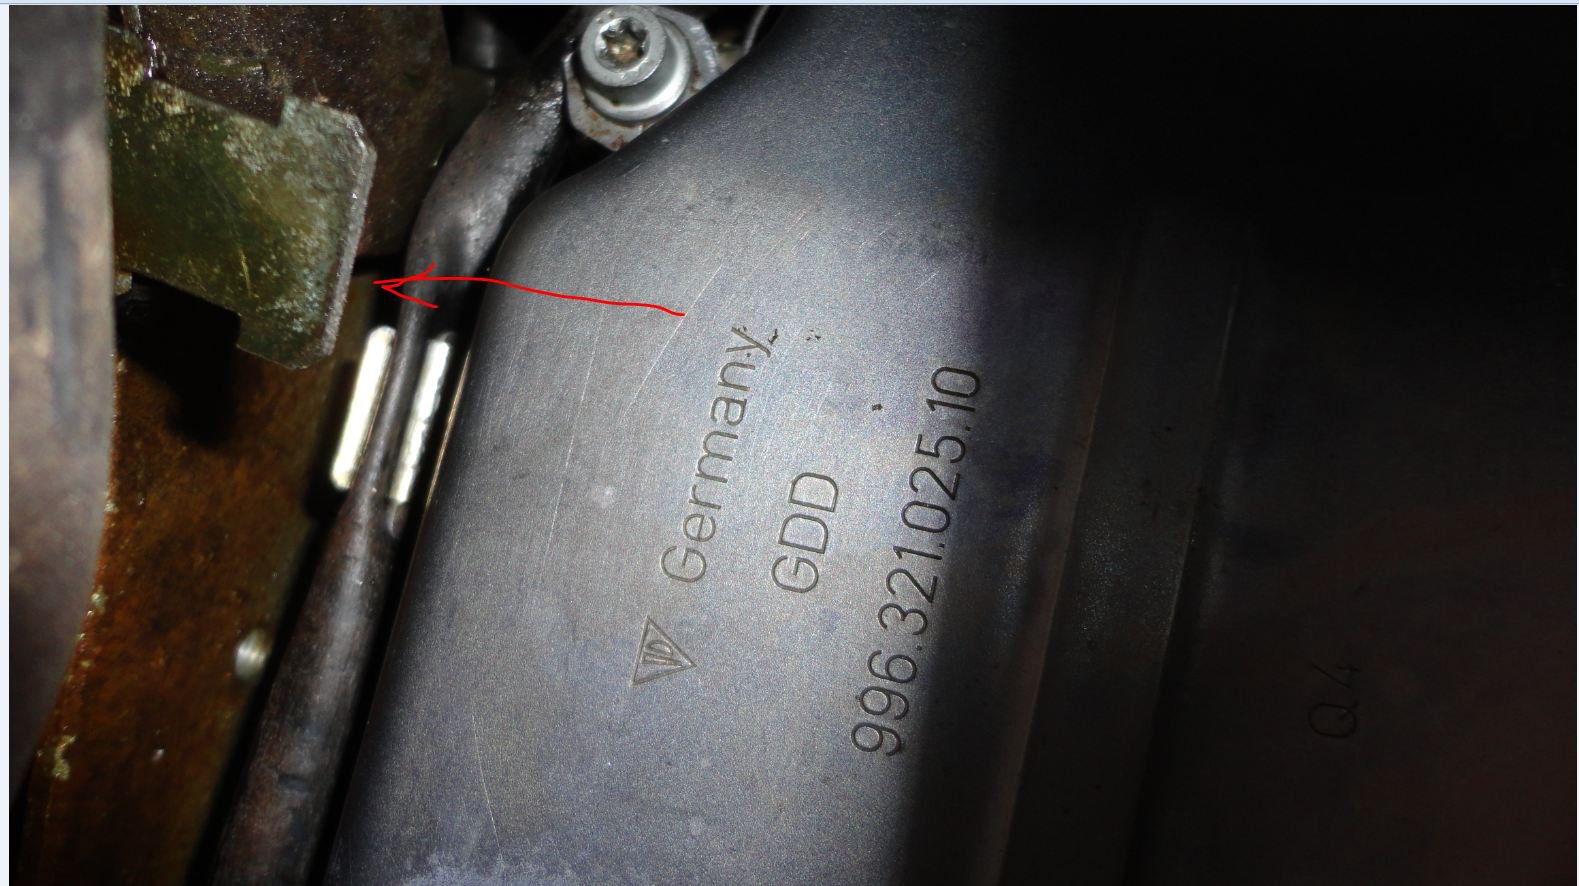
It supposed to clamp one or 2 an inch-thick water hoses. Those water hoses run one on top of another across the body, just above the rear edge of the under-carriage plastic shield. Not sure if it goes to hose #8 but seems it's the only clamp with a flat hole to go over that flat pin on the picture I had taken. -
What kind of a clamp is for the water hose by the front end of the MB automatic gearbox on 996.2? Is it 996-106-419-52?

-
According to your statement I called a local dealer yesterday and asked to pull the options for my 987.1 which I also having and it aslo is having Tiptronic. Turned out, it has an option 195 70Ah battery and the guy said the factory ships Boxsters over with 70Ah batteries to only get overseas which they change to 80Ah. But, sometime ago I had put the factory 70Ah battery which lasted only for 2 years and I switched back to 80Ah battery. I said back to the dealer if according to them the factory puts 70Ah Boxsters to only to get a new car shipped overseas, why my 996.2 is having the option 197 88Ah stronger battery for the first place? - He didn't respond with anything.
-
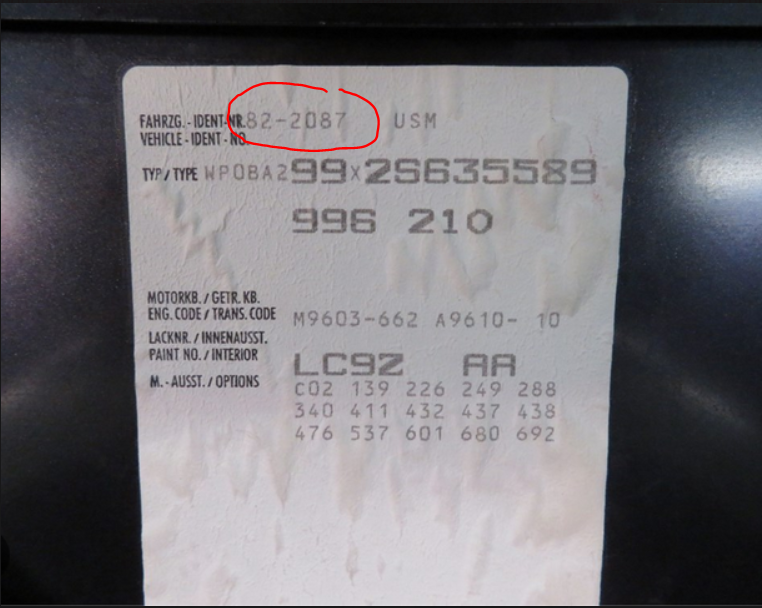
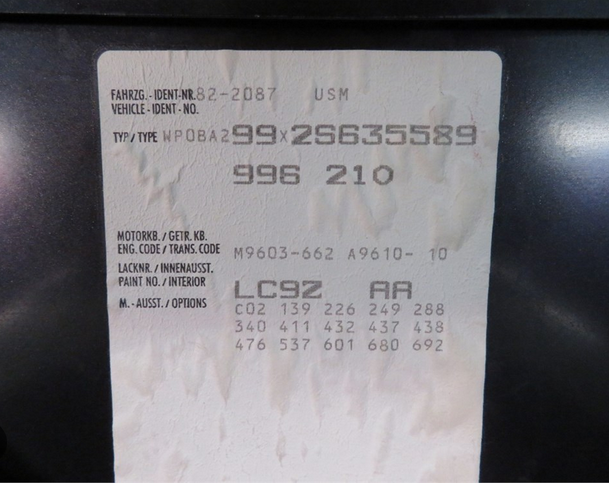
This is from Porsche for my 996 VIN:
-
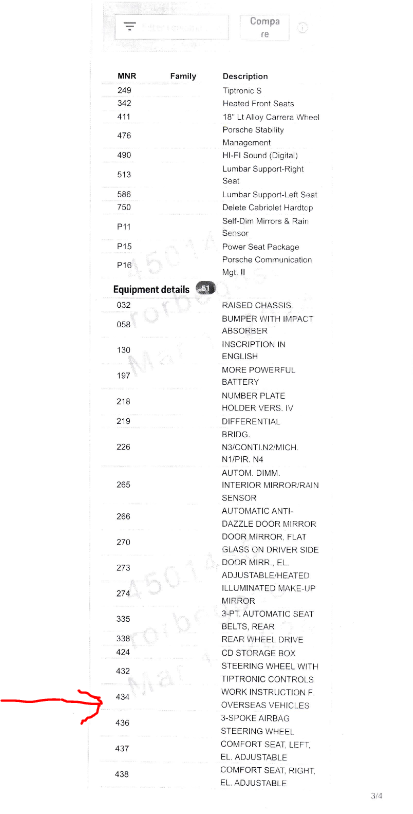
My MY2003 996.2 is having the option 434 Work Instructions for cars overseas on the hood label. What these instructions are? Is there a PDF of these instructions somewhere or something?
-
82-2087 number on the 996/986 hood label is it a dealership code or the car's Production Number?
-
To my knowledge the CDR-24 is a default config which radio has a built-in amp. My car is having option 490 Digital Hi-Fi Audio along with the 670 Navigation and the amp in the front trunk similar size and shape to BOSE amp but diff. pins layout.
-
Yes. MB 722. Interesting as you saying they put bigger batteries only to some cars with tiptronic as this someone else's label showing A9610 but no bigger battery. Q: 82-2087 number on this hood label is it a dealership code or the car's Production Number?
-
My 996.2 pup is having an option 197 on the hood label (Stronger battery 88Ah). Q: Smaller batteries have less weight to help for racing but do you know why to some cars Porsche puts stronger batteries over the standard ones while the standard batteries designed to be enough to supply the necessary need for electrical supply already? I looked the 987 parts catalog and the 987 cars also have an option 200 for a 95Ah stronger battery. The only deviation from a default 996 configuration I see my MY2003 996.2 pup is having the PSM option 476 and the digital radio option 490 but you don’t use PSM without engine running and I seen another build hood label of a 996 with the Bose audio (option 680) without a stronger battery – so stronger battery is not per say a necessity for the better audio option. And for soft top opening/closing if performed without the engine running – but I also seen other 996 310 hood label without stronger battery – so it’s not a requirement for the soft top opening mechanism neither.
-
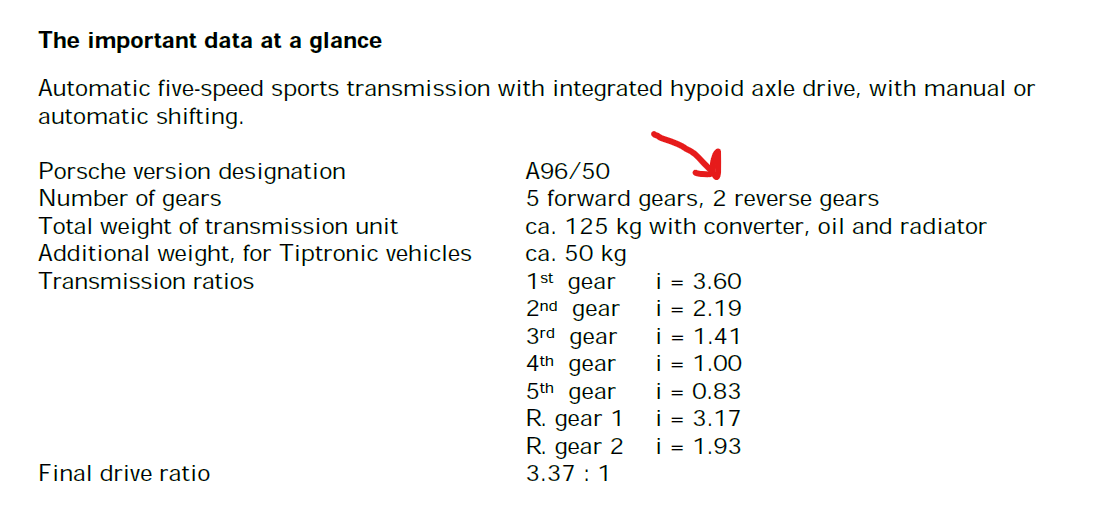
Why the 996.2 with the Mersedes-Benz automatic transmission A96/50 (Mersedes 722.70) is having 2 reverse gears? In the instrument cluster there is only 1 light for Reverse gear. What are these 2 reverse gears are for? For the 996.1 with a ZF gearbox there is only 1 reverse gear, same as in the manual transmission for either 996.1 and 996.2.
-
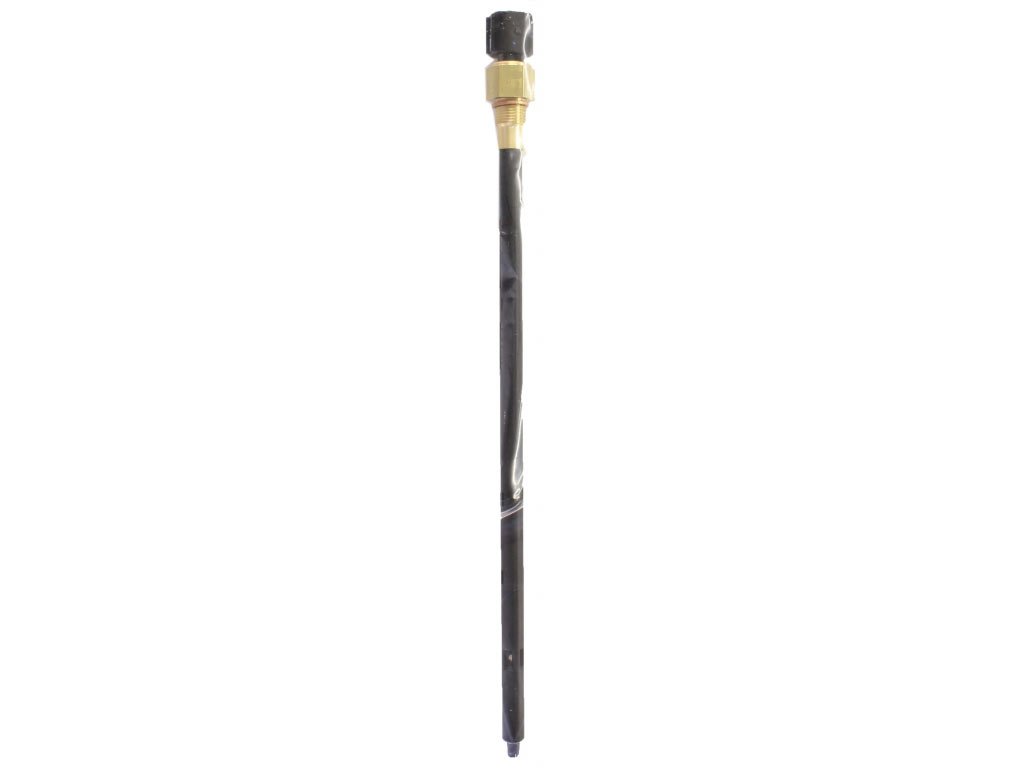
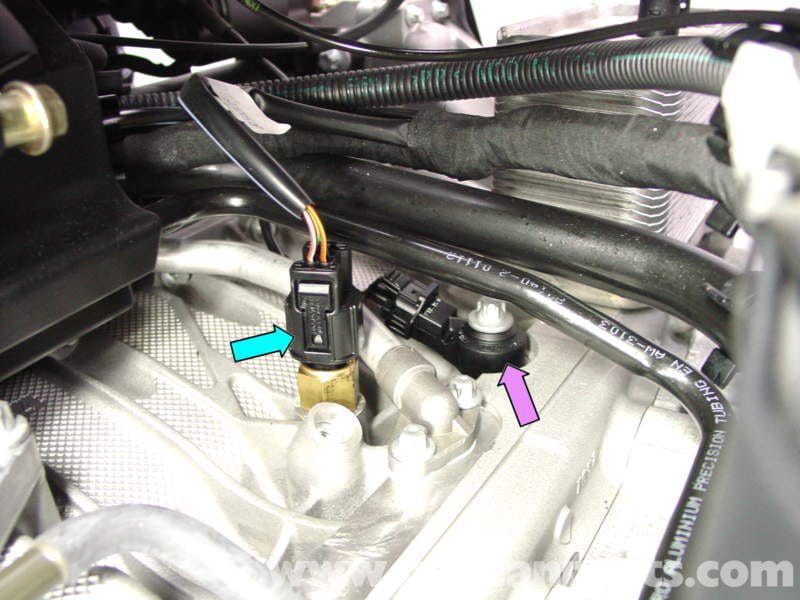
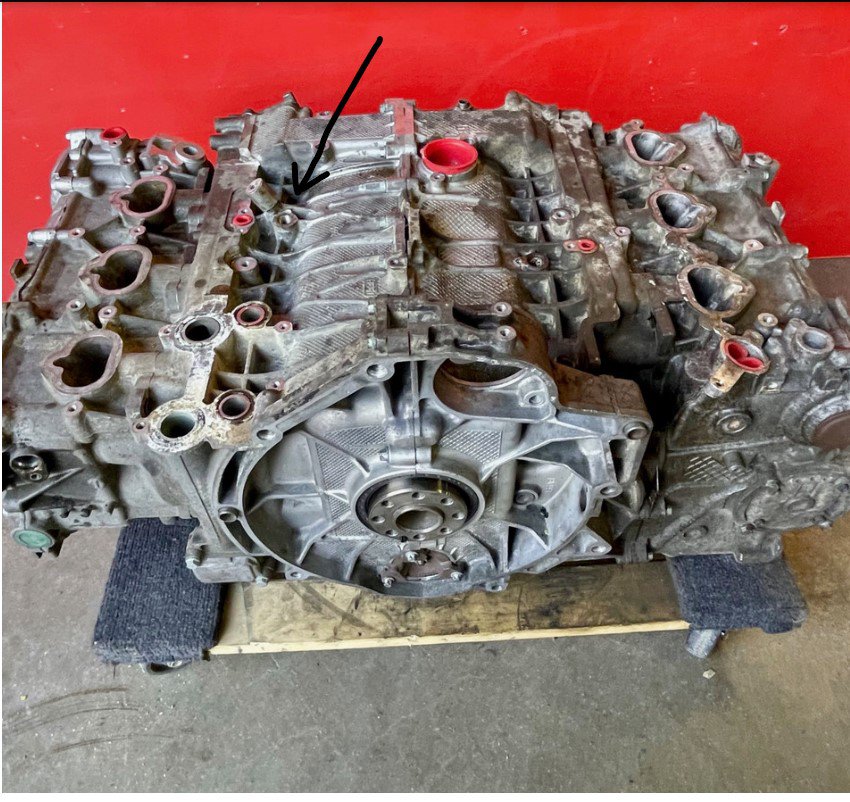
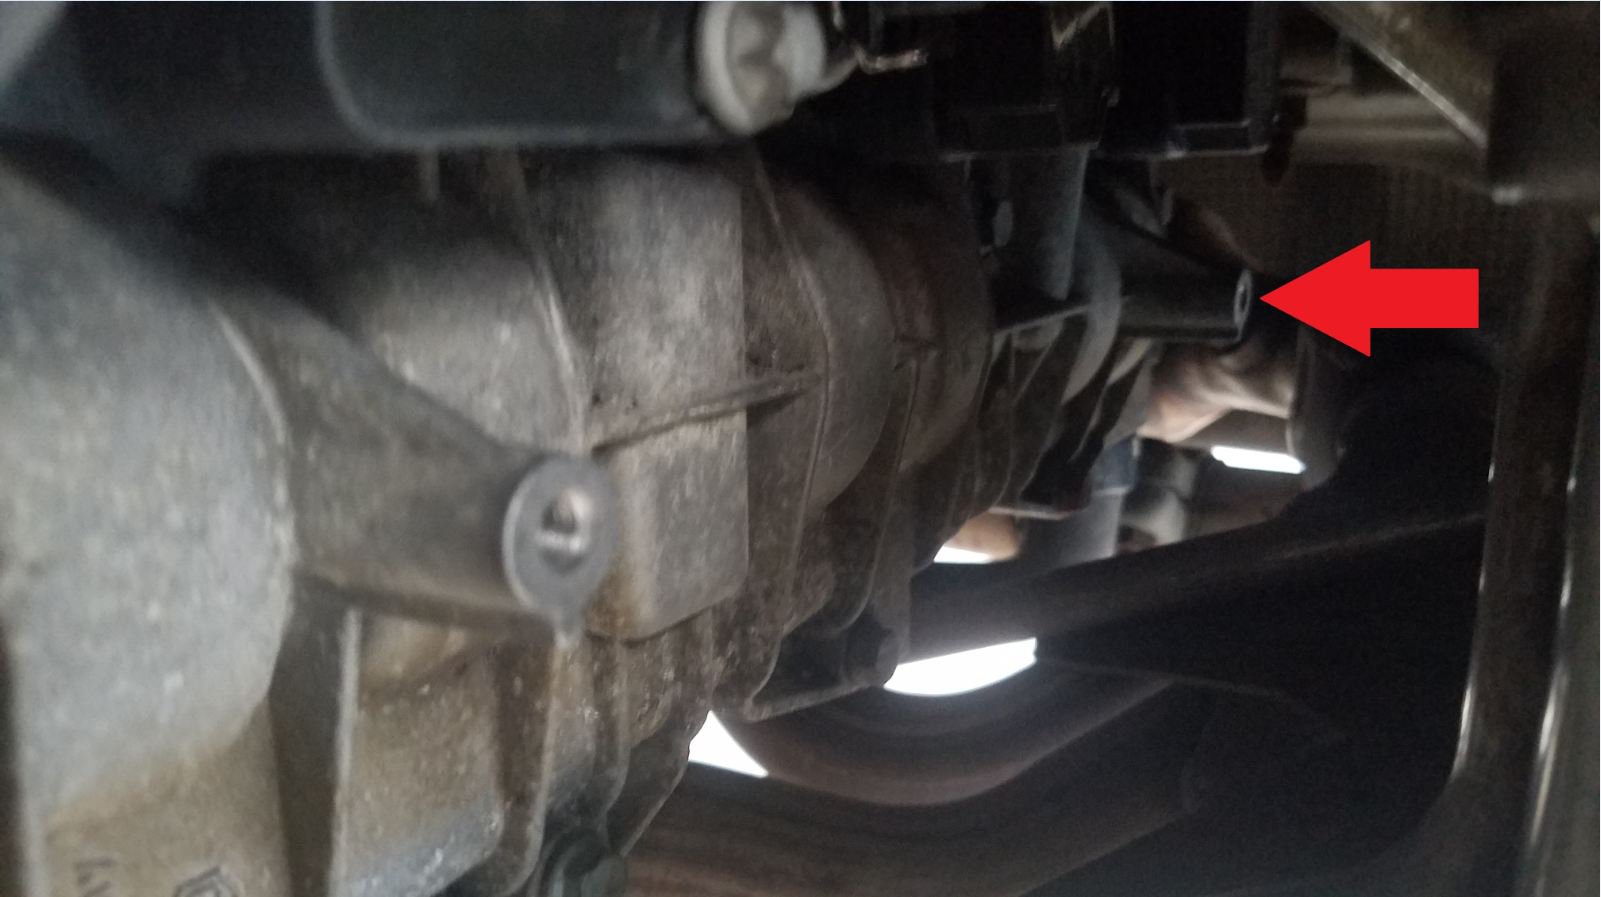
There is a thread in this forum on the oil level/temperature sensor 996 606 150 02 location (called in PET as an "Oil Level Sender", which supersedes 996 606 150 00 and a guy said it takes him a 1.5hrs to get to the sensor by removing the RH intake manifold. Can someone who did it provide the steps (I want to avoid of breaking anything). 996 606 150 02 Oil Level Sender: The Blue arrow: The black arrow (the engine blok is pictured from the other way around, from the front of the car):
-
Solved. I didn't find any mentioning on the heat shield in the Porsche Carrera 996 Group 1 Engine From 15 service manual so I bent both sidewalls outward a little to pass the rear stud and finally got the heat shield in-place. Then I straighten up both side walls as they were and screwed the screen up. Thoughts and observation: The 996 104 445 01 Heat Shield is marked in the Parts Catalog with "A" (Assembly only) - installed when the car was assembled. They don't sell it. They sell the other shield 996 104 445 02 which is more rounded up than the "01" S-shaped shield and the 996 104 445 02 is having only one side-wall. Appearing the 996 104 445 01 shield is perfectly sliding down under so there is no need to take it out to do a maintenance on coils/spark plugs while seems all stupid mechanics trying to take it out, cut the side walls off, whatever. So the factory made a re-visioned part which they sell which is not having one of the side walls. But, the matter is without a side wall the overheated air will eventually crack the wall of the coil which is near-by. That was the whole point I wanted to get the original part with both side walls, not the revised part.
-
The orientation on the pictures is the same way as on the diagram. It's not upside-down. You can't put the heat shield upside-down in there.
-
Did you read my Q?
-
My original LH (Driver Side) coils heat shield side wall was cut at the rear end so I bought exactly the same factory 996 104 445 01 Heat Shield which ironically was taken from the LH side of the donor car as well. So the issue is I can't figure of how to insert the uncut heat shield into the place? - When I tried to put in in from the wheel arch, the rear sidewall gets stuck by the engine block rear screw stud and I don't see any way to get the heat shield in-place. Is it any magic for taking the original factory heat shield from and to the 996.2 3.6L engine?
-
I like this discussion on the Bentley book which seems is a great resource. My 2 cents are the factory 996 PDF manuals that are available for free on the Internet (which consists of 10 Groups (from 0 to 9) with over 3,000 pages overall were sufficient for me for a handful of repairs I've undertaken so the guidance in those on disassembling/reassembling things and general diagnosis have been very useful.
-
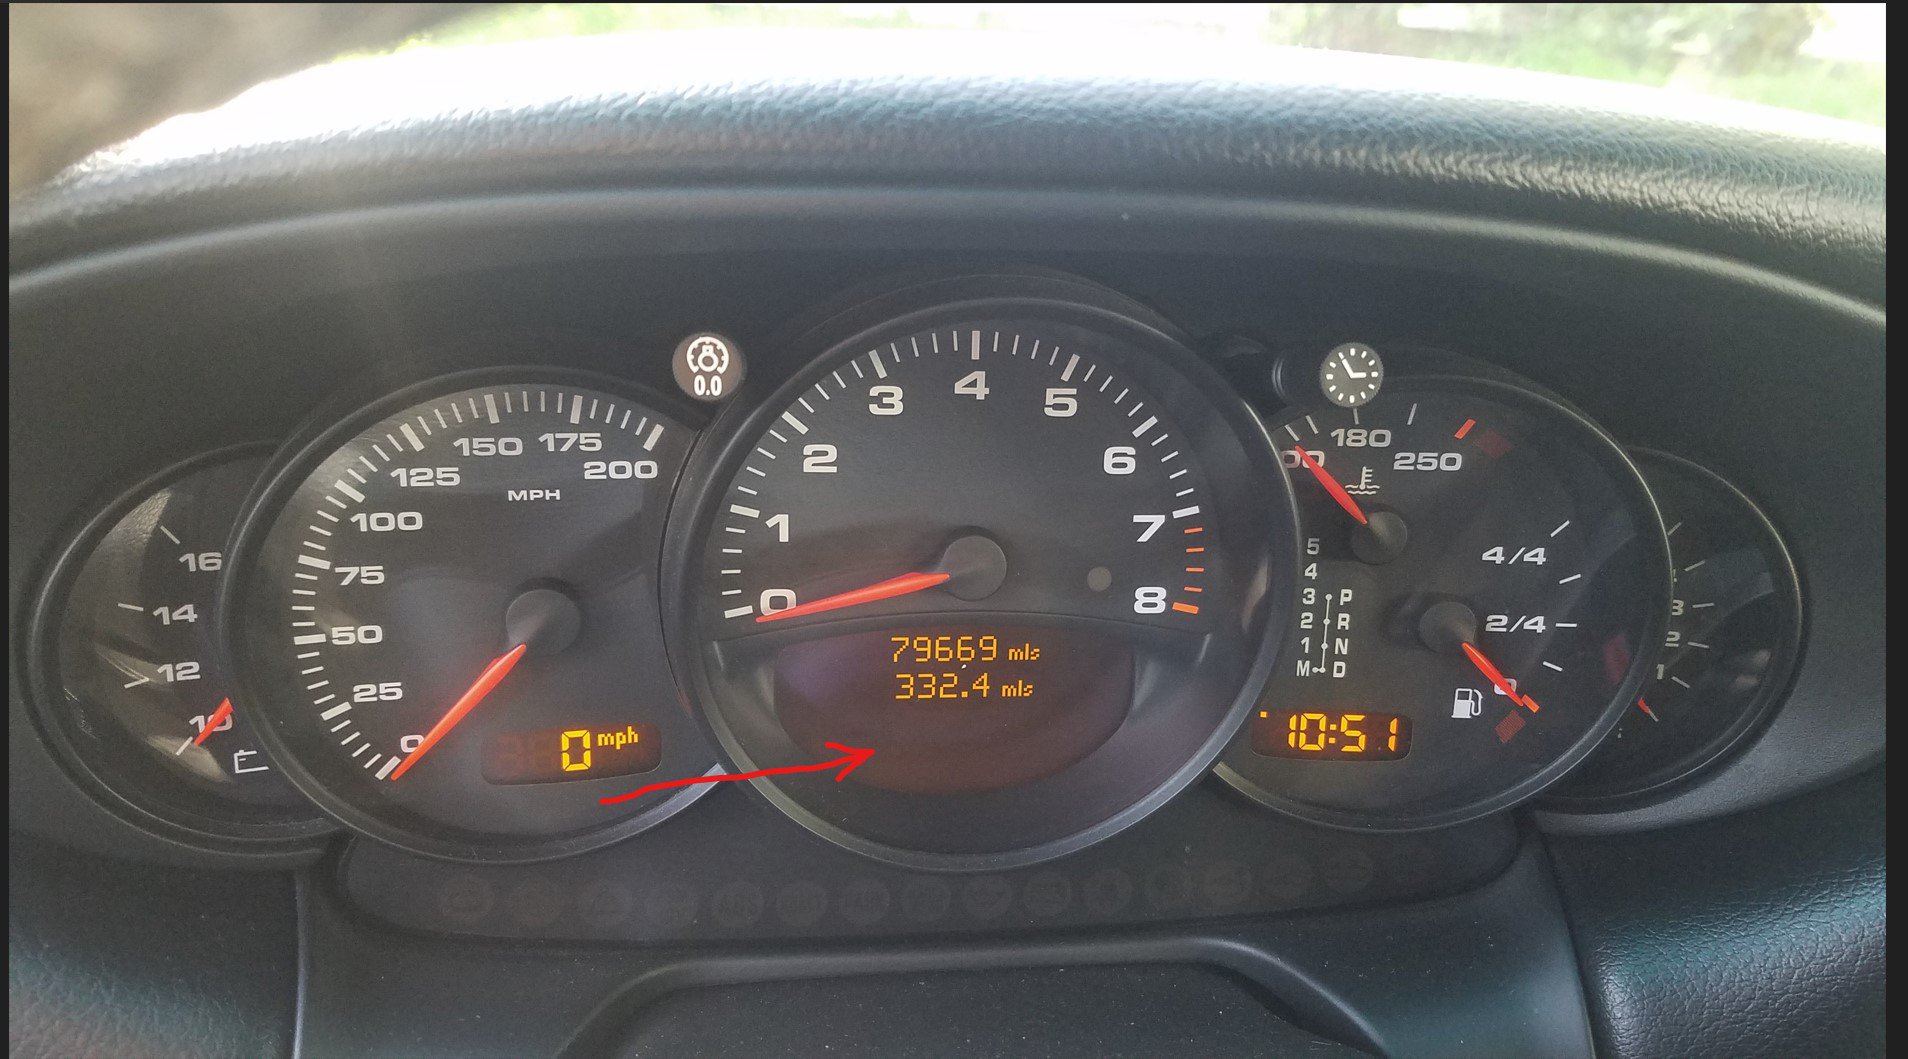
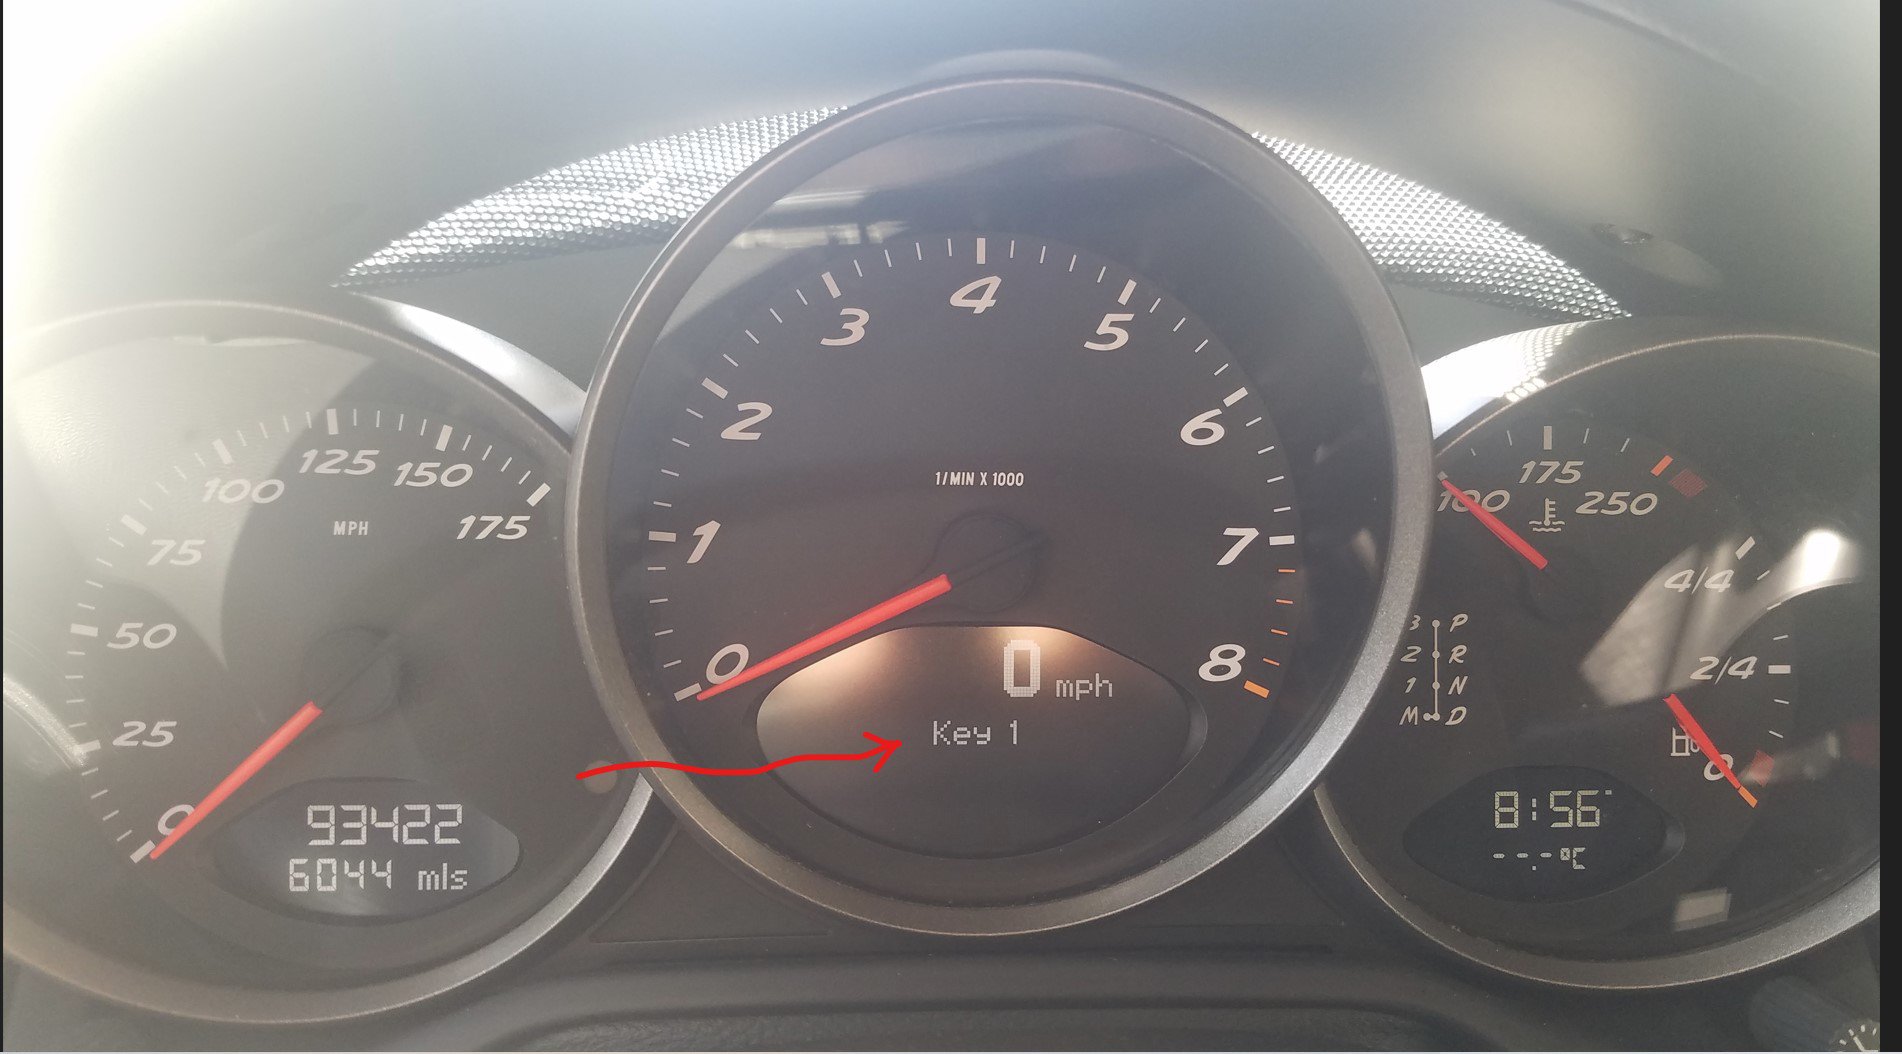
After a dealer programmed new keys to 996.2 is not showing key # on the central display no more when unlocking the car. It used to say: "Key 1" I remember it clearly, same as the 987... The tech is saying the 996/986 don't do that. He showed me a 996.1 is not showing it. Can folks who are having 996.2 confirm if your car is showing the key number on the main display when unlocking the car or not? 996.2: 987.1:
-
Is it anywhere in besides of the local dealership can I cut a key blade for the 996 to the key code I have or to the VIN?
-
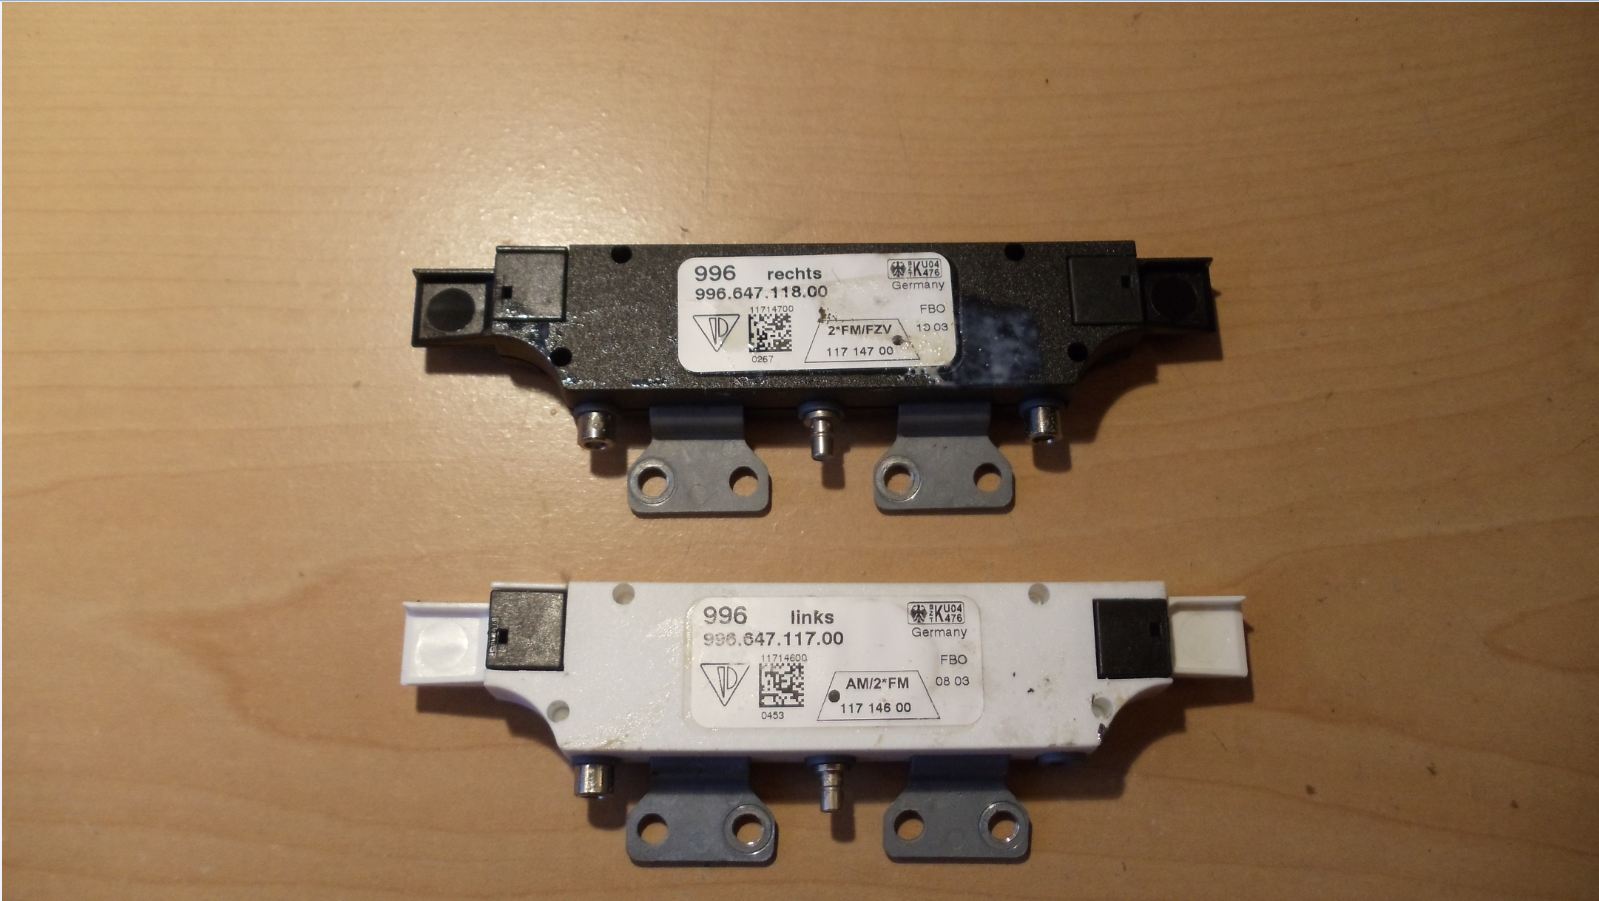
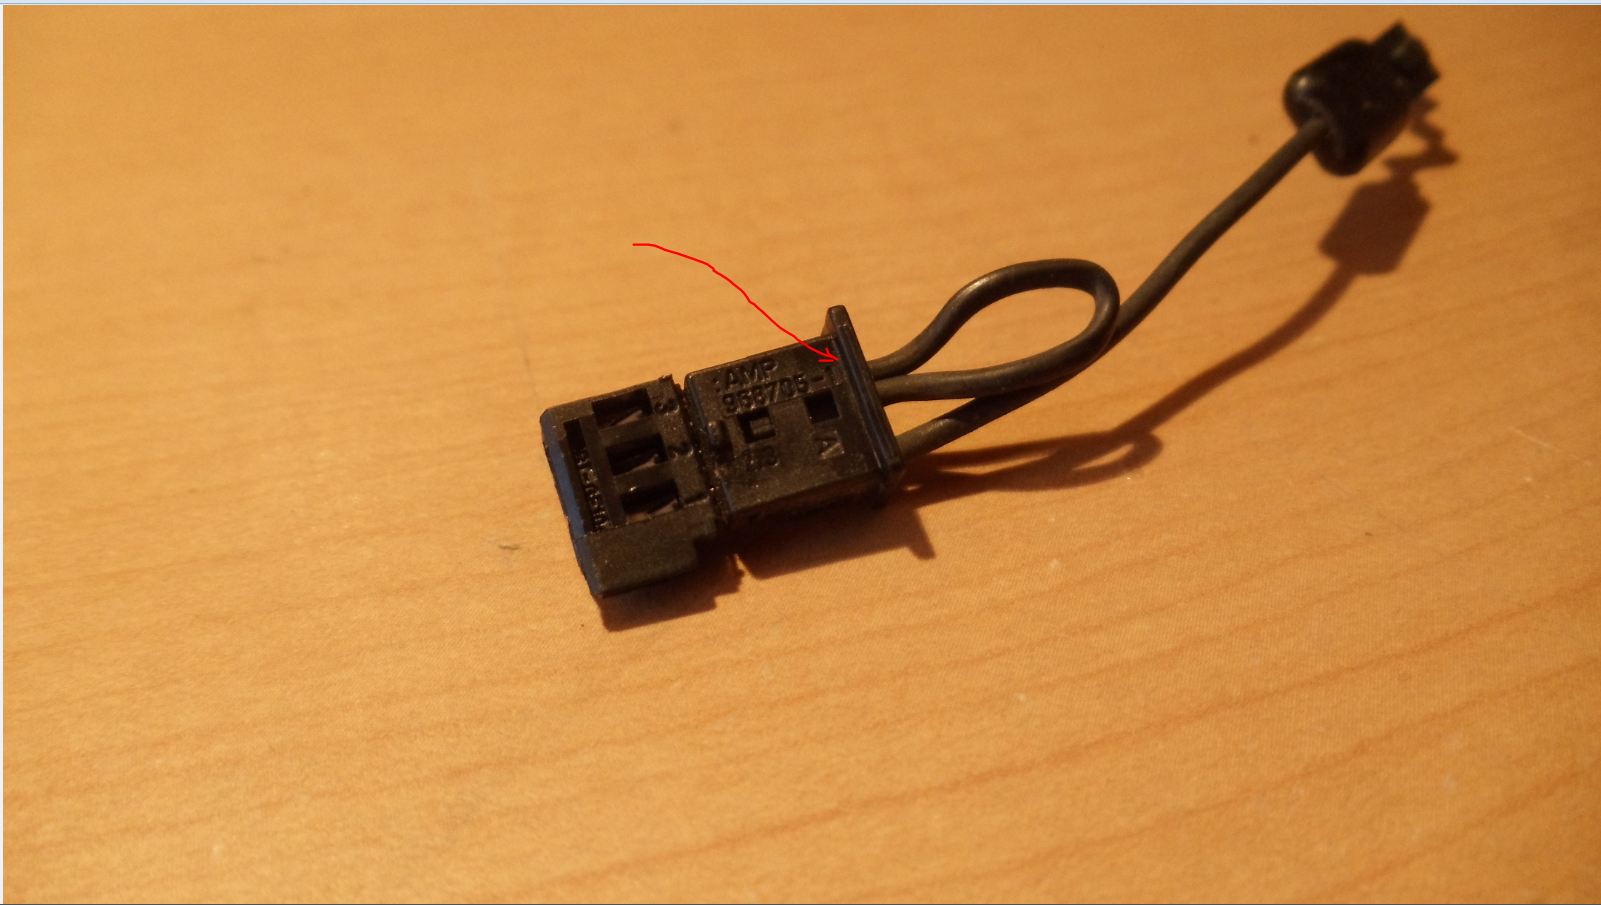
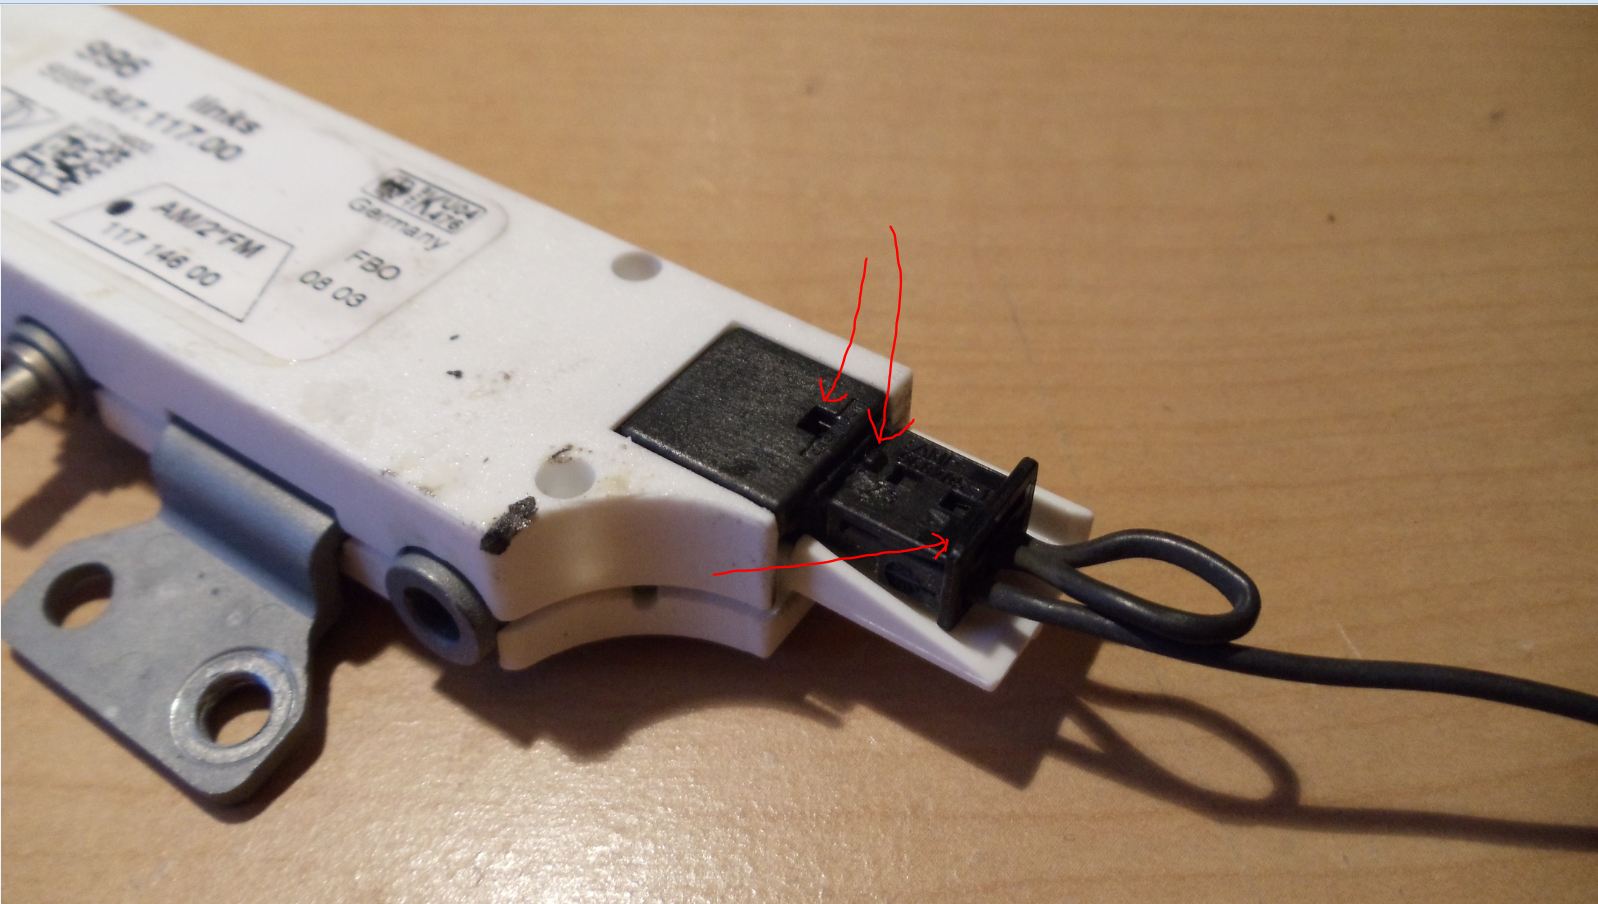
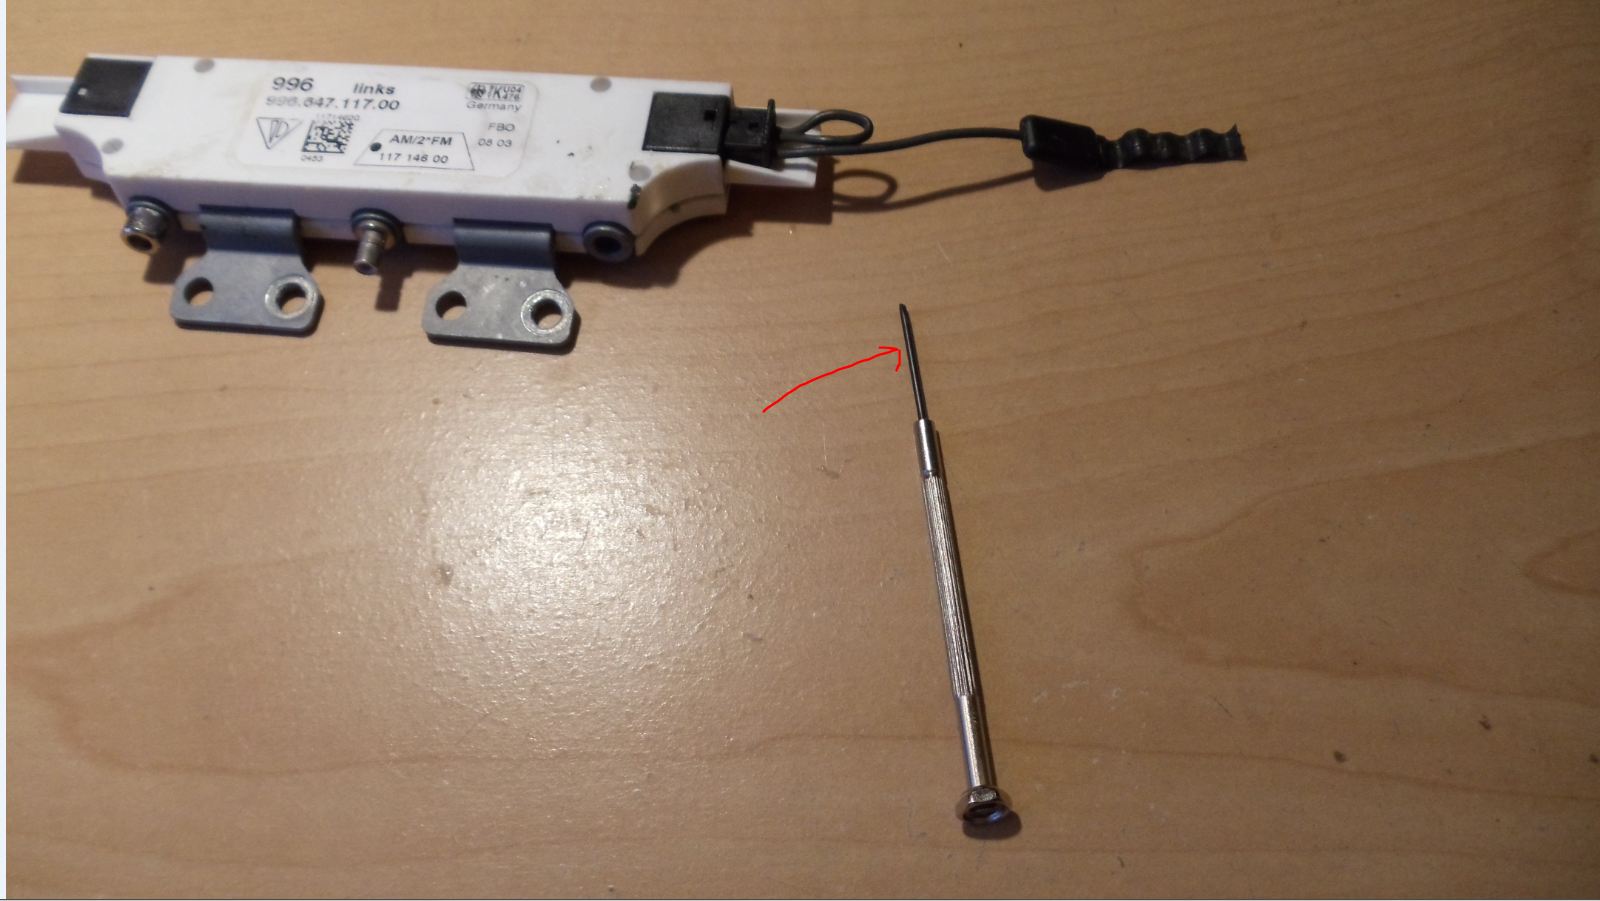
Solved. My problem was the AM/FM antenna amplifier (WHITE) in the LH A-pillar was dead and the FM antenna amplifier (BLACK) in the RH A-pillar was dying. I noticed in the parts diagram than my car which is with the PCM2.0 Nav is having 2 antenna amplifiers (in each A-pillar) unlike the cars with just radio which have only one antenna amplifier in the RH A-pillar, and the antenna amplifiers for the PCM Nav unit are different from the one for the regular radio. I opened up the cover of the LH A-pillar and disconnected both antenna cables and started the engine and the radio was working with the engine ON. So when I was waiting on the LH amplifier 996 647 117 00 to arrive, on the two engine starts out of 10 the reception issue on the radio came up and similarly after a few mins after the engine was shut off the radio was working again. So I have had ordered the other RH amplifier 996 647 118 00 as well. The RH amplifier arrived first and that was perfect, so I had a chance to replace the dying amplifier first to make sure the replacement is good at all times and not shadowed by the LH amplifier. I did 2-day about 10 engine starts-ups and rides and the reception on just RH amplifier was good. I also learned that just one amplifier is not good enough for a good radio reception, when I was passing the low grounds, the reception was slightly not perfect. So it was no any issues on any engine starts. Then the LH white amplifier arrived, and I connected it and did like 10 engine starts/idle and the reception was perfect, no any issues. Then I took the pup for a spin and headed to those low grounds where on just one amplifier the FM perception was slightly w/ some static noise. And passing the same low ground spots the radio is perfect now. Achtung! The antenna plugs are easy to break! They have the little bar on top it's the only place to grab them to pull out and I had broken that tiny bar. The cause is the securing pin is to tall and the force to pull the plug out and break the little plastic bar is greater than to unpin it. Use a 1mm flat screwdriver. 1. Unplug 2 radio cables which go to the control unit. 2. Insert the flat screwdriver in the OUTER connector (facing YOU) so it lifts up the cover where the pin is. Just insert the screw driver straight. DO NOT PULL UP!!! 3. Pull the plug out. The screwdriver will come out too. 4. Unscrew the amplifier. It is held by 2 x 25 Torx screws. 5. VERY gently turn unscrewed amplifier facing parallel to you (parallel to the windshield) so you can insert the 1mm flat screwdriver into the INNER connector from aside. 6. Holding the amplifier pull the inner plug out. BE VERY CAREFUL! At no points do not pull the gentle flat antenna cable out from the windshield. If you rip off the antenna cable it will be a WAY bigger issue!!! Reassemble in the reverse order. 1. Plug the inner antenna connector first 2. Screw in the amplifier to the pillar 3. Plug the outer antenna connector 4. Plug in the antenna cables to the control unit. 5. Try the radio/start the car 6. Take off the black masking tape from the old amplifier and put it on the new amplifier.