Welcome to RennTech.org Community, Guest
There are many great features available to you once you register at RennTech.org
You are free to view posts here, but you must log in to reply to existing posts, or to start your own new topic. Like most online communities, there are costs involved to maintain a site like this - so we encourage our members to subscribe or donate. All subscriptions and donations go to the costs operating and maintaining this site. We prefer that guests take part in our community and we offer a lot in return to those willing to join our corner of the Porsche world. This site is 99 percent member supported (less than 1 percent comes from advertising) - so please consider an annual subscription or donation to keep this site running.
Here are some of the features available - once you subscribe RennTech.org
- View Classified Ads
- DIY Tutorials
- Porsche TSB Listings (limited)
- VIN Decoder
- Special Offers
- Paint Codes
- Registry
- Videos System
- View Reviews
- and get rid of this welcome message
It takes just a few minutes to register, and it's quality Porsche information at a low cost.
Contributing Members also get these additional benefits:
(you become a Contributing Member by subscribing or donating money to the operation of this site)
- No ads - advertisements are removed
- Access the Contributors Only Forum
- Contributing Members Only Downloads
- Send attachments with PMs
- All image/file storage limits are substantially increased for all Contributing Members
- Option Codes Lookup
- VIN Option Lookups (limited)


Daryl80
-
Posts
42 -
Joined
-
Last visited
Content Type
Profiles
Events
Forums
External Paint Colors
Downloads
Tutorials
Links Directory
Collections
Classifieds
Store
Everything posted by Daryl80
-
DIY guide for removing interior plastic pieces?
Daryl80 replied to panameras's topic in 986 Series (Boxster, Boxster S)
Hi All, I agree with all the advice here, however here's a tip when I did mine. Especially in reference to the 3 thin strip trim pieces, I was able to take them out relatively easy considering there are like 20 screws behind there. If you're handy with your tools, once you lie in the footwell, you will see that there is a a/c pipe that leads from the centre to the side airvents. Wiggle it back and forth. Eventually it will pop off and you can pull it out. This leave about a 3 inch gap that you can put your arm in and guide your screwdriver Takes some time, but its much better than the other solutions, of drilling it or ripping it out. Now that I have all my parts out, I'm getting a 3D pattern layered on it. It will be of a carbon fibre pattern, and will definitely be better than those sticker options. Whilst the pattern wont match OEM exactly, it'll be 1/10th of the cost also. Once done, will attempt to post some pics here. Cheers! -
Is this the correct Antenna Adapter?
Daryl80 replied to Daryl80's topic in 986 Series (Boxster, Boxster S)
Yeah, no worries, once I get the correct cable, I'll install it and take a few photos -
Hi all, I am about to move onto the next phase of my stereo install which is to install my old Nakamichi CD45Z. It's also amber in lighting, so should look fairly factory. The only thing is, what antenna adapter will I need? I've seen a few european ones, such as in the photo attached. They say its for a BMW, Audi or VW, but not explicit for a Boxster. Can anybody advise? Or moreso, where can I get one of these? I'm located in Australia, so that may be a bit more difficult. Thanks

-
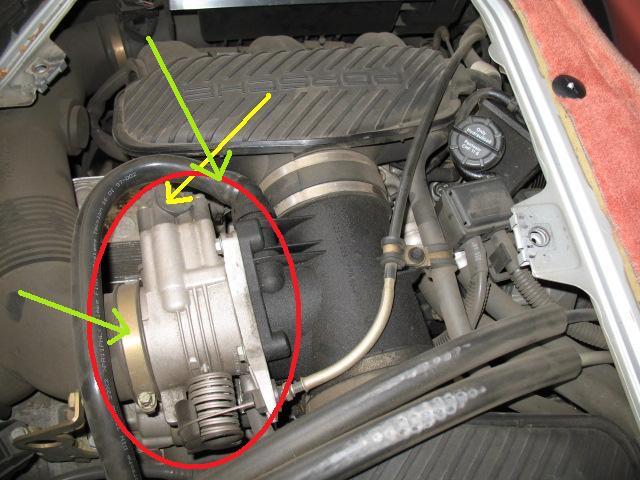
Hi Tool Pants Thanks for your reply and picture. Firstly compared to mine, your engine is spotless! But yes correct I do have a 1997. I've taken your photo, so can I confirm a few things. Can you please confirm that the item circled in red is the throttle body. Is that correct? In regards to the idle control valve, do I need to remove the tubes as marked in green, to get to it? To be honest, I thought I had to remove the pipe that comes from the airbox into the throttle body and was expecting to need to get into the butterfly valve. Is this not needed for a 97 Boxster? Thanks again. I'll give it a go with the two bolts, but please to everyone else, keen to hear if you have any more advice.
-
Hi Loren Thank you for your help. Bought some carb cleaner in a can and was all set to clean the throttle body. This was the first time I ever opened up the engine compartment, and ****, was it dirty! Everything was covered in a grimy soot, so I would not be surprised to find the throttle body completely clogged up. The only thing is now, I have no idea what I'm looking for. I've kind of traced where I think the air box would be, and i can see a thick pipe that leads to the centre of the engine. (between the parts that read's Porsche) I'm guessing this is the throttle body. Is it? I'll try to get my camera to take a photo, but if this is the throttle body, how on earth do I get to it? There are cables on top, other pipes. Sorry for my ignorance, I'm not really engine literate, so if there is a DIY guide, I would definitely appreciate it. Thank you all ps, I've done a search, but sorry couldnt find anything
-
Hi All May I ask, what exactly is a throttle body cleaner? I'm located in Australia, and unfortunately, CRC doesn't stock the throttle body cleaners locally. I seem to have similar symptoms, but is there a more generic term for the cleaner? Thanks for your help
-
Mounting Subwoofer Behind Seat onto Engine Wall
Daryl80 replied to boxed's topic in 986 Series (Boxster, Boxster S)
Good thinking on angling the sub. Let me see how I go. As for mounting the bracket to the floor. Again, no sure, but with a bracket long enough, or even bent slightly to force it back you may not need to As for the brand of velcro, I'm actually located in Australia, so probably not going to be of any help. Though it did look like the stuff found here http://www.velcro.com/industrial/index.html Hope it helps. -
Mounting Subwoofer Behind Seat onto Engine Wall
Daryl80 replied to boxed's topic in 986 Series (Boxster, Boxster S)
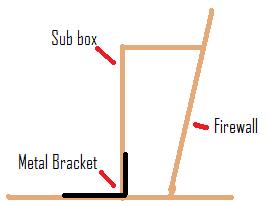
Hey Boxed, Thanks for the reply and photos. Nice setup. I'll use your idea with coat hangers. Nice one.... As for securing it down. Can I ask on why?? Is the box shifting from side to side? Is it falling forward upon braking, or are you trying to psuedo seal it with the back firewall. Anyway, for me, in a amp install I did, I had a problem where the amp would topple over. Not good. So I used a metal bracket to kinda hold it up right on the floor. Please see my dodgy drawing. This way, the floor would brace it and it wouldnt fall forward. Again with velcro, it should hold fairly well, and it won't be permanent. As for not being sealed in the back, I'm pressuming you must have made the box fit fairly snug. Any tips also on that.... I just know that a sub normally doent work well in free air applications Thanks
-
Mounting Subwoofer Behind Seat onto Engine Wall
Daryl80 replied to boxed's topic in 986 Series (Boxster, Boxster S)
Not sure if I can add any help, though I've been keen to do a similar install myself. Are you able to show any pics of the sub and enclosure. More so, any tips at all on how you made the box? Material, technique etc? Thanks! Oh, and for me, in my last car, I mounted the sub only using velcro. It looked to be some industrial strength ones, but that stuck to the carpet like glue and never moved about. Cheers! -
Hi All Each to their own I guess. But I write to tell you of my experience. I only own a 986, not only that it doesn't come with a glove box like some of the latter models. I first thought that I would have had to go down the soldering iron route, but I'm located in Aus, where dealers and parts are few and expensive. So had a look around and noticed under the foot well the only thing blocking access to the back of the dash was the air conditioner air pipe. This is the one that leads from the centre to the side vents. The great thing is that this can be pulled apart and once out, had enough room to squeeze my hand/ arm in. Now I did end up with a fair few scratches, but I did manage to undo all T10 screws back there. So there you go, another method. It was relatively painlesss. Scratches on the arm heal, but now I can go abouts in painting my ones, rather than look for a replacement. Time taken 1.5 hours in total, including trying to work out what can be removed and what couldn't be. Hope this helps someone
-
Broken vent fins. Do I need a replacement part
Daryl80 replied to Daryl80's topic in 986 Series (Boxster, Boxster S)
Hi Chris_in_NH Thanks heaps for your reply. I appreciate the detail you've gone to in explaining the process. I'll give it a shot this weekend and let you know how I go. Whlist it sounds fiddly, doesn't sound too painful, so thanks again. Fingers crossed it all goes well. -
Hi systech, Thanks heaps! That link is exactly what I'm looking for. I've printed it out for my reference material. kbull88, apologies not sure if I can see the attachment or link you gave the upholsterer. Can you re-attach it again?
-
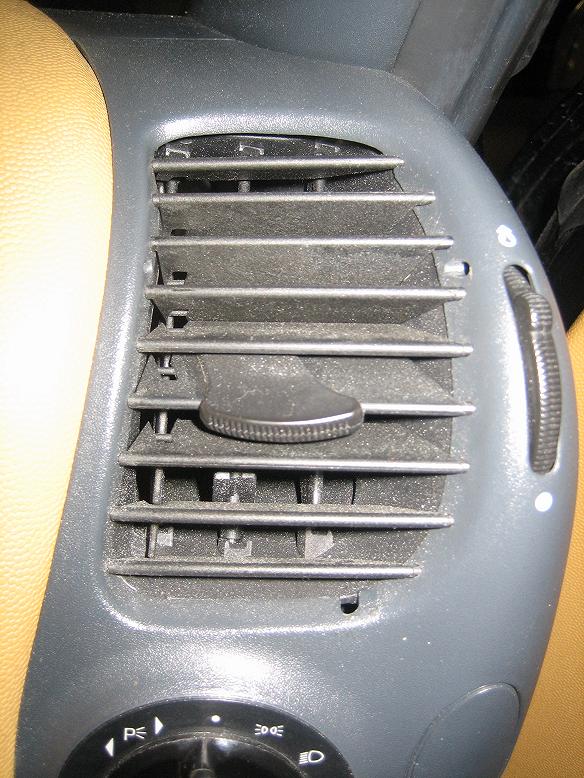
Hi All, I've not yet worked out how to pull apart the dash, but was hoping for advice in understanding whether my dash vents can be repaired or needs to be replaced. As you can see in the photo below, the fins seem to have been disconnected from the slider so does this simply clip back on? Keen to know if anybody has any experience in this area Thanks heaps. Sorry for asking such a trivial question, but appreciate any feedback you can provide. Cheers!
-
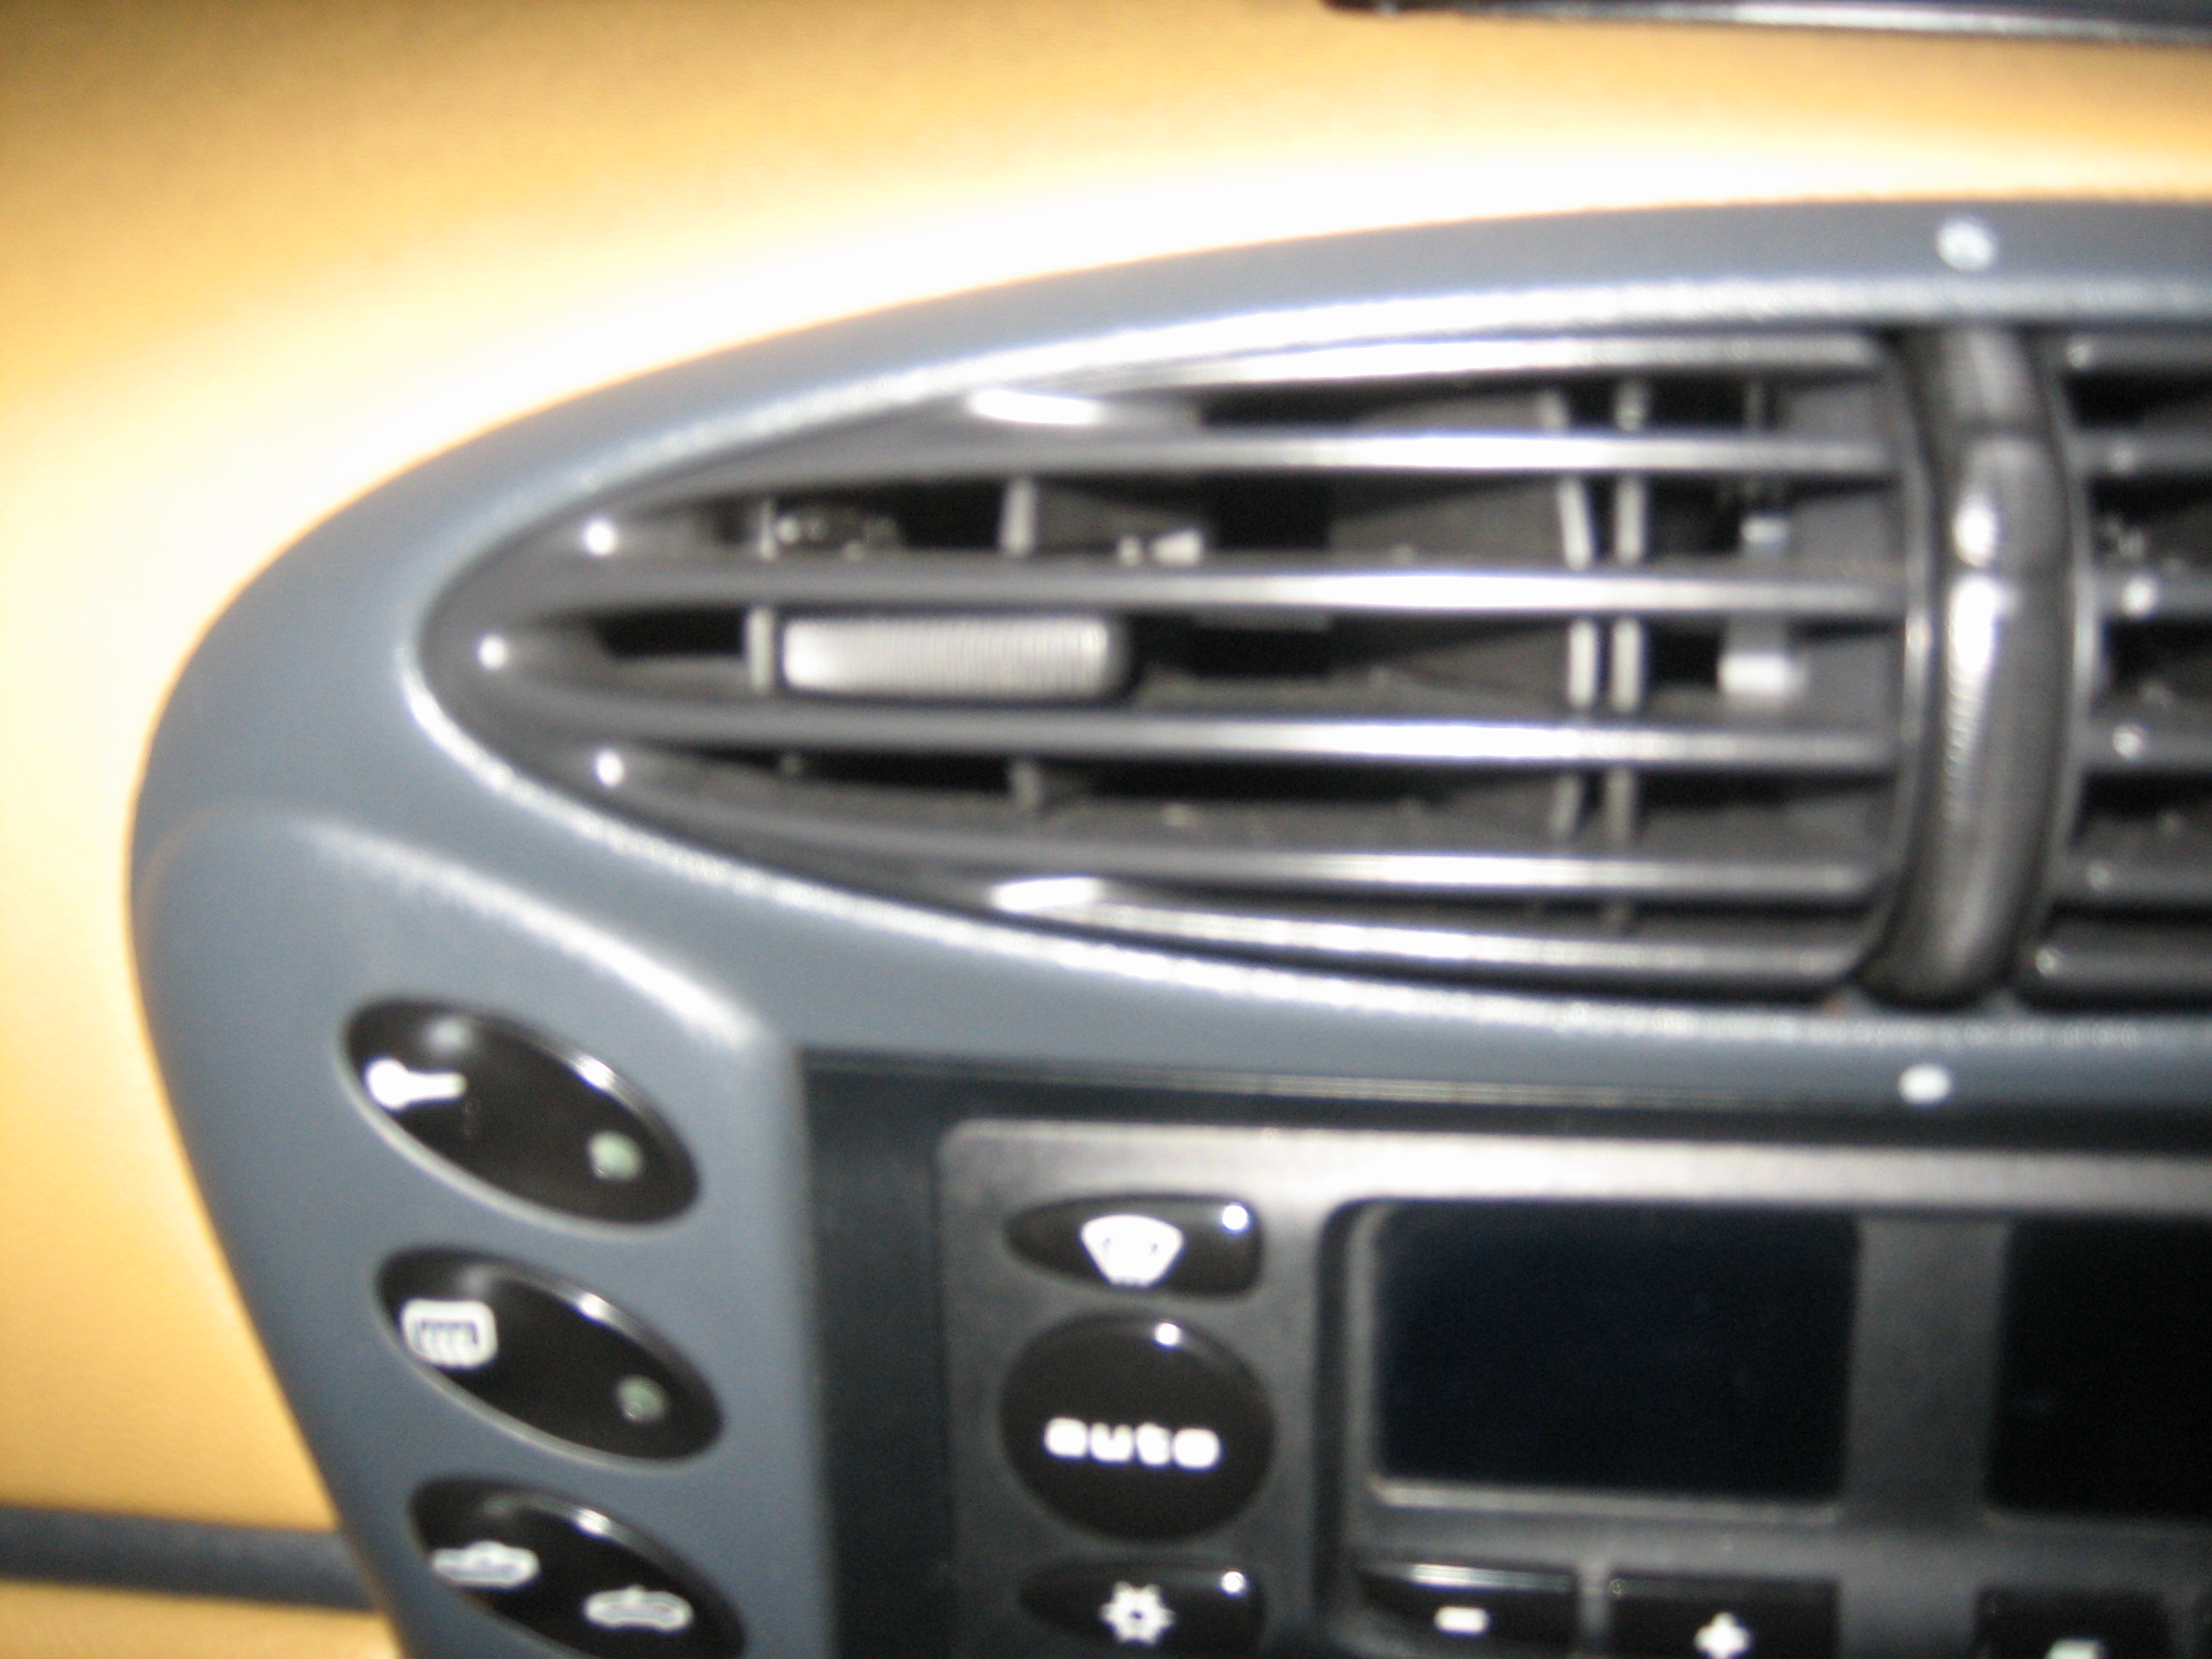
Hi All Hope all is well. I write seeking help an advice in learning how to pull apart the dash. I have searched across these forums, but was not able to find the answer, so seeking some help here. I am looking to have most of my trim pieces repainted, but of course need to learn how to pull apart each section. The sections that I'm looking to learn how to pull apart are: The upper part of centre console, the lower part of the centre console the transmission tunnel cover the 3 strips of plastic that goes below the front passenger airbag, and besides the steering wheel column the two side air vents the inside door handles Finally, I'm looking to pull off the strip that is part of the door handle and extends to where the door pockets are. I'm not sure if I'm explaining myself, so I've attached a photo with the sections of the door that I would like painted. Thanks heaps to all who reply. Oh and I'll be taking heaps of photos of each stage, so please let me know if anybody is interested in photos of each stage. Thanks!
-
New Stereo/Nav, Amp, Speakers, Door Subs
Daryl80 replied to 5thtonbench's topic in 986 Series (Boxster, Boxster S)
Hi 5thtonbench! That is absolutely stunning. I write from Australia, and this post has been circulated amongst many of 986 buddies here downunder. Like I, all are keen do something like this. You've definitely inspired us all. But like us all, can I ask for your help with a few things. Our questions, surround the headunit install, my concern is did you need to butcher anything to fit the double din in? I had thought that there was a separating shelf between the original climate control and radio slots, which meant that you would have had to chop this up to fit a double din in. Is that right? If so complex? Tips on how it can be done? Were there any wiring issues in powering the headunit up with power, amplification, or navigation up? But yes like WilliamsF1, would you be willing to make another. Just mention your price for one more! :) Final thing, the only concern we had, was that given we all drive soft tops, were there any security concerns that you had with exposing this HU. I know we all drive in safe areas, but keen to hear if you had any thoughts on the matter. Thanks again! -
Navigation in an older Boxster
Daryl80 replied to monterino's topic in 986 Series (Boxster, Boxster S)
I too would love to see how it looks. Can you email me some photos at wongdaryl@hotmail.com? Thanks heaps! -
Hi All, I write, hoping it would have been better news. Just bought myself my first Boxster. Its a clean '97 model, that had a full PPI check. Received the full bill of health. Now its been two days where the car has not been driven and the battery is completely dead Interior lights dont work, when I try to start the car, nothing happens, not even the click click click noise of the starter motor. The dash warning lights are all dim, so I'm not able to start my car now! *sigh* Now my only suspicion is with the side mirror demister. I only say that because even when the key switched off and taken out, the demister light was still on. I even tried pulling out the fuse, but the light remained on. Since I have no idea about Porsche's I thought this was normal, but suspicious. But could this be the root cause? The car was sitting off and idle for 2 days like this. Sigh, any comment would be greatly appreciated, as I've been looking forward to owning one for ages, I just wish the car would start! As a side note, does anybody know what Optima battery model would fit a Boxster? Or what battery size I should get. I want to start afresh, once the problem is found. I'm located in Australia if that helps Thanks!