Welcome to RennTech.org Community, Guest
There are many great features available to you once you register at RennTech.org
You are free to view posts here, but you must log in to reply to existing posts, or to start your own new topic. Like most online communities, there are costs involved to maintain a site like this - so we encourage our members to subscribe or donate. All subscriptions and donations go to the costs operating and maintaining this site. We prefer that guests take part in our community and we offer a lot in return to those willing to join our corner of the Porsche world. This site is 99 percent member supported (less than 1 percent comes from advertising) - so please consider an annual subscription or donation to keep this site running.
Here are some of the features available - once you subscribe RennTech.org
- View Classified Ads
- DIY Tutorials
- Porsche TSB Listings (limited)
- VIN Decoder
- Special Offers
- Paint Codes
- Registry
- Videos System
- View Reviews
- and get rid of this welcome message
It takes just a few minutes to register, and it's quality Porsche information at a low cost.
Contributing Members also get these additional benefits:
(you become a Contributing Member by subscribing or donating money to the operation of this site)
- No ads - advertisements are removed
- Access the Contributors Only Forum
- Contributing Members Only Downloads
- Send attachments with PMs
- All image/file storage limits are substantially increased for all Contributing Members
- Option Codes Lookup
- VIN Option Lookups (limited)

Hobbes
-
Posts
129 -
Joined
-
Last visited
-
Days Won
2
Content Type
Profiles
Events
Forums
External Paint Colors
Downloads
Tutorials
Links Directory
Collections
Classifieds
Store
Everything posted by Hobbes
-
Coolant leak Challenge?!?!
Hobbes replied to Hobbes's topic in 996 Series (Carrera, Carrera 4, Carrera 4S, Targa)
Thanks for the advice. I'll Check the area. I may just go ahead and check my local autoparts store and see what thee have in this area and do it myself. I found a DIY here on the website. -
Coolant leak Challenge?!?!
Hobbes replied to Hobbes's topic in 996 Series (Carrera, Carrera 4, Carrera 4S, Targa)
Thanks! I know about old and tired from personal experience. I was at the Porsche dealership yesterday and picked up their coolant. I don't have the vacuum filling system. I'll see if there is DIY on the net. I've never done it. -
Coolant leak Challenge?!?!
Hobbes replied to Hobbes's topic in 996 Series (Carrera, Carrera 4, Carrera 4S, Targa)
Well, I think I found the culprit. looks like a trip to the auto store is all I need. though I'm still curious what might cause the 'blowout' look of the hose. perhaps being old is sufficient enough of an answer?
-
Coolant leak Challenge?!?!
Hobbes replied to Hobbes's topic in 996 Series (Carrera, Carrera 4, Carrera 4S, Targa)
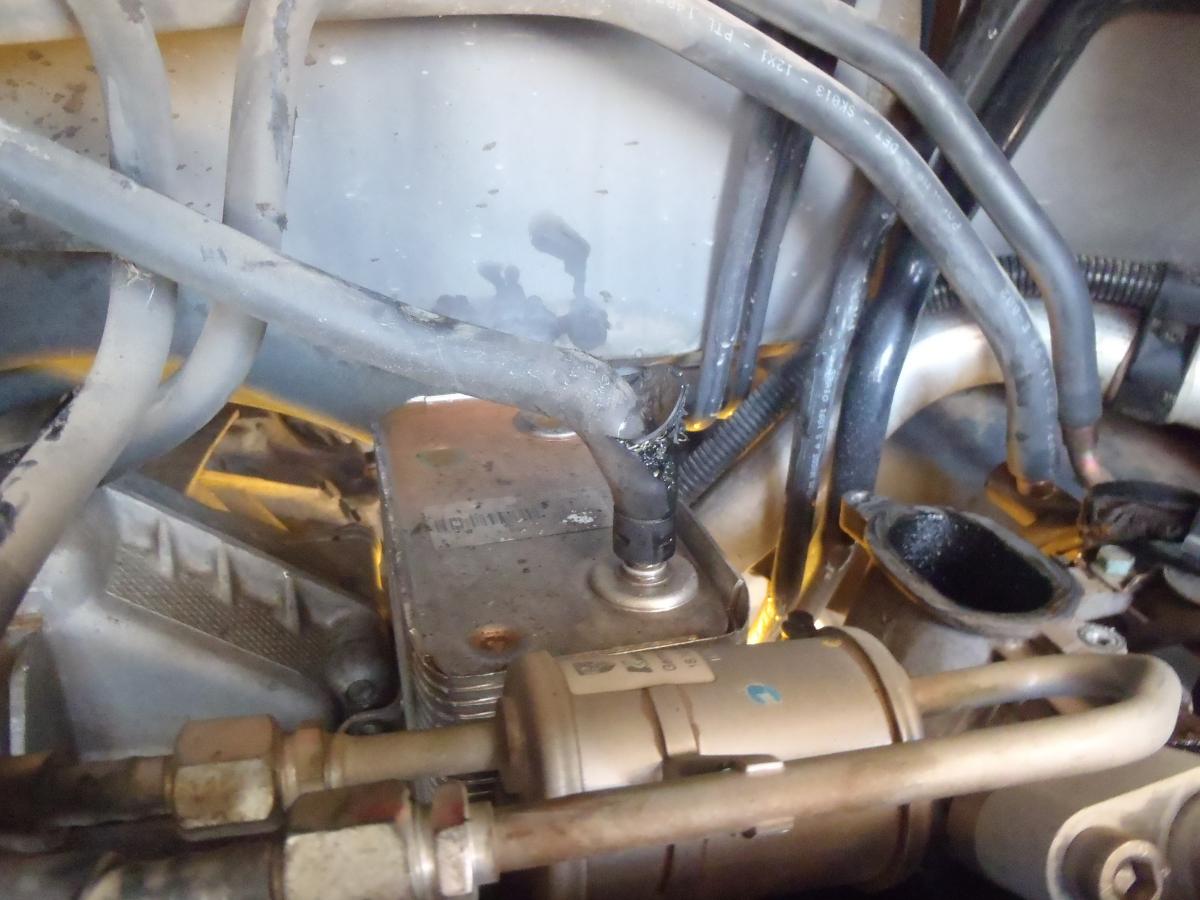
Thanks. I just replaced the water pump and thermostat not too long ago. I just about have the upper intake out. Bolts are out, but now comes a bit of finesse to get it out. By the way, I looked at the oil cooler. Upon inspection, I found a pool of coolant sitting on top of it. -
Coolant leak Challenge?!?!
Hobbes replied to Hobbes's topic in 996 Series (Carrera, Carrera 4, Carrera 4S, Targa)
By chance are there any other common fixes that might be worthy to tackle while replacing the oil cooler? I would hate to have this open and could have done something else in the same area. -
Coolant leak Challenge?!?!
Hobbes replied to Hobbes's topic in 996 Series (Carrera, Carrera 4, Carrera 4S, Targa)
Thanks JPF. I don't have the manual but I'll see if I can find an online version. Otherwise I'll move out smartly and start the right side procedures. Thanks again for your help! May be time for me to write up a DIY tutorial. I cant do much else right now except removing the stuff. Ken -
Coolant leak Challenge?!?!
Hobbes replied to Hobbes's topic in 996 Series (Carrera, Carrera 4, Carrera 4S, Targa)
That is reassuring. I appreciate the quick response. The price isn't that bad and being a DIY, enthusiast mechanic I'll save the $$$ in labor. The 996 has about 120K miles so it is probably due for a new oil cooler - the leak proves it. I am in the process of removing the top half of the engine (removed the airbox so far) I'm guessing this is the easiest approach to getting access to the oil cooler? -
I am looking for some help with regards to a coolant leak. I got a red blinking temperature gauge warning. The 996 overheated. The coolant leak is on the top of the engine near where the transmission and the block bolt together. The leak appears to dominate towards the passenger side of the 996. When I start the 996, coolant streams out from the area as I mentioned. Reference graphic for a better picture. Has anyone experienced this same leak or is familiar with what would cause this leak? Durametric does not give any faults or warnings. Any Ideas? Thanks, Ken
-
Wow! 20 hours labor for a AOS!
Hobbes replied to allenh5's topic in 996 Series (Carrera, Carrera 4, Carrera 4S, Targa)
FYI, I wrote up a DIY to replace the AOS (should be in the DIY section for the 996). http://www.renntech.org/forums/topic/37442-air-oil-separator-replacement-aos/ I am not a mechanic by trade, but I was able to do it fairly easy. If you have the tools (a basic metric tool box) and time, this might be useful if you can to save some money. I didn't have to remove or drop the engine, but I did have to remove the upper manifold in part for easier access and to clean out the residual oil in the upper. Hope this helps. Ken -
p1219, p1577, p1578
Hobbes replied to zone5996's topic in 996 Series (Carrera, Carrera 4, Carrera 4S, Targa)
I received the same delayed acceleration problem and error codes as Zone5996. I ordered P# 996-606-116-00-M14 (Throttle Position Switch) from Pelican Parts; however, when I received the part and where I thought it went in my car are not one in the same. I have two questions. First, for the part I ordered, would this fix the symptoms described above? Secondly, where the heck does this part go? Thanks, Ken -
Thank you. To be honest, I do not know how different this would be for a 2003. If I had to guess, there wouldn't be much difference as far as the main parts removed (e.g., coolant tank, alternator, etc). Getting the coolant tank out is a little tough, but getting it back in took an equal amount of manipulation to get it back in. I had to remove the fuel lines by the coolant tanke and the electrical connector on the bottom of the coolant tank and with a right combination of twists of the tank, I was able to get it out. Regards, Ken
-
Air Oil Separator Replacement (AOS) EDIT: Fixed text boxes to see text better. This is an AOS DIY that walks you through the process of replacing the AOS. This is for a 2000 996 C2 Cab, six speed. I tried to be as thorough as I could in writing the DIY. If there is something left out or lesson learned from your personal experience with the AOS and or this DIY, please let me know so I can incorporate it into the document. Regards, Ken How do you eat an elephant? -- One bite at a time! Air Oil Se Author Hobbes Category Carrera (996) - Common Fixes and Repairs Submitted 03/26/2011 03:49 PM Updated 03/20/2017 06:36 AM
-
Air Oil Separator Replacement (AOS)
Hobbes posted a tutorial in Carrera (996) - Common Fixes and Repairs
EDIT: Fixed text boxes to see text better. This is an AOS DIY that walks you through the process of replacing the AOS. This is for a 2000 996 C2 Cab, six speed. I tried to be as thorough as I could in writing the DIY. If there is something left out or lesson learned from your personal experience with the AOS and or this DIY, please let me know so I can incorporate it into the document. Regards, Ken How do you eat an elephant? -- One bite at a time! Air Oil Separator Replacement.pdf -
Hello, I'm looking for a 'how to' on the removal of the rear driver-side window regulator (#996.543.015.06). These things are not cheap and I want to pull it to see if it is indeed broken or a repairable issue. Thanks, Ken
-
Sirius + iPod + Becker CDR 220
Hobbes replied to Hobbes's topic in DIY Articles - Carrera (996) - Mods
Just an update to this configuration... I know this isn't a secret or new, but I wanted to share my recent findings. The Sirius / Becker radio combo has been working great. I wanted to mention a recent test modification I did with the Becker / Aux cables. I recently purchased the Droid from Verizon. I use the Pandora App for the Droid at work with my 3.5mm headphones. I recalled that one of the inputs from the Aux cable mentioned in the how-to is also a 3.5mm jack. I removed my Sirius and plugged the 3.5 mm into the headphone jack on the Droid and started Pandora..it was music to my ears, literally. I am running Pandora App through my car stereo. Additional bonuses I found. When I make or receive a phone call, Pandora stops...phone rings...I answer the call. The phone conversation comes over my car stereo. Since, the microphone on the Droid works pretty well, I can talk normally without any problems and the other end hears me just fine. End call and Pandora turns back on. Ken -
Abs And Battery Light - Intermittent
Hobbes replied to Hobbes's topic in 996 Series (Carrera, Carrera 4, Carrera 4S, Targa)
Thanks for the help here. I was driving to take the alternator to get checked out and on my way, my instrument panel light up like a christmas tree. I turned around to get pointed towards my home and I lost all power. slowly, the electrical systems started to shut down. The radio, then fan, then my digital speedometer and when I pressed on the accelerator to get to the safe area on the side of the road, I had 0 power. Then the car went into hibernation and would not start. If this still sounds like the voltage regulator is bad, then that would be lesser of the two evils in having to replace the alternator. Thanks for the response to confirm if the problem is still the voltage regulator with the systems described earlier and above. Ken -
Thanks in advance for any assistance... I have a 2000 996, 3.4. ~86K miles. A couple of days ago I was driving. I pressed on the gas and when I did, the climate control fan and radio turned off. I looked at the voltmeter and it spiked to 14+ volts. The instrument cluster showed an ABS and Battery light solid. I immediately slowed down to pull over and within 30 seconds, the A/C fan and radio came back on without a problem. However my ABS and battery light stayed on, then went out. In the past couple of days, the ABS and battery light both come on intermittently then go off. My voltmeter on the dash registers about a 11 volts. I hooked up my durametric and checked for fault codes. Under engine faults, the software indicated Porsche fault code of 107 - supply voltage exceeds limit; accompanied with a fault code of P0563. The durametric indicated a low voltage reading under the ABS system. I read the voltage through durametric and it fluctuated between 10.52 and 11.02 volts. I just put in a brand new battery this past weekend and all connections are tight. Could someone possibly identify the source of the problem(s)? Is it the alternator? Voltage regulator? or are there other things I can do to isolate the problem or is it simply the alternator going bad? I appreciate any help. Ken
-
J. I did this mod with the cans for my 996 C2. I had a pretty good local muffler shop who only charged me the labor, $80. We found some old stainless steel pipes in his "scrap" pile and molded them to the angles needed to fit the 996. The technique we used was to take the 3.4 cans and and put the two side-by-side to get the proper length and angle. I have the measurements and I'll get them to you. We also had to shorten the tail pipe to fit into the rear valence. by the way, the sound is quite nice. Hobbes
-
HID Converstion Kit - DIY
Hobbes replied to Hobbes's topic in 996 Series (Carrera, Carrera 4, Carrera 4S, Targa)
Thanks for the info and kudos. Hopefully they'll last some time before they go out. I'll be sure to keep an eye out, so far they are working out great. Hobbes -
Not sure what these are
Hobbes replied to Hobbes's topic in 996 Series (Carrera, Carrera 4, Carrera 4S, Targa)
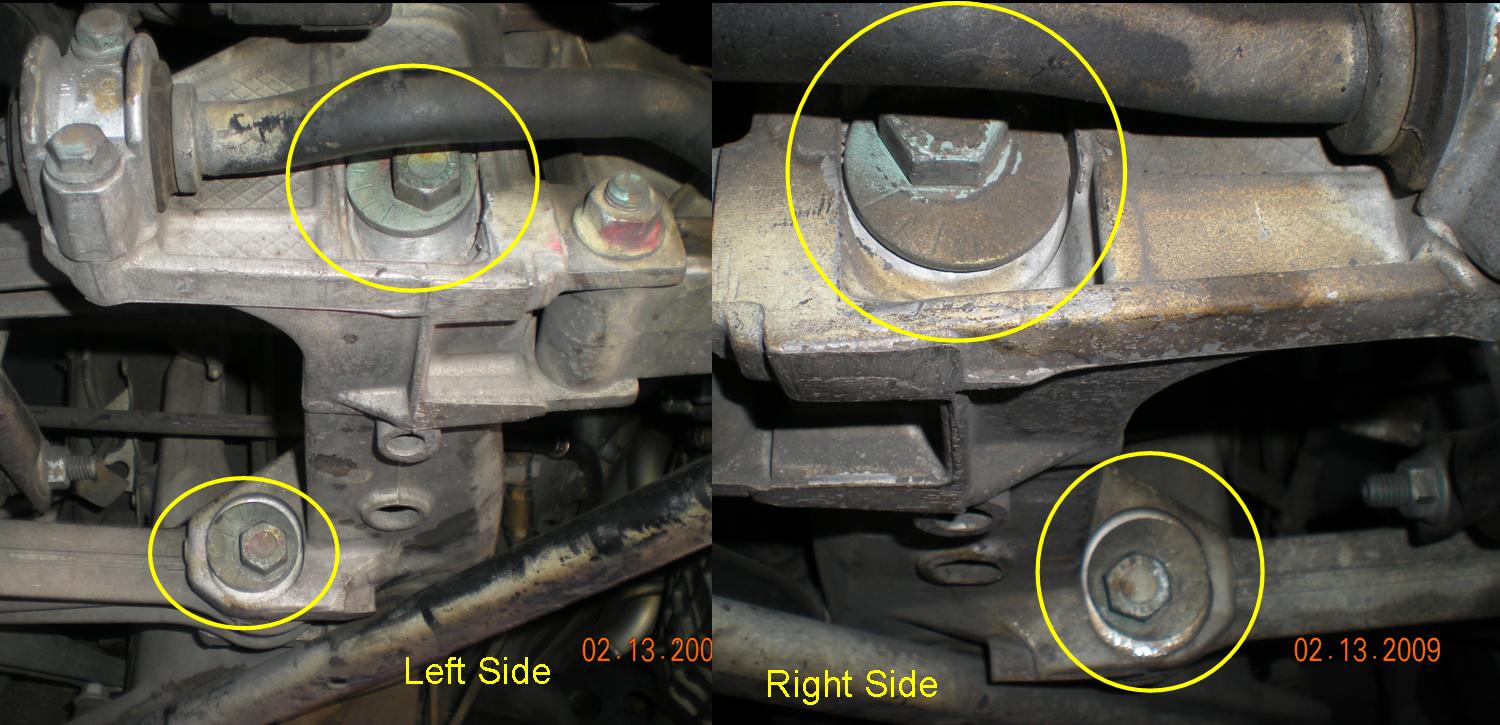
Top bolts adjust rear toe. Bottom bolts adjust rear camber. You should not mess with these unless you have alignment tools. Thanks Loren. I guess these are suppose to move as I corner etc? so is the placement appear to be okay? nothing to worry about? -
Sorry for my ignorance and vagueness in my explanation. When I was under the vehicle, I noticed a couple of things that just didn't seem right. One noticeable thing about them is an obvious movement. Is this a major problem? What is a recommendation to correct the problem. Is it as simple as loosening the bolts and letting the 'washers' fall back down into place? What impact does this problem have on the car. The pictures were taking looking from rear to front. Thanks. Hobbes
-
Amberectomy revisited
Hobbes replied to londoner06's topic in 996 Series (Carrera, Carrera 4, Carrera 4S, Targa)
Alex, You are correct. The angle piece in the picture (amber) is what you want to remove and it is not glued. It's pretty easy to remove. I used a pair of needle nose pliers and a hot scalpel to break apart the plastic. The dremmel with the wand approach should work nicely. As far as the bulbs. I got lucky and found a set of silver bulbs at autozone. You may be able to pick up a set of clear LEDs that light up amber. Ken -
HID Converstion Kit - DIY
Hobbes replied to Hobbes's topic in 996 Series (Carrera, Carrera 4, Carrera 4S, Targa)
Not sure of the model # on the HID kit, but if you an Ebay search on product # 220350626889, they should come right up knock on wood, the link should work: http://cgi.ebay.com/ebaymotors/ws/eBayISAP...em=220350626889 -
HID Converstion Kit - DIY
Hobbes replied to Hobbes's topic in 996 Series (Carrera, Carrera 4, Carrera 4S, Targa)
Thanks, I'll check into the LED bulbs. It looks kind of goofy right now, but I can always turn off the fogs until I get the LEDs. Glad I could help other would-be modders out there. -
What's your favorite mod?
Hobbes replied to Caguy's topic in 996 Series (Carrera, Carrera 4, Carrera 4S, Targa)
Mods are lots of fun and a great way to get to know your driving machine inside and out. I've done a variety of mods. Simple stuff mostly, but adds both life and visual appeal. Not mods, but I replaced the RMS, clutch, brakes/rotors and spark plugs. It's not as hard to do it with the resources available on this site. Completed Mods 1. Sirius/Ipod hook up to the Becker 2 MK II 3.6 Muffler Mod 3. Amberectory - removed the orange internal lens from the front headlights 4. Replaced orange side markers with clear (using amber LED bulbs) 5. Painted brake calipers (Black to yellow) 6. HID conversion kit (H7/6000K) Near Future mods 1. Clear Lens 3rd Brake light (upper & Lower) 2. Cold Air intake K&N 3. Short Shift kit Not soon enough mod 1. Suspension 2. Front and rear bumper, side skirts and tail. 3. Anything else I can dream up. -Ken