Welcome to RennTech.org Community, Guest
There are many great features available to you once you register at RennTech.org
You are free to view posts here, but you must log in to reply to existing posts, or to start your own new topic. Like most online communities, there are costs involved to maintain a site like this - so we encourage our members to subscribe or donate. All subscriptions and donations go to the costs operating and maintaining this site. We prefer that guests take part in our community and we offer a lot in return to those willing to join our corner of the Porsche world. This site is 99 percent member supported (less than 1 percent comes from advertising) - so please consider an annual subscription or donation to keep this site running.
Here are some of the features available - once you subscribe RennTech.org
- View Classified Ads
- DIY Tutorials
- Porsche TSB Listings (limited)
- VIN Decoder
- Special Offers
- Paint Codes
- Registry
- Videos System
- View Reviews
- and get rid of this welcome message
It takes just a few minutes to register, and it's quality Porsche information at a low cost.
Contributing Members also get these additional benefits:
(you become a Contributing Member by subscribing or donating money to the operation of this site)
- No ads - advertisements are removed
- Access the Contributors Only Forum
- Contributing Members Only Downloads
- Send attachments with PMs
- All image/file storage limits are substantially increased for all Contributing Members
- Option Codes Lookup
- VIN Option Lookups (limited)


perryinva
-
Posts
306 -
Joined
-
Last visited
Content Type
Profiles
Events
Forums
External Paint Colors
Downloads
Tutorials
Links Directory
Collections
Classifieds
Store
Everything posted by perryinva
-
So can we assume that this eliminated the clunk?
-
How to lower engine, 996?
perryinva replied to venturawildes's topic in 996 Series (Carrera, Carrera 4, Carrera 4S, Targa)
They are liquid filled and designed for the weight and stress of a moving/torqueing motor/tranny combination. The weight of the car itself is is born by the suspension. Do not assume that because it looks like it hangs from the mount that the bolt is "pulling down". I'd bet dollars to donuts that the mount is designed such that the bolt still compresses the fluid. When you jack up the engine, you are now bottoming out/and or stretching the mount with more than half the weight of the car. A cut away of the mount would shed a ton of light on this. I've jacked it that way (once) but it is clearly Porsche policy to NOT do that. I bought this (for $1275 in a group buy) so I never have to screw with jacks again on any of my cars again (I hope). www.ezcarlift.com -
996 suspension
perryinva replied to pchassis's topic in 996 Series (Carrera, Carrera 4, Carrera 4S, Targa)
No problem, you've got it exactly right now...you understand it now more than 95% of the others!! I'll send you the pdf for the PSS9 and PSS10s, they are the same except the 10s have a much better diagram showing exactly what parts you can/have to re-use. (and the firmness adjustment knobs are different and backwards from each other...follow the PSS9 knob instructions). I'm putting together a pictorial instruction for the PSS9 installations, but it will be a few weeks beofre I really have the time to finish it up. -
996 suspension
perryinva replied to pchassis's topic in 996 Series (Carrera, Carrera 4, Carrera 4S, Targa)
Send me your email address. I will send you a pdf of the PSS9 instructions if you don't have them. They are pretty clear as to where you can adjust the spring perches for the strut springs. If you have the diagram that shows the parts breakdown for the front and rear struts, it shows where on the strut you measure (top of each spring perch to either center of bracket (F) or mounting hole ®). You must keep the perches in the specified range..it has NOTHING to do with the height of the car on the above charts. You car will end up where it ends up...that was the point of my post. SO you can adjust them to either the top, middle or bottom of the Bilstein designed range..I recommend the middle, and then install them. Or you can lower the perches all the way down to make installation easier, then adjust them back up to where they belong. You CANNOT "adjust your car 25mm lower" than it was, unless you car was(is) at the normal stock heights, ie 158mm front and 163mm rear for a C2 with 18" wheels. Then, because Bilstein has designed the struts to drop your car about 25mm, you will end up there. My car, with stock setup, is lower both F&R on stock struts, so my PSS9s, do not lower it 25mm. In GENERAL, the car will (can) be from 15 mm lower (if your car was at the bottom of the accepatable range from Porsche on OE springs, or around 26" from fender lip to ground) to as much as 45mm lower (if you were at the top of the acceptable range, or a fender lip around 27"), but you CAN"T adjust them to anywhere within that range, you can only very minorly (is that a word?) adjust them about 5mm within the range that they end up in. The fronts have +- 10mm of adjustment and the rears have +- 2.5mm, most of it primarily for corner balancing. Now you CAN use the illustrated measuring poins to rough in the corner balance of the struts, get both L&R sides even, and then get the fronts and rears proportional to each other, using the X73 or X74 numbers as a basis. Does this clarify it for you? -
concerns over tire choice
perryinva replied to vrex's topic in 996 Series (Carrera, Carrera 4, Carrera 4S, Targa)
Larger wheel diameters always put more stress on rotors, though I honestly don't think they can't handle the difference. The wheel diameter is the same concept as a longer breaker bar on a socket, or gearing. A large wheel going across the ground at 65mph when the brake is applied exerts more torque to the brake than a smaller wheel. It's the same reason that you will be geared higher with a higher diameter and run lower RPMS, than with a smaller diameter. Notice I'm saying diameter not 18 or 19" wheels...totally different. If the poster wants to put 295/35 tires on 18" rims, instead of 285/30s, it will make the car look more 4WD, raise the center of gravity, and may contact the wheel wells on bad bumps. But he will get better mileage and slower 0-60s, and be able to drive thru snow better. How much of each I can't say, but it's not what it was designed for, so make the change, take the risk. I'd think they'd suck on the track. I honestly have no idea if they fit, as that is very manufacturer dependent, but 1/2" all around doesn't sound too much to me (that's almost the same as normal tire wear, ie a worn 295/35 will be close to a brand new 285/30 in diameter), and they will not trigger ABS, or 4WD limp mode. -
996 suspension
perryinva replied to pchassis's topic in 996 Series (Carrera, Carrera 4, Carrera 4S, Targa)
Since this got resurrrected, I'll just point out that these readings are with new tires at recommended inflation. Worn tires alone will vary this up to (the following was a brain fart, and is totally wrong, and I apologize for that - I KNOW tire tread is 7/32" not 7/10", so this SHOULD read 0.22", or 5.5mm NOT, 18mm LESS (7/10s of an inch), plus all tires from different makers are NOT the same diameter, even for the same size. This is just one minor spec of the "N" rated vs non-"N" rated tire specs. In addition, it is a grave misnomer to conclude that PSS9's are the same type height "adjustable" as true adjustables like JICs or Motons. This is not true at all. There is a strict allowable range set by Bilstein, if you want the strut to perform as designed. Many have called the PSS9s junk because they were trying to force the strut to perform outside it's recommended range, simply because it is possible to adjust the spring to that location. They are a great improvement over stock, within the limits prescribed by Bilstein, which is one of the reasons they are so much less than Moton or JIC. SO the charts above are of very limited FYI use when installing PSS9s...you CAN"T just choose the height you want to ride at, you can only choose "a little higher in the Bilsein range or a little lower". The installation instructions are crystal clear on this. There is only a 5mm range of adjustment for the rears, you start about 30mm lower than stock and can only go down to about 35mm, in the front. The start point is car dependent. Remember Porsches spec for the springs is + or - 10mm!!. If your car runs naturally higher due to spring tolerance, then you may find it 35 or 40mm lower to start. If your car runs lower, then it will lower less, as you are replacing the inconsistent stock springs with the consistent Bilstein ones. The 5mm is primarily for corner balancing, not for ride height. While the fronts start about 30mm lower and allow adjustment of 20mm lower from there, the rear hasn't that range, and sort of deyermines wher he fronts will end up. According to the PSS9 "expert" at Bilstein I spoke with, this is to allow adjustment for different front spoiler heights, rake, and corner balancing. The fronts require more height adjustment to "move" the same weight frontward or rearward, than the rears, due to the heavy rear bias on the 911. They are designed to be installed near the center of each range. I had called them because I thought it odd that the fronts had 20mm adjustment vs the 5mm in the rear. The rear height is more critical due to the rear engine RWD design of the 911, and the PSS9 is designed to be in it's best range when installed accordingly. They make 1.5mm thick spring isolator "kits" (read big fat blue plastic washers) that allow you to add a little height if need be, and fix the spring windup clunk that sometimes occurs on the front struts in slow turns.My $0.02. -
Agree, except for those silver stripes in the headlight assemblies. If not for those, the front end is just such a smooth integration of aerodynamics and original 911, it's just excellent. I always thought the MKI headlights just looked too big, but liked the lines (after de-pumpkined). The MkIIs are still too big, just not as much, and those silver stripes just emphasize the diff.
-
concerns over tire choice
perryinva replied to vrex's topic in 996 Series (Carrera, Carrera 4, Carrera 4S, Targa)
From other MBs. whre the merit sof the X51 enhanced oil pan & oiling system has been discussed, oil starvation from high G's is a myth on the 996s, carried over from the Turbo 993s, and would require R compound slicks to achieve. -
Porsche Lambo doors style
perryinva replied to jose's topic in 996 Series (Carrera, Carrera 4, Carrera 4S, Targa)
Have you eve opened and closed a Lambo style door kit? It gets REAL old, REAL fast. They are a PITA to live with, based on the two people I know that put them on (not 996s, tho), and never seem to close right. That said, I still think they look cool, but if I just had money to burn for bling, I MIGHT do it if I had a cab..never a coupe. -
rear bumperette
perryinva replied to baytran's topic in 996 Series (Carrera, Carrera 4, Carrera 4S, Targa)
On my '02 C2 they are as Loren states, just popped in and held by tabs. They cannot be tightened by any screw. If you removed the bumper cover, which allows easy removal of the bumperette cover without breaking any tabs, then a piece of foam over the under bumperette cover bumper reinforcement would snug it up, tho. At $100 each, unpainted, be careful with them, prying off is a sure way to breaking it. -
Go to www.porschedealers.com and put in your zip to locate your dealer. The ones closest to you will comeup with a picture for each dealership. Directly under each pic is a hot link text to a 20% coupon. I just checked, and mine is still available.
-
Use the 20% off online coupon from your dealership, as the shipping on oversized parts is pretty steep, other wise Sunsets pricesare best..
-
Nice, that's for the inners. The outers are only $52, so $114 a side, or $228 tota plus S&H. They state they are genuine Porsche, but that their S&H is higher than most as that is where all their profit is. Suncoast had quoted $250 the set in another post, so they are in-line. I'm getting a quote from Sunset, too.
-
Silver Hood Crest
perryinva replied to JamesD's topic in 996 Series (Carrera, Carrera 4, Carrera 4S, Targa)
No flames, but I find it interesting that this subject pops up regularly on all the Porsche MBs, where people are willing to pay $125+ for a cast metal color change of the emblem, yet exclaim how overpriced a shift knob & boot are at $300, something stitched from leather with a hand assembled leather and metal knob that is used everytime you shift (a manual) and you see inside the car.....just odd to me..FWIW, I like the silver crests as well, especially on black, silver, grey bodied cars. -
The airbag cover houses the crest. It was available in leather or vinyl. All the leather ones have colored crests. Some of the vinyl ones do. also, though I have no idea why. A replacement airbag cover, in vinyl, has the embossed crest.
-
Sounds like Ben replaced the same 4 TREs, (2 inner, 2 outer) as 2 parts for $335 in parts vs 4 parts for what Joel is saying for $250...Either one of you have the part numbers to verify we're talking the same thing..I have Bens problem to the tee, we posted this before, and I've GOT to do this so I can just plain enjoy the car this summer!!!
-
Ben, did you mean above that your symptoms OF the noise WERE "most audible after the car's been driven and warmed up at parking lot maneuver speeds" and that changing out the tie rod ends greatly reduced it, or that those are the sypmtoms of the steering column noise you have left. I've got the same symptoms now, and will change out the tie rod ends if that is the most likely solution. Thanks!
-
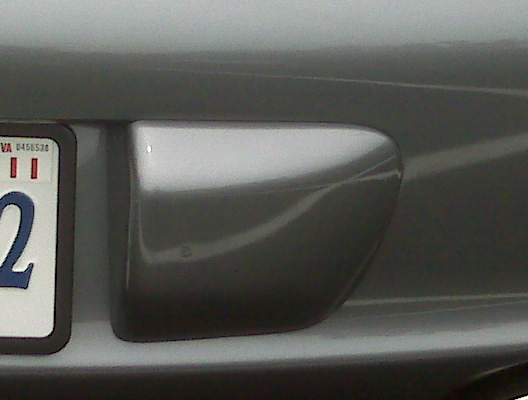
Painted bumperettes
perryinva replied to londoner06's topic in 996 Series (Carrera, Carrera 4, Carrera 4S, Targa)
As you can see, it's not horrible and it didn't crack, but for the extra $20 (while they were doing my front bumper), I correctly concluded it was a few bucks well spent. If I didn't line up the dent on the parking lot white line reflection, you wouldn't be able to see it in the pic & it is barely noticeable as the color is consistent, thanks to the film. I still want to get it replaced, tho. -
Painted bumperettes
perryinva replied to londoner06's topic in 996 Series (Carrera, Carrera 4, Carrera 4S, Targa)
They flex in pretty far before actually hitting the bumper portion underneath. I had mine covered in 3M film yesterday, and, of course got hit today while stopped at a stop light by a girl in her Toyota on her cell phone. She was looking straight ahead (but obviously not seeing) and had to be aware of the whole thing as it happened, and STILL hit me, just enough to lurch the car. One of the bolts holding her front plate in place hit the right hand bumperette square. The film did a great job of protecting the paint, and didn't tear, but the plastic cover is still dented. She asked what I thought it would cost to fix, I said $150, and she whipped out some cash and went on her way. I don't know what I was thinking, as ANYTHING painted on th ePorsche is going to be way more than that. I sent an email to Eric at Bumperplugs to see what he can do. Here's a pic of it from my cell phone.
-
Self dimming mirrors
perryinva replied to cmgleason's topic in 996 Series (Carrera, Carrera 4, Carrera 4S, Targa)
Wow....I'm dumb founded. I've always known, and have explained to many, how a manual dimming mirror works. And NEVER has it EVER occured to me to take an unused memory setting and make it a "night" setting to do the same thing for the outside mirrors. You really CAN teach an old dog a new trick. Too cool, I can't wait to try this out!! Now I HAVE to get an autodim inside mirror for the 996! -
3rd Radiator for Street Use?
perryinva replied to BruceP's topic in 996 Series (Carrera, Carrera 4, Carrera 4S, Targa)
I'd like to see pics of your install when done. For those that have done the 3rd rad, do they catch a lot of crud, being so low and exposed there? -
What was the cost, at what dealer. if you do not mind?
-
Thank you swede-man, doug, kgoertz, and richard!! Swede-man, obviously you replaced the parts yourself. If so, how would you rate the difficulty? Is it the same part number for both sides? I will have a lift available. Since I will be installing PSS9s, and will need an alignment anyway, this would be the perfect time to replace the part!! I'll also check my lower ball joint.
-
Any chance of an illustration or pic of which inner tie rod ends you mean? Or do you have the part numbers you installed? That would be enough! Thanks!
-
Engine Temp
perryinva replied to lixmas's topic in 996 Series (Carrera, Carrera 4, Carrera 4S, Targa)
Clean the rads, but you HAVE to take the bumper cover off to do it right. Blowing them out or vacuuming through the inlet is only maybe 50% efficient. Aslo check for corrosion if a year round driver in area that uses salt. Funny, but on the 3 996's (all 2002s) I've looked at, the fans start immediately when the AC button is pressed, regardless of temp.