Welcome to RennTech.org Community, Guest
There are many great features available to you once you register at RennTech.org
You are free to view posts here, but you must log in to reply to existing posts, or to start your own new topic. Like most online communities, there are costs involved to maintain a site like this - so we encourage our members to subscribe or donate. All subscriptions and donations go to the costs operating and maintaining this site. We prefer that guests take part in our community and we offer a lot in return to those willing to join our corner of the Porsche world. This site is 99 percent member supported (less than 1 percent comes from advertising) - so please consider an annual subscription or donation to keep this site running.
Here are some of the features available - once you subscribe RennTech.org
- View Classified Ads
- DIY Tutorials
- Porsche TSB Listings (limited)
- VIN Decoder
- Special Offers
- Paint Codes
- Registry
- Videos System
- View Reviews
- and get rid of this welcome message
It takes just a few minutes to register, and it's quality Porsche information at a low cost.
Contributing Members also get these additional benefits:
(you become a Contributing Member by subscribing or donating money to the operation of this site)
- No ads - advertisements are removed
- Access the Contributors Only Forum
- Contributing Members Only Downloads
- Send attachments with PMs
- All image/file storage limits are substantially increased for all Contributing Members
- Option Codes Lookup
- VIN Option Lookups (limited)


JuncoJones
-
Posts
49 -
Joined
-
Last visited
Recent Profile Visitors


JuncoJones's Achievements
-
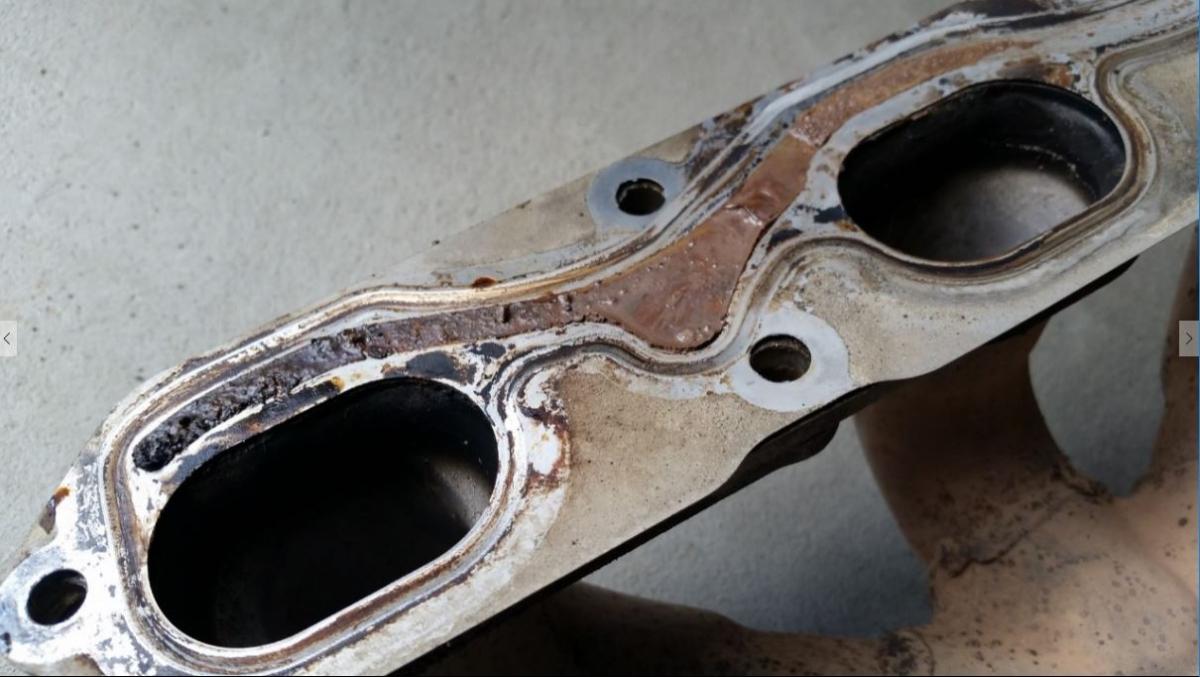
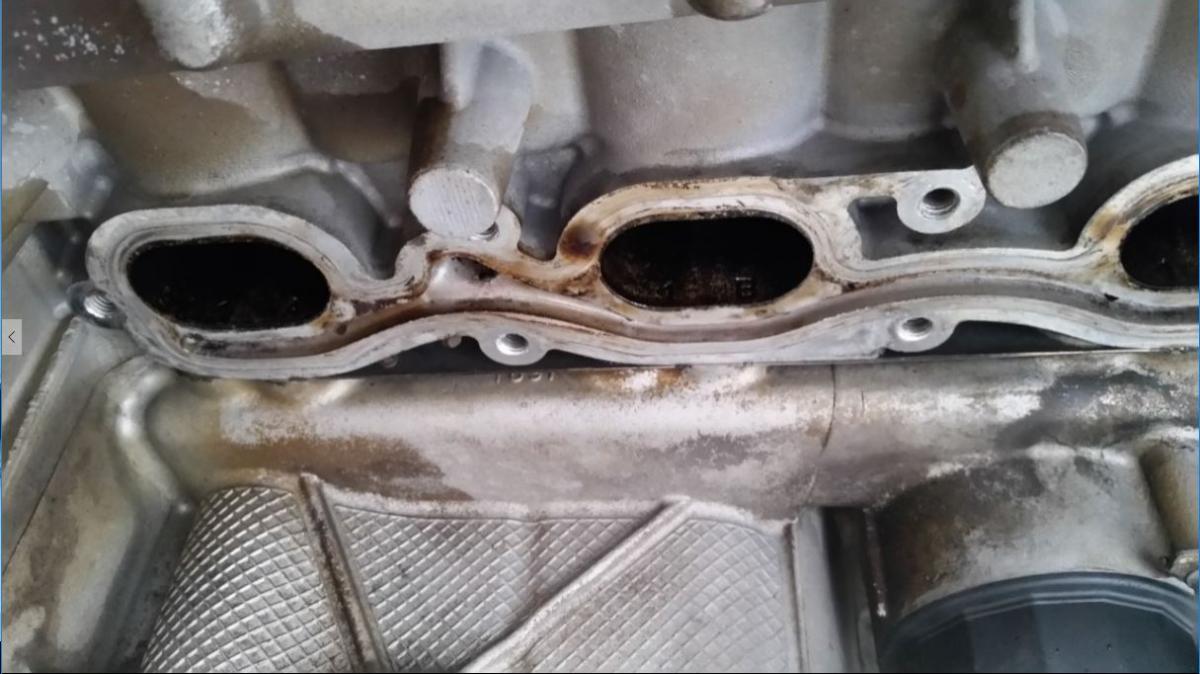
 Cameron, When both the pump is ON and the solenoid is open, air from the engine bay is pumped directly into the catalytic converters. In the picture of the exhaust, you can see the bottom part of the pass-thru hole between both cylinder ports.
 -
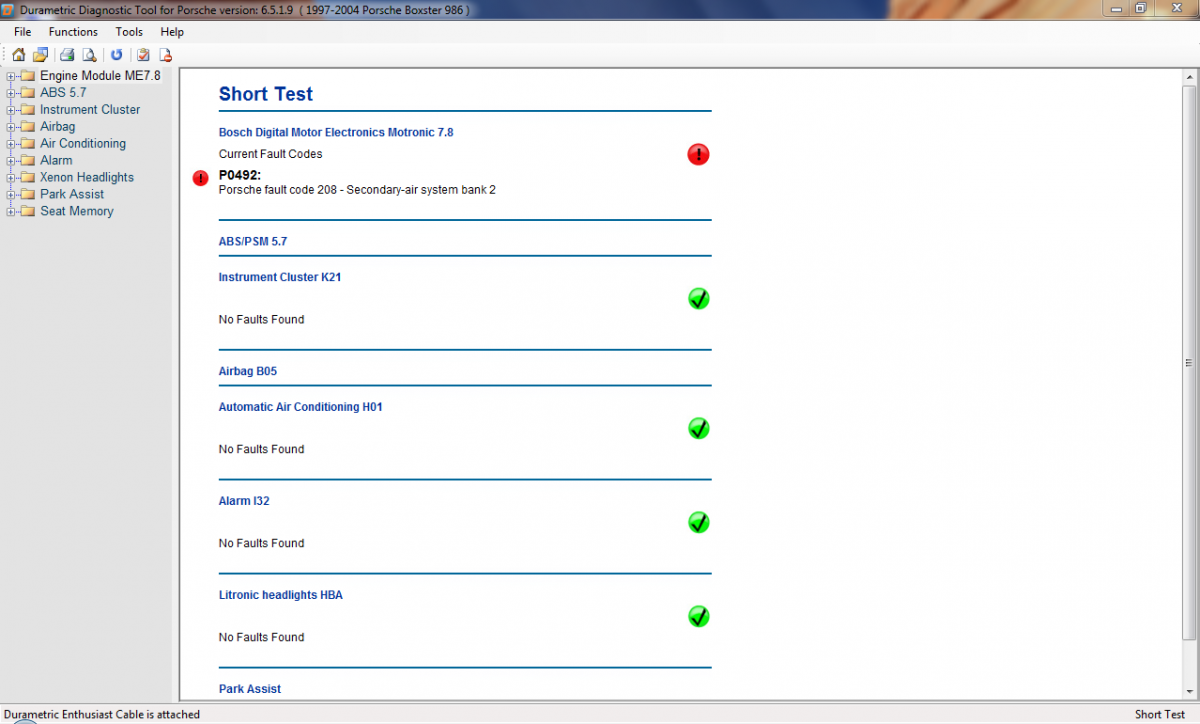
Another P0492 issue
JuncoJones replied to Cameron Tam's topic in 996 Series (Carrera, Carrera 4, Carrera 4S, Targa)
The SAI holes go pass-thru accross the block (top to bottom). I've pressured-washed the entire area, which ended up working pretty well (a rather unorthodox approach, but I felt comfortable about it). You need to remove both intake and exhaust manifolds, spark plugs, disconnect battery, etc., etc. etc. Any excess water needs to be very carefully siphoned from all cylinders by using a vacuum pump (such as a brake bleeder). here's the link: Having the area cleaned up is a project, what also needs to be understood is the reason why those ports are getting clogged. In my case, it was oil-related. Check the status of your Air-Oil separator (AOS), as a faulty one will feed oil back into the combustion. Also sticky lifter issues can allow for more oil into the combustion chambers. And excess oil will eventually re-clog your SAI pass-thru holes and the CEL will be triggered on, never fun. -
2003 Boxster S with random misfires in cylinder-1
JuncoJones replied to JuncoJones's topic in 986 Series (Boxster, Boxster S)
Found what the problem was...an aged AOS. With the replacement part, works like a brand new car, same as before... Jones -
2003 Boxster S with random misfires in cylinder-1
JuncoJones replied to JuncoJones's topic in 986 Series (Boxster, Boxster S)
Thanks for your reply, JFP. I've already ordered a cooling system pressure tester, and will post the results once I get that done. Also very interesting your comment about the head gaskets...I'll certainly keep that in mind. Jones -
Hi there folks, I’m having some random misfires in my ’03 Boxster. I’ve disassembled the intake manifold to get a better understanding of the problem, and as per the picture below, there is clearly something going on with cylinder-1. a week ago, CEL came on for random misfires in cylinder-1 (P0301) Engine runs well, has high millage (320km) and no noticeable degradation in performance Checked the coolant, and was below the minimum mark (which was flushed a couple of months ago) On the exhaust side, there are dripping marks, probably coolant leaking through the exhaust manifold gasket (!) All this makes me think that it’s leaking coolant through the head gasket into cylinder-1. I already know this is not a four-hour repair to be completed during a weekend, and that one way or another, the engine will have to come down for surgery. . so I'll definitively appreciate any inputs! Thanks, Jones.

-
Your list looks good to me, SteelStroke. I only replace the brake pad sensor cables if they were ‘chewed out’ by the rotors. Otherwise I’ll keep the new ones as spare parts, and clean and reuse the old ones. You also have anti-vibration shims, which fit tight inside of the brake pistons, and sometimes are hard to come out, particularly with all the road salt if the car is driven during the winter time. The shims are different for the front and rear calipers. Lastly, the small screws that hold the rotors in place, sometimes they also need to be replaced.
-
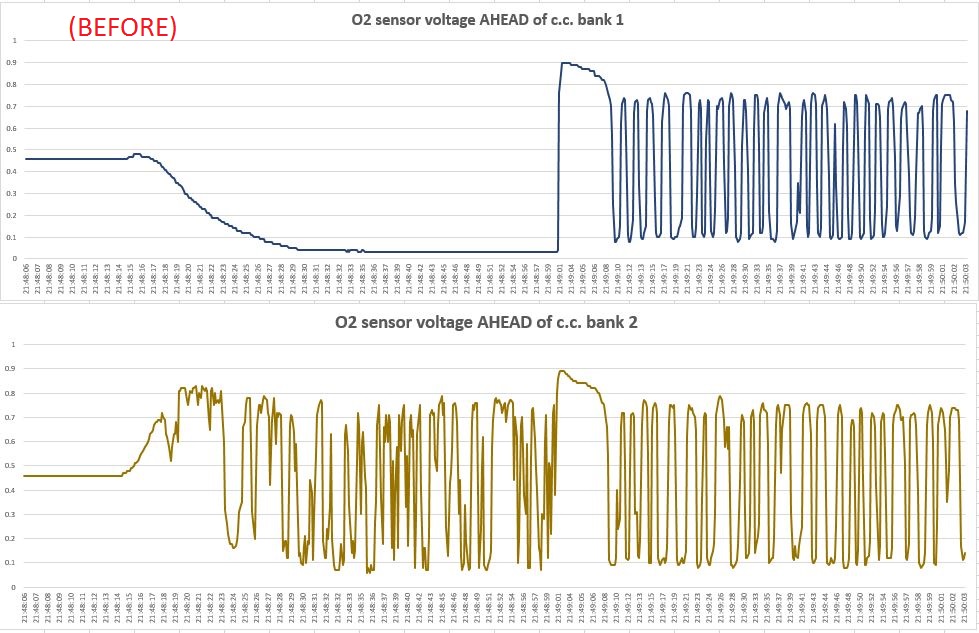
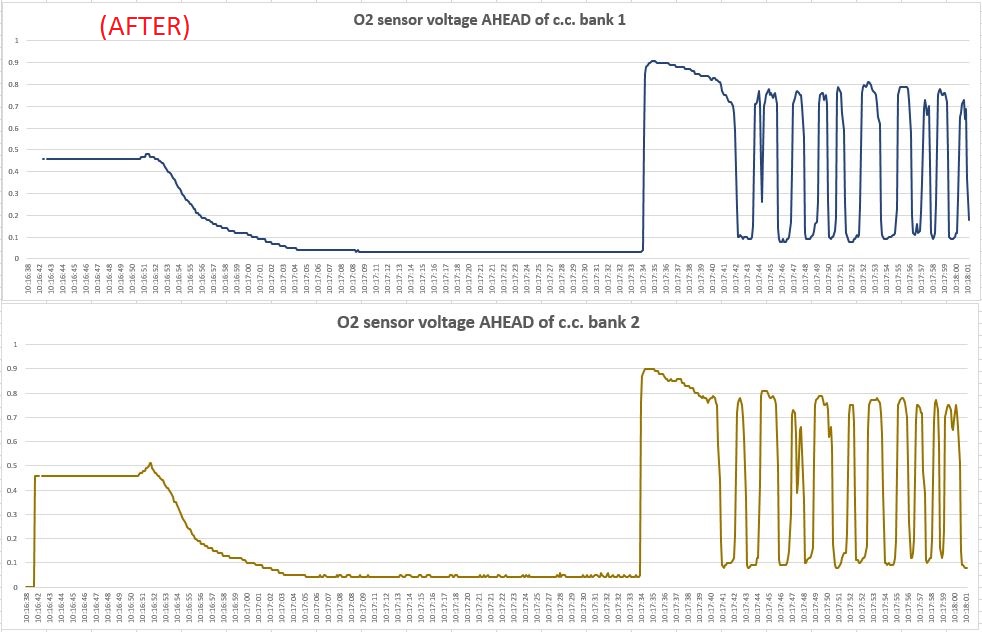
All flags are in Ready state... very cool! and here's the BEFORE and AFTER graphs of the 02 sensors, also posted in the DIY guide. Cheers, Jones.
-
Also BEFORE and AFTER graphs with the 02 sensors data analysis. Cheers, Jones
-
Hi everyone, I've posted a quick tutorial on the P0492 error code issue. Here's the link. Cheers, Jones
-
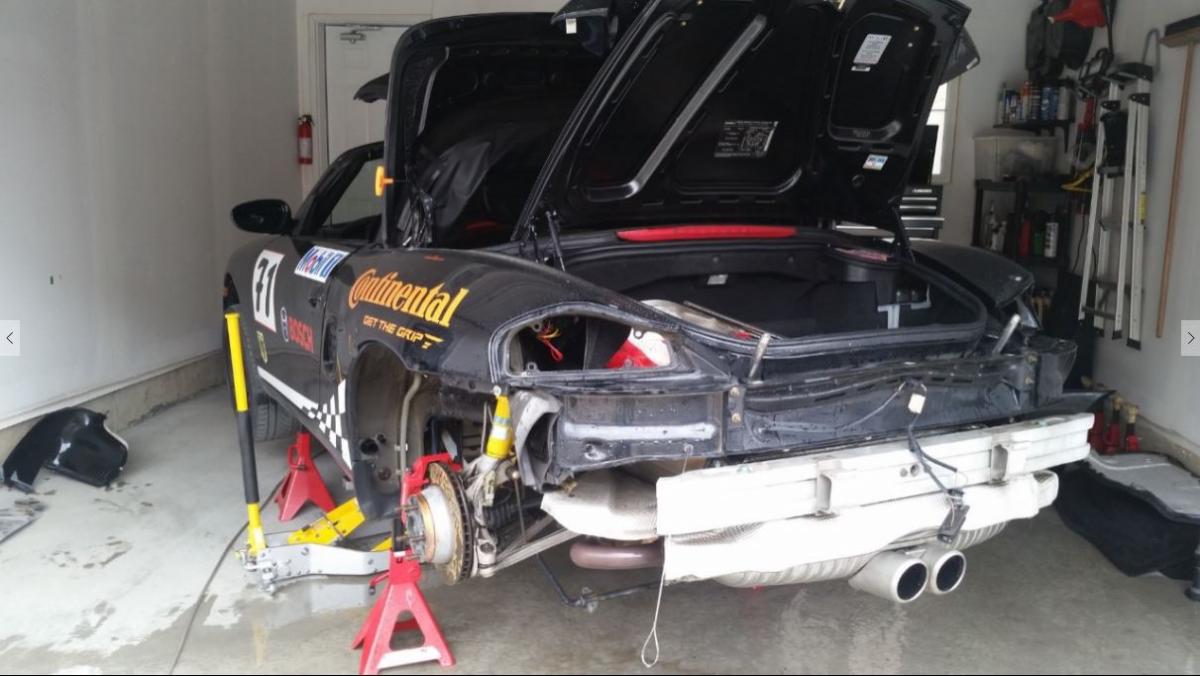
Here’s a quick tutorial on how to fix a P0492 error code on a Boxster 986 / 987 / Carrera 996 / 997. Error: P0492 – Porsche fault code 208 – Secondary-air system bank 2 Symptoms: no visible symptoms, except for the CEL (check-engine light) being triggered, particularly during cold engine startups with the SAI (Secondary Air Injection) pump running for the first 90 seconds. Diagnostics: when troubleshooting the P0492 error code, I initially focused my attention on all SAI components located on top of the engine, such as the SAI pump, hoses, solenoids, vacuum hoses and reservoir, etc. I found it easier to remove all vacuum components and work on a workbench and running individual tests, with the invaluable help of a handheld vacuum tool. I did find the vacuum reservoir had a leak, and one vacuum line was damaged (mostly brittle due to heat / time). Also tested both solenoids with a 12-V DC power supply and then replaced the damaged components with new ones. The CEL was off for a few days, but it came back on, throwing the same error code. With great help of Ahsai on troubleshooting the O2 sensors readings during a cold startup cycle (thread here), it looked like the problem was an obstruction in one of the paths used by the SAI pump to blow cold air form the engine compartments into the catalytic converters. And because I didn’t wanted to work on my car during the cold season, I parked the project for the winter and lived with the CEL on for many months, certainly one of my joys in life ;) Solution: When the first nice spring days finally arrived, I used the opportunity to do this and other maintenance jobs in my car, like deep cleaning after the winter season (It’s my all-year-round daily driver), two axle rebuild job, etc. With regards to the exhaust manifolds removal procedure, where a broken bolt can quickly become a nightmare, I had already done some prep-work on all manifold bolts: driving the car until reaching running temperature, quickly jacking-up the car and loosen all exhaust bolts while still hot, thoroughly cleaned, anti-seize and remount. This method, while not everyone’s cup of tea, ended up being quite effective in my case. And when I finally removed both exhaust manifolds, where I was originally expecting lots of carbon buildups, I instead found a soft clay-like product (oil?), which was quite easy to remove with a finger nail (through the gloves, of course ;). I thoroughly pressure-washed all components, carefully avoiding to send the water jet directly into the exhaust valves / catalytic converters and the use of any degreasers. A 2,000 psi electric pressure-washer with a 10 degree spread nozzle can be extremely effective, particularly at short distances. Attached is a picture of the engine block after the pressure-washing job. Finally, a grey Scotch-brite, well lubricated in oil, for mirror-like surface finishes (well, in most cases). It honestly looked amazing… too bad I forgot to take a picture… my apologies. Finishing-up with another thorough cleanup of all exhaust bolts, a new thin layer of anti-seize and a complete car reassembly, and my P0492 error code is finally gone, hopefully for good! Cheers, Jones
-
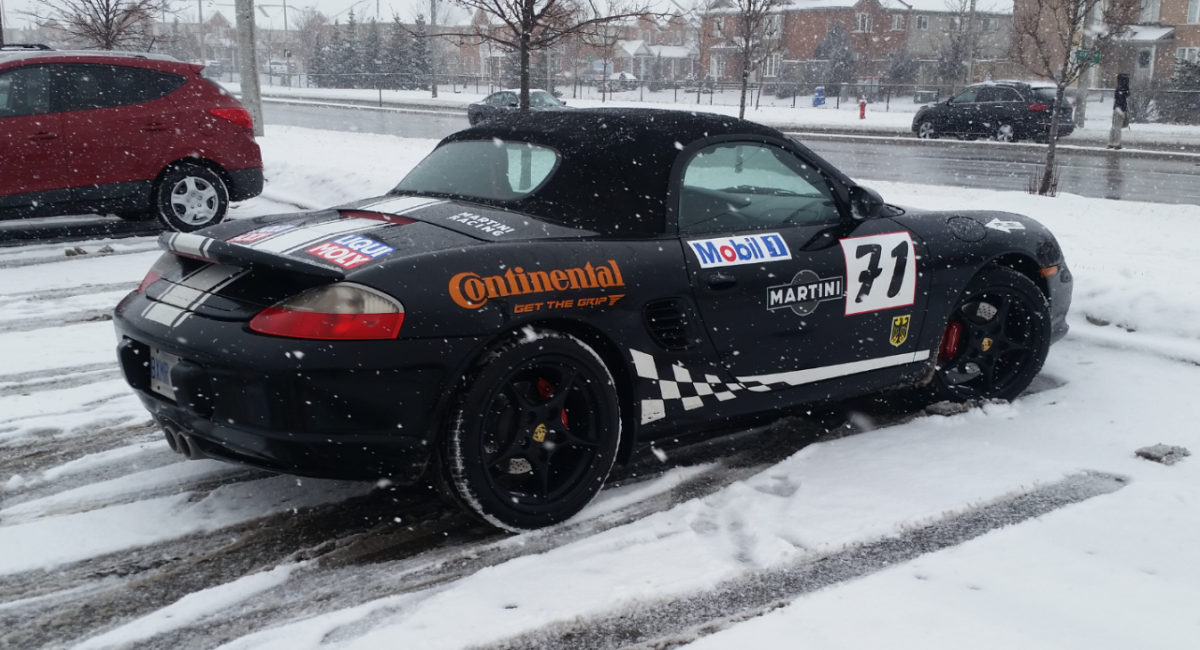
who drives their Boxster in the winter?
JuncoJones replied to jimmythemufflers's topic in 986 Series (Boxster, Boxster S)
Cool picture ;) ...and that's exactly the way the car is supposed to be driven! I've been using Liqui Moly 5W40 for Ever...and with over 300k, my car still runs like new. Here in Toronto it sometimes gets -30 Celsius in winter, and I had no problem at all with that viscosity. Jones -
who drives their Boxster in the winter?
JuncoJones replied to jimmythemufflers's topic in 986 Series (Boxster, Boxster S)
I drive mine all-year around, every single day, and as much as I can. I use Continental DWS tires, which I think are great. To avoid rust, whenever possible pressure-wash the car, particularly underneath the body frame.
-
Bjorn, Posting a video always helps, it provides us with more information. So if you can, go ahead. Now In my typical style, I’ll throw some unconventional techniques that I would try (and already have, of course) in my own car: Liqui Moly Engine flush – some people don’t like this product, I find it extremely efficient. It will thoroughly clean your engine from inside. These engines are highly dependent on effective oil pressure, and can potentially help eliminate oil-related issues, like sticky lifters and clogged solenoids. This will clean any gunk and build-ups, but of course, it won’t magically fix damaged or worn-out components. Add it to the oil, idle the car for 10 minutes and replace oil and filter. Liqui Moly Injector cleaner – this is a fantastic product. Add it to your fuel with a full tank of gas. The first time I used it on both my cars, I remember I felt a huge improvement after the first 10 minutes of driving. Once the injectors are clean, you won’t feel any noticeable difference. Now, these won't necessary fix your P1090 code, but like I mentioned above, can help rule out other possible causes.
-
Caliper rebuild
JuncoJones replied to no1joey's topic in 997-1 Series (Carrera, Carrera 4, Carrera 2S, Carrera 4S)
I don't think that scratch will have any impact on your project, no1joey. Your comment above is right, as both the seal AND the piston are the areas that need to be perfectly flat. There should be no fluid pressure built on that part of the caliper. I also suggest to make sure that scratch is perfectly flat, so you don't run the risk of scratching your piston while its moving up and down. -
Intermittent rough idle when engine fully warmed up
JuncoJones replied to timbo's topic in 986 Series (Boxster, Boxster S)
Timbo, During normal running conditions, the car should idle around 680/700 RPM. If then you remove the oil filler cap, that should create a vacuum leak in the crankshaft, and the car should start running rough. The cap should always fit tight when in place. I also don’t think you will be able to hear most vacuum leaks, sometimes they are very small, but enough for having low or no vacuum formed in the system. And you also have 2 systems to troubleshoot: the crankshaft and the intake manifold. This is also where a friend’s smoke machine comes very handy. Cheers