Welcome to RennTech.org Community, Guest
There are many great features available to you once you register at RennTech.org
You are free to view posts here, but you must log in to reply to existing posts, or to start your own new topic. Like most online communities, there are costs involved to maintain a site like this - so we encourage our members to donate. All donations go to the costs operating and maintaining this site. We prefer that guests take part in our community and we offer a lot in return to those willing to join our corner of the Porsche world. This site is 99 percent member supported (less than 1 percent comes from advertising) - so please consider an annual donation to keep this site running.
Here are some of the features available - once you register at RennTech.org
- View Classified Ads
- DIY Tutorials
- Porsche TSB Listings (limited)
- VIN Decoder
- Special Offers
-
OBD II P-Codes - Paint Codes
- Registry
- Videos System
- View Reviews
- and get rid of this welcome message
It takes just a few minutes to register, and it's FREE
Contributing Members also get these additional benefits:
(you become a Contributing Member by donating money to the operation of this site)
- No ads - advertisements are removed
- Access the Contributors Only Forum
- Contributing Members Only Downloads
- Send attachments with PMs
- All image/file storage limits are substantially increased for all Contributing Members
- Option Codes Lookup
- VIN Option Lookups (limited)


jpflip
-
Posts
684 -
Joined
-
Last visited
-
Days Won
9
Content Type
Profiles
Events
Forums
External Paint Colors
Downloads
Tutorials
Links Directory
Collections
Classifieds
Store
Everything posted by jpflip
-
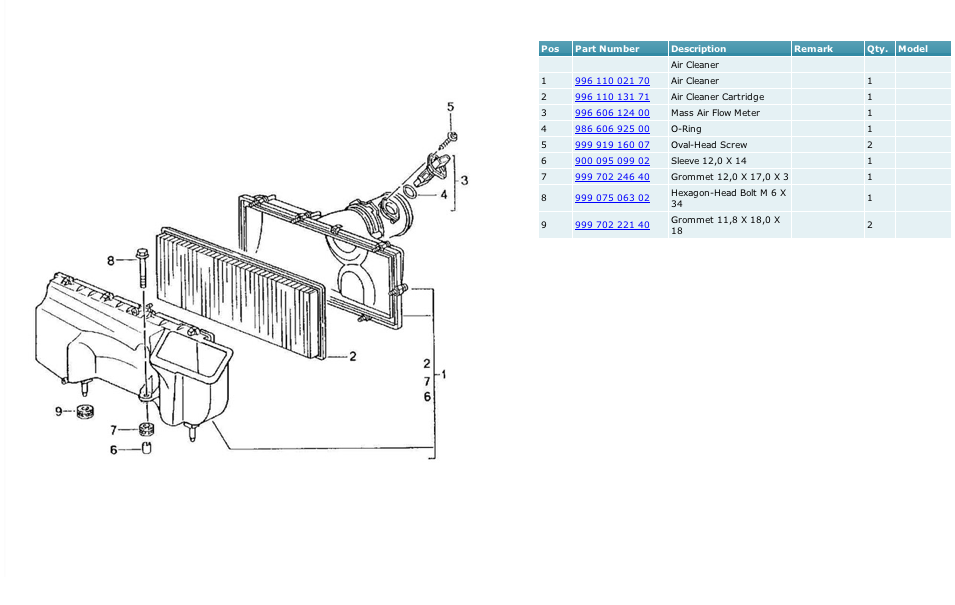
This DIY is a basic test for the mass flow sensor. If at fault, a simple cleaning procedure (many procedure on the net) should be done first, before spending money on a replacement. But I have to admit that I got a spare one in the luggage compartment with basic tools for troubleshooting purpose ;-) Porsche 996 TT Mass flow sensor part# 996 606 124 00 This sensor, when at fault, can give you many error codes. The maf related code are # P0102, P0103, P0171, P0172, P0174, P0175, P1105, P1106, P1107, P1108, P1125, P1126, P1127, P1128, P1130, P1132, P1133, P1134, P1142, P1143 ++ The troubleshooting should start with this simple test. The only tool you need is a voltmeter (electronic store less than $10.00), wires for the voltmeter and a sewing needle. And if you have to clean your maf your will need a tamper-proof torx bit #20 to remove it. (Ebay and Craftsman) First: Locate the maf. There is no need to remove anything else. Second:Remove the rubber boot by pulling at one end and lifting. Third: Once the rubber boot is removed you will see 4 wires, also on the plug you will see some numbers 1-2-4-5. The wire number 5 is the one we need. It is white with blue stripe. Simply insert a needle into the blue sleeve of the specific wire to be able to connect your meter. Or if you got a very thin needle probe just insert it in the position #5. Fourth: Take your voltmeter ( select DC volt) and connect the positive to the #5 wire and the negative to a good ground. In my case I have used the ground on the fuel filter. Note: A good ground is important. I tried several location before having a proper reading.... Turn the key to ignition without starting and check the voltage it should be approx. .9 to 1.1 volt. Finally: Start the car and let it warm up until it is possible to check the oil level. Now the voltage should be approx. 1.4 volt. (1.2 to 1.5 is consider normal as per OBDII manual.) If you got different reading that mean the maf is defective or need cleaning. Start with the less expensive of the two. A bottle of MAF cleaning or electric contact cleaner (oilless) ...CRC maf cleaning is a product especially for this job... Hope this help. I did this DIY with the help of other forums members, previous post, (thanks Adam 669) and research on the net and into the Porsche DME 7.8 OBD II MANUAL. Hope this will be useful. Feel free to add information or feedback.... J.P.
-
I have installed agency power diverter valves and they fit OEM "F" hose...
-
The installation of the diverter valves and F hose is really simple. But to reach everything it is a bit difficult. That is why you got the possibility of lowering the engine to get a better access. see these links... Lowering the engine and this one is a pdf for valves removal: Diverter valves replacement. I did exactly like mention in those two links and it work like a charm... Good luck.
-
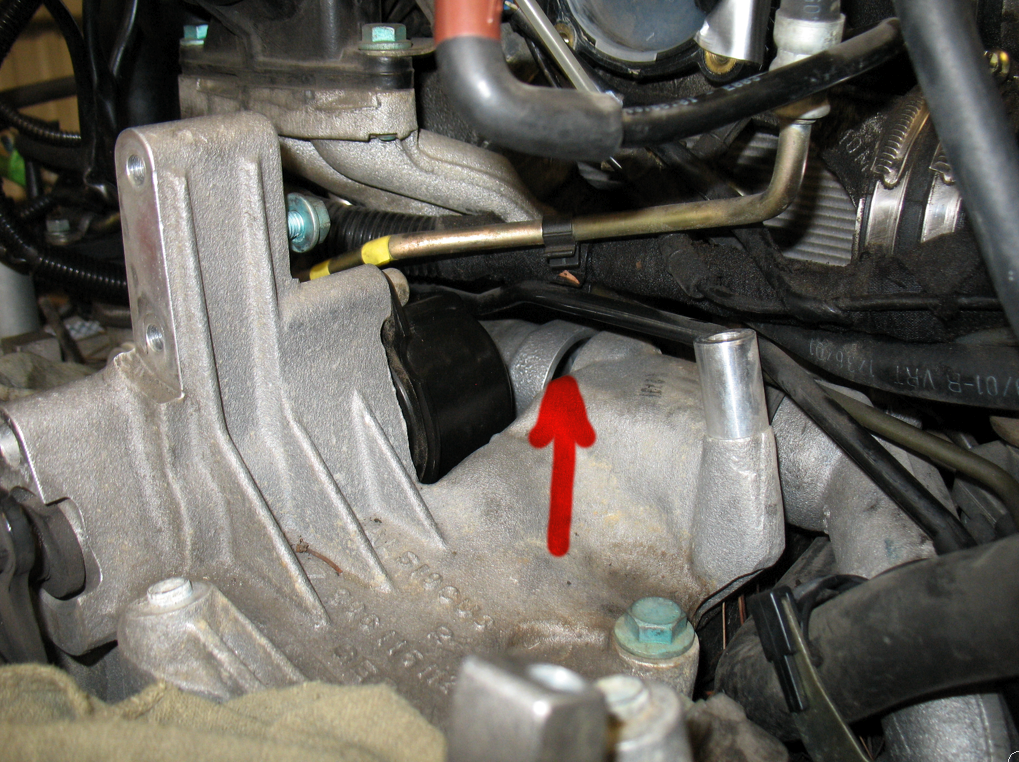
I saw a TT in a shop not far from my place that had a leak on these parts top left aft end of the engine under the coolant tank....

-
Good job!!! and also good information jporter, thanks... There was a post from Pumalex on 6speed also with pictures: fuel pump exposed
-
Driving Without The Front Wheel Housing Liner
jpflip replied to fdorn's topic in 996 TT, 996 TT S, 996 GT2
Imho these liners were installed to prevent components, under them, and sheet metal, fenders, structure etc from being struck by stones or other road debris. Of course you can do damage but also affect the anti corrosive treatment that protect those sheet metal parts..... At least stay away from gravel roads..... -
I saw on Ebay the 997 TT spoiler hydraulic kit but didn't know if it fit the 996 TT ! So it does?
-
I've been following the topics on this subject, here and on 6speed, since a couple of years and nobody came out with a solution to replace the internal seals. Because I don't think anybody found them. Too unique maybe..... Some people used thicker grade oil to service the system even some put additive in the oil. Did it last? We don't know! There was a 6speed member who had access to various hydraulic components and he could not found a fix. What's been done is purchasing a used hydraulic assembly from Ebay and with all the best parts building one serviceable. Or ,like many people did, install a fix wing... Of course if you found a solution don't hesitate to share your findings!
-
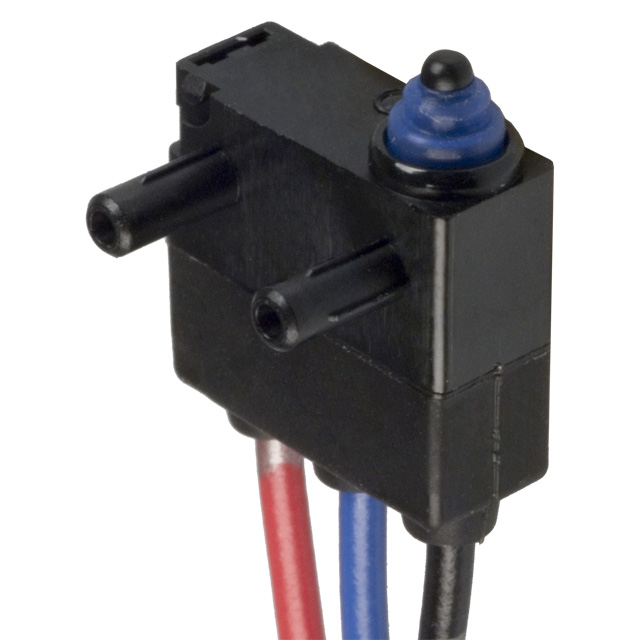
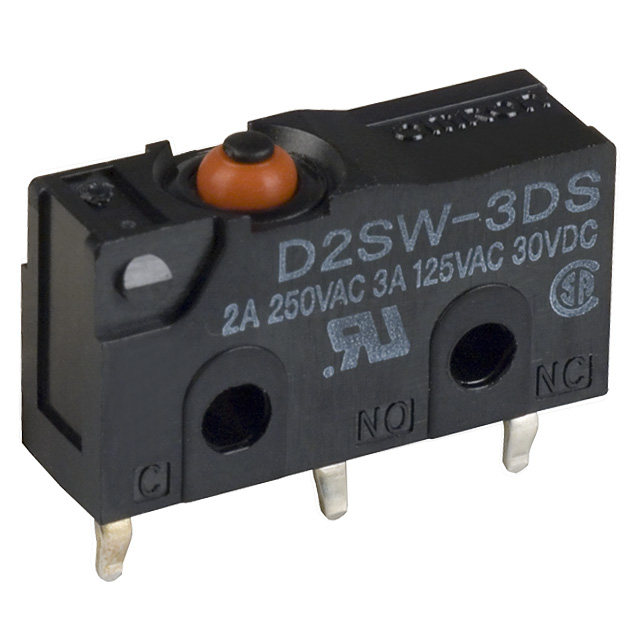
Just to add the solution to this thread. Here's the fix from Garrett360: (hope I am allowed to do that, if not please remove this post) "A quick update that might be helpful - I bought a $5 microswitch from Digi-key.com and successfully repaired the locking mechanism by dissecting a new switch, using the new plunger and seal. Fortunately the Porsche switch can be disassembled without breaking it apart - I broke apart the new switch and everything fit together perfectly. All is well, saving from having to buy the entire lock for this small switch! I bought three switches since I was not sure which would work best. The first image below was the easiest to cut open and had the same plunger type as the original switch, and I used the blue seal, too. Its part number is:SW719-ND The other switch I bought, could work as a replacement by epoxying it into place if an entire switch is required. Its part number is: SW291-ND" Many thanks to Garrett360 for this job well done!!!
-
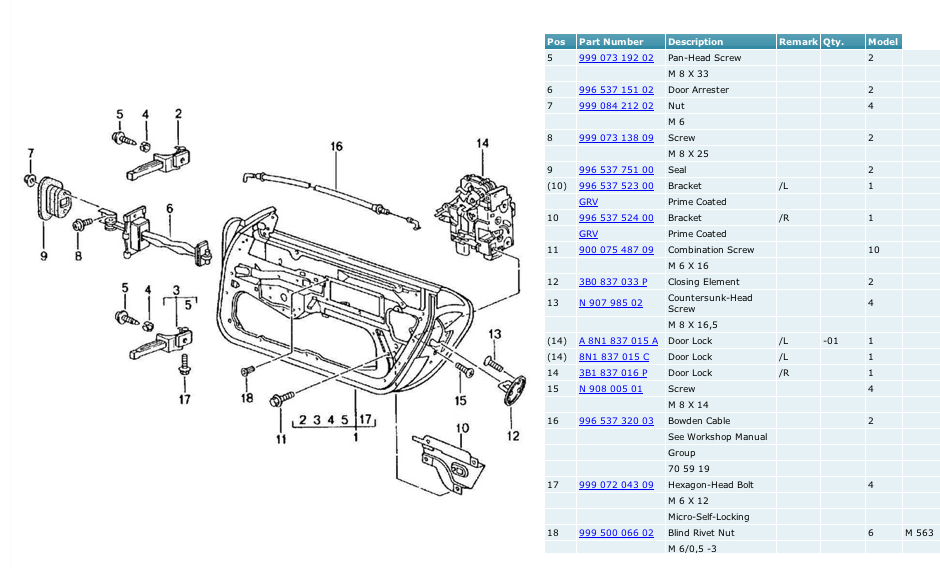
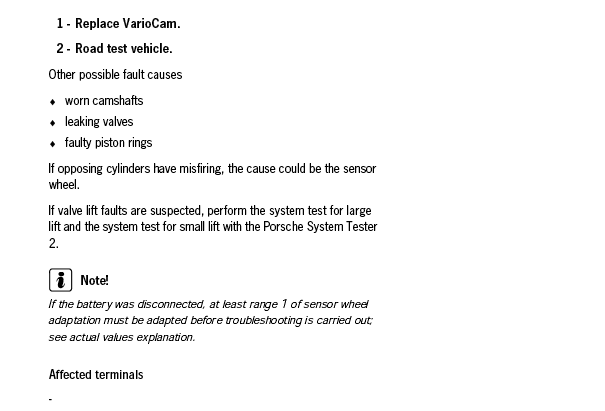
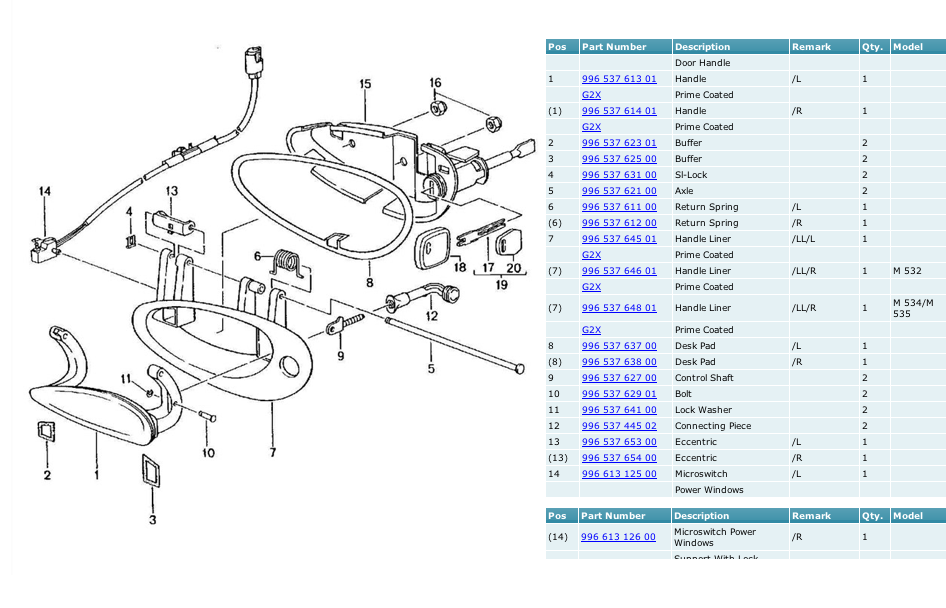
Wow! It is in fact a very unique switch.... Thanks for posting. Let's hope Richard will get an alternate number... This switch is within the door lock #14 on the picture, I guess. I was looking at the part# 8N1 837 015 C(the first one doesn't work) and it says genuine vw/Audi part. May be you can get this switch at a Volkswagen dealer.... Funny with the part# I just found a thread on Rennlist with a cheap sollution to your problem... Look here Switch
-
Rear spoiler instructions for bleeding hydraulics
jpflip replied to roadsterdoc's topic in 996 TT, 996 TT S, 996 GT2
I've been following this problem here and on 6speed and nobody was able to replace the seals because they cannot purchase them separately and they are unique. (I never dismantle one myself) Some people on 6speed used thicker oil to fix their leaks...Did it last ? We don't know. I saw one thread on 6speed were the guy completely dismantle both rams and pump to found out that he was not able to replace any internal parts... So far the only solution, if your keeping the movable spoiler, keep an eye on Ebay for a used mechanism. There was one, a couple of months ago, who went for less than $200.00. Having two complete system help to build a good one... If you got any success in your attempt to fix the problem please do not hesitate to share your findings. Thanks, J.P.
-
Just found a previous discussion about the same problem. Iceyankee-tsi was able to take the solenoid from the right cylinders and switch it to the left to be able to found out if the solenoid was at fault. It is interesting to see the progression but we don't have the follow up and final fix....
-
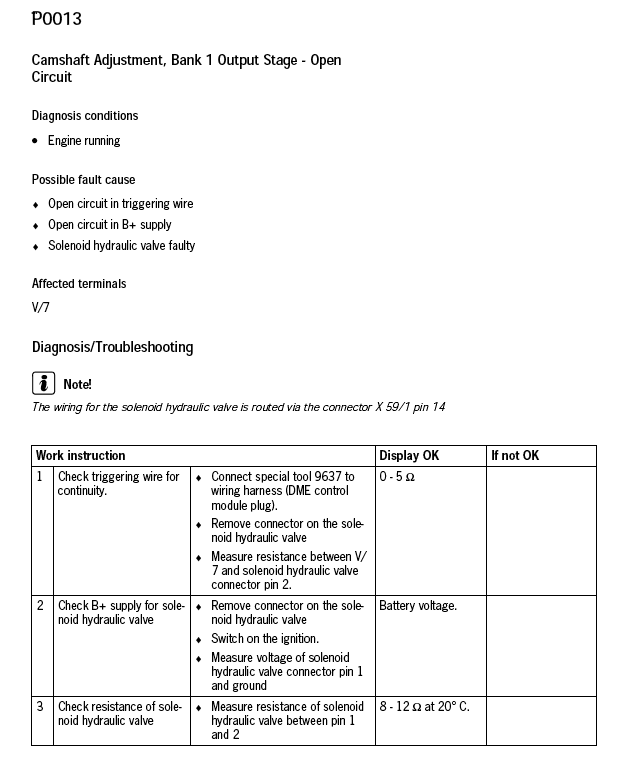
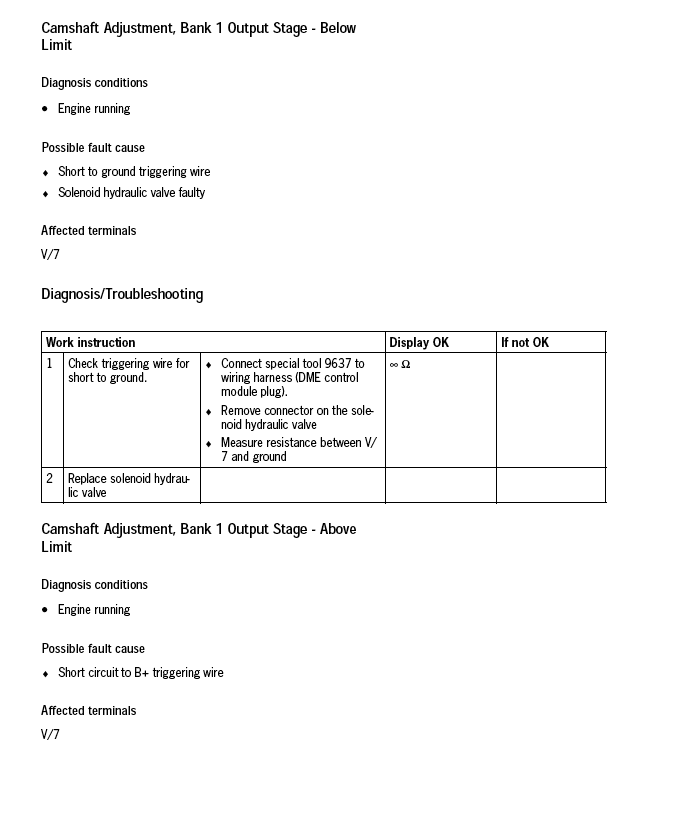
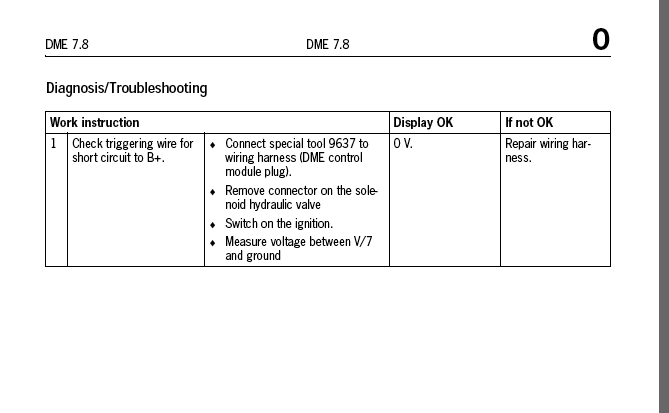
p0013- camshaft adjustment bank1 open circuit p0300- porsche falut 507 misfire detection p0301- porsche fault code 508 misfire cylinder 1 p0302- porsche fault code 510 misfire cylinder 2 p0303- porsche fault code 512 misfire cylinder 3 You definitively got a problem with the left bank. But can, the variocam malfunction give you a misfire ???? The answer, according to the OBDII manual is yes. See pics... The pictures included are all related with a fault P0300. And when your reading the troubleshooting it become clear, you are having a real problem with cam timing. If the replacement of the solenoid doesn't fix it, it can be the cam actuator which is a bigger job, special tooling needed, and also a lot more expensive....Keep us inform of you findings.... (TWC is the three way catalytic converter)
-
Jpflip - The same microswitch senses if the door is open or closed, so if it is sticking then it would cause all the problems described. Whilst the erratic window movement might be the regulator, this wouldn't cause the interior lights to stay on, or prevent the car from locking. Good! I am learning something new here. I didn't know about the existence of weak switch in the lock assembly. I will keep and eye on this thread and also I will note the part# if you can get it. Thanks.
-
May be your wright Richard but look at the beginning of his problem "It started with the window not staying slightly down when the door was open - the result was that the door would not close".... I have replaced my regulator on the passenger side and it fix the problem of the window not going down on opening of the door and of course I was not able to close the door because the window was too far up!
-
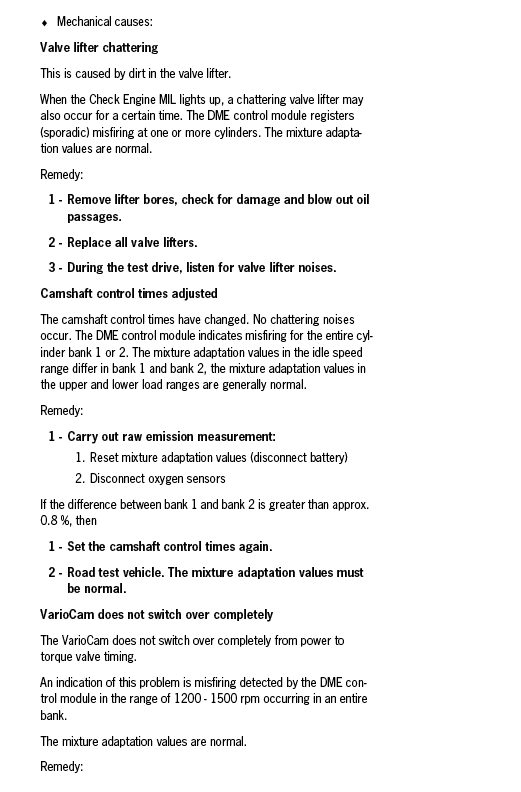
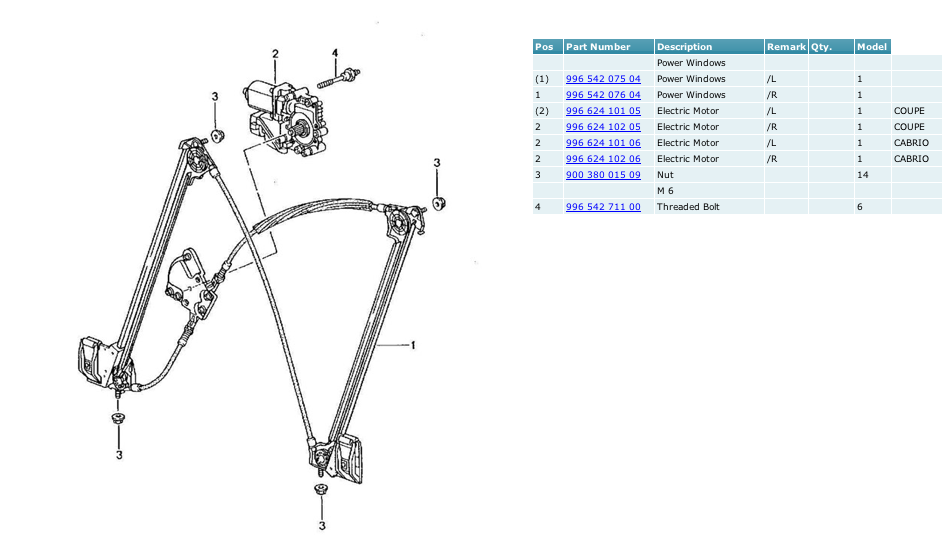
But there is also another possibility. The window regulator is known to fail and need to be replace if all the other option are not fixing your problem. Item #1 on this picture. 996 542 075 04. (I saw one on Ebay for around $140.00) see this link:Regulator...
-
If the reprogramming is not working it can be a switch (like Richard is saying) in the door handle that is u/s (unserviceable) item # 14 on the picture... Also look here Switch... and here: Window...
-
Yes Richard it can be a switch but: Did you drain the battery lately? First you should try to reprogram the window. Manually close each power window as far as it will go, then press the rocker switch for closing the window again(10 seconds). The limit position of the respective power window is now stored in the control module again.
-
Alex was it a broken spot weld or a missing bracket....
-
:thankyou: Thanks again. We first checked the connectors, tightened the clips a bit and sprayed contact cleaner. Then, we connected a 12v line to the soleniod and it clicks. However, when I used the "drive links" of the durametric, it couldnt activate the bank1 solenoid. I activated the bank 2 and it clicks. Afterwards, we checked the the b+ line, there's continuity. We still haven't checked the trigger wire going up to the DME. Will do it today. Nevertheless, I test drove the car yesterday and it was normal. The CEL didn't lit up (it lights up after driving one miles or more) but when I used the durametric, the "P0013 camshaft adjustment bank1 open circuit" was still there. We will continue looking for source of the fault. We havent checked the harness and connectors on bank to leading to the DME. Is there an easier way to check the trigger wire? Best regards. Willie :renntech: Nothing other than what is mention in the troubleshooting manual, sorry...
-
Thats funny! Good luck in your research Ben and if you got any success just pass the info if possible...
-
Just curious. The Porsche part# 999 113 454 40 is available for about $26.00 (Pelican)... Do you think the ones for Mercedes are better? Just for fun I have looked at several Mercedes parts for transmission, different years, different types and they don't mention the size of the seals, 40 X 60X 9, like Porsche do.... Too bad because the mercedes seals overhaul are a lot cheaper....
-
I replace the rear tires twice before the front ones. Rears wear out a lot faster. Stay with the same brand front and rear and you should be ok. I am not encouraging the mix of tire types but my front ones are Bridgestone Potanza s02 and the rear ones are Kumho Ecsta and even at high speed got no problem. But try to stay with the same type on all four...
-
Strange misfire or stuttering at higher rpm's at wot
jpflip replied to 8757william's topic in 996 TT, 996 TT S, 996 GT2
Easy job, see MAF replacement DIY it is almost the same for the TT and also see MAF DIY. (Torx screwdriver needed) See picture for location and part# 996 606 124 00 info: a couple on Ebay....
-
There is a site that give you all the Porsche parts catalog it is AutoAtlanta and you will found the parts in question item#23 and #24 AutoAtlanta 2. #23: camshaft actuator 996 105 303 71 and #24: o-ring 999 707 504 40. For your question about driving it that way, I cannot tell! Having a "real" fault on a variocam system is evident. If you got a Durametric you can reproduce what a fault of this system represent. You have to use "drive link" and select the bank you want to fail. You will see a very strong change in engine RPM and engine sound.... This is the only experience I got with a failed variocam system.