Welcome to RennTech.org Community, Guest
There are many great features available to you once you register at RennTech.org
You are free to view posts here, but you must log in to reply to existing posts, or to start your own new topic. Like most online communities, there are costs involved to maintain a site like this - so we encourage our members to subscribe or donate. All subscriptions and donations go to the costs operating and maintaining this site. We prefer that guests take part in our community and we offer a lot in return to those willing to join our corner of the Porsche world. This site is 99 percent member supported (less than 1 percent comes from advertising) - so please consider an annual subscription or donation to keep this site running.
Here are some of the features available - once you subscribe RennTech.org
- View Classified Ads
- DIY Tutorials
- Porsche TSB Listings (limited)
- VIN Decoder
- Special Offers
- Paint Codes
- Registry
- Videos System
- View Reviews
- and get rid of this welcome message
It takes just a few minutes to register, and it's quality Porsche information at a low cost.
Contributing Members also get these additional benefits:
(you become a Contributing Member by subscribing or donating money to the operation of this site)
- No ads - advertisements are removed
- Access the Contributors Only Forum
- Contributing Members Only Downloads
- Send attachments with PMs
- All image/file storage limits are substantially increased for all Contributing Members
- Option Codes Lookup
- VIN Option Lookups (limited)


Ross1
-
Posts
77 -
Joined
-
Last visited
Content Type
Profiles
Events
Forums
Exterior Paint Colors
Downloads
Tutorials
Links Directory
Collections
Classifieds
Store
Everything posted by Ross1
-
Try cleaning the throttle body! It's easy to do and if it doesn't work you aren't out anything.
-
New radio/amplifier alternator wining noise
Ross1 replied to tolum's topic in 986 Series (Boxster, Boxster S)
You need to take the actual ground cable for the amp and bolt it to the chassis! If that doesn't fix your problem, then experiment with some extra wiring and try connecting all your grounds together. There's no reason why you should have to settle for just a little humming noise. After a while that will even start to bug you! You can do it! As a side note. You can buy high end RCA cables that have external grounds on them! -
New radio/amplifier alternator wining noise
Ross1 replied to tolum's topic in 986 Series (Boxster, Boxster S)
Ground your subamp to the chassis! Cassiebox is correct about ground loop problems. The hissing noise is caused by the amp trying to find a common ground, so it travels through the RCA cables and creates the noise. Make sure your main amp is also grounded to the chassis. Your head unit can most likely still use the factory ground wire. This solution has worked for several people in this forum. -
I personally would go for a custom clear bra! Protects your paint while maintaining the good looks of your car! Local detail shops most likely can do it for you.
-
Windows Stopped Working After New Battery
Ross1 replied to cbr786's topic in 986 Series (Boxster, Boxster S)
Try disconnecting the battery for a minute to do a reset and try again! -
Try this link: http://www.bmwtips.com/tipsntricks/wheel-r...cuff-repair.htm
-
Stalling 2003 C4S
Ross1 replied to speedc4s's topic in 996 Series (Carrera, Carrera 4, Carrera 4S, Targa)
Try replacing the fuel filter! -
Run power to the battery! Ground your amp to the chassis! Find the switched power lead (the one that powers up when you turn on the radio, not the key) and connect to the power up connector on the amp. You can find this wire using a volt meter or a troubleshooting light. Good luck!
-
Suspension noise - please help
Ross1 replied to BoxsterSScott's topic in 986 Series (Boxster, Boxster S)
I had the same problem! I took a syringe and filled it with gear lube. Then I injected it into the rubber boot for the ball joint that's located right behind the brake rotor. Problem fixed! -
What drivers did you put in the dash? The QSD 213 5 1/4 drivers won't fit, right?
-
Wiring through the firewall for car amp
Ross1 replied to Daryl80's topic in 986 Series (Boxster, Boxster S)
A ground loop isolator is a bandaid for an incorrect installation! All it is doing is trying to filter out extraneous noise. I have never used one, but I doubt that it filters out everything and possibly filters out some of the music! I stick to my previous comment that eliminating the ground loop and using high quality wiring and you won't have a problem! -
Wiring through the firewall for car amp
Ross1 replied to Daryl80's topic in 986 Series (Boxster, Boxster S)
You indicate that you already have it wired to go pass the battery. Turn it on and see what happens! If you have wired it correctly and if indeed you have used high quality wiring, there may be no problem! The biggest causes of background noise is a ground loop or low quality wiring! If your power, RCAs, and speaker wire are high quality, you shouldn't have a problem! -
I have a friend who bought a Cayenne last year for over $90K. A few weeks ago he went into the dealer and they would only give him $30K on trade in! Ouch!!
-
Is the guide rose missing? It holds the actuator in place so it while go through the latch on the door. 50 cents at your local dealer!
-
-
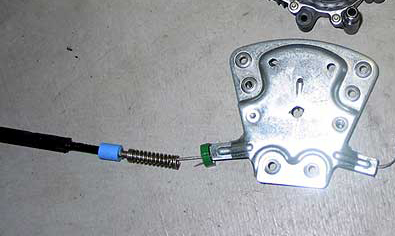
I got that picture off an already posted DIY for the window regulator! I didn't have a camera with me when I was doing the repair, so I don't have any pictures. Based on what I know, that picture is of a broken plastic piece. The cable is loose because they have disassemble the regulator. If you could zoom in you would see that the tube part of the plastic is not attached to the bigger piece any more. It is probably inside the pulley housing. The tube acts as a guide as the spring compresses and uncompresses. Once the tube breaks off, the cable slips through the plastic piece and creates the slack that prevents your window from going down. If you are not mechanical, I would suggest just getting a new regulator! The hardest part of the repair was putting the cabling back together. You also don't want to use just a simple 2 part epoxy. I suggest the marinetex that I used. It's tough!! You can get it at your local boat shop or maybe even Walmart. It's used to repair boat hulls.
-
I had the same problem with my window regulator. The reason that slack is created in the cable is because of the inadequate blue plastic piece that breaks! From the outside this piece looks like it is about a 1/2 inch long and holds the cable sheath in place. In actuality, this piece has a tube piece that extends down the spring and into the pulley. What happens is the tube piece breaks off and slides into the pulley (possibly causing a grinding noise and start the fraying of your cable) and the cable sheath slips through the hole of the plastic piece and thus creates the slack in the cable. I actually took my regulator apart and reattached the plastic pieces using marinetex and it's as good as new. Probably better because the marinetex is stronger than plastic so I don't expect it to break again!

-
If the sound varies with speed, then it's most likely your wheel bearing! Jack up your wheel and spin it to see if you can here a noise. You might need to jack up both rear wheels to compare the difference.
-
2nd Key Fob Doesn’t Work
Ross1 replied to arthur6's topic in 997-1 Series (Carrera, Carrera 4, Carrera 2S, Carrera 4S)
Sounds like you need to replace the battery! If you can start the car with the key, then it is already programmed! -
Ground your amp to the chassis and just use the stock wiring ground for your HU! That worked for rahlstrom!
-
AMP connectors to mate with factory harness
Ross1 replied to rahlstrom's topic in 986 Series (Boxster, Boxster S)
I agree! It's like buying a porsche and then running bias ply passenger tires! :o Your stereo is only as good as the weakest link. If you have replaced the head unit, amp and speakers, why skimp on the wiring? -
The pop sound is caused by your amp still being turned on when the radio goes off! You need to find the AMP ON/OFF wire on the AVIC D3 and connect it to the ON/OFF connection to your amp.
-
Ground looping is caused by your amp and head unit having different grounds than your audio signal. You are probably using the stock wiring with your AVIC and so when it was connected to the stock amp they had common grounding. Grounding your amp to the chassis instead of the battery should eliminate the loop!
-
There was no argument! They paid for it!
-
I needed a spare key a few weeks ago and so I took it into the dealer to be programmed. Unfortunately, they deleted the original key from the computer. Because I didn't have the 24 digit code for that key, it became useless! They had to order me another key to replace it. When I was back in to get that key programmed, I asked the mechanic about getting the code out of the PIWIS and he said that it only shows part of the code. Not the full 24 digits. It is just used to identify which memory position (i.e P1, P2) the key is programmed. So hang onto those key code tags!!