Welcome to RennTech.org Community, Guest
There are many great features available to you once you register at RennTech.org
You are free to view posts here, but you must log in to reply to existing posts, or to start your own new topic. Like most online communities, there are costs involved to maintain a site like this - so we encourage our members to subscribe or donate. All subscriptions and donations go to the costs operating and maintaining this site. We prefer that guests take part in our community and we offer a lot in return to those willing to join our corner of the Porsche world. This site is 99 percent member supported (less than 1 percent comes from advertising) - so please consider an annual subscription or donation to keep this site running.
Here are some of the features available - once you subscribe RennTech.org
- View Classified Ads
- DIY Tutorials
- Porsche TSB Listings (limited)
- VIN Decoder
- Special Offers
- Paint Codes
- Registry
- Videos System
- View Reviews
- and get rid of this welcome message
It takes just a few minutes to register, and it's quality Porsche information at a low cost.
Contributing Members also get these additional benefits:
(you become a Contributing Member by subscribing or donating money to the operation of this site)
- No ads - advertisements are removed
- Access the Contributors Only Forum
- Contributing Members Only Downloads
- Send attachments with PMs
- All image/file storage limits are substantially increased for all Contributing Members
- Option Codes Lookup
- VIN Option Lookups (limited)


atta
-
Posts
79 -
Joined
-
Last visited
Content Type
Profiles
Events
Forums
Exterior Paint Colors
Downloads
Tutorials
Links Directory
Collections
Classifieds
Store
Everything posted by atta
-
High Performance Audio System and rear speakers?
atta replied to atta's topic in 986 Series (Boxster, Boxster S)
Yes, that's the one I bought. Have'nt received it yet after 40+ days. The price looked too good to be true, - hope it was not.:( A. -
Actually, looking at the picture + picture of the rubber stops, it looks like the center is too high. Good news is the bumper cover is made of pretty flexible plastic, so try to just take it off/loose and put it back on to see if you can get a better fit. Might actually have to adjust down the sides (turning the rubber stops to reduce their height) if they have been used to compensate for the misalignment.. The link Cassiebox provided has all the details you need to remove the bumper cover. Goodl uck! :) Atle
-
Found a good deal on a complete HPAS system on eBay. I think it looks very promising. Waiting for it to arrive, I was curious if it would work with rear speakers. Looking at the 986 TSB it sais it's a 2 x 200w at 2 ohm system while the 996 TSB sais it's a 2 x 200w at 2 ohm + 2 x 100w at 4 ohm. Part numbers are the same. This leads me to believe that I can add a rear speaker setup using the same additional wiring that is used to hook a rear speaker kit to a 6 channel amp? This is the setup that I am considering: (Going for great sound with OEM look) - Kenwood DNX8220BT double din head unit w/trieullionaire AVIC kit (that I hope will fit the Kenwood unit) - HPAS with its high power amp, quality xovers and new speakers (front components and 2x160mm on each door panel) - BOSE sub box for rear fill and added base (well, rear fill and its great looks really) using OEM wiring harness I'm aware that I either have to modify the BOSE box or change out the drivers. I will probably to the later. Perhaps with MB Quarts. From what I understand the HPAS speakers are made by Jehnert.de and based on MBs w/tuned xovers to match the cars acoustics. So my questions are: - Does this sound like a good setup or are there any flaws in my logic? - Suggestions on what to do to the BOSE box to complement the HPAS system? Eg. rewire, new drivers, ... - Can the rear speaker wiring harness (Amp to BOSE box, it's supposedly the same connector as the regular rear speakers) be ordered separate? PN? Atle
-
What's this string?
atta replied to atta's topic in 986 Boxster Convertible Top Issues and Solutions
I have the two straps (pictured in previous post on my desk) and I guess they ripped off pretty clean. Either that, or they have another use combined with the shoe lace.. :huh: Guess I could try to sew them on again. There is a TSB on this, right? Atle -
What's this string?
atta replied to atta's topic in 986 Boxster Convertible Top Issues and Solutions
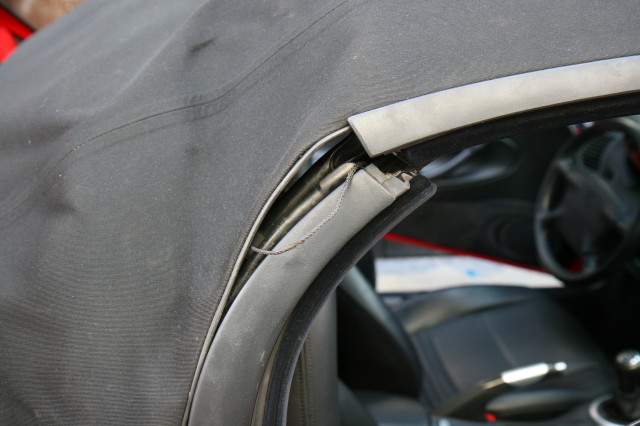
This is a +03 986 top w/glass roof. When I bought it (used w/frame) both the velcro straps were torn of (I need to order new ones) and this string is hanging out. So either this top use both of these mechanisms or the string has a different use.. A -
Make sure you put the alignment tool on the right way as it can go on from both sides and gives different results. I marked the cables and used the tool (just in case) and did not have to pull any cables. When I think back I might have pulled just a little on the right one, but just a little - and by hand. Put the tool on from the right side, so that the opening is to the left. Also; it's a different alignment tool when using the standard 9x7 shifter from the SS. I think my tool was white. SS one is green. Atle
-
What's this string?
atta replied to atta's topic in 986 Boxster Convertible Top Issues and Solutions
So it seems! :) Any idea where it belongs? Afraid my car will fall apart now that it is untied! ;) Atle -
What's this string?
atta replied to atta's topic in 986 Boxster Convertible Top Issues and Solutions
I've read through all the instructions I've found detailing a canvas installastion and I can not find a mention of this string. This leads me to believe it is spesific to either the headliner or 03 top. But I can't find any material on either. Anyone with a 03+ top or headliner familiar with this string.. ? Right now it is stuck in the guide channel, but not sure if this is correct or not. I can only find the string on the right side. A -
What's this string?
atta replied to atta's topic in 986 Boxster Convertible Top Issues and Solutions
That looks like a wire . This is a string, not very different in looks that a shoe lace. Perhaps it has something to do with the head liner? A. -
What's this string?
atta replied to atta's topic in 986 Boxster Convertible Top Issues and Solutions
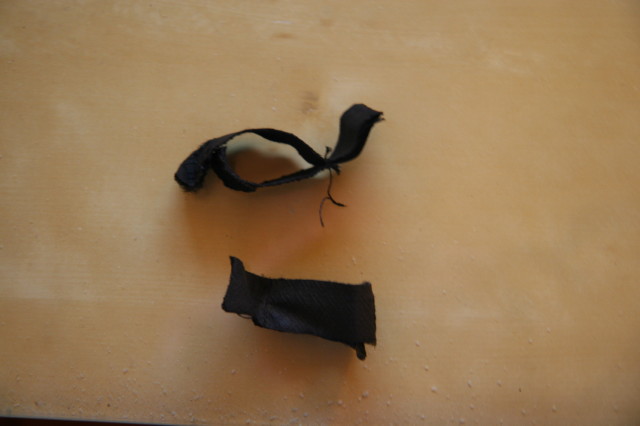
Do you know if it is possible to fix? I can't see a string on the other side. It looks like it goes into one of the channels in the frame where it is secured with a knot or something at the end. Definitely not a screw. The straps look like this (after I removed them from the car). A large loop that can be opened with velcro and a small closed loop. They were just sitting there on the black bar seemingly doing nothing, so I removed them for inspection. How do they guide the top? Atle
-
Hi, whats this string hanging out of a 03 top? I also found two velcroed tabs on both side (removed on this picture) that seems to do nothing... Atle
-
2003 Roof alignment issue
atta replied to yo_yo's topic in 986 Boxster Convertible Top Issues and Solutions
Hi. Did you figure out how to sync the B-version transmission? I'm curious how it is calibrated as the top open and top closed microswitches are relocated to inside of the left transmission. A. -
Do you know if it is possible to buy just the mounting adapter, so that a 03+ PSE can be used on a 99 986 2.5? And does the kit (000 044 200 20) include the tail pipes? Atle
-
I think the microswitch-part that I mentioned is this switch, so I don't need this as it's not used on the new style (and I already have it). I guess the microswitch is already in the new transmission then? If anyone has any hints to how to hook it up.. One can probably not buy just the plug? I also found that I would need new cables, as they are 1" longer on the new setup. 2 x 986 561 717 03. A.
-
A.: You can make an adjustment that will allow the front edge of the convertible top to get closer to the top of the windshield frame, thus releasing some of the tension from your "overtight" top. The adjustment is made by lengthening or shortening the pushrods with the "red" plastic ball cups that are attached (popped onto) to the underside of the B-Pillar knuckle. You can loosen the 10mm nut (the one with the thick washer) and then adjust the length of the pushrod accordingly. Be careful not to overdo it, because at some point in its length it is not a linear progression (i.e., it will get further away from the top edge of the windshield when you expect it to keep getting closer, etc...) As far as your "B-pillar" microswitch problem, you are correct that Porsche went to the "B Version" transmissions for the convertible tops in mid-1999. With the "A Version" transmissions, there was a half-moon gear in there. With the "B Version" the large gear is a complete circle. At that time, the "B-Pillar Microswitch" was moved to the passenger side (right side) transmission. Replacing the transmissions is very straightforward: One large 19mm bolt that holds down the V-lever on each side, and three 13mm nuts that hold the transmissions to the studs that are mounted onto the rear quarter panel. You will need new type of studs for the new transmissions. Then, of course you have to connect the cables and pop off the plastic ball cups (red on your car) and the black hydraulic pushrods. I recommend that while you are it, replace those red plastic ball cups with white ones, and keep the reds as spares. There is a guy in Belgium who sells just the plastic ball cups. Porsche only sells the complete push rod assembly. PM me if you want his info. Regards, Maurice. Thank you Maurice. Appreciate your help. I already read your previous mention of the Belgium guy selling the plastic cups, so I found him on eBay and ordered a set earlier today. :D These are the parts that I believe are needed: - Left transmission : 986 561 179 03 - Right transmission : 986 561 180 03 - Studs / "spacer bolts" : 6 x 986 561 789 01 - Microswitch with support: 986 613 767 01 - new relay and some wiring Is there anything else I need/should change while I'm at it? Oh, and I read in the workshop manual that there are two centering screws (regular chassis) on each side of the frame where the bolts are. They were not used on my setup, but it would probably help with alignment as just moving the frame a little bit helped me clear the windshield. I think I might try this if I still have alignment issues. Right now it seems to be coming in a little high, but then again the car is new to me so I don't really remember how it used to be. :) A.
-
Hm. Found in the workshop manuals that they changed to the new transmission type in may 1999. Guess My car is an early model 99 then, so with 35 kmiles on it is it likely to see the engine fail soon? :( I just bought the car (imported from the US) ..it was first registered in june 2000, so I figured it was a late model but now it looks like its not after all. :( I paid almost $55 000 for the car, I don't want the engine to fail on me. ($24k from the lot, rest is Norwegian tax and duties). A.
-
Quick update. I did as suggested in another thread where someone had a top that was hitting the windframe after having had the frame out of the car: Loosened the six bolts holding the frame, grab the "knuckle" and pushed it up and back while tightening the nuts. It no longer hits the windshield! I simulated the microswitch and it now seems to be working fine. I also loosened one of the wires holding the top down, the ones you pop off going into service mode, to get it to go all the way forward but I think I might tighten it up a bit once everything is working as I suspect its just the top that is a little tight after not having been used for a while. My battery died on me, so I need to get a booster and have it running again to verify for sure - but I think it is just minor adjustments left if any. So the frame swap seems to be a success except for the microswitch issue. I hope changing out the gears and relay is not a big job as I have almost used up my wifes goodwill account already. :rolleyes: If anyone know the procedure and parts required that would be a big help. Oh, and by the way: :renntech: Atle
-
From what I can gather the new switch is located in the new style transmission. So now my questions are: - How easy is it to just replace the transmissions with the new ones, and - Is the alignment issue I'm seeing fixable (not going all the way forward, hitting windscreen on the way back, not going all the way back) I checked the wiring diagrams, and it appear like there is a different setup for both the locked/unlocked switch and the "top closed" switch. I'll get a SmartTOP, and then it looks like I "just" need to re-wire top unlock at the relay base and add the wiring for the transmission switch. Hate that I did not do my homework when I bought the car and got a MY00... I think my car is a late 99 by the way, so this new setup probably did not happen until MY00. A.
-
litomonkie: Did you get this figured out? I changed my 99 over to a 03. Moved the microswitch as the new frame has the mounting holes for it, but since found out that nothing moves ut to press it in on the 03 frame. A.
-
Ok, so I checked the old frame and sure enough, its not the same. Even though there is the same provisions for mounting the microswitch there is nothing touching it. I tried pushing it in, and the top started going down. It does not fit or needs asjustmens though, as it would hit the windscreen and not come down properly. I raised it again, and it will not go all the way closed. Is there a way for me to get out of this other than putting back the old frame? Would a new gear with the new microswitch solve this.. ? Thanks! Atle
-
1999 986 My rear window cracked and I could not find a shop to put in an aftermarket glass roof, so I purchased a used roof and frame from a 2003 model with the oem glass roof. Just swapped it over and tried to close, but stopped (stalled - motor working hard) about 2 inches from closed. I tried to just pull it in and close it with the latch, but when I open it up again it goes back the same 2 inches. Clamshell is completely closes. Now, when I push the button I can tell the motor starts working but nothing happends. What could be causing this? When I think about it, I think when I put the red rods back in place the top was further back than the original frame. Atle ps! I moved over the b-pilar microswitch, but nothing is touching this now so I guess its in use when the top is down and not up?
-
9x7 Shifter Assembly DIY Instructions?
atta replied to ekam's topic in 986 Series (Boxster, Boxster S)
Hi. Did the 9x7 shifter (standard) swap today and love it. Just one question... I tried moving over the green plastic "plate" that was under the black shifter cable, but I felt it was in the way so I removed it again. Is it supposed to be on or off? Atle -
Front and rear spacers for 18" SportDesign wheels
atta replied to atta's topic in 986 Series (Boxster, Boxster S)
On what wheel size and offset is this? I've noticed that 15mm + 18mm is a popular combination in Europe for the Boxster (sold as pair by companies such as TechArt and DesignTek), but I'm not sure if if they will fit my particular wheels. By the way, that's 15mm spacers, so 30mm axle extension. Atle -
Hi. Just got a 1999 Boxster that came with the sport option and the 18" SportDesign wheels. Front: 7,5 J x 18 ET50 (RO?) with 225/40 ZR 18 Rear: 9 J X 18 ET52 with 265/35 ZR 18 I bought a set of H&R Track+ spacers with bolts on an ebay auction saying these would fit a Boxster. Now that I have read through a lot of posts about spacers here on the forum I'm worried that they might not fit the front. The spacers are 15mm front and 18mm rear. From what I read 18mm rear should be OK, but I have not found anyone mentioning running more than 7mm on the fronts..? Atle
-
Don't mean to hijack this thread.. Seems though the symptoms were the same we're experiencing different issues. My leak is through the door, - thank you Chris! I could tell the previous owner has removed the door panel (and broke one of the clips on the bottom - are these replaceable?). Have to take it apart some other day to inspect the seals. Must be something catching the rain and forcing it out the carpet as the drain hole in the door seems to be working fine. A. 1999 Guards Red/Black Boxster