Welcome to RennTech.org Community, Guest
There are many great features available to you once you register at RennTech.org
You are free to view posts here, but you must log in to reply to existing posts, or to start your own new topic. Like most online communities, there are costs involved to maintain a site like this - so we encourage our members to donate. All donations go to the costs operating and maintaining this site. We prefer that guests take part in our community and we offer a lot in return to those willing to join our corner of the Porsche world. This site is 99 percent member supported (less than 1 percent comes from advertising) - so please consider an annual donation to keep this site running.
Here are some of the features available - once you register at RennTech.org
- View Classified Ads
- DIY Tutorials
- Porsche TSB Listings (limited)
- VIN Decoder
- Special Offers
-
OBD II P-Codes - Paint Codes
- Registry
- Videos System
- View Reviews
- and get rid of this welcome message
It takes just a few minutes to register, and it's FREE
Contributing Members also get these additional benefits:
(you become a Contributing Member by donating money to the operation of this site)
- No ads - advertisements are removed
- Access the Contributors Only Forum
- Contributing Members Only Downloads
- Send attachments with PMs
- All image/file storage limits are substantially increased for all Contributing Members
- Option Codes Lookup
- VIN Option Lookups (limited)


JimPDX
-
Posts
207 -
Joined
-
Last visited
Content Type
Profiles
Events
Forums
External Paint Colors
Downloads
Tutorials
Links Directory
Collections
Store
Posts posted by JimPDX
-
-
With gray?
I have to admit that I only lived with the "wood" trim pieces for 24 hours. I just hated the contrast with my grey leather. It is amazing how a rear console replacement which took over 1 hour the first time could be swapped out in 15 minutes by the third time!
Here is what I'm (happily) back to:

I think the wood trim pieces were nice looking but the contrast with the gray interior was off as you said...BUT...what you did in this pic looks GREAT!...
Jim
-
Do you mean the defroster trim?
If so, look here
BTW... the clips will likely break when you remove the pieces.
Thats it...Thx Loren...
Jim
-
Loren...
Inside between the top of the dash and the windshield fits a long plastic trim piece that runs the length of the dash. Depending on road conditions that piece of plastic can rattle pretty badly. I'd like to remove it and felt tape it in places...do you have a picture of where the clips are so I don't break it upon removal...
Thx for your assistance...
Jim
-
Hello,
996 C2 '99 Coupe
My drivers side overmat keeps slipping forward.
The velcro topped disc that attaches to the floor that hold the mat down keeps popping out of the hole. The 'self-tapping' thread on the disc doesn't seem to grip anymore when screwed in - I think the hole has been worn bigger?
I don't think it is the disc at fault, I have compared it from one on the passenger side.
Any tips or tricks to get it to stay put?
Regards,
Koenig
I'm not sure I understand what an overmat is? Are you speaking of the floor mat? Is that what is moving?
If it is, you can buy a metal mat spring clip at an auto parts store that grabs the mat on one end and on the other end of the clip are two curved pins which slide and lock into the carpet below the mat. I use these on my cross country and they work very well. They are about $5.00 for a pair.
Jim
-
While I was detailing my car this weekend I noticed one of my rims, Carrera 5 Spokes, was loosing its clear coat in some parts. At the same time I noticed one other was deveoping hair line cracks in the clear coat
The rims have never been hit and nor do they have any curb rash. Anyone ever experienced this before and I assume this is easily rectifiable.
Similar situation happened on my car...I got hit by a rock or some other piece of road debris and it put an small chip into the side of the rim. After a few months I noticed that the clear coat was chipping away around the initial chip. I really couldn't justify having the wheel repainted for such a small chip but I was concerned about it getting worse.
I essentially abraded the chip with a very fine wet sandpaper 000 grit wrapped around a lead pencil rubber eraser. I extended the sanding about 5mm around the original chip. Bought some touch up paint and applied a small dab of it to the area. Then took some very mild rubbing coumpound (Blue Coral) and the applied it to the area and with the edge of a credit card. With the edge of the credit card I rubbed the rubbing compound out till the dab of paint was smooth to the touch and even with the other painted surface. I then applied a small dab of clear coat and let it dry in the sun for about an hour and 1/2...then did the rubbing compound credit card thing again.
Looks fine. You have to get right on top of the wheel to see where the chip was...
Jim
-
You can try those plastic low profile rhino ramps. There are now 2 types according to weight ratings. Good if you have a sloped driveway since the engine will be level.
99.% of the time we just use a jack on one side since it is so easy to change the oil and most of the times we are on flat ground. Then lower the jack while the oil drains into the pan.
Thx for the info...
Jim
-
996 555 081 02 A18 Lining Black Leatherette - retail $383.05
Muchas G...Loren!!
Jim
-
Sorry. I should have included that...
MY 1999
Interior:black
Yes. Leatherette
Thx
-
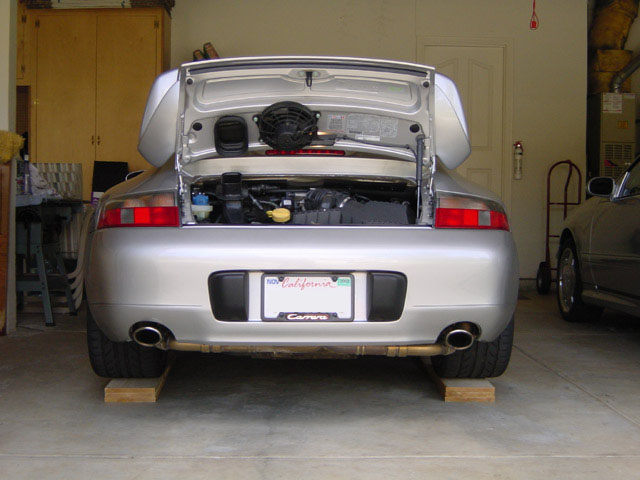
For oil changes you don't even need ramps. I use 2 x 10s - three per side.
More than enough clearance.
Loren...
Looks like an option...I have a protection plate which reduces my clearance about 3/4 of an inch...
Do you lift the car and set the boards under it or do you drive the car over the boards?
Thx
Thx...
Jim
-
Loren...
Do you what the part number is for the vinyl covered trim piece that sits perpendicular the rear seat shelf just below the rear window. The piece runs the width of the rear shelf and is about 4 inches wide...
Thx for your assistance...
-
Coolant hose. The parts list says to use a newer 996 106 233 55 instead (if available).
As always...thank you kindly for the info...
Jim
-
Thank you Loren---what is part number 996 106 233.52?
I saw this on a recent service invoice with a notation that said: replaced 996 106 233 52 rear passenger side unit. Driver side unit should be replaced at next servicing. Do you have any idea what it is I am supposed to replace? No other explanation...
My service advisor is out today...and have been on hold way to long...so I thought I'd check with the P Guru...
Thx...
Jim
-
Does anyone have any experience using car ramps for doing an oil change? If so can you recommend a type, style or brand of ramps. Maybe something with a low rise. Any difficulty using the ramps?
Thx…
Jim
-
-
I know it started in July -- is that the latest one to your knowledge then?
Thx
-
There was a change made to the IMS seal, crankshaft gear, flange and chain in Sept 2000 production. Some of the old parts are not available anymore and you can't mix most of the parts. This is covered in detail in TSB 10/00 1551 New Drive Chain and Seal for Intermediate Shaft (dated 11-10-00). R&R the seal (if you have the right parts) also requires several special tools. IMHO... unless you have the TSB, tools and workshop manual - you may not want to tackle this.I am looking for the IMS new housing number and seal number along with any info on removing and installing the INS.
Loren...
Is there a new TSB and if so is it posted yet? I did a quick look and didn't see it...
Thx...
Jim
A - Toothed segment with hexagon-head bolt M 12 x 50 No. 9538/1
B - Socket wrench No. 9110
C - Retaining device No. 9642
-
I just wanted to say hello to everybody. I look forward to using and contributing in the future.
Welcome to the forum...this is a good place!!
Jim
-
....And everybody knows red cars cost more to insure.
AND you could use the hydrogen in your on board fuel cell, picking up a couple of BHP not loading down the alternator.
Exactly correct!
-
Jesus H...!!!
Thanks for the link Dman
Jesus H...!!!!!!
Subject: M3 at Nurburgringhttp://www.dgtalpimp.com/m3_gtr_nurburgring.wmv
If this doesn't get your blood pumping.... And make you realize how
truly amateur we all are. I lost count of how many times I would have
died had it been me behind the wheel.
Toward the end of the clip he's got this car in Full song on the back strech really flying.
D Manjava script:emoticon(':drive:')
-
I'm sure John is working on it. Probably doing an upgrade.
Looks like it is back up now.
Thx Loren...Yep...its back online...
Thx again...
-
Is anybody else having difficulty logging into rennlist.com...none of my rennlist links seem to work. Its been that way since yesterday.
thx
-
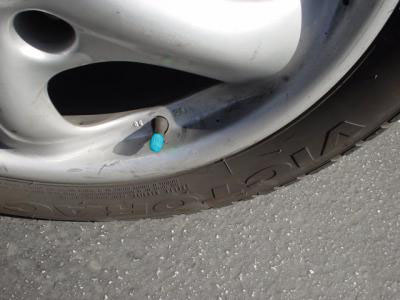
I am not going to debate the use of nitrogen in a street car.
But I saw this Boxster at a tech session with green dust caps on the valve stems. The owner bought tires from Costco and said that they use nitrogen and put the green cap on, and it does not cost any more money.
I'm glad the SUV in front of me with tires from Costco has the green cap. :P
Up here in Oregon Costco fills with Helium and gives us blue valve caps. The ride is quite uplifting... :jump:
-
Thx everyone...Loren is right I just did my oil in a 996 it took every bit of 9 qt.+ a bit more, to make it between the marks.A good rule of thumb is to add the 8.7 US Qt's then crank it up and let the oil circulate then get a good reading as to how much more to add. The last Qt go's slow in getting up to the mark, its easy to add too much if you are not careful. Get a good reading on the dipstick and gauge before topping off the last quart.
It might be best to run the engine to get oil circulating then shut it off and let the oil settle to the bottom of the case before adding more.
I just know it took more than I expected.
D
I have spent years reading things closely and it continues to amaze me that even the Porsche dealers hold varying positions on oil quantity not to mention the fact that their owner's manual says "A" and their service manual says "B".
I put 9.3 qts of oil in my car at the last oil change 3000 miles ago and it took me up to the the top triangle bar very nicely. When I had my car serviced at Sunset they said they put in 10 quarts because that is what they charged me for, but I suspect the put in 9++ because when I got the car back the oil gauge showed filled to the line above the top triangle
That bothered me...so from that point on, I filled with 9.3 when I started doing the changes myself and I hit that top triangle like a bullseye!...
In my original post which Loren answered right away I was concerned about the discrepancy of quantities and thinking that what I was putting into my car was either too much or not enough...
Thx...
Jim
-
The owner's manual states the oil change quantity with filter is 8.25 liters. Converting to qts. 8.25 x 1.057 = 8.7 qts.
The DIY instructions indicate 8.75 liters. Converting to qts. 8.75 x 1.057 = 9.25 qts.
9.25qts - 8.70qts = 0.55qts delta = appx 16+oz more oil w/ DYI. 16 oz seems a significant delta.
Questions
1.) Does the owner's manual recommended fill of 8.7 qts show on the engine oil level gauge as the MAX point with the up pointing triangle?
2.) What does each space on the engine oil guage between the bars equate to in terms of oil amount? (If, as the owner's manual states, the difference between the two marks (min and max up and down pointing arrows) is 1.5 liters or 1.59 qts or appx .25qt (8oz) of oil for each of the 6 spaces on the guage).
3.) That being the case the one bar over the max mark on the guage should represent 8 oz of oil. However, if you fill to the DYI then you would be 8oz over the upper bar above the max up pointing arrow or 16 oz over...correct?
Thx...
Jim

Anyone tried a 3M Clear Bra for a 996 ?
in 996 Series (Carrera, Carrera 4, Carrera 4S, Targa)
Posted
Why do you want to put a 'clear' bra on your car? Let it go, get a chip or two...it gives the car character. You can touch the chips up every now and then...enjoy the car and save your dough for your first RMS repair.