Welcome to RennTech.org Community, Guest
There are many great features available to you once you register at RennTech.org
You are free to view posts here, but you must log in to reply to existing posts, or to start your own new topic. Like most online communities, there are costs involved to maintain a site like this - so we encourage our members to subscribe or donate. All subscriptions and donations go to the costs operating and maintaining this site. We prefer that guests take part in our community and we offer a lot in return to those willing to join our corner of the Porsche world. This site is 99 percent member supported (less than 1 percent comes from advertising) - so please consider an annual subscription or donation to keep this site running.
Here are some of the features available - once you subscribe RennTech.org
- View Classified Ads
- DIY Tutorials
- Porsche TSB Listings (limited)
- VIN Decoder
- Special Offers
- Paint Codes
- Registry
- Videos System
- View Reviews
- and get rid of this welcome message
It takes just a few minutes to register, and it's quality Porsche information at a low cost.
Contributing Members also get these additional benefits:
(you become a Contributing Member by subscribing or donating money to the operation of this site)
- No ads - advertisements are removed
- Access the Contributors Only Forum
- Contributing Members Only Downloads
- Send attachments with PMs
- All image/file storage limits are substantially increased for all Contributing Members
- Option Codes Lookup
- VIN Option Lookups (limited)


Izzy
-
Posts
740 -
Joined
-
Last visited
-
Days Won
6
Content Type
Profiles
Events
Forums
Exterior Paint Colors
Downloads
Tutorials
Links Directory
Collections
Classifieds
Store
Everything posted by Izzy
-
Sorry to hear it went that way. Depending where you are located, finding a decent non-dealer place to take the car could be a good choice, save some bucks. Izzy
-
OBC Retrofit to 996 with Tiptronic
Izzy replied to Izzy's topic in 996 Series (Carrera, Carrera 4, Carrera 4S, Targa)
That is perfect, Thank you all! I will make sure to take copious pictures and throw it in the DIY page. Izzy -
I am building up my enthusiasm for the OBC retrofit for my 199 996 Tip. Does of you who have done it, any special precautions or needs for the Tip? There are multiple threads with partial instructions, looks like I can assemble all the steps needed. The connector is still kind of a mistery, does it exists or is it made up with VW and BMW parts? And where does it connect once purchased or built is not clear. I got a part list from the PCA tech site, will gather all of that and attack it in a few weeks. Any advise very welcome. Thanks Izzy
-
Flashing Check Engine Light
Izzy replied to skymast's topic in 996 Series (Carrera, Carrera 4, Carrera 4S, Targa)
It really might be worth it to re-install the coils and the connectors to the coils. Something may be loose and not making full contact. -
For ramps, something I learned from another member is to make them with a 2"x12"x10' lumber. Cut them into 24", 18", 12" lengths. The last piece cut in half. Then assemble (nail, screw, glue) them as a stair step, all flush on one side. Attach the last piece to the end as a stopper. Works great for mostly anything you do on the car rear and it is cheap. Sears has a great $69 3Ton jack that extends to 21", also low profile and fits under car. I like the extra lift to get under the car when I need to do do maintenance. They have a kit that comes with jack stands too. Look in the DIY section for the "how to jack" the 911, and where to put the stands. Don't forget a wheel chokes so it doesn't roll on you when jacking (an experience you will never forget). For the wheels, 19 mm is the size. Make sure you have a deep socket or extension for the wrench for the rear wheel bolts. Also, I find a breaker bar very handy when removing the bolts. A 24" should do. Have fun, and don't forget the safety glasses and to remove your watch when sticking your hands in the car mechanics.
-
water phobia?
Izzy replied to boxstermao's topic in 996 Series (Carrera, Carrera 4, Carrera 4S, Targa)
Nothing wrong with your post, I washed the car yesterday and tried the trick, but didn't get much water on the intake at all. I use the finer mist from the hose on the top, and the high velocity stram on the bottom to get the crud out. This is a technical Porsche site, not a Dr. Phil parenting site. Some people have many issues, you can ignore them, and keep your car thoughts or findings coming. -
Normal or Problem?
Izzy replied to ntrylvl's topic in 996 Series (Carrera, Carrera 4, Carrera 4S, Targa)
I forgot to mention, mine is a 99, all cable too -
Normal or Problem?
Izzy replied to ntrylvl's topic in 996 Series (Carrera, Carrera 4, Carrera 4S, Targa)
I have the same exact sensation with mine (Tiptronic), more noticeable in colder days. I have cleaned the throttle body thinking that was the culprit, but it didn't make a difference. And like you, it goes away after 20 seconds or so. -
Can be true. But for some, like me, I actually find relaxation and stress release with "tinkering" with the car. I can't explain it, but it is soothing to take it appart and put back together, but then I am a mechanical engineer working in a bank, so I may need the hands-on thing. Sometimes, I end up at the dealer. Sometimes I spend more $$ doing it myself too. But still cheaper than a shrink! Cheers Izzy
-
Hmm, can't thinkof any connectors that would be on the way for an oil change. Have you checked the oil level with the dipstick? I would check the following: 1. Oil cap, remove and reset 2. Oil dip stick, make sure the oil level with the dipstick is good and replace the dipstick tight into place 3. You can drive to an Autozone of similar place, they have the OBDII readers you can borrow and use in their parking lots. Just in case. 4. When you replace the air filter, you probably took out the airbox. Make sure there is nothing loose or knock out with the rear spoiler. 5. You can always disconnect the battery for 5 minutes and reset the system when reconnecting, make sure you have the radio codes. Otherwise, not much there in the oilchange that would cause this. Izzy
-
Parts info request
Izzy replied to stebbid's topic in 996 Series (Carrera, Carrera 4, Carrera 4S, Targa)
You could try posting a picture. Or better yet, the Sunset Porsche website has a parts catalog, with all the drawings and part numbers. You could very likely find it there, I have found it very useful. It is a US catalog. Izzy -
You may want to take it someplace where you can read the codes, and faults. At first it sounded like some bad gas, but if it ran fine afterwards, something else is not right. A dealer will read all store codes and troubleshoot if you don't have the OBDII readers. Or a place like Autozone have readers you can use in their parking lot. Izzy
-
Overheating at Track
Izzy replied to mcvgums's topic in 996 Series (Carrera, Carrera 4, Carrera 4S, Targa)
Mark, A couple of things come to mind, one simple one would be to remove the front bumper cover, and vacumm the radiators. I would venture to guess it was probably never done, and you may have 6 years of leaves and crud in there. I have a 99, did it last winter, had a full vac of debris. Second, make sure the coolant level is at the max. The light in my car would flash if my level was 1-2 cups low (literally). So top it off if needed with 50/50 Porsche coolant. Lastly, the fan is checked with the engine on and at operating temperature. On the right side and top of the engine there is a temp probe. There is a picture of it somewhere in the site. Make sure you can find it before turning the engine on, and no loose clothing. Then disconnect the probe and the fan should go on. That could be the last reason. But I would do them in the order I suggested, since the radiators do need a cleaning, use the soft brush on the vac. Izzy This thread shows the picture for the connector, engine compartement fan http://www.renntech.org/forums/index.php?s...compartment+fan -
New Rotors installed
Izzy replied to Izzy's topic in 996 Series (Carrera, Carrera 4, Carrera 4S, Targa)
Good point Dave. However I have been tracking with Pagids upfront for a while after trying different setups, and found that for my driving, the added front transfer gives me more agressive turning, less chance of ending up butt first on the grass (done that plenty of times!) But I always go back to OEM street pads after tracking. Izzy -
New Rotors installed
Izzy replied to Izzy's topic in 996 Series (Carrera, Carrera 4, Carrera 4S, Targa)
Thank you guys. This morning I mounted the Pagid oranges on the front and new Porsche OEM on the rear. Breaks fine. Pagids are always amazing, and I mount them a week before track day to get use to the fast braking. All seems fine, will keep them until after track weekend. Wheels look great too, don't know why I didn't do this sooner. Don't know how long it will last, or how it will stand to the soap and scrubs. -
New Rotors installed
Izzy replied to Izzy's topic in 996 Series (Carrera, Carrera 4, Carrera 4S, Targa)
Looks like some people clean the rotors prior to install, others get new pads to go along. I have used break cleaner solvent on BMW,Honda, and Volvo rotors, they did come coated with some cosmoline or other like coat. But the Porsche ones did not feel at all like they had a coating, no residue on the box or on my hands. They felt totally dry. So I didn't think to spray them. The pads are probably half life OEM's. I also use Pagid oranges for track day. Thinking about driving this week the long highway way to work and back, light braking. If they are still garbage by Wednesday, probably change to the Pagids, which are only used on track and have a couple hundred miles only. Or should I change to Pagids tomorrow, more aggresive bite will bed-in the rotors faster? -
Today I installed 4 new rotors (dealer direct, Porsche OEM). Used Loren's DIY, piece of cake, all rotors came out without any strugles. While the wheels where off, I did a thourough cleaning, and sprayed the inside with the silver metallic paint (2 coats) and enamel(2 coats). Amazing how the wheels look like new. All the black marks are history now. :clapping: But here is the problem, did a quick drive up and down the street, and to my surprise the brakes where very weak. The pads are mid-life, the fluid is a week old. With the old rotors, the car stops on a dime. With the new ones, I have to drive like with a minivan. Is this normal? and if so, any idea of how long (miles) for wearing-in? I am heading to Road Atlanta this weekend and don't want to fly into the wall with poor brakes :eek: . The old rotors where exactly and the low wear thickness. Thank you Izzy
-
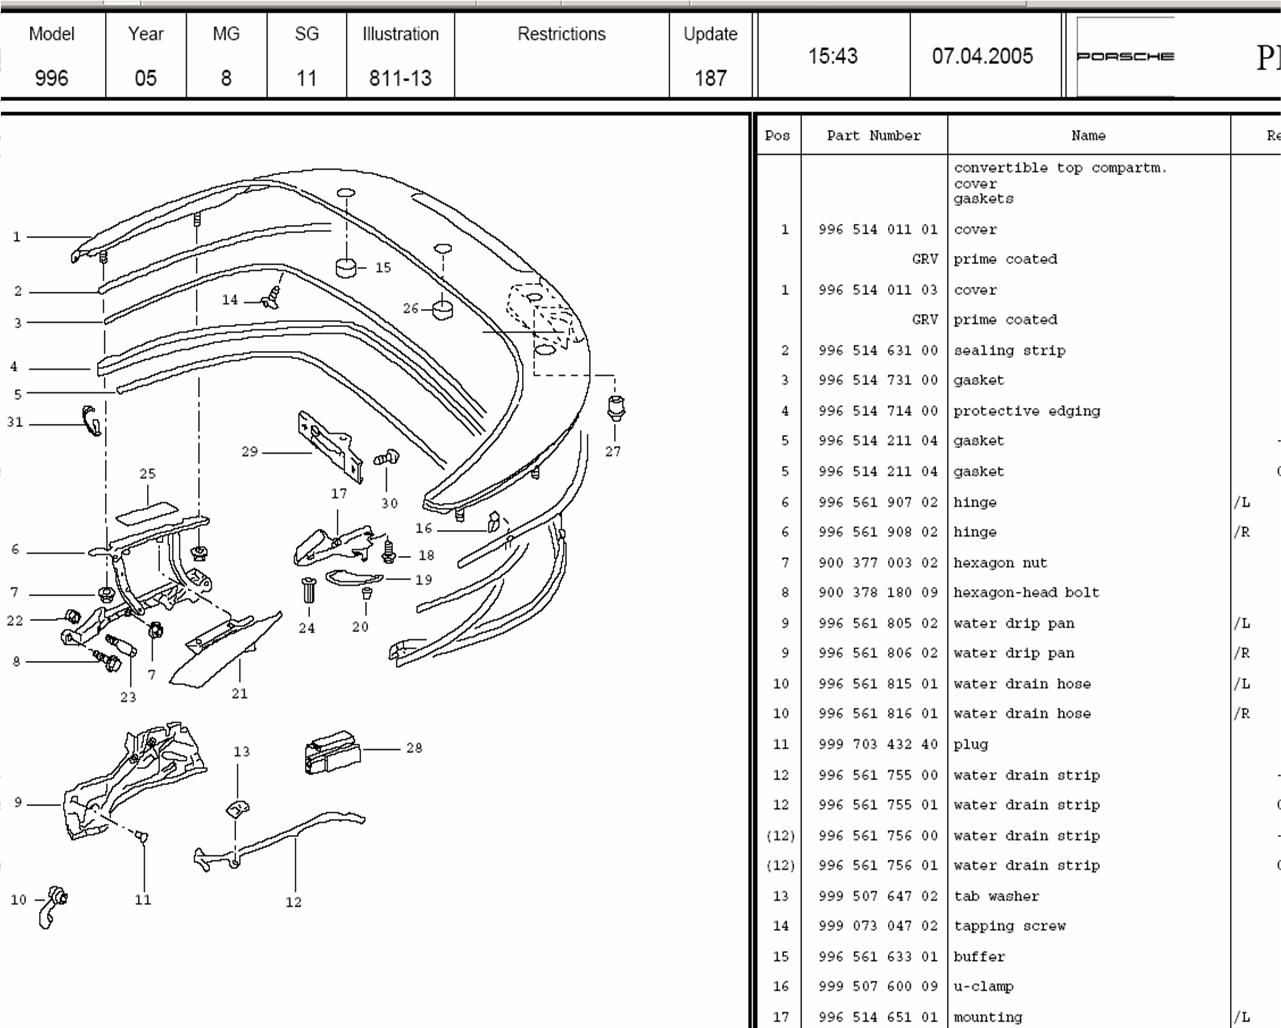
Sorry Izzy,everything works fine except that the rear cover dont close/lock. Got it. That is strange if the dealer couldn't find anything wrong. I had a problem once with the rear cover. When the cover is fully extended during the cycle, look on both sides for potentially a broken hinge part piece. It was very hard to see because it fell off and it was black like the rest of stuff in there. But replacing the part cured the problem, it was part 6 in the view below. I will see if I have other information on it.

-
I am not sure I follow, Mika. Does the top open and close? Is the rear cover not fully closing? Is it the side flaps not completing the cycle up or down? This last one can mess up your top cycle and drive you crazy and it is an easy fix. Let me know or throw some pics, perhaps we can help. Izzy
-
Another new guy with questions
Izzy replied to mjl's topic in 996 Series (Carrera, Carrera 4, Carrera 4S, Targa)
Welcome MJ. Nice car, get it out to a track someday to truly feel what it can do. On the cab, there are a number of TSB's on noises in the TSB section. One quick thing I did for mine (99) was put some fine film of petroleum jelly on the rubber where the top comes in contact with the window frame. Worked wonders. Izzy -
Polishing your exhaust tips
Izzy replied to FlashingBlade's topic in DIY Articles - Carrera (996) - Common Fixes and Repairs
Chris, I have used Mothers chrome polish and an ultrafine 0000 steel wool. After washing and drying the car, apply the polish with the steel wool, let dry and repeat. It even took out the rusty spots out. I also have a 99. Izzy -
Gas door no longer locks?
Izzy replied to SPR's topic in 996 Series (Carrera, Carrera 4, Carrera 4S, Targa)
I went to check mine, same problem. Guess I never checked. Missing the grommet, and found the part number in Sunset catalog. 996 624 505 02 "Guide Rose" is the name What I found out in my case is that the emergency operation cable rubber connector was interfering with the plunger movement. Some drops of mystery oil cured that and it works fine. But will order the guide, since it probably acts as a separator between the rubber emergency connector and the plunger, and helps guide to the hole in the lid. Look in Sunset's website for the catalog if you need more parts, the drawings are very good for assemblies. Izzy -
PSE Exhaust Conversion
Izzy replied to 911h20's topic in 996 Series (Carrera, Carrera 4, Carrera 4S, Targa)
Interesting look I wonder how long those welds will last, or if it looks like it was done by some kids in a shop class (free labor anyone?). -
Cabrio Parking Brake Light
Izzy replied to Izzy's topic in 996 Series (Carrera, Carrera 4, Carrera 4S, Targa)
I cut the speed wire long time ago, so can lower the top while moving. Just wondering if anyone tried the parking brake trick yet, which is done by some in the Boxster. I am planning on checking the voltage later today, got to first take the youngest to see Curious George. Then I can monkey around in the garage. Pun intended -
Brake Pads
Izzy replied to Jorge332655's topic in 996 Series (Carrera, Carrera 4, Carrera 4S, Targa)
Jorge, If you wait until the sensors light up, that means you have to do the brakes and put in new sensors too (about $14 each). You can change the pads earlier and don't need new sensors, just keep your eyes on the pads. I got mine from Sunset, about 60% of the dealer price for the pads and the spacers. I change my pads for tracking, so I got it down to about 15 minutes. Once you do it once, it is a piece of cake. I would not open my bleeder line though, but open the cap off the break fluid reservoir to release pressure from the pistons being pushed into the calipers. I would be concerned of any air being sucked in as the pistons may retreat and come back, just a little bit, but enough to get an air bubble. Izzy