Welcome to RennTech.org Community, Guest
There are many great features available to you once you register at RennTech.org
You are free to view posts here, but you must log in to reply to existing posts, or to start your own new topic. Like most online communities, there are costs involved to maintain a site like this - so we encourage our members to donate. All donations go to the costs operating and maintaining this site. We prefer that guests take part in our community and we offer a lot in return to those willing to join our corner of the Porsche world. This site is 99 percent member supported (less than 1 percent comes from advertising) - so please consider an annual donation to keep this site running.
Here are some of the features available - once you register at RennTech.org
- View Classified Ads
- DIY Tutorials
- Porsche TSB Listings (limited)
- VIN Decoder
- Special Offers
-
OBD II P-Codes - Paint Codes
- Registry
- Videos System
- View Reviews
- and get rid of this welcome message
It takes just a few minutes to register, and it's FREE
Contributing Members also get these additional benefits:
(you become a Contributing Member by donating money to the operation of this site)
- No ads - advertisements are removed
- Access the Contributors Only Forum
- Contributing Members Only Downloads
- Send attachments with PMs
- All image/file storage limits are substantially increased for all Contributing Members
- Option Codes Lookup
- VIN Option Lookups (limited)


DBJoe996
-
Posts
704 -
Joined
-
Last visited
-
Days Won
21
Content Type
Profiles
Events
Forums
External Paint Colors
Downloads
Tutorials
Links Directory
Collections
Store
Posts posted by DBJoe996
-
-
I seem to remember that someone posted that there is a seal on an actuator arm right above this, and it is known to go bad. Externally replaceable at not much cost. Might look into that.
-
Around your house could be an amateur radio operator or your Ministry of Defence. The 433 mhz frequency is popular for all sorts of uses. https://en.wikipedia.org/wiki/LPD433
As for the supermarket parking lot - do you notice any remote cameras that may transmit to a security camera system? They probably transmit in the 433 mhz range.
-
 1
1
-
-
Third way is to use a plastic wedge and pry apart the bumper and left rear tail light. Not much, but enough to use a coat hanger to fish out the cable. There is an emergency release cable under there for the engine lid. Find it and open the engine lid. Use the engine compartment jumper points to hook up a 12V source, then pop the front hood. That is a lot easier than finding the front trunk emergency release cable.
-
Your next question will be, which one is it?

-
1
-
-
I was simply suggesting a course of action for narrowing down the problem to the MAF sensor. Sometimes it is something simple (as you found - disconnected connector plug) and then it could be your MAF sensor needs replacement. The MAF sensor is delicate. Short of having Durametric to see real time values while the engine is running, the best course of action is a process of elimination. You can get an inexpensive OBDII reader from the auto parts store for <$50 to clear codes. I have one, plus Durametric, that I use on several of my vehicles and it has proven invaluable. Or you could just jump to step 4 and replace the MAF sensor. The sensor is critical to engine performance and emissions. As I said, in the end I replaced mine with new and that worked after several attempts at cleaning it failed to solve the problem.
-
Yes, behind the rear seats, lift up the rectangular carpet piece and it is there.
-
p1128 corresponds to: "Long Term Fuel Trim B1 System Too Lean" which means that the car thinks it's running leaner than it should be.
p1130 corresponds to: "Air/Fuel Sensor Circuit Range/Performance (Bank 1 Sensor 1)" which basically means the same as the p1128.Bank 1 is cylinders 1-3, left side of engine when looking into the engine bay
– Incorrect signal from MAF sensor
– Intake air system leaking (there are sprays made that you spray on the outside of the air intake and listen for an RPM change to give you a hint)
– Fuel pressure too low
– Volume supply of fuel pump too low
– Fuel injectors fouled (Techron)
– Exhaust system leaking (Cover the exhaust pipes partially when the car is in the air and the motor running and listen)1) Make sure you installed the MAF sensor in the correct way (towards air flow) and that the electrical connector is snapped in tight and correctly
2) Put some Techron in your fuel, clear codes and see if they come back
3) Clean MAF sensor again if they come back
4) Clear codes and repeat
5) Most people solve this P1128/P1130 problem with a new Bosch MAF sensor. I cleaned mine several times, then just simply replaced it with new. That solved my problem. Could be your O2 sensors, but I would start with the MAF sensor.
-
Steady as a rock after cleaning. I was subject to occasional blips, more like hiccups. I pulled the ICV, filled the inner chamber with carb cleaner and let it sit overnight. Then I rigged up a 9V battery with some small wires and alligator clips, and then just touched the pins on the ICV until I figured out which connection cycled the valve open. Pretty simple to do really. I will say this, I had done some cleaning in the past but didn't cycle the valve open with a 9V battery. I thought I had it cleaned out, but then not really. Same idle problems came right back. I noticed the rotating valve inside the chamber kind of "snapped" back and forth and would stick open. Not good. The interior chamber and the rotating valve I thought was always black. Turns out that is not the case! The rotating valve inside the chamber is silver when clean. So I cycled the valve, gently scrubbed the interior and valve with Q-tips (lots of Q-tips) soaked in carb cleaner paying close attention to the edge and underside of the valve, got it all shiny again, sprayed it with a light spray of WD-40 and then the rotating interior valve worked smoothly. I don't know if that will completely solve low idle RPM but it sure made the engine idle smoothly once again.
-
You are very welcome. Glad to hear you got it sorted out! The ICV is a tricky bit of business, particularly to clean it out. I use a 9V battery to cycle the valve back and forth while soaking it in carb cleaner. Mostly, a sticky ICV will cause the idle RPM to wander, or float about a particular RPM range. Could be that now you just need to take it for a nice easy drive to get the DME adaptation back. If the idle doesn't correct itself, then you are correct, a new ICV would at least eliminate one problem with low idle.
-
Sometimes a 12V battery will test okay, but is not really okay. The cold cranking amps is what you need in the battery as a reserve for starting. Like Loren suggested, check everything from the battery back to the starter for corrosion. Make sure the clamps are tight on the battery. Check the engine ground and even better, unbolt it and clean up any corrosion or surface junk. How old is your battery? Anything over 3 years old I would consider suspect and would replace with a new AGM battery. Also, although a bit more major of a project - some have had the starter Y-cable replaced as this is a known weak point that leads to starting problems. If you are undoing the battery cables, always undo the negative lead first! And know your radio code before disconnecting the battery. After disconnecting the battery for whatever reason, also a good idea to clean the jumper junction box in the engine bay where the 12V cables connect. The main 12V wires from the battery to the starter connect there. Like I said, disconnect the negative lead FIRST on the battery before doing any work on the main 12V cables.
-
Thanks Loren!
-
radio code in a 2001 turbo with a cdr220 serial number: y5051197
-
I see what you are saying. My take on that, a piece of the outer sheath is still attached to the grommet, is (1) I would try to get it to slide back in the piece still attached to the grommet; (2) if you can't get it back in, cut off the compression nut and see if it will slide back in, then use some epoxy and a worm clamp; (3) if it does not slide back into the sheath with the compression nut cut off, then I would try to slice or cut the outer sheath remaining in the grommet lengthwise just a little bit and see if the exposed metal part of the cable will slide back in the grommet. The deal is not changing the effective length of the cable assembly and outer sheath. If you remove the piece of outer sheath still remaining in the grommet, I'm afraid even with a liberal dose of epoxy, it won't hold
-
Flat spots usually go away, if the tire has good tread and it is not too old and dry rotted. It may drive you crazy for awhile at certain speeds. If the tires are older than 3 years, you might consider new tires and balancing in the near future.
-
Yes, that is what I was thinking - small dab of epoxy on the outer sheath and then slide it firmly back into the grommet. You might do several test fits to make sure it seats completely in the grommet. Was also thinking that if the "nut" prevents the cable sheath from sliding all the way in, cut it off with a dremel and epoxy, then use a worm clamp to provide compression.
-
Agree with Ahsai. Clear the codes by disconnecting the negative battery lead for several minutes, or using your code reader. Given that it has not run in 8 months there could be some stale gas. Put a bottle of Techron in the fuel tank. Then go for an easy drive. Try to maintain an even speed over some distance (several miles). See what codes may come back. The P03XX are misfires. They could go away with some consistent running with a warm engine. Otherwise you may need to replace spark plugs and check your coils for cracking.
-
Sorry for the delay. It really looks like you have either cut something apart or pulled apart the outer cable sheath from where it seats in the black plastic grommet. That unit is all one piece. If you look at part number 5 in the attached diagram, then click on part number, it will bring up a picture of the one piece accelerator cable that includes the black plastic grommet as one whole unit. I'm trying to find a better picture but I have not found one yet. The way you are supposed to undo the cable is to insert a flat blade screwdriver under the black plastic grommet on the TB. If you look closely you will see it has a tab on it that needs to be compressed to release the whole grommet from the TB as one piece. The reason I mention this is you may be able to release the grommet from the TB and repair the cable connection to the grommet with some epoxy. But I would not rely on that as a long term fix.
Diagram: http://www.autoatlanta.com/porsche-parts/hardparts.php?dir=996-99-05§ion=702-10
-
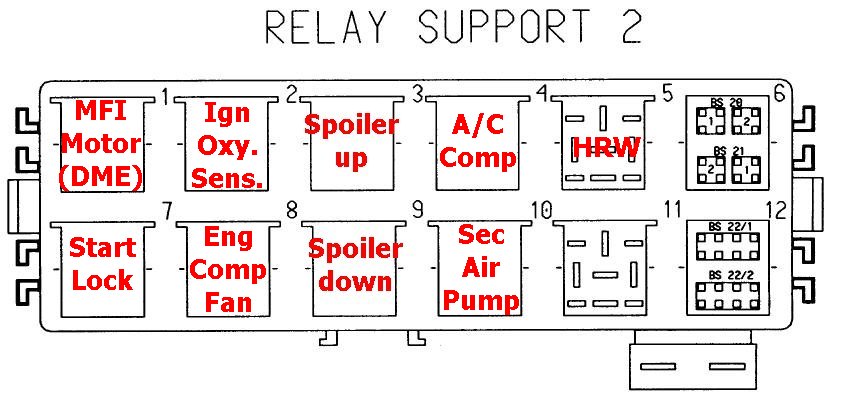
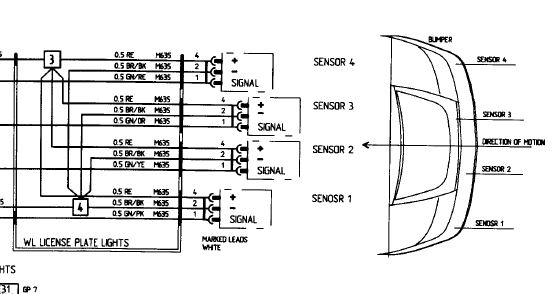
Don't worry, you are not the first to find this plug and ask this question. It goes nowhere. Sometimes it is loose, and sometimes it is plugged into a blank plastic socket connector to the right, near where the O2 sensor connectors are located. I've heard that it is perhaps used as a test port connector, but I have no idea for what. It also could be the Parking Sensor Assistant plug for the rear bumper sensors, which most of us do not have. Consists of four sensors on the rear bumper to aid parking.
-
Yes, pretty much what I experienced. And yes, the outer sheath of the cable actually snaps into the black plastic guide as you discovered when you took it apart. The outer sheath snaps into the black plastic piece that protrudes out the back of the square hole. It took no more than a pretty good tug by hand on the internal cable to get the sheath seated back into the plastic guide. It actually did "snap" into place. That removed all the tension on the whole cable and then the TB butterfly valve operates correctly. Do not use pliers on the internal cable or outer sheath as you may damage it. This is sort of like a fulcrum point for the internal cable and outer sheath. When it is not snapped in, the cable just doesn't work properly.
-
Undo the cable from the TB and check for smooth motion of the cable. Might have someone push on the accelerator while you observe the motion of the cable. I had this happen to me once and found that the cable was not "snapped" into the little black plastic guide on the TB. Fixed by undoing the cable from the TB and pulling on the cable so that the outer cable sheath snapped into the plastic guide. You can't see behind there to make sure it is seated all the way. But that is what it was for me.
-
1
-
-
Used oil is going to show signs of shearing. You had 4,000 miles on your oil and it will exhibit loss of viscosity at that point. Basically, oil loses it's properties over time/use. That's what oil does and that's why you need to do an oil change. Oil wears out.
Shear stability is a measure of the amount of viscosity an oil may lose during operation. Oil experiences very high stresses in certain areas of the engine such as in the oil pump, cam shaft area , piston rings, and any other areas where two mating surface areas squeeze the oil film out momentarily . Most multigrade engine oils contain special types of additives, called Viscosity Index Improvers, which are composed of very large, viscosity-controlling molecules. As the oil passes through the engine, these molecules are permanently sheared or torn apart over time, causing the additive to lose its viscosity-contributing advantages which reduces the oils ability to maintain its higher number. ie.. 10w30 ,
Synth Oils do not rely as much on special Viscosity Index Improver additives and will experience little permanent viscosity loss.
BTW - a synth 10W/30 has a value of 9.30-12.49 Cst's @ 100 deg C. I would say your 15.01 Cst for 5W/40 @4,000 miles is nothing to worry about.
-
I concur with the $3K cost of retrofit and clutch assembly. There are another couple of recommended things to add to the list while the engine is out - consider the age of the car (16 years) and service record. It is very easy to replace the AOS, spark plugs and coil packs while the engine is out, but a real PITA to do with the engine in the car. Also have the O-rings under the oil cooler replaced as well. Another item(s) that do not age well and can give some trouble is the oil filler pipe, plastic vacuum tank and coolant tank. These items are relatively inexpensive and doing them while the engine is out is highly recommended. You could also throw in new motor mounts and transmission mount inserts.
-
1
-
-
Then probably Part No. 14 in this diagram http://www.autoatlanta.com/porsche-parts/hardparts.php?dir=996-99-05§ion=804-20
-
Really the best in the business - LNEngineering http://lnengineering.com/
Use one of their Certified Installers and you will have peace of mind http://theimssolution.com/certified-installers/
Get the Solution
You cannot know the status of either the IMS bearing or RMS until the engine/transmission is dropped and separated and the old bearing and seal are removed. The RMS may weep oil and there may be some leakage detected at the transmission/engine joint. The LN Certified Installers will run a complete pre-qualification of the engine prior to changing out the IMS bearing.
-
1
-
how to control the motor model
in 996 Series (Carrera, Carrera 4, Carrera 4S, Targa)
Posted
Post your engine number. It looks like this. Do an e-gas calibration - move ignition key to the on position (do not start the engine and do not put your foot on the accelerator pedal), wait for one minute. There should be a series of clicks and sounds from the engine compartment. Then remove the ignition key. Then start car normally.