Welcome to RennTech.org Community, Guest
There are many great features available to you once you register at RennTech.org
You are free to view posts here, but you must log in to reply to existing posts, or to start your own new topic. Like most online communities, there are costs involved to maintain a site like this - so we encourage our members to subscribe or donate. All subscriptions and donations go to the costs operating and maintaining this site. We prefer that guests take part in our community and we offer a lot in return to those willing to join our corner of the Porsche world. This site is 99 percent member supported (less than 1 percent comes from advertising) - so please consider an annual subscription or donation to keep this site running.
Here are some of the features available - once you subscribe RennTech.org
- View Classified Ads
- DIY Tutorials
- Porsche TSB Listings (limited)
- VIN Decoder
- Special Offers
- Paint Codes
- Registry
- Videos System
- View Reviews
- and get rid of this welcome message
It takes just a few minutes to register, and it's quality Porsche information at a low cost.
Contributing Members also get these additional benefits:
(you become a Contributing Member by subscribing or donating money to the operation of this site)
- No ads - advertisements are removed
- Access the Contributors Only Forum
- Contributing Members Only Downloads
- Send attachments with PMs
- All image/file storage limits are substantially increased for all Contributing Members
- Option Codes Lookup
- VIN Option Lookups (limited)


1schoir
-
Posts
2,739 -
Joined
-
Last visited
-
Days Won
9
Content Type
Profiles
Events
Forums
Exterior Paint Colors
Downloads
Tutorials
Links Directory
Collections
Classifieds
Store
Everything posted by 1schoir
-
987 Convertible Top part number
1schoir replied to contadino's topic in 987-1/987C1 Series Part Number Requests
Michael Happy to be able to oblige! P.M. SENT! Let me know if you need any assistance before or after the parts arrive ...these tops are terrific, but can be a royal PITA if one is not attuned to its weak points///\\\ Regards,, Maurice. Sorry Maurice but I was not able to find a PM from you-not is SPAM folder. Could you resend please? Thanks again, MW123 Resent Recently. Regards, Maurice. -
New headlights I found online, but where to buy them?
1schoir replied to Jinster's topic in 986 Series (Boxster, Boxster S)
Ahhhhh, Pie in the Sky...my ABSOLUT favorite type of treat!!!! Try the very helpful Dave Wilson at the Bert Smith Porsche Dealership in Florida.... Best Regards, Maurice. -
987 Convertible Top part number
1schoir replied to contadino's topic in 987-1/987C1 Series Part Number Requests
Michael Happy to be able to oblige! P.M. SENT! Let me know if you need any assistance before or after the parts arrive ...these tops are terrific, but can be a royal PITA if one is not attuned to its weak points///\\\ Regards,, Maurice. -
That warranty is just about the same as that of the Bosch.. 3 years full and 6 years pro-rated...When it's on sale, it's less than $95 at Pep Boys.. Regards Maurice.
-
Convertible top dash light on
1schoir replied to Oldguy57's topic in 986 Boxster Convertible Top Issues and Solutions
Guy: First of all, we like photos and we try to avoid other Dealers whenever practicable. ....balljoint with the shaft, replaced it, top works fine but the dash light stills on and the windows will not go full up when the top is down.... There are two instances where the light can stay on abnormally. The one you are describing here (top all the way open) is controlled in part by the black lever microswitch that resides on top of the convertible top electric motor ((Just forward of the third brake light). In other part, it is controlled by the Double Relay in the driver's side kickpanel. It's the only double relay there so you can't miss it... You can temporarily defeat this little annoyance by devising either a stack of 1/4" thick blocks of semi-sturdy styrofoam and installing them one a time, on top of the electric motor housing, or, better yet, under the clamshell where it makes contact with that "Black Lever Microswitch. Alternatively, some garages have used a different method, which includes installing (by glue) a suitable spring on the underside of the clamshell such that it will trip the black lever microswith a tad sooner and thereby "fool" the top into "thinking" that it is time to start the "comfort close feature" or "after-running time) as Porsche usually refers to it in its manuals. Here you just have to make sure that the spring can hit, and then DEPRESS" the black lever microswitch. Let us know how you make out and what, if any symptoms have left. Unless the dealer is in a good mood, avoid it like the proverbial plague. FYI, this is one of the few (perhaps even the "only") area of the early (i.e., "A Version") transmissions and set-up that still is providing a bit of a challenge. However, some of you description may provide some useful info to add to the community wisdom here, so, We'll see how that tidbit develops. In the meantime, try the two solutions I suggested and report back. ...decide to change the two micro switchs, the one at the brake lever, and the one at the latch, light is on again, and stills ON.... The brake lever microswitch, when the dashboard idiot light is illuminated, is normal when you pull up on the handbrake and... that is what lets you know that power to the convertible top motor is going to be turned on. The other microswtich (actually there are TWO inside that latch assembly) is the one that has to get tripped/released, in order to keep working properly. If your windows drop the requisite (approximately 4 inches) when you pull on it, then at least one of the two microswitches inside the latch assembly is just fine. To check out the other one, do a search here or go to Mike Focke's Boxster Pages (Google it) to get a number of articles that will familiarize you with the top. ..Congratulations on your new ride.! and remember, we LOVE pics.... .Best Regards, Maurice. Hello Maurice: Thanks a lot for your reply. I just tried two layers, one at a time, of 1/4 in black, self stick medium density foam, gluing them on the micro switch contact point on the clamshell without success, do I have to use a more dense foam? Also tried michaelwakers123's 1 second more on the switch, and also it didn't make any difference. I did not visualise how to install the spring you told me to try, again should I use a more strudy foam? Two more observations: When I unlatch the top, the windos drops 4 inches, stand for a sec or two, and the they drop, one at a time totally, some time the two, sometimes just one. When I open the top, and when it get's at the end of the cycle, when I hear the motor begin to stress and the clamshell is fully closed, if I push the top switch again to continue the cycle, it seems to me that the clamshell tries to open again, weird, isn't it? As for the dealer, well I went there to have some of my car's history. But I'll try to find a independent gagrage, cause the only thing "high end" there is the overpriced service, well overpriced, and it seems to me that they do not have any interest in working with older cars, should be their pride! Again thanks a lot and I do not know what to try anymore, maybe as m2 suggested, the tensioner cables? Have a nice day! Fermin I did try to attach a pic of my ride, but file too big, so I'll try to take a more "light" pic this week end. Fermin: We are definitely on the same page, especially the part that expressed the sentiment that their "older" cars should be the source of tremendous pride...I guess it just doesn't accrue to their proverbial bottom line...It's a short-sighted view in my experience, but greed or financial obligations of certain dealer's make it so. Shame of them....literally! .... ..... Anyway, the fact that you mention that your windows sort of drop independently of each other may mean that there is some moisture/damage/corrosion in the immobiliser unit (under the driver's seat, small, flat, black box). That unit gets wet if the convertible top drains are not always kept clear, as that causes water ingress (and, of course, the water promptly finds its way into the passenger cabin and toasts the unit! The other possibility for that "independent of each other dropping of the windows upon pulling the convertible top latch" may be a faulty double relay (kick panel to the left of your left calf as you sit in the driver's seat ), so it might be worth checking that out, maybe even with another member's working relay. The article that I referred you to will show you photos of the two different types of relays (i.e., Black Triangle on its top surface or Black Rectangle/Square on the top surface of the double relay). With respect to the spring, it has to be a reasonably subtantial one that gets glued on or attached to the underside of the clamshell, but it size (perhaps conical, tapered on the end that faces the black lever microswitch on top of the electric motor. The sping then compresses to not interfere with the tight fitting clamshell when it is full down. It's a little Rube Goldberg, but some mechanics have used it successfully. As far as weirdness: "...When I open the top, and when it get's at the end of the cycle, when I hear the motor begin to stress and the clamshell is fully closed, if I push the top switch again to continue the cycle, it seems to me that the clamshell tries to open again, weird, isn't it?..." , it's not so weird. There are a number of factors which affect that last little bit of travel of the leading edge of the convertible top frame...The amount of tension on the tensioner cables which act on the rearmost main bow, the overall length of the front pushrods, AND, on '97 to '99 Boxsters, there is also the bend in the silver metal tiny arm of the B-Pillar Microswitch to consider. If the B-pillar microswitch's lever is too "open" from its original shape, that will cause it to contact (and then be tripped by) the base of the B-pillar of the convertible top frame. That may also explain the "weird" nature of the problem as that contact causes a signal to travel through the wires to the double relay, which then "dictates": to the electric motor when to stop turning the V-levers. You can experiment with shortening/lengthening the overall length of the front pushrods, as that will also affect how the leading edges of the top will line up with the windshield frame. Note that it is NOT a linear progression and that, once you reach maximum extension, the V-levers will continue to spin for 1 of 2 seconds and then you will notice that the top starts to pull back. It can then "rock" back and forth, so keep that in mind. If, as you mentioned in an earlier post, you have to "pull the front of the top " to make it stretch a little to get it into the fully closed and latched position, then that is something that you can try to ameliorate by adjusting the overall length of the front pushrods: loosen the 10mm bolt with fat washer (after marking your starting position with nail polish or something equivalent) and push the two parts of each one together VERY SLIGHTLY and then tighten the 10mm bolt back on . Be careful with the 10mm bolt and fat washer because the drain hole underneath the V-levers area seems to have magical magnetic properties HaHa)and it has eaten many stray bolts and such. LOL! M2's suggestions is a good one, so , see Keep us posted and I'm looking forward to seeing pics. Regards, Maurice. -
Convertible top dash light on
1schoir replied to Oldguy57's topic in 986 Boxster Convertible Top Issues and Solutions
Guy: First of all, we like photos and we try to avoid other Dealers whenever practicable. ....balljoint with the shaft, replaced it, top works fine but the dash light stills on and the windows will not go full up when the top is down.... There are two instances where the light can stay on abnormally. The one you are describing here (top all the way open) is controlled in part by the black lever microswitch that resides on top of the convertible top electric motor ((Just forward of the third brake light). In other part, it is controlled by the Double Relay in the driver's side kickpanel. It's the only double relay there so you can't miss it... You can temporarily defeat this little annoyance by devising either a stack of 1/4" thick blocks of semi-sturdy styrofoam and installing them one a time, on top of the electric motor housing, or, better yet, under the clamshell where it makes contact with that "Black Lever Microswitch. Alternatively, some garages have used a different method, which includes installing (by glue) a suitable spring on the underside of the clamshell such that it will trip the black lever microswith a tad sooner and thereby "fool" the top into "thinking" that it is time to start the "comfort close feature" or "after-running time) as Porsche usually refers to it in its manuals. Here you just have to make sure that the spring can hit, and then DEPRESS" the black lever microswitch. Let us know how you make out and what, if any symptoms have left. Unless the dealer is in a good mood, avoid it like the proverbial plague. FYI, this is one of the few (perhaps even the "only") area of the early (i.e., "A Version") transmissions and set-up that still is providing a bit of a challenge. However, some of you description may provide some useful info to add to the community wisdom here, so, We'll see how that tidbit develops. In the meantime, try the two solutions I suggested and report back. ...decide to change the two micro switchs, the one at the brake lever, and the one at the latch, light is on again, and stills ON.... The brake lever microswitch, when the dashboard idiot light is illuminated, is normal when you pull up on the handbrake and... that is what lets you know that power to the convertible top motor is going to be turned on. The other microswtich (actually there are TWO inside that latch assembly) is the one that has to get tripped/released, in order to keep working properly. If your windows drop the requisite (approximately 4 inches) when you pull on it, then at least one of the two microswitches inside the latch assembly is just fine. To check out the other one, do a search here or go to Mike Focke's Boxster Pages (Google it) to get a number of articles that will familiarize you with the top. ..Congratulations on your new ride.! and remember, we LOVE pics.... .Best Regards, Maurice. -
As to the "Another Boxster" comment in the Planned future cars section of the profile, I'm of course referring to an '03 or '04 Boxster, NON-S, for a transplant from a compatible 3.6 Liter powerplant. Best Regards, Maurice.
-
Plastic ball joint
1schoir replied to matthewjamesdunn's topic in 986 Boxster Convertible Top Issues and Solutions
Miles: Not AFAIK. There is one in the Netherlands. PM me if you would like his coordinates. Be very careful to not operate the top with "dangling" front pushrods (i.e., pushrods that result from their respective plastic ball cup breaking apart). A dangling pushrod will invetably cause a tear or rip in the foam drain tray, that will cause water to get into the passenger cabin, where it will promptly fry the Immobilizer (under the driver's seat, or in your case, IIRC, under the passenger seat :eek:) Regards, Maurice. -
Rey: The only "engine" that has to be running to get the top in motion is the electric motor that resides just ahead of the third brake light. That electric motor drives the two transmissions (one left, and one right, bolted to the inside of the rear quarter panel) through the respective left and right drive cables. The transmission on each side then rotates the V-lever that is bolted onto its respective face, which V-lever then moves the front and the rear ( black "hydraulic") pushrods. Each of the two pushrods on each side then acts on the clamshell (black "hydraulic" pushrod) and on the convertible top frame (front pushrod with plastic ball cup) via the steel ball that is bolted onto the base/underside of each B-Pillar by means of a thin nut. As for old age..."It happens to the best of us"! :drive: Regards, Maurice.
-
Rey: The "hanging canvass cover with two cables has no effect on allowing the roof to get power, but should be hung in its correct location. Hanging it in the correct location will prevent possible damage to it or other moving parts and, most importantly, serves to direct any water or rain away from the electric motor and rear of the convertible top well. It also channels water to the drain holes located in the foam drain tray(s). Also, make absolutely certain that the idiot light for the emergency brake is on after you have pulled up on the emergency brake. Regards, Maurice.
-
Clamshell/convertible top repair
1schoir replied to Ceejay59's topic in 986 Series (Boxster, Boxster S)
Great work finding out the cause of the problem. No mice around here, but I have read that they like the taste of something that is used to cover the electrical wires on German cars. Something like starch that is used on the insulating cover of the electrical wires. Thanks for the kind words. I'm glad I was able to help and enjoy the top down driving while the weather lasts! I'll take you up on that beer or two if we cross paths. The same offer applies to you if you ever come out to Long Island. Regards, Maurice. -
Engine/Camshaft tools
1schoir replied to Dharn55's topic in 996 Series (Carrera, Carrera 4, Carrera 4S, Targa)
JFP: I believe you are correct, but we didn't try it on a three chain engine. We did it on 99 Boxster with 3.4 engine from a 996 and it worked without us having any doubt about its effectiveness. Regards, Maurice. -
Engine/Camshaft tools
1schoir replied to Dharn55's topic in 996 Series (Carrera, Carrera 4, Carrera 4S, Targa)
You can safely and effectively change the IMS bearing to the LN version without any camshaft locking tools. Wayne Dempsey of Pelican Parts has come up with an ingenious way of locking the sprocket on the IMS tube (which is behind the IMS flange,just on the other side of the engine case) by using three 25mm long set screws that get substituted for the IMS flange bolts. Those set screws press against the face of the sprocket (which is inside the engine, on the other side of the case) and prevent the sprocket from moving (or altering the timing). Simple, effective and fool proof, and you don't even have to find TDC and use a locking pin. Regards, Maurice. Hey Maurice, Wayne told us he was working on this some time ago. Do you have a link or more literature on his invention? I'm guessing some sort of stud that allows you to slide the ims cover off while the studs stay in place? logray: That's correct. Its a set of three M6 set screws with allen head recessed head which is flush with the sides of the bolt's threads. What we did was to remove one of the three IMS flange/cover bolts at a time and replaced it with the 25mm set screw, which then ends up flush with the aluminum face of the engine. Before you drive that set screw so as to lock the sprocket, you must first make sure that you are not driving the screw into one of the small holes that are arranged around the circumference of the sprocket on the IMS. You can see the face of the sprocket through the hole left by the removal of one of the original flange bolts so as to determine that the location of each of the three flange bolts does not end up on one of the holes in the sprocket (otherwise the set screw, if you continue to drive it, can end up inside the engine). After you have gently forced the set screws against the face of the sprocket (inside the engine) they end up flush with the face of the engine and you now have a sprocket and IMS tube that is locked and cannot move. I just found the link to the article again...Here it is: http://www.pelicanparts.com/techarticles/Boxster_Tech/14-ENGINE-Intermediate_Shaft_Bearing/14-ENGINE-Intermediate_Shaft_Bearing.htm Look specifically in the section entitled "Bearing Removal". Kudos to Wayne of Pelican Parts for publishing this remarkably simple and effective procedure. :clapping::clapping::clapping: Regards, Maurice. -
Clamshell/convertible top repair
1schoir replied to Ceejay59's topic in 986 Series (Boxster, Boxster S)
Ceejay: Thanks for the good weather wishes! First double check that the idiot light bulb itself is good by verifying that it lights up when you first turn on the ignition. If it lights briefly before you start the car and does not remain on when you pull up on the handbrake, that is definitely the reason that you are not getting any power to the electric motor. The microswitch is located below the base of the emergency brake, inside the center console on the driver's side. You can't remove and replace it without removing the center console, but you can blow compressed air at it. Regards, Maurice. -
Engine/Camshaft tools
1schoir replied to Dharn55's topic in 996 Series (Carrera, Carrera 4, Carrera 4S, Targa)
You can safely and effectively change the IMS bearing to the LN version without any camshaft locking tools. Wayne Dempsey of Pelican Parts has come up with an ingenious way of locking the sprocket on the IMS tube (which is behind the IMS flange,just on the other side of the engine case) by using three 25mm long set screws that get substituted for the IMS flange bolts. Those set screws press against the face of the sprocket (which is inside the engine, on the other side of the case) and prevent the sprocket from moving (or altering the timing). Simple, effective and fool proof, and you don't even have to find TDC and use a locking pin. Regards, Maurice. -
Clamshell/convertible top repair
1schoir replied to Ceejay59's topic in 986 Series (Boxster, Boxster S)
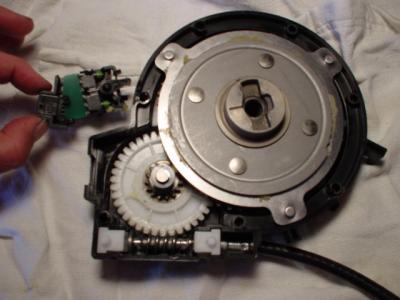
Ceejay: We had the most horrendous, long lasting winter here in NY as well. Glad that it finally appears to be over. It's very common for the emergency brake microswitch to malfunction and thus not turn on the idiot light on the dashboard. Moving it up and down will sometimes make it work until you can clean the microswitch or replace it. Again, if that light does not come on, there will be no power to the electric motor. I had forgotten some of the details we discussed last year. If the transmissions can rotate a full 360 degrees without shutting off, then the problem can only lie in one of two places: The double relay itself or the little switch points inside the "Stehle" brand transmission on the driver's side (even though the workshop manual says the passenger side). Here is a photo of the little switch points inside the driver's side transmission: Before taking apart the driver's side transmission, it would be easier and more cost effective to try another double relay, either a new one or borrowed from someone else's Boxster which is known to be good. Getting ready for a trip to the Blue Ridge Boxster Summit, so I may out of the loop for a few days, but I'll check on Sunday night to see if you have made progress. Regards, Maurice.
-
Clamshell/convertible top repair
1schoir replied to Ceejay59's topic in 986 Series (Boxster, Boxster S)
Ceejay: There are a number of inputs required to allow power to flow to the electric motor, so you have to eliminate the possible causes (of no power) one at a time. Since the car was stored, the easiest items to check are the two fuses: Fuse B6 supplies power to the convertible top double relay. Fuse D3 supplies power to the convertible top electric motor. Then make sure to double check that the parking brake is pulled up and, more importantly, that the emergency brake idiot light is lit up on the dashboard. No light, no power to the electric motor. Next check the two microswitches in the latch receptacle assembly. There is one on the left side of the assembly (has a large plunger that juts out when the latch is open). That one controls the 4" window drop that occurs immediately when you pull down the latch to open the top. There is another one on the right side of the assembly, and that is the one allows power to flow to the convertible top double relay. That one looks like two parallel strips. It's possible that the latter switch is faulty, even though it may appear to be intact when you visually inspect it, and sometimes even when you test it with a multimeter. Specifically, take a close look at the solder joints where the leads attach to the plug. This can be hard to detect, so check it with a magnifying glass for hairline cracks in the solder joint and for corrosion. If necessary, heat up the connections with a soldering iron and flow a tiny bit of solder onto the suspect joint(s). The remaining possibility is that the electric motor has developed one or more "dead spots", which sometimes happens in routine operation, and sometimes happens when the car has been sitting idle. You can easily remove the connector to the motor and try to power it with a 12V battery connection. Also, remove the double relay and tap it sharply on the ground as that sometimes will "revive" it. Then clean off the male spades of the relay of any corrosion, no matter how slight. If you can get some emery cloth (fine grit), you can also insert it into the female receptacles on the relay tray (where the double relay normally plugs in) with the help of a thin, flat stick and clean off any possible corrosion. As to the issue of the "convertible top open" idiot light not going out at the end of the cycle, that is very unusual in a "B Version" transmission set up, which is the one you should have in the 2000. It is more likely that you are not holding the button down long enough to get the light off. The quandary is that if there is something wrong with the system, it could keep rotating the V-levers and explode the plastic ball cups, or worse. In the B Version set up, you can disconnect the plastic ball cups and the black "hydraulic" pushrods and then keep the button depressed to see if the light goes off with a continued holding down of the button. If you do that,, you will not risk damaging the plastic ball cups, but you must then "resynch" the V-levers. To confirm that you have the B Version setup, verify that the double relay has a black square on the top surface (as opposed to a black triangle), You should also not have the black lever microswitch mounted on top of the electric motor. Here is a photo of where that double relay is located and what it looks like: You can also see the top right corner of the fuse tray to help you locate B6 and D3. IIRC, there was some question as to which version of the transmissions and set up you had in that car. Regards, Maurice.
-
Vic: Permatex Black Silicone Adhesive Sealant, available at most auto chain stores, including Pep Boys, AutoZone and Advance Auto Parts. It's strong, remains flexible and cures reasonably quickly. If the tear is large, you can use some backing material under the foam tray before applying the Permatex. Regards, Maurice.
-
Deckman: The interior door lights and the locking the car with the fob may have to do with the lock assembly, so you may have inadvertently disconnected one of the wires to it. For the window not closing all the way, if it's unrelated to the door lock assembly, try first to "retrain" the window, following the procedure in the owner's manual. Press the up button until it's closed all the way, then press the UP button again and hold it for 5 seconds. Do the same for the completely open position and see if that fixes the problem. If not, you will have to check the lock assembly and must remove the door panel again. Regards, Maurice.
-
Key no longer locks or unlocks door
1schoir replied to gimmemebit's topic in 986 Series (Boxster, Boxster S)
Since you have been using the key itself to lock and unlock the door for quite some time, it's probable that a small rod in the lock assembly has either broken apart or become disconnected. You will have to remove the door panel to get access to the mechanism, but the difficult part is getting into the car to begin with. Some AAA guys have a rubber wedge that can be inserted between the window and the B-Pillar (at a point about 10" above where the door handle sits, at the rear edge of the window. That wedge allows you to then insert a long metal rod (a thick wire hanger will do), where you can then hook the inner door handle and yank on it twice. Once to unlock, and a second time to open the door. You can DIY this if you can get your hands on a rubber wedge, but you have to be very careful not to overstress the glass to avoid shattering it. Regards, Maurice. -
PM Sent. Regards, Maurice.
-
Vic: Tell your wife that she will have a smile from ear to ear when you take her out for a ride with the top down (with just a push of the button)! ;) The immobilizer is under the driver's seat. The driver's seat is fastened to the floorpan on two rails. Each rail has two fasteners, one in front of the seat, one under the rear of the seat. The bolts require a female torx socket, but in a pinch you can use a good quality 1/4 inch drive 10mm socket. Once you have the four bolts out (slide the seat completely forward and get the two rear bolts, and slide the seat completely back and get the two front bolts), there is a large electrical connector under the seat. If you disconnect that connector, make sure that the key is off and out of the ignition switch. Do not turn on the ignition or put the key in there while the connector is disconnected or you will set off the airbag light, which can then only be reset with a Durametric, PST2 or PIWIS tester. If you want to avoid all of that, the wire under the seat is long enough to allow you to set the seat down exactly alongside the driver's door sill, perhaps resting on a square box or small platform. Check to see if there is moisture in or near the immobilizer, If there is, you may get away with taking it apart and drying it with a hair dryer and/or cleaning it with isopropyl alcohol to get rid of, or prevent, surface corrosion on the circuit board. If the car is inside, we can figure out what caused the water to seep into the cabin. Probably clogged drains if the foam drain trays are intact. Here is a photo of the immobilizer under the seat. It comes off with a slight turn of that one plastic Philips head screw near the lower left corner of the photo. Regards, Maurice.
-
The drain tray is the foam liner directly under the V-levers, and it runs from the underside of the B-pillar to the rearmost side of the clamshell, one on each side. Here is a link to Mike Focke's web site, with lots of photos for reference. Take a look at the three part DIY on how to replace the top and frame assembly with an OEM unit from an '03 or 04. The part II PDF has all of the photos of the various parts: http://sites.google.com/site/mikefocke2/thetop-itsmaintaince%26replacement I'll send you the info on the plastic ball cups. Regards, Maurice.
-
Vic: 1. Did you get any description from the previous owner as to how the problem developed and what symptoms he had and if and when they changed? The cause of the top starting to open and then going back the other way is a miscalibrated B-Pillar microswitch. That microswitch is on the '97 to '99 Boxsters and it is activated by being depressed (or released) by the B-pillar. It has a small silver metal arm that sometimes get bent out of shape and thus will make or break contact too early or too late when it is depressed or released by the B-Pillar. That microswitch is located behind the semi-cylindrical carpeted panel that is behind and below your left shoulder as you sit in the driver's seat. The white plastic ball cups on a '98 means that they have already been replaced, at least once. The originals, which were less durable and more brittle, were red. Porsche only sells the complete front pushrod assembly. If you want to buy just the plastic ball cups, send me a PM and I'll send you the info on a guy in the Netherlands who sells them. 2. Are your V-levers intact? 3. Also, verify which version of the drive cables that you have. Are they smooth sided or do they have a "cross-hatch" pattern on the outside black vinyl sheath. If you have the smooth-sided ones, you have to confirm whether you have at least 1/2 to 3/4 of an inch of the inner speedometer-type cable sticking out of the sheath after you disconnect each cable from the sides of the electric motor's output flanges. Just pull up on the upside-down U-clips that hold them securely into the sides of the electric motor. If the inner cables don't stick out enough, they won't be driven by the electric motor, or they will be driven intermittently. Be careful not to operate the top with dangling pushrods (because of a broken plastic ball cup or a disconnected one). They can dig in an rip or tear the foam drain tray. If that happens, you can get water intrusion into the cabin, where it will find its way to the immobiliser under the driver's seat. That will cost big $$$ to repair and could leave you stranded, so make sure to check that there is no water under the carpet behind the driver's seat. Regards, Maurice.
-
The start of the road to this repair is to verify whether your plastic ball cups are intact or if they have shattered or popped off the steel balls at the base of the B-Pillar. Are you getting any movement of the clamshell or nothing at all? If the clamshell is not moving, then perhaps your black "hydraulic" pushrods are either damaged or have popped off the V-Levers, or more likely, the outer sheaths of your drive cables have stretched Also check to make sure both V-levers are intact. You can get a good idea of what all of these parts look like and where they are on the car by doing a search here or going to Mike Focke's website and taking a look at the section devoted to the top. Regards, Maurice.