Welcome to RennTech.org Community, Guest
There are many great features available to you once you register at RennTech.org
You are free to view posts here, but you must log in to reply to existing posts, or to start your own new topic. Like most online communities, there are costs involved to maintain a site like this - so we encourage our members to donate. All donations go to the costs operating and maintaining this site. We prefer that guests take part in our community and we offer a lot in return to those willing to join our corner of the Porsche world. This site is 99 percent member supported (less than 1 percent comes from advertising) - so please consider an annual donation to keep this site running.
Here are some of the features available - once you register at RennTech.org
- View Classified Ads
- DIY Tutorials
- Porsche TSB Listings (limited)
- VIN Decoder
- Special Offers
-
OBD II P-Codes - Paint Codes
- Registry
- Videos System
- View Reviews
- and get rid of this welcome message
It takes just a few minutes to register, and it's FREE
Contributing Members also get these additional benefits:
(you become a Contributing Member by donating money to the operation of this site)
- No ads - advertisements are removed
- Access the Contributors Only Forum
- Contributing Members Only Downloads
- Send attachments with PMs
- All image/file storage limits are substantially increased for all Contributing Members
- Option Codes Lookup
- VIN Option Lookups (limited)


1schoir
-
Posts
2,739 -
Joined
-
Last visited
-
Days Won
6
Content Type
Profiles
Events
Forums
External Paint Colors
Downloads
Tutorials
Links Directory
Collections
Store
Posts posted by 1schoir
-
-
Hi,
ToolPants, thanks for checking out this post, your input is always welcome.
To answer your question, as well as Maurice's, yes, the mounting bolts are the new ones. You can tell just by looking at them, as the built-in spacer is about twice as thick as the old style spacers. The transmissions are screwed in as tight as they go and they don't budge if I try to move them by hand. In fact, after I installed them and I saw how bad they're wobbling when I operated the top, I thought I forgot to tighten them, so I took everything off to get back at the bolts, just to realize that they were screwed in as tight as possible.
I agree with ToolPants, it looks like the sheet metal they are connected to is not strong enough and they give in when enough pressure is placed upon them. Although both transmissions move, the passenger side is not as bad (hence that side doesn't pop as often). I hope that taking the car to a body shop and reinforcing those sides will eliminate the issue.
The transmissions seem to be vertical, at least when they are resting. When they're moving - well that's when the issue happens, and they angle up/down, left/right, depending on what forces are pulling / pushing at the time.
So now I have to find a decent body shop that can reinforce those sides.
Thank you for letting me know that the sides are NOT supposed to move and the transmissions are not supposed to be 'flexible' :)
I'll keep you posted...
Thanks,
Julian.
Julian:
I know you said that the woman that you bought the car from said that she had problems with the top that she had "aligned". Is it possible that when the top malfunctioned with her, that the sheet metal supports on which the transmissions were mounted were either "torn" or "ripped" or cracked?
When you remove the air intakes and pulled back the lining, can you visually inspect that sheet metal to see if it's damaged? That might confirm that you have isolated the problem and are heading in the right direction. It is good that you confirmed that you have the correct spacer bolts and that the transmissions are tightly fastened.
Regards, Maurice.
-
I am getting lost trying to follow this.
You had and old style and new style transmission. A transmission was moving. You put in two new style transmissions, and both are moving? Is that the problem?
If so, they should not move. But how do you know they move?
When you put a new style transmission in a 1997-2000 you need to replace the 3 mounting studs. The mounting studs for the old and new style are different. Are the correct studs in the car?
The studs go into sheet metal. This is a weak point with the early cars as the sheet metal was weak. In the later cars this area was reinforced. I worked on a car where the sheet metal was bent from the force of a transmission gone wild, which bent the sheet metal, and the transmission was on an angle. Are both your transmissions vertical?
Julian:
Tool Pants is correct when he says that the "mounting studs for the old and new style are different". I think that you said in an earlier post (#17) that when you bought the new style transmissions on eBay, that they also came with the cables, and bolts. The bolts are actually "spacer bolts" (part # 98656178901) and hold the later style transmissions in the same final position as the earlier transmissions. This is because the housings and mounting points are slightly different between the early and late transmissions.
Did you compare your original spacer bolts with the new ones you got from eBay and verify that they are different? If you use the early style spacer bolts with the newer style transmissions, the transmission will wobble as you won't be able to get it mounted snug. Is that what is happening?
Regards, Maurice.
-
I looked at the switch and it appears to be functioning properly. The pushrods pop after the switch is pushed, because the clamshell is still going down at that point. The top is all the way up, but the clamshell still needs a couple of seconds to sit down fully. It is during that time that the pushrods pop.
What seems strange is that the transmissions, together with the sides they're mounted on, move. I am not sure if this is normal or not - can someone verify? When I say they move I mean they move as if the bolts weren't properly screwed in, although they are. I'm thinking it could be that the pushrods pop because the transmissions move and they cause too much pressure on the rods. If they were solid and only moved circularly, as they're supposed to, then there wouldn't be any flexibility. But that's what I don't know - are the transmissions supposed to be flexible or not? Maybe I'll take a small video to illustrate what I mean.
Thanks!
The sides of my car (just outboard of the transmissions) do not flex while the top is operating.
Keep in mind that when "the clamshell is still going down at that point", the V-levers are still rotating and therefore are still pulling or pushing on the opposite side (where the white plastic joints) are as well.
Can you tell whether they pop off at the very end of the travel (i.e., just after the clamshell has come down into its final position)? Is that the moment when the sides "move"?
Regards, Maurice.
-
I know how you feel about wanting to rip it all out...
The top main relay for MY97-99 is part # 986-618-111-02.
It is located at the upper part of the driver's side footwell, in a relay tray that is locate above the fuse panel. You can't miss it because it is a double relay and is much larger than all of the other relays in that tray. IIRC it's the one that is one over from the right, third row up from the bottom. (Note: the first row on the bottom has no relays plugged in to it).
The B-pillar microswitch part # is 986-613-101-02.
The B-pillar microswitch is located near the top of the carpet-covered semi-round long plastic trim panel that is just behind your left shoulder as you sit in the driver's seat. To access it easily, you must remove that piece of trim by unscrewing the phillips screw which is hidden in the pile of the carpet, about three inches from the bottom and 3/4" forward of the engine firewall. Then loosen by 2 turns (DO NO REMOVE) the 8 mm bolt that is located (on an angle) just forward of the front driver's side carpet pad on top of the engine cover. Then you can manoeuver the piece of trim off and you will see the B-pillar microswitch near the top, just below the big plastic "knuckle" at the bottom of the B-Pillar part of the convertible top mechanism.
Here is a photo of the microswitch:

The red arrow (click on the photo to enlarge) is pointing to the small metal lever part of the microswitch. The microswitch housing is the little black plastic box just below it. (Note, in this photo, the trim panel has only been pulled aside and has not yet been removed, to give you a reference of where the microswitch is located).
As the top closes, there is a black metal arm that comes up along with the B-pillar (which is actually pivoting at that point) and that metal arm presses on the small metal lever part of the microswitch, which in turn presses on the tiny switch encased in the black plastic box. As the small metal lever is pulled forward, it presses on the switch and you can hear the relay in the footwell clicking. If that metal lever is bent out of shape, it will either trip the switch too soon or too late, but there is no adjustment possible of the relay body itself, only in the bend of the small metal lever.
As far as the likelihood that the problem is probably mechanical, I tend to agree but can't be positive because that main top relay is one complicated piece of electronics. The fact that your light still goes out is a good sign from the relay.
Since you mentioned that you spun the V-levers as I suggested and that now caused BOTH white plastic joints to pop, why not try to rotate the V-Levers a little in the opposite direction (i.e., after you get them back to your original position where only one pops, go a little further in the opposite direction than the one you first tried and see if that solves it.)
Keep us posted.
Regards, Maurice.
Thanks for your detailed response. I saw the switch but I thought it was a seatbelt switch, seeing how it is right next to the seatbelt... I will hook everything back up and watch the leveler in action.
I spent 4 hours yesterday evening trying to figure it out and I still can't get it back to the way it was. Both sides still pop now. I took out the two pushrods and just left the clamshell connected for a semi-automatic operation, at least for the time being. I needed to get away from it and start fresh. My patience is running very thin with this project now and I don't want to do anything I might regret later.
Is this micro switch activated only when the top goes up?
The relay seems to be OK, although you never know. I'll take it out and shake it up a bit to see if it gets any better. The alternative is to knock at my neighbor's house, who also has a Boxster, and ask if I can borrow his relay... But that's creepy, I don't even know the guy!
Thanks again,
Julian.
Julian:
The microswitch is tripped when the top reaches very close to the end of its travel when it is almost closed. Again, there is a black arm that rotates up in conjunction with the pivoting of the round bottom of the B-pillar part of the convertible top mechanism. That black arm presses on the small metal lever part of the microswitch forward and the small metal lever presses on the microswitch to trip it. If you use a small L-shaped pick or a small L-shaped allen key, you can pull the small metal lever forward until you hear the relay click in the footwell.
There were a couple of posts by Tool Pants where he said that tapping on or shaking up the relay after you remove it sometimes "fixes" it. So, definitely give that a try.
The neighbor option doesn't sound creepy, it doesn't hurt to ask. Who knows, he may have some questions about his Boxster that you can help him with. Just make sure his car is either a MY 97, 98, or 99. The later relays are different. BTW, you have to pull pretty hard to get the relay out, but there are no clips or anything else holding it in.
If you want to start from scratch again as far as the position of the V-Levers go, take a look at some recent posts I made which show where the V-levers go in relation to the "marking notches" on the housings of the transmissions. I posted a couple of photos with the V-levers drawn in. If you can't find them, let me know and I will hunt them down.
I do know that one cause of the white plastic joints popping off is that the V-levers continue to rotate past the point where everything is snug (i.e., the forward edge of the top has reached the windshield or the top is completely open and the clamshell snug up on top of it). That is why I suggested that you try to "back-off" the V-levers in one direction or the other.
Try not to get too frustrated. Look at it this way... After you resolve this problem, there is nothing you will not know about how the top operates and you never have to worry about getting stuck with your top open or closed again. Some proof of this is that you are now easily able to make it work in the semi-automatic mode, etc. , whereas you probably had no idea how it all worked before. Not necessarily a choice you would make, but sometimes these cars don't give us the choice.
Regards, Maurice.
One more thing I forgot to mention. If you look at the photo of the mircroswitch that I included in my post #27, you can see the black arm that rotates up. If you blow up the photo, you can see that black arm just behind the small metal lever that the red arrow is pointing to. Also, just to the right of the small metal lever you can see the side view of the small black screw that holds the microswitch in place.
Regards, Maurice.
-
I know how you feel about wanting to rip it all out...
The top main relay for MY97-99 is part # 986-618-111-02.
It is located at the upper part of the driver's side footwell, in a relay tray that is locate above the fuse panel. You can't miss it because it is a double relay and is much larger than all of the other relays in that tray. IIRC it's the one that is one over from the right, third row up from the bottom. (Note: the first row on the bottom has no relays plugged in to it).
The B-pillar microswitch part # is 986-613-101-02.
The B-pillar microswitch is located near the top of the carpet-covered semi-round long plastic trim panel that is just behind your left shoulder as you sit in the driver's seat. To access it easily, you must remove that piece of trim by unscrewing the phillips screw which is hidden in the pile of the carpet, about three inches from the bottom and 3/4" forward of the engine firewall. Then loosen by 2 turns (DO NO REMOVE) the 8 mm bolt that is located (on an angle) just forward of the front driver's side carpet pad on top of the engine cover. Then you can manoeuver the piece of trim off and you will see the B-pillar microswitch near the top, just below the big plastic "knuckle" at the bottom of the B-Pillar part of the convertible top mechanism.
Here is a photo of the microswitch:
The red arrow (click on the photo to enlarge) is pointing to the small metal lever part of the microswitch. The microswitch housing is the little black plastic box just below it. (Note, in this photo, the trim panel has only been pulled aside and has not yet been removed, to give you a reference of where the microswitch is located).
As the top closes, there is a black metal arm that comes up along with the B-pillar (which is actually pivoting at that point) and that metal arm presses on the small metal lever part of the microswitch, which in turn presses on the tiny switch encased in the black plastic box. As the small metal lever is pulled forward, it presses on the switch and you can hear the relay in the footwell clicking. If that metal lever is bent out of shape, it will either trip the switch too soon or too late, but there is no adjustment possible of the relay body itself, only in the bend of the small metal lever.
As far as the likelihood that the problem is probably mechanical, I tend to agree but can't be positive because that main top relay is one complicated piece of electronics. The fact that your light still goes out is a good sign from the relay.
Since you mentioned that you spun the V-levers as I suggested and that now caused BOTH white plastic joints to pop, why not try to rotate the V-Levers a little in the opposite direction (i.e., after you get them back to your original position where only one pops, go a little further in the opposite direction than the one you first tried and see if that solves it.)
Keep us posted.
Regards, Maurice.
Thanks for your detailed response. I saw the switch but I thought it was a seatbelt switch, seeing how it is right next to the seatbelt... I will hook everything back up and watch the leveler in action.
I spent 4 hours yesterday evening trying to figure it out and I still can't get it back to the way it was. Both sides still pop now. I took out the two pushrods and just left the clamshell connected for a semi-automatic operation, at least for the time being. I needed to get away from it and start fresh. My patience is running very thin with this project now and I don't want to do anything I might regret later.
Is this micro switch activated only when the top goes up?
The relay seems to be OK, although you never know. I'll take it out and shake it up a bit to see if it gets any better. The alternative is to knock at my neighbor's house, who also has a Boxster, and ask if I can borrow his relay... But that's creepy, I don't even know the guy!
Thanks again,
Julian.
Julian:
The microswitch is tripped when the top reaches very close to the end of its travel when it is almost closed. Again, there is a black arm that rotates up in conjunction with the pivoting of the round bottom of the B-pillar part of the convertible top mechanism. That black arm presses on the small metal lever part of the microswitch forward and the small metal lever presses on the microswitch to trip it. If you use a small L-shaped pick or a small L-shaped allen key, you can pull the small metal lever forward until you hear the relay click in the footwell.
There were a couple of posts by Tool Pants where he said that tapping on or shaking up the relay after you remove it sometimes "fixes" it. So, definitely give that a try.
The neighbor option doesn't sound creepy, it doesn't hurt to ask. Who knows, he may have some questions about his Boxster that you can help him with. Just make sure his car is either a MY 97, 98, or 99. The later relays are different. BTW, you have to pull pretty hard to get the relay out, but there are no clips or anything else holding it in.
If you want to start from scratch again as far as the position of the V-Levers go, take a look at some recent posts I made which show where the V-levers go in relation to the "marking notches" on the housings of the transmissions. I posted a couple of photos with the V-levers drawn in. If you can't find them, let me know and I will hunt them down.
I do know that one cause of the white plastic joints popping off is that the V-levers continue to rotate past the point where everything is snug (i.e., the forward edge of the top has reached the windshield or the top is completely open and the clamshell snug up on top of it). That is why I suggested that you try to "back-off" the V-levers in one direction or the other.
Try not to get too frustrated. Look at it this way... After you resolve this problem, there is nothing you will not know about how the top operates and you never have to worry about getting stuck with your top open or closed again. Some proof of this is that you are now easily able to make it work in the semi-automatic mode, etc. , whereas you probably had no idea how it all worked before. Not necessarily a choice you would make, but sometimes these cars don't give us the choice.
Regards, Maurice.
-
Also, you say you have replaced all of the parts. Did you also replace the convertible top main relay and the B-pillar microswitch? Apparently, the MY 2000-2004 right (psgr) transmissions contain the microswitch that was previously in the B-pillar.
Regards, Maurice.
Hi Maurice,
I did not replace the top main relay. I also did not replace the B-pillar microswitch. Do you have a picture of this switch? How do I get to it? If it was a problem with either one of these, don't you think the light wouldn't go out at all? Right now the light does go out, but the driver's side pops... It seems more like a mechanical problem than electrical, but at this point I am willing to try anything. If you have any pictures of the top relay and the B-pillar microswitch I would appreciate it.
Update: I tried moving the top with the drill as suggested, reconnected, put everything back together, and now both sides pop. I tried to go back to the way it was before but I haven't had enough time to get it back (I did this on my lunch break). I will try later tonight to see if I can get it to where it will (sort-of) work... What a royal pain this top turns out to be! I may just rip it all out and get me a big-ol' golf umbrella to keep in the car just in case it starts raining.
Thanks again,
Azzar0.
I know how you feel about wanting to rip it all out...
The top main relay for MY97-99 is part # 986-618-111-02.
It is located at the upper part of the driver's side footwell, in a relay tray that is locate above the fuse panel. You can't miss it because it is a double relay and is much larger than all of the other relays in that tray. IIRC it's the one that is one over from the right, third row up from the bottom. (Note: the first row on the bottom has no relays plugged in to it).
The B-pillar microswitch part # is 986-613-101-02.
The B-pillar microswitch is located near the top of the carpet-covered semi-round long plastic trim panel that is just behind your left shoulder as you sit in the driver's seat. To access it easily, you must remove that piece of trim by unscrewing the phillips screw which is hidden in the pile of the carpet, about three inches from the bottom and 3/4" forward of the engine firewall. Then loosen by 2 turns (DO NOT REMOVE) the 8 mm bolt that is located (on an angle) just forward of the front driver's side carpet pad on top of the engine cover. Then you can manoeuver the piece of trim off and you will see the B-pillar microswitch near the top, just below the big plastic "knuckle" at the bottom of the B-Pillar part of the convertible top mechanism.
Here is a photo of the microswitch:
The red arrow (click on the photo to enlarge) is pointing to the small metal lever part of the microswitch. The microswitch housing is the little black plastic box just below it. (Note, in this photo, the trim panel has only been pulled aside and has not yet been removed, to give you a reference of where the microswitch is located).
As the top closes, there is a black metal arm that comes up along with the B-pillar (which is actually pivoting at that point) and that metal arm presses on the small metal lever part of the microswitch, which in turn presses on the tiny switch encased in the black plastic box. As the small metal lever is pulled forward, it presses on the switch and you can hear the relay in the footwell clicking. If that metal lever is bent out of shape, it will either trip the switch too soon or too late, but there is no adjustment possible of the relay body itself, only in the bend of the small metal lever.
As far as the likelihood that the problem is probably mechanical, I tend to agree but can't be positive because that main top relay is one complicated piece of electronics. The fact that your light still goes out is a good sign from the relay.
Since you mentioned that you spun the V-levers as I suggested and that now caused BOTH white plastic joints to pop, why not try to rotate the V-Levers a little in the opposite direction (i.e., after you get them back to your original position where only one pops, go a little further in the opposite direction than the one you first tried and see if that solves it.)
Keep us posted.
Regards, Maurice.
-
I replaced the clamshell pushrods as well, just to make sure I have all new parts. The top will go up, the clamshell goes down, but right before the light goes out the driver's side white plastic ball pops out of socket. When I put the top down, I let the clamshell go up, then snap the white plastic ball back into the socket and continue putting the top down - everything works fine.
So right now it **almost** works, but I have that pop. What could I do to eliminate this problem? Like I said, the entire top mechanism (with the exception of the motor) has been replaced with the newer, 2000+ transmission style components.
TIA
Azzaro:
I am not sure if this will resolve your problem but, you might try the following or at least give it some thought:
Put the top up until just before the white plastic joint pops off the ball, then disconnect the cables from the motor side. Then spin the cables with a drill for a few seconds in the same direction as before (i.e., so that the top continues to go in the up/closed position). If you don't have two drills, spin each cable one at a time and be sure that you have spun them an equal amount of time (or an equal amount of forward travel of the front edge of the top). Then reconnect the cables to the motor and see if that turns the light out before the white plastic joints pop off. Even one or two inches might make the difference.
Also, you say you have replaced all of the parts. Did you also replace the convertible top main relay and the B-pillar microswitch? Apparently, the MY 2000-2004 right (psgr) transmissions contain the microswitch that was previously in the B-pillar.
Regards, Maurice.
Edit: Even though the factory manual says the microswitch is in the passenger side transmission, it is actually (and definitely) in the driver's side transmission, along with another microswitch (which has taken the place of the black plastic lever microswitch that was on top of the electric motor on the '97 to '99 Boxsters).
-
"What good are these wonderful cars if you can't share them with the folks you love."
Thanks again,
I wish that everyone could appreciate that statement. Your grandson is a very lucky young man.
Regards, 1schoir (Maurice).
-
Maurice,
Thanks, I did get the transmission back together but the top did not move smoothly. I was trying to adjust the timing but I noticed that the pass side was not moving again. I am supposing that the sector gear came out of the worm gear again. I will disassemble the unit again this weekend and if I have troubles I'll post again.
Thanks.
Tom:
When you take the transmissions apart again, before you put the black plastic covers back onto the backside of the transmissions, if you hold the V-lever against the opposite side and spin the transmission so that the V-Lever is located in between the "marking notches" (as in the photo in the link above), you will find that the half-moon gear is engaged and not far from their starting point.
Also, make sure that you snug up the four screws (plus the nut on the fifth one in the middle) that hold the smaller plastic cover on top of the worm gear. Apparently the black plastic cover compresses over time and the screws, even though they have not backed out, end up loose. That sometimes causes the worm gear to skip and will eventually throw the timing off.
Looking forward to see how you make out.
Regards, Maurice.
-
I'm getting ready to jack the rear of my car up and place it on jackstands, leaving the front wheels on the ground.
I will be working under the rear end, removing my mufflers, and I am wondering if it is safe to have the car inclined on one end.
I expect some twisting and pulling with the mufflers, and am concerned with the stability of the car on the 2 jackstands on the rear end.
I just want to have some reassurance from those of you who may have done this.
I will definitely be choking the front wheels.
Do I need to engage the parking brake? Does that help, or do those only affect the rear wheels?
Perhaps I should also place some bricks or pieces of wood under the tires, just in case the car slips off the jackstands?
Thank You All!
Lots of people (myself included) make it a practice to put their removed wheels and tires under the car. Cheap insurance if something happens.
Regards, Maurice.
-
Okay... I realise that my question was stupid!!!
After looking more closely, I noticed the there are two lugs on the lever arm that fit into the transmission. So I think that this problem is solved.
HOWEVER, my top was previously timed perfectly and never did it make any noise when opening or closing. Now it is struggling and makes a few scary noises. Sometimes the clam shell stays open about 1". As the top is moving the sides are not moving smoothly and one side sometimes jumps to a little to "catch up" to the other side.
I reset the lever arm positions using a small level and I reset the adjustable arms that have the plastic ball sockets that always break before I closed the top.
I have a 98 Canadian Boxster. It has the new flexible shafts cables.
Still looking to hear from the experts.
Thanks everyone, especially those that are trying to help.
Tom
Tom:
Take a look at the "marking notches" on the outside cover of the transmissions. The V-Lever arms should be in between the notches. Of course, you already know that there are two cut-outs on the part of the half-moon gear into which the 19MM bolt gets screwed into. So, unless you are 180 degrees off, the V-Lever can only be bolted on one way.
Take a look at post # 12 in this link for a photo of the marking notches with the V-Levers drawn in red: http://www.renntech.org/forums/index.php?s...amp;#entry75978. Note that you will have to remove the V-Levers again so that you can press the foam liner back in place (because you can't see the marking notches with the foam liner in the way. But, once you put the foam liner back in place, line up the V-Levers with the cut-outs and they will be in the same exact position as you had them with the foam liner off (i.e., in between the marking notches).
When I did mine, with the transmissions off and opened up, I just set the half-moon gear at the beginning of the 50 teeth and then, by spinning each cable with a drill, I moved each of the V-Levers so that each one in turn lined up between the marking notches.
Let me know how you make out or if you have any further roadblocks.
Regards, Maurice.
-
after piddling with it for a little while i can push my finger in where the hook goes...there is a little button and if i push it far in it will close...when the hook is in it seems like its not pushing that switch/button all the way or as far as it needs to go. hmm.... i guess i'll have to take it apart and see about adjusting it. for now i have a piece of paper stuck in there for it to shut..haha
I just started running into this exact issue. Did you find a fix? Appreciate any insight.
Level9inc and DenVogel:
Check out this thread. It contains information posted by Dan H that will help you narrow down your problems and maybe even save you some $$: http://www.renntech.org/forums/index.php?showtopic=10458
Regards, Maurice.
-
I just started having problems with my 968 Cabrio top as well. It started making a grinding sound while opening. And the top would open unevenly. I opened up the motor housing and disconnected the cables from the two motors and discovered that the inner cable drives that spin the transmission were NOT long enough to go into the motor far enough. So it was stripping itself out inside the motor.
Any ideas on why this happens??? And how should I fix it?
From what you describe, it sounds exactly like what happens to the early (MY97-99) Boxster cables. Although the Boxsters have only one motor (as opposed to the two on your car), the outer black plastic sheaths on the driver's side and passenger's side cables would stretch to the point where the inner (speedometer-type) cables appeared to have "retracted" into the outer sheath and, as in your case, were no longer sticking out enough to be driven by the motor. These early cables were later replaced by Porsche by "reinforced" cables which purportedly did not stretch like the old ones.
Take a look at this post by Tool Pants, with photos, and see if this is what your cables look like and perhaps the same repair procedure can be applied to your 968. I did it on my early Boxster and the fix worked great and only took about 30 minutes. You will want to end up with about 3/4 of an inch sticking out if your problem is like the Boxster's problem.
Here's the link: http://www.renntech.org/forums/index.php?s...pic=68&st=0
Regards, Maurice.
-
good point but previous owner told me he had lost the manual ... it was not a great experience ... but here i am ... love my car but i will not do it again. honesty must be the thing of the past.
If the procedure is the same as it is for the earlier Boxsters, try this:
With the ignition on, turn the small adjusment knob that is to the right of the tachometer towards the left (i.e., counterclockwise) (It's located near 6,000 RPM mark, with an icon of an analog clock on it), and hold it for about 5 to 10 seconds. That should change it to read in kilometers. If you do it again, it should go back to miles.
Regards, Maurice.
-
How long will it take
Can I do my self?
Is it hard
What are the quick steps,do I start from the front or back?
Anybody please help
1. About 6 to 12 hours.
2. Yes, you can do it yourself.
3. It is not too difficult if you have some mechanical ability and a LOT of patience.
4. The quick steps are outlined in the link posted by Mike Focke. You start from the front when dissassembling the old top and you start from the back when installing the new top.
I did it about a month ago. Just make sure you have all the parts you need before you start and that you get a top that's made by on of the better manufacturers.
Regards, Maurice.
-
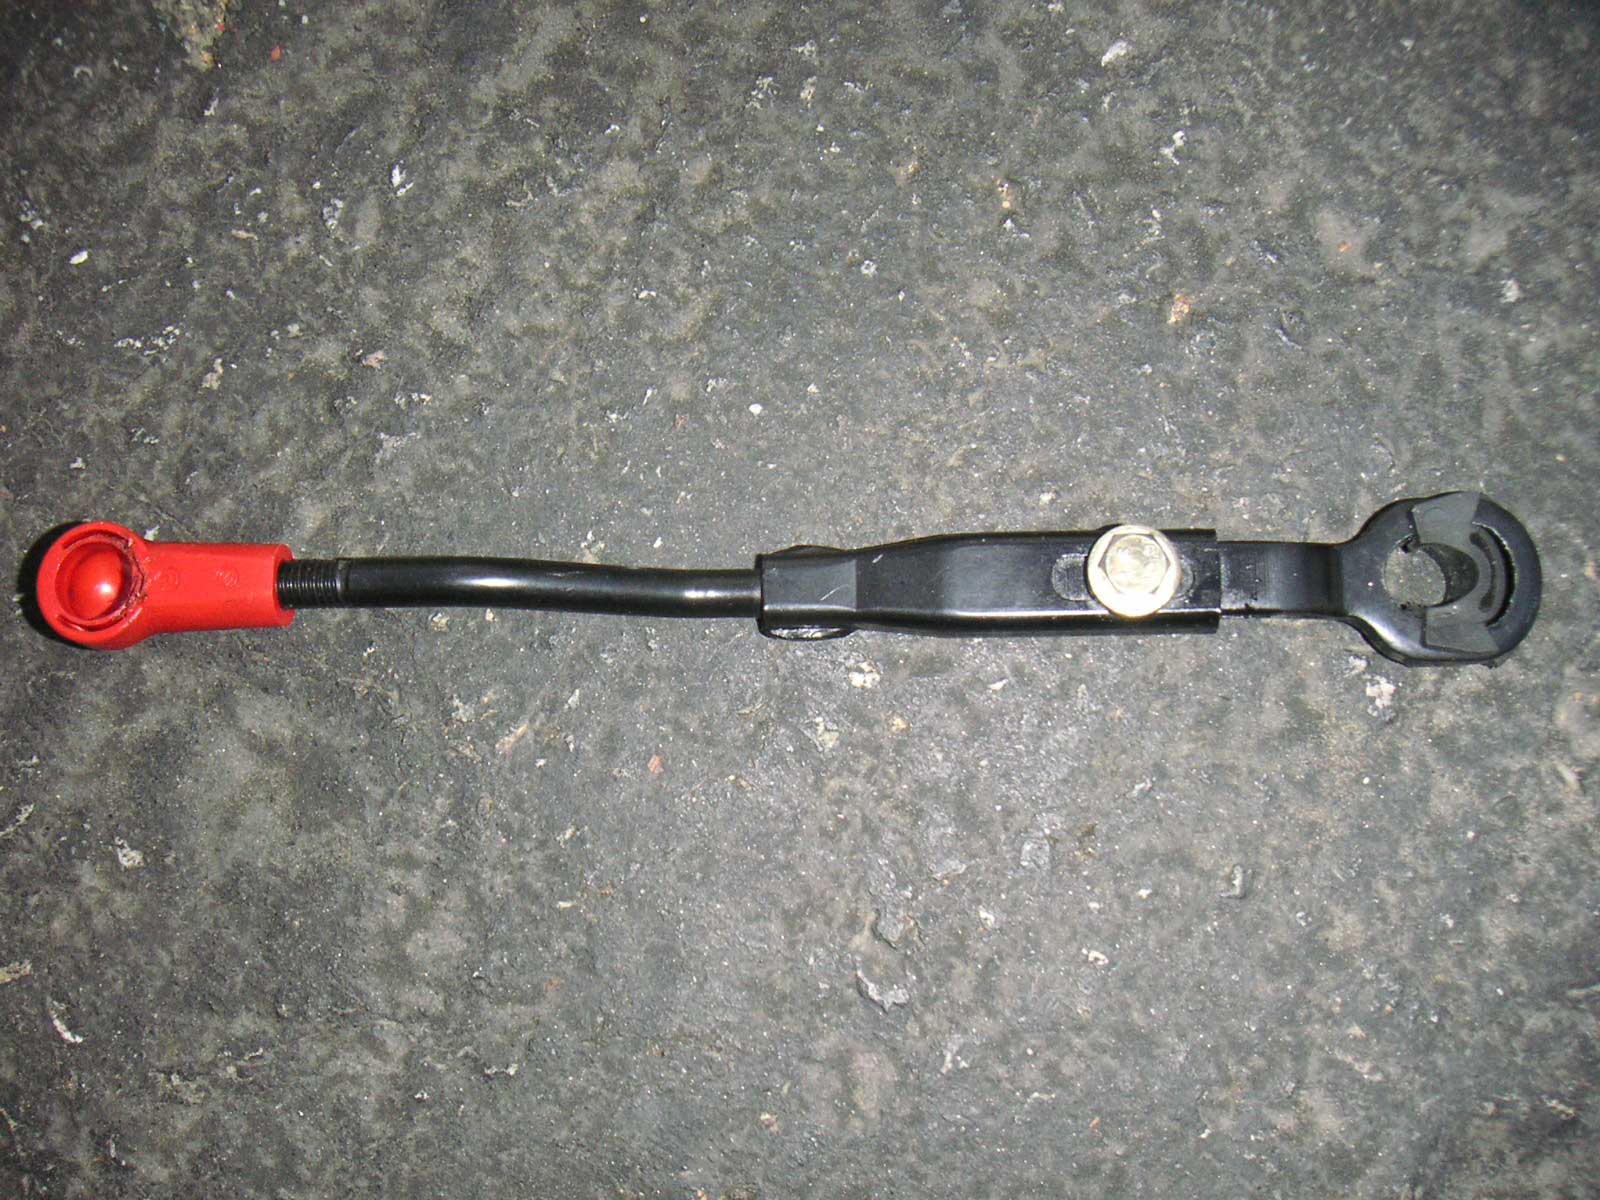
The red cap on the pushrod's end was broken as shown below:
Anyone has the part number of it? Can I replace the cap only or the whole pushrod?
Thanks in advance.
Part number is 986-561-279-02 (same for driver and for passenger side) and no, they don't sell the cap only. The new rod arms now come with white plastic ball cups ("caps"), which are more durable and less prone to becoming brittle, etc. The rod arms are about $40 to $75 each depending on where you buy.
There is someone selling a replacement part for the ball cups only that is made of metal, but it is generally not recommended as the plastic ones are designed to break before some much more serious damage occurs to the top. See Tool Pants' recent post on these metal ball cups.
Regards, Maurice.
-
I'm glad that helped. Keep us posted. I think Tool Pants was the first person to tell me that the dealer's tech used those markings for synching. I screwed up my timing so badly the first time, no amount of reading those instructions could get me to a good starting point until I did the all the way down, then up approach. If you're using a drill to sync, make sure that the torque setting is at the lowest setting.
Mark:
Well, that was the key but in a roundabout way!
I was not making any more progress until I could figure out what was causing the V-levers to spin in only one direction no matter which way the Up/Down button was pushed.
It turns out that the B-pillar microswitch is what can be used if the motor will only spin in one direction. If you pull back the carpet-covered plastic panel on the driver's side B-pillar, you can see how that microswitch operates. It's sort of the opposite of most microswitches in that it will set off the relay when it is pulled (all the way) up. When the top is almost closed, just prior to latching, there is a piece on the bottom knuckle of the convertible top rear hoop that serves to pull up that microswitch. So if you ever have a problem with the top only operating in one direction no matter which way you push the button, just slip something around that microswitch lever and pull it forward and you will hear the relay at the driver footwell click. When it does, press the up/down button again and it will now operate the V-levers in the opposite direction of rotation.
You were partially correct with your observation that the V-levers might be bolted in the wrong way. More accurately, after I put the V-levers in line with the marking notches as in the V-levers that I sketched in, and hooked up the black push rods and the rod arms with the white plastic cups to the V-levers and the bottom knuckle of the top, I was still not able to operate the top in both directions. It would only get to a certain point and then the switch would either die or operate in only one direction.
The key turned out to be that the half-moon gears were actually the part that had to be rotated 180 degrees and at that point the V-lever had to be flipped upside down so that it fit between the marking notches. At that point, I hooked everything back up and voila, the top worked perfectly and the clamshell followed along perfectly as well. I think that by rotating the half moon gear around, it ends up somewhere near the middle of its 50 teeth and thus does not "fall off" the worm gear which is turned by the cable.
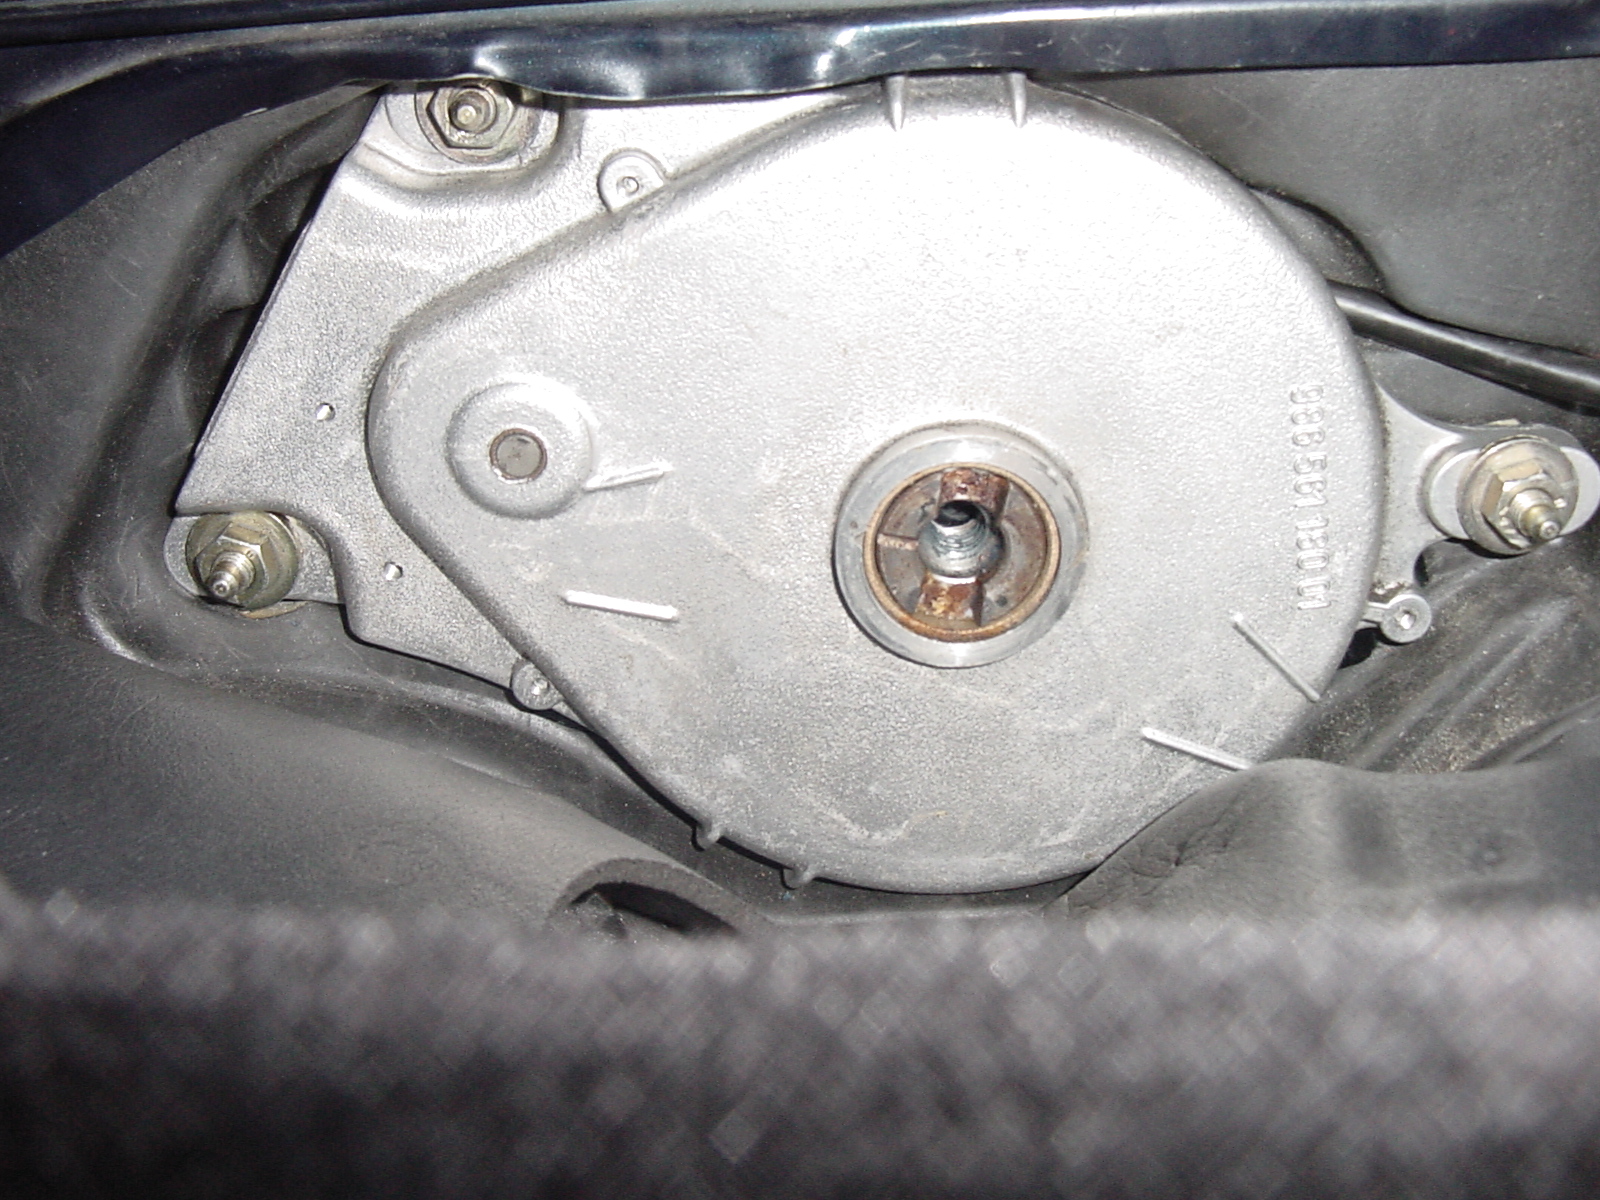
Here is a photo of the half-moon gear in the transmission. From this postion, you have to spin the cable so that the half-moon gear is near the middle of its travel. Then, when you install the transmission and install the V-lever (with the 19mm bolt torqued to 59 ft/lbs) you don't have far to go to line up the V-lever with the marking notches .
Here is a photo of the transmission showing the marking notches. The notches, in the way they are slanted, help you to make sure that you don't have the V-lever installed 180 degrees off.
Here is a photo of the B-pillar microswitch with the red arrow showing the little metal lever arm that must be pulled forward if your top only operates in one direction.
I was able to do the installation that finally worked with the top 2/3 of the way closed (about 12 inches from the windshield). At that point, I first hooked up the white plastic cups onto their ball joint, and then connected that part of the rod arm to the part that is already on the V-lever by means of that one 10mm bolt and thick washer. Then, after hooking up the end of the black pushrod with the clip to the clamshell arm, I maneuvered the clamshell so that the other end of the black pushrod could reach and be pushed firmly onto the ball joint on the rearmost part of the V-lever. I then did the same to the driver side and made sure the V-levers were in the same relative position on each side and that the clamshell was level when looking at it from behind. I also measured from the rear ball joint on the V-Lever to the bottom of the side rail (in which the lowest part of the clamshell arm slides back and forth in a sliding plastic cup) on each side and got about a 4 inch measurement (by taking a page of how the manual says to measure with the newer style transmissions (Version "B"), just to make sure the V-levers were synched.
I then pressed the button to open the top and everything worked!
This is the first time since I bought the car that the top has worked in the automatic mode and the former owner told me that it had not worked in "a couple of years" before I bought it from him. From what I have been able to learn and observe, it seems that this all started with one of the cables stretching and everything went downhill from there.
I want to express my gratitude to especially to Mark in Sunnyvale, to Tool Pants for the posts in the archives, to $Chris in NH and to Azzar0 for their invaluable help in getting this done. Without RennTech Forums, I was looking at a big $$ repair, (to say nothing of the feeling of accomplishment). :renntech:
Regards, 1schoir.
One more note. For those of you experiencing the "back and forth cycling" as the top gets near its fully closed position (as described in my first post on this thread), that is caused by the B-pillar microswitch being tripped and "untripped" by the part that presses on it (at the bottom of the black knuckle of the B-pillar frame member of the convertible top). I haven't figured out how to adjust it so that it happens exactly when the top reaches the maximum closed position, so I may just replace that microswitch.
Regards, 1schoir.
-
Good info, I'm re-read this a few times to absorb it.
A few questions comments I'd love you to comment on.
1. After taking off the broken arms I tested the transmission for even movement and measured the distance the connecting pin was on each side. They are currently identical on each side and they both turn nicely, but of course they are not under load. Do you think destroyed cable inside the sheath would only show "out of sync" under load? I do know they can fray as that is what my drivers window did!
2. Do you think there is a chance they everything is good and the plastic ends just lived their life? It seems Chris in NH is pretty opinionated that the cable has to be at fault which I respect...but I'm not seeing it yet! Additionally they broke together and I never noticed anything acting "out of sync" or twisted from uneven pressure.
3. Would you recommend a re-sync via the drill method and moving them to full forward motion I've seen posted or is there something better?
Shawn
Shawn:
I agree with Tool Pants when he says that the metal joints can be used if everything else is in perfect condition. To err on the side of caution, I would even go further and add "and if the newer style transmissions and related parts have been installed". Replacing the transmissions with Version "B" was a tacit acknowledgment by Porsche that the earlier transmissions (Version "A") and related hardware were too prone to malfunction, sometimes with catastrophic results.
With respect to your questions:
1. It depends on how far gone the inner cable(s) is/are. It's possible if one (or both) of the inner cables have just started to "unravel" that they could appear to function normally until they are placed under load, and then at that point react differently.
2. I think it would be too much of a coincidence for both red plastic joints to have reached the end of their service life at the exact same time. Are you sure that they let go at the precise same time (i.e., did you hear or feel only one big "pop") or is it possible that they broke in rapid succession. Let's assume that they both were brittle (10 years old, etc.) and that they were "weak". Now if one of them let go, the uneven tension could then cause to other ( already weakened one) to pop immediately thereafter. Did it possibly sound more like a pop-pop? That would also comport with Chris in NH's experience, where the second one would break because of the uneven pressure that would then be applied by the cable on the still-connected side.
3. I just recently successfully re-synched by using the "marking notches" on the outside face of the transmissions as a starting point. I am attaching a photo of the passenger side transmission with the "marking notches" and with a sketched-in V-Lever drawn onto it. To see the marking notches, you have to pull back the foam liner.
You'll be interested to know that this method is the one reccommended in the factory manual for Version "A" (old style transmissions) and that for Version "B" they recommend a similar starting point AND measuring in a similar fashion to what you described. I used the marking notches method and after getting one lined up, I used a drill to operate the other cable so as to get the other V-lever in the same position relative to its marking notches and then measured the distances from the metal ball on the rearmost part of the V-lever to the bottom of the side section sealing channel (where the bottom of the clamshell arm slides back and forth).One of the advantages to this method is that when the V-levers are between the marking notches, both the rod arms (with the plastic cups) and the black hydraulic pushrods are easy to reach and to attach to their respective ball sockets. If you spin the cables all the way to the forward position, it will be more difficult to reach from inside the car under the clamshell to attach those joints.
You should also first determine that your transmissions have not been replaced (I don't know if you have owned your Boxster since new). Also, it is possible to have only one side replaced with the new style transmission to work in conjunction with a Version "A" transmission. The switchover took place in either March or May 1999.
Regards, 1schoir.
-
Yea I couldn't figure out how to change the post entry location when editing it. I think I'm committed to the general area.
I'll re-read that post again as I found it before but failed to see how the cables interact with the push rods to shatter the ball end. If they changed them from red to white I figured they were the failure location.
I may have upgraded cables as they have the texture look as listed in the post you reference and have at least 3/4" of cable sticking out, but that is in my cool garage tonight. I doubt they shrunk that much in the sun this weekend!
Maybe mine is just weak plastic connectors on the rod unless you see another way the cable interact with the failure. Thanks!
Shawn
Shawn:
The older red plastic cups on the end of the rod arms become brittle with age and heat/cold cycles and the white ones apparently hold up better.
I think you are making a wise decision not to replace the connectors with the metal ones, for the specific reason that you listed.
If you do have 3/4" of metal cable sticking out on each end, make sure that everything has been "synchronized" before you press the button and that once the clamshell and then the top starts moving, that both sides (driver side and passenger side) are moving equally and that nothing looks lopsided as the top goes down and as the clamshell operates up and down to close.
Again, if you have 3/4" sticking out, there are two other possibilities, both of which have been covered on previous threads (one by Tool Pants and one by Jporter).
One possibility is that the inner metal cable may have come unwound or broken apart inside the black plastic sheathing (the cable actually consists of strands of wire twisted together, with a square end, like a speedometer cable).
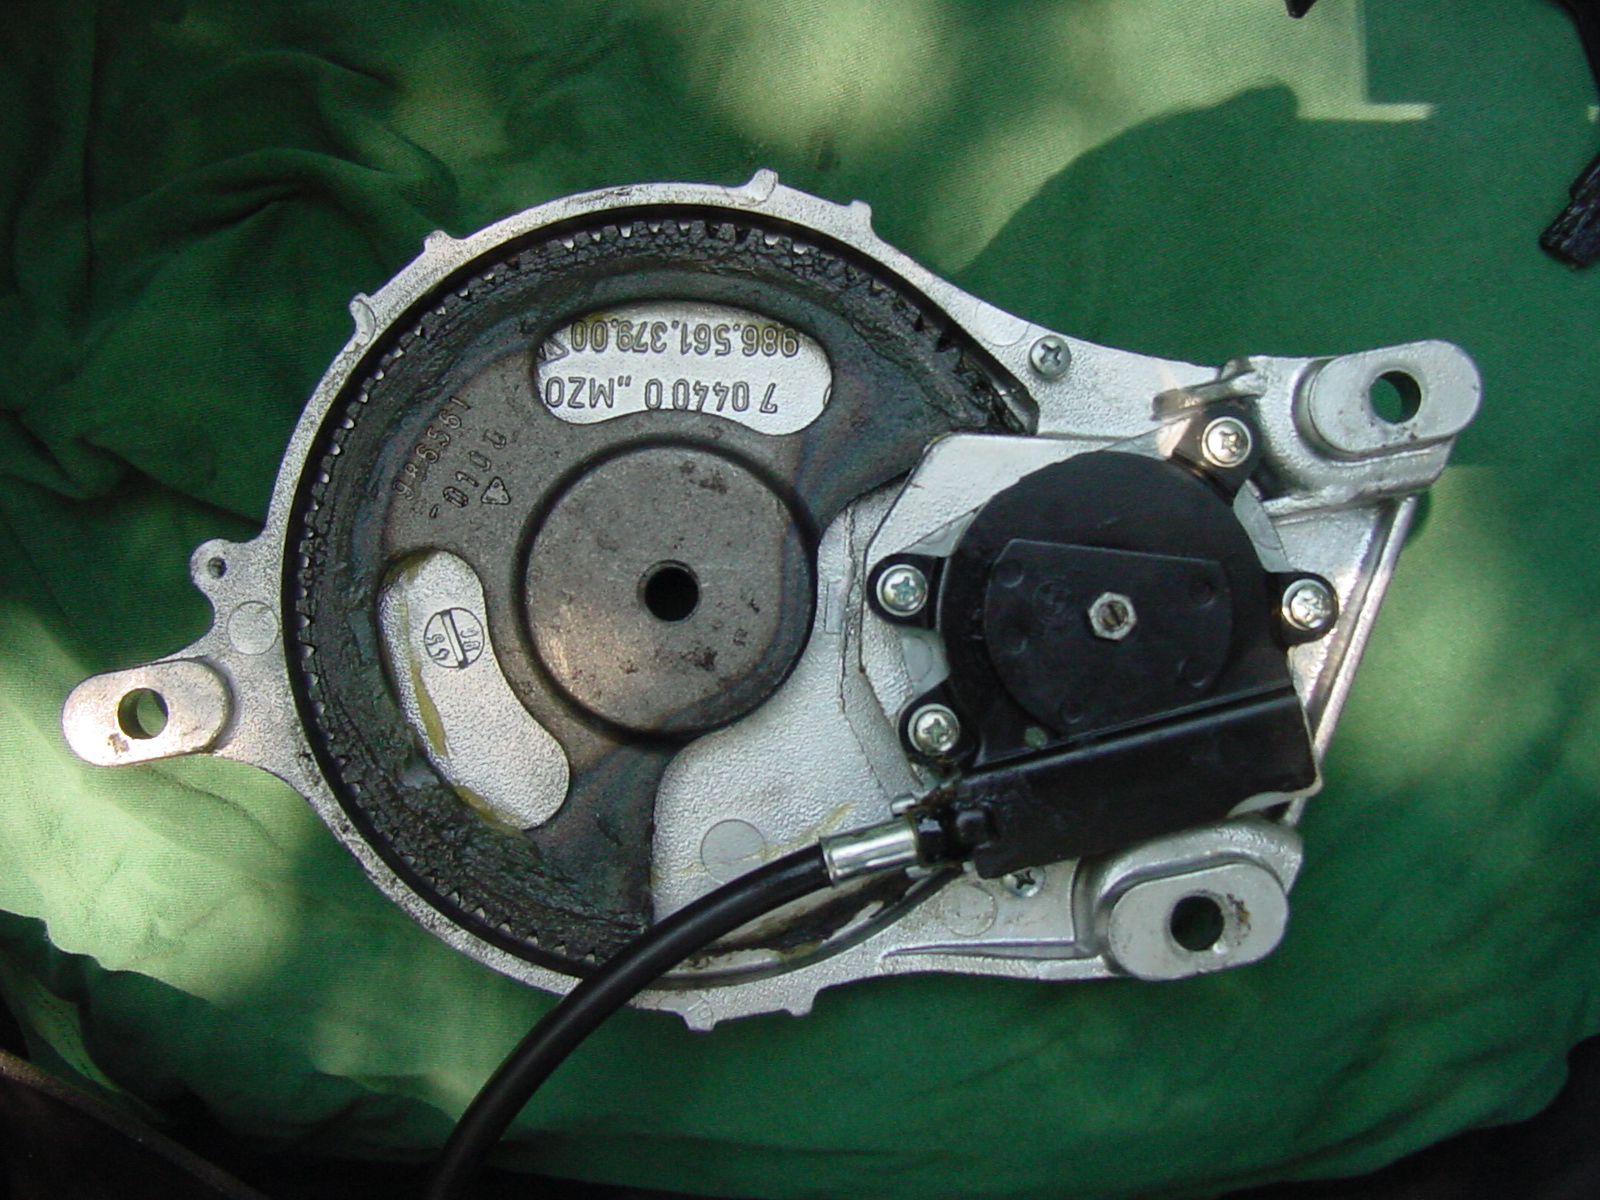
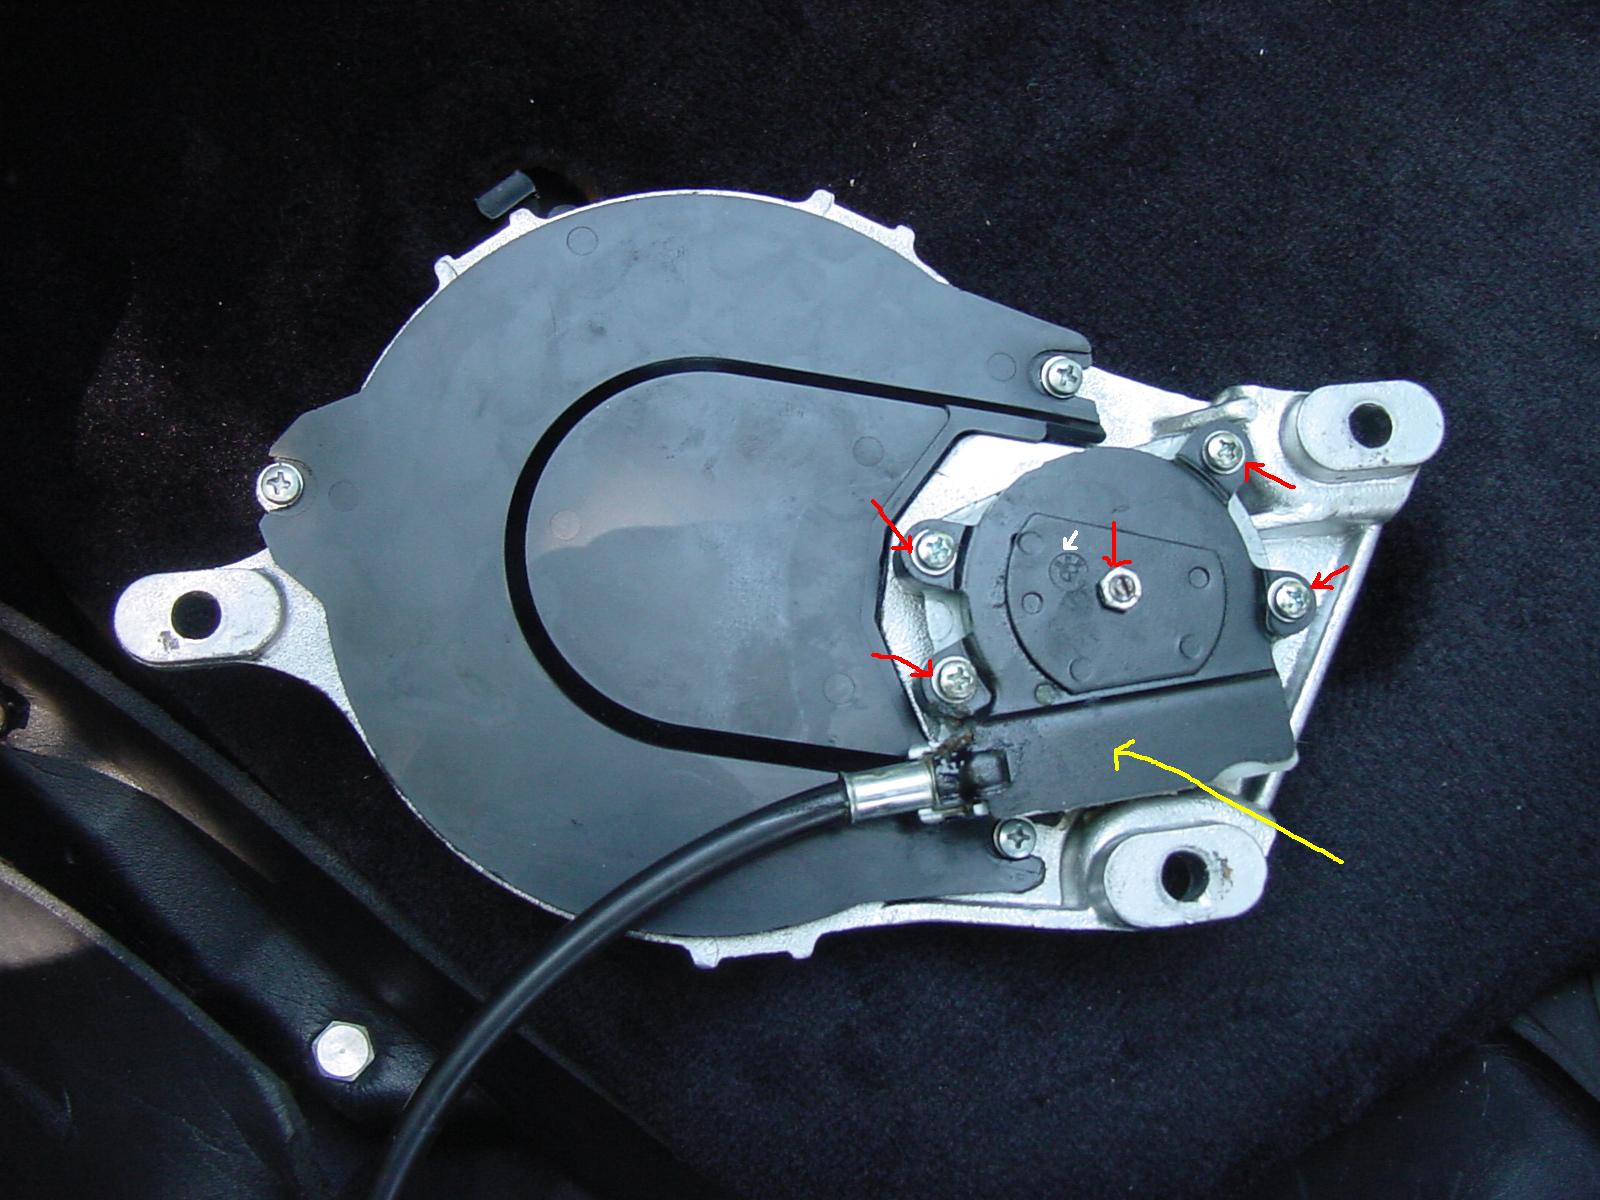
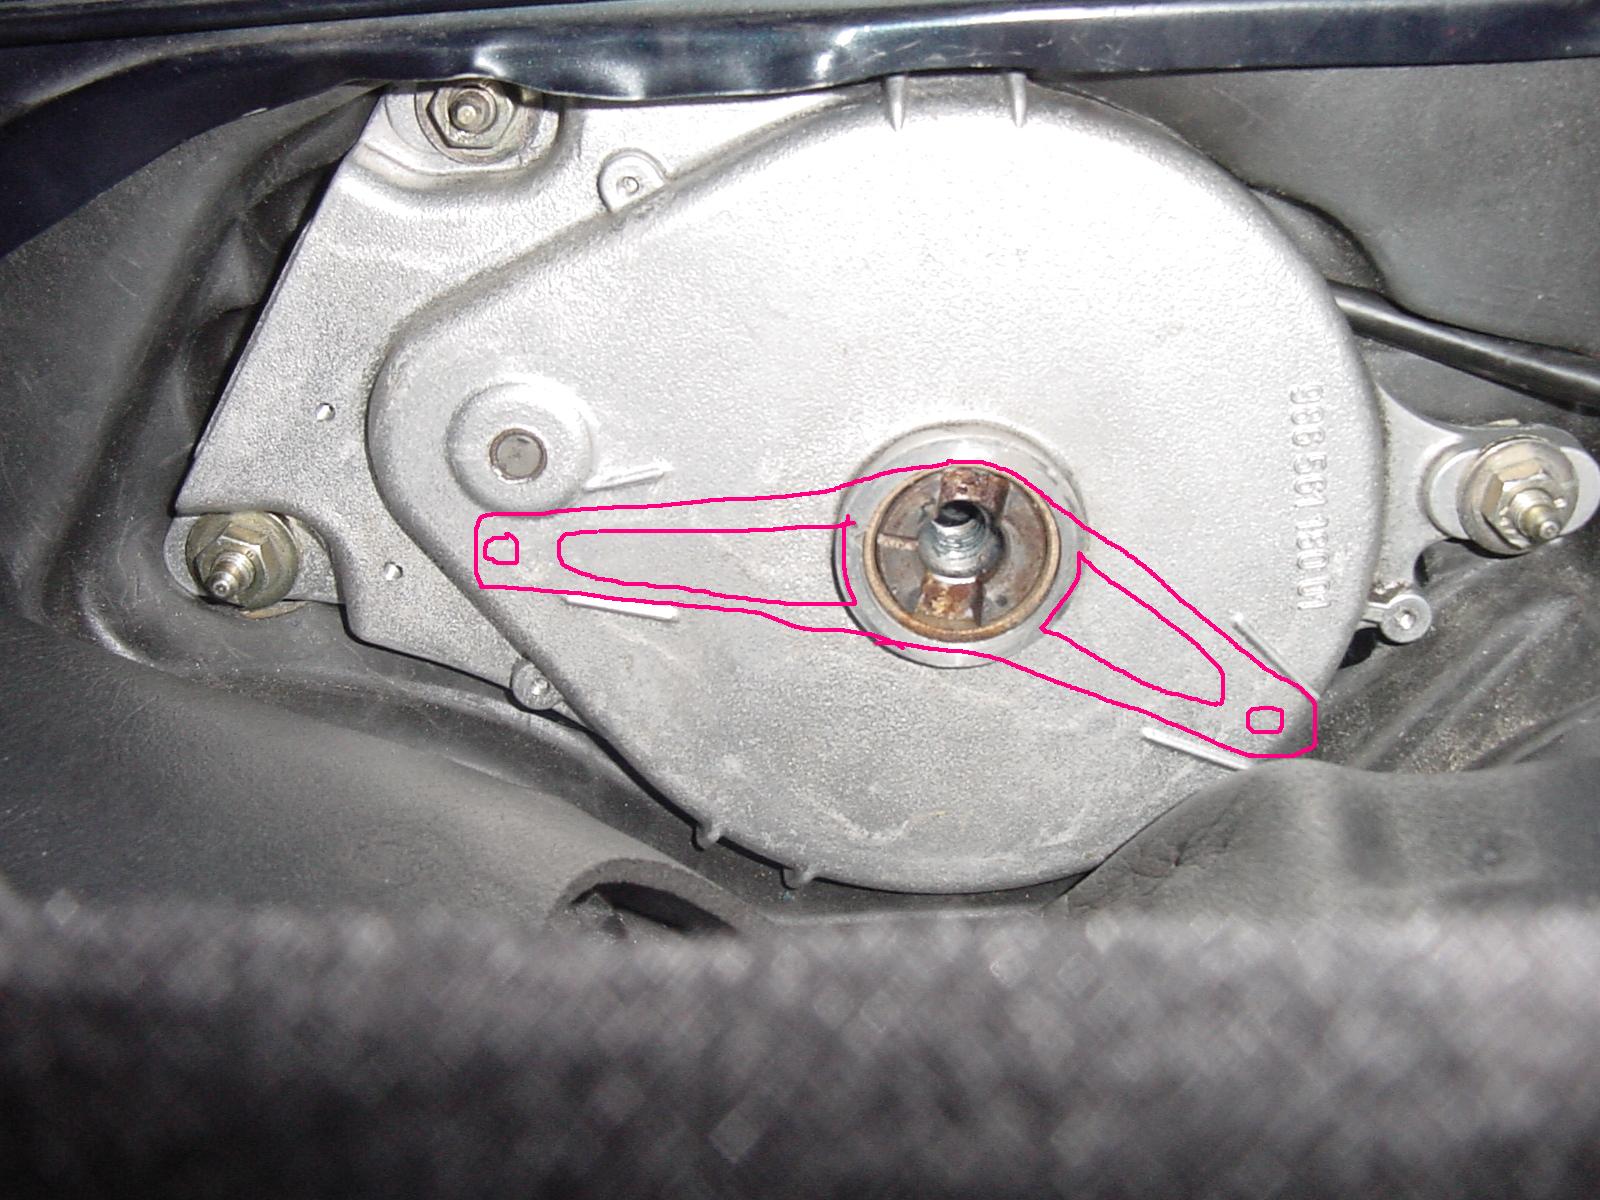
The second possibility is that at the other end of the cable (i.e., not the electric motor end, but where the cable goes into the transmission) the worm gear plastic housing that holds the worm gear in its place so that it can transmit the spinning action of the cable to a turning action of the half-moon gear may have come loose or broken. I am attaching a photograph of the back of one of the transmissions. The red arrows show which screws you should be sure are tight. The yellow arrow points to where the worm gear resides. The white arrow shows it's a BMW part.
Either one of those possibilities would cause the motor, through the shielded cables, to exert uneven pressure on the left and right metal tension bow of the convertible top frame and break the plastic connectors.
Try to spin each of the metal inner cables by hand to see if they spin with no resistance at all, or even try to pull them out of their black plastic sheaths to see if they just pull out. If so, then it's probably the first possibility.
To determine whether it's the second possibility, you will have to remove the transmissions.
BE SURE TO TAKE A LOT OF PHOTOGRAPHS OF THE POSITIONS OF THE V-LEVERS BEFORE YOU TAKE ANYTHING APART, IF YOU HAVE TO GO THAT FAR.
Regards, 1schoir.
-
Does anyone know if the O2 sensors are different precat and post cat on a 996?
Are the OEM O2 sensors wideband (actual values reported) or narrow band (lean, stoich, rich)?
Last one, any difference between o2 sensors on a 996 3.6 vs. 997 3.8?
Thanks,
Vman
Pre-cat and Post-cat on a 996 are the same.
If you would post the Model Years, it might be easier to determine.
Regards, 1schoir.
-
I'm glad that helped. Keep us posted. I think Tool Pants was the first person to tell me that the dealer's tech used those markings for synching. I screwed up my timing so badly the first time, no amount of reading those instructions could get me to a good starting point until I did the all the way down, then up approach. If you're using a drill to sync, make sure that the torque setting is at the lowest setting.
Mark:
Well, that was the key but in a roundabout way!
I was not making any more progress until I could figure out what was causing the V-levers to spin in only one direction no matter which way the Up/Down button was pushed.
It turns out that the B-pillar microswitch is what can be used if the motor will only spin in one direction. If you pull back the carpet-covered plastic panel on the driver's side B-pillar, you can see how that microswitch operates. It's sort of the opposite of most microswitches in that it will set off the relay when it is pulled (all the way) up. When the top is almost closed, just prior to latching, there is a piece on the bottom knuckle of the convertible top rear hoop that serves to pull up that microswitch. So if you ever have a problem with the top only operating in one direction no matter which way you push the button, just slip something around that microswitch lever and pull it forward and you will hear the relay at the driver footwell click. When it does, press the up/down button again and it will now operate the V-levers in the opposite direction of rotation.
You were partially correct with your observation that the V-levers might be bolted in the wrong way. More accurately, after I put the V-levers in line with the marking notches as in the V-levers that I sketched in, and hooked up the black push rods and the rod arms with the white plastic cups to the V-levers and the bottom knuckle of the top, I was still not able to operate the top in both directions. It would only get to a certain point and then the switch would either die or operate in only one direction.
The key turned out to be that the half-moon gears were actually the part that had to be rotated 180 degrees and at that point the V-lever had to be flipped upside down so that it fit between the marking notches. At that point, I hooked everything back up and voila, the top worked perfectly and the clamshell followed along perfectly as well. I think that by rotating the half moon gear around, it ends up somewhere near the middle of its 50 teeth and thus does not "fall off" the worm gear which is turned by the cable.
Here is a photo of the half-moon gear in the transmission. From this postion, you have to spin the cable so that the half-moon gear is near the middle of its travel. Then, when you install the transmission and install the V-lever (with the 19mm bolt torqued to 59 ft/lbs) you don't have far to go to line up the V-lever with the marking notches .
Here is a photo of the transmission showing the marking notches. The notches, in the way they are slanted, help you to make sure that you don't have the V-lever installed 180 degrees off.
Here is a photo of the B-pillar microswitch with the red arrow showing the little metal lever arm that must be pulled forward if your top only operates in one direction.
I was able to do the installation that finally worked with the top 2/3 of the way closed (about 12 inches from the windshield). At that point, I first hooked up the white plastic cups onto their ball joint, and then connected that part of the rod arm to the part that is already on the V-lever by means of that one 10mm bolt and thick washer. Then, after hooking up the end of the black pushrod with the clip to the clamshell arm, I maneuvered the clamshell so that the other end of the black pushrod could reach and be pushed firmly onto the ball joint on the rearmost part of the V-lever. I then did the same to the driver side and made sure the V-levers were in the same relative position on each side and that the clamshell was level when looking at it from behind. I also measured from the rear ball joint on the V-Lever to the bottom of the side rail (in which the lowest part of the clamshell arm slides back and forth in a sliding plastic cup) on each side and got about a 4 inch measurement (by taking a page of how the manual says to measure with the newer style transmissions (Version "B"), just to make sure the V-levers were synched.
I then pressed the button to open the top and everything worked!
This is the first time since I bought the car that the top has worked in the automatic mode and the former owner told me that it had not worked in "a couple of years" before I bought it from him. From what I have been able to learn and observe, it seems that this all started with one of the cables stretching and everything went downhill from there.
I want to express my gratitude to especially to Mark in Sunnyvale, to Tool Pants for the posts in the archives, to $Chris in NH and to Azzar0 for their invaluable help in getting this done. Without RennTech Forums, I was looking at a big $$ repair, (to say nothing of the feeling of accomplishment). :renntech:
Regards, 1schoir.
-
Hi 1schoir,
I think you bolted the lever the wrong way. The cycling back and forth and not reaching the top is symptomatic of having the gears inside the transmission in the wrong position relative to the V lever. Here's what I would suggest.
Spin each transmission following the down movement until the gears inside jumps off the teeth (I.E. CCW).
Reverse the spin to re-engage (ie CW)
Put your top in the down position. The trick is to have another boxster to take a look at and see how the V lever is supposed to face. I'll take alook when I get home tonight.
Adjust the lever to line up the black and red ball joint by spinning in the top up direction only. This is very important.
-Mark
Mark:
Thanks for sending me the information.
Although a few of the older threads on the subject in these forums discussed the V-levers and their position relative to the transmissions, it was not until I read the instructions that you sent me that I found an explanation for the "markings" on the outside of the transmissions. For anyone else who has looked for this answer but could not find it, here it is:
The instructions read as follows: (For transmission Version A [old style transmissions] Insert the flexible shaft of the convertible top gear to be adjusted into the drive motor and SET THE DRIVE LEVER (V-Lever) TO THE CENTRE OF THE MARKING NOTCHES with the rocker switch. Then (adjust convertible top gear on left and right synchronously).
For the newer style transmissions (Version "B") (after production date 03.05.199) [not sure whether that refers to March 5, 1999 or May 3, 1999 due to different European nomenclature for days/months/years] the instructions are similar, but it then specifies to measure 195 mm (+ or - 0.5 mm) from the center of the drive lever ball head to the upper edge of the side section sealing channel.
I have attached a photograph which I took of the psgr side transmission which clearly shows the "Marking Notches" and I have drawn in where the V-Lever is supposed to be for reference. (The marking notches are two on the left and two on the right, below the centerline of the transmission, on either side of the drawn-in V-lever.)
I believe that this is the proper starting point and I will attempt that and report back.
Regards, 1schoir.
-
I just got a silver Carrera emblem for my trunk and I wanted to know how to remove the original matte black one without damaging the paint.
Thanks!
Here's a link to a web page that shows you the method by which to safely remove your original emblem. Dental Floss!!! : http://boxsters.addr.com/hacks/logo_removal.htm
Regards, 1schoir.
-
ischoir,
Once the gear comes off, there's no reason to keep pressing. For some bizzarre reason, the transmission gear only spins one way. So while it's a half moon, it ony uses say a quarter of circle of rotation. The problem is if you don't have it synched correctly, it gets stuck in an up or down position. I spent 3 weeks trying to figure this out when I tried to fix my top. It took me a while to realize that the gears can only rotate one direction. I think I assembled/disassembled the joint at least 7 times in the process. Anyway, here's a picture of the driver side(US of course, for our international audience), taken from the top. So if you were to set yourself at eye level with the transmission (and you can see through the car's body), the position will be similar to you making an L with your left hand tilted slightly towards the front.
If I recall correctly, the top open light is set by the switch on the motor. I never had an electrical problem, so I never bothered with it. Can you PM me your email address, I have something that might help you troubleshoot.
The main idea is to get the top in a known position. Having the top down is the best way since this removes the effects of the red ball joint arm, etc out of the equation
-Mark
-Mark
Thanks for the explanation and the photo, Mark. I can now see how the V-Lever is supposed to be positioned with the top in the maximum down position.
So far, I've only taken the transmissions apart twice, and the pushrods and rod arms 3 or 4 times. I hope I don't get to 7 or more.
It's raining like crazy here, so I will have to wait until it stops to have at it again. I have PM'd you my e-mail address.
Regards, 1schoir.


98 Top Stuck in UP position
in 986 Boxster Convertible Top Issues and Solutions
Posted
Julian:
Glad to hear that it looks like you found the root of the problem. At the very least, getting the two sides reinforced will only help ensure a more permanent and trouble-free repair.
As far as the body shop you use, after you explain (and show them) the way the original sheet metal is cracked and has holes, any competent body shop welder will be able to reinforce that area, and it will probably end up as overkill.
I don't think that you should have to remind them, but be very sure that they are aware to disconnect the battery before any welding is performed. The electronics can fry in a split second if they don't take that precaution.
If you can take photos of the repair, it might help some people in this forum down the line.
Regards, Maurice.