Welcome to RennTech.org Community, Guest
There are many great features available to you once you register at RennTech.org
You are free to view posts here, but you must log in to reply to existing posts, or to start your own new topic. Like most online communities, there are costs involved to maintain a site like this - so we encourage our members to subscribe or donate. All subscriptions and donations go to the costs operating and maintaining this site. We prefer that guests take part in our community and we offer a lot in return to those willing to join our corner of the Porsche world. This site is 99 percent member supported (less than 1 percent comes from advertising) - so please consider an annual subscription or donation to keep this site running.
Here are some of the features available - once you subscribe RennTech.org
- View Classified Ads
- DIY Tutorials
- Porsche TSB Listings (limited)
- VIN Decoder
- Special Offers
- Paint Codes
- Registry
- Videos System
- View Reviews
- and get rid of this welcome message
It takes just a few minutes to register, and it's quality Porsche information at a low cost.
Contributing Members also get these additional benefits:
(you become a Contributing Member by subscribing or donating money to the operation of this site)
- No ads - advertisements are removed
- Access the Contributors Only Forum
- Contributing Members Only Downloads
- Send attachments with PMs
- All image/file storage limits are substantially increased for all Contributing Members
- Option Codes Lookup
- VIN Option Lookups (limited)


ciaka
-
Posts
469 -
Joined
-
Last visited
-
Days Won
16
Content Type
Profiles
Events
Forums
Exterior Paint Colors
Downloads
Tutorials
Links Directory
Collections
Classifieds
Store
Everything posted by ciaka
-
Please read the entire set of instructions before you begin. Understand the entire process. Then start the work. Last thing you need is to be half way through, not understand what to do next, and be stuck. Follow instructions sequentially. Most pictures taken are of passenger side. Hope it helps. Let me know if you have questions. *** EDIT *** - I was gone for awhile and all of my tutorials had their photos removed. Not sure why, but regardless, here they are back again.
-
Aftermarket Head Unit?
ciaka replied to Mike Lewis's topic in 9PA, 9PA1 (Cayenne, Cayenne S, Cayenne Turbo, Cayenne Turbo S)
I had a thread going on another place, discussing just the thing. Compiled list of items that I would need. However I managed to fix my pcm and didn't feel like spending money, so it all stayed. Sometimes I do think if it would still make sense to swap. Anyway, here is the url... http://www.6speedonline.com/forums/cayenne-955-957/308317-suggestions-aftermarket-replacement-pcm-dvd-radio-gps-05-ctt-w-bose-3.html -
Has anyone else experienced and fixed this themselves? I want to attempt this myself, but saying dealer fixed it does not provide enough direction for my simple brain. If anyone can chime in with some procedure that gives tips, eats, so I don't mess up the door position entirely, it will be great. Doors have shims already but driver from door is about 3mm lower and on highway sometimes I hear noise.
-
Sorry to hear on your loss. Does sound very expensive. Indeed, replacing of pads themselves does not require one to remove calipers from the car. Only think one needs to do is remove the sensor cables and remove a bolt that allows the caliper to be tilted on way to remove/insert new pads. IMO, pad replacement is still a very easy thing to do. These cars cost enough, no need to keep giving the dealers more and more money. I think the key thing here is knowing exactly what one has to do, before they start doing it. Then, once process is known before work starts, it will be much easier to execute. On wheel area bolts, nuts, it always helps to add penetrating lubricant to help remove the hardware. Again, really sorry to hear this. Please use this community forum in case of questions, or if you have doubt of any kind. Take care.
-
Thanks for input. Done that. Replaced the control arms. Hoping to add a DIY for this soon. Once I saw the bolt/nut/washer combo, I knew. Agree, if you turn the bolt head instead of turning the nut, you will damage the bolt and pop the indexed washer off onto the bolt threads. IMO, the design could be much better for a Porsche hardware. Existing seems too cheaply made to be reliable. Guessing that sellilng 2 dollars worth of metal for 15 bucks, makes sense for Porsche.
-
Cayenne Front Sway Bar Link Replacement DIY Part of my suspension refresh was replacing these.Hope it helps the next person.There are multiple ways to elevate the car. The ideas is to have front elevated so both wheels are even, and neither side is torqued due to being flexed.So have the car off the ground however you need. Then have a mechanism to be able to maneuver lower control arm up/down, so you can remove the upper nut/bolt from the link and mount holes.I opted to use 1 jack stand, lift jack on opposite side (to make sure both whee Author ciaka Category Cayenne (9PA, 9PA1) - Common Fixes and Repairs Submitted 06/11/2015 09:45 PM Updated 10/03/2016 10:05 PM
-
Yes, checked the fuse box. The 40A fuse (large orange in location 56), is all intact...not blown. Checked any other fused (location 23 too), and all is OK. Did more diagnosis on this after work. Have some codes: Air Conditioning Section: 353 - Feedback from blower regulator front value below lower limit valu 2193 - Power Supply for blower regulator short circuited to ground After I pulled the large fuses, checked and reseated them, I turned on the car and the front AC started cooling again. It sure points to the blower regulator IMO. Funny thing, I recently replaced the blower regulator with a new one. The part number was exactly what it was calling for (have to dig up now if needed). Will have to get under glove box to looksie at the regulator now. Guess will follow my blower regulator DIY to do this...lol. Anyone have suggestions on this?
-
Part of my suspension refresh was replacing these.Hope it helps the next person.There are multiple ways to elevate the car. The ideas is to have front elevated so both wheels are even, and neither side is torqued due to being flexed.So have the car off the ground however you need. Then have a mechanism to be able to maneuver lower control arm up/down, so you can remove the upper nut/bolt from the link and mount holes.I opted to use 1 jack stand, lift jack on opposite side (to make sure both wheels are even off ground. Then used jack lift to adjust lower control arm to remove the long bolt, and reinstall new one.Good luck. Follow these pictures in the order you see them, read all instructions and make sure you understand them. Then do the step.Have fun. *** EDIT*** - I was gone for a while and all my pics had been removed from my tutorials. Regardless how it happened, here they are.
-
Just finished refreshing suspension, and thought - awesome....good to go for a while. As soon as I thought that, the AC is acting up. Background/Symptoms: Couple months ago, the condenser developed a crack. Had that replaced by a shop. All seemed OK. Over last week or so, started to hear squeaking noise coming from under the glove box. Seemed to come on whenever front zone AC was active and set to blow. Knowing about this from reading threads on here, I assumed it may be the blower. Get home yesterday, AC working just fine (except the annoying squeaking when blowing air). Today, get in the car, start, and the rear zone is blowing air (although not cold), but front zone is not blowing any air at all. Anyone can give input as to what could be the cause? Few months ago I replaced the blower motor resistor/voltage regulator with a new one (knew from past my old VR was not providing all voltage it was supposed to (about 9 as opposed to about 12V). Have not yet gotten in there - just got into work, but wanted to see if you fine folk on here can help provide possible places to check. Thanks again.
-
Cayenne Front Tie Rod Replacement Text is located on each pic. Follow pics in the order they are labeled. IMO, you will find it easy to just read each step, make sure you understand what it asks you to do, then do it. If you have any doubt, chime away and people on this forum will help. Hope it helps you out. NOTE: On driver side, the tie rod rear side does not have a shield to remove. One less thing to think about. *** EDIT*** - I was gone for a while and all my pics had been removed from my tutorials. Regar Author ciaka Category Cayenne (9PA, 9PA1) - Common Fixes and Repairs Submitted 06/09/2015 08:06 PM Updated 10/03/2016 10:07 PM
-
Cayenne Front Tie Rod Replacement
ciaka posted a tutorial in Cayenne (9PA, 9PA1) - Common Fixes and Repairs
Text is located on each pic. Follow pics in the order they are labeled. IMO, you will find it easy to just read each step, make sure you understand what it asks you to do, then do it. If you have any doubt, chime away and people on this forum will help. Hope it helps you out. NOTE: On driver side, the tie rod rear side does not have a shield to remove. One less thing to think about. *** EDIT*** - I was gone for a while and all my pics had been removed from my tutorials. Regardless how it happened, here they are. -
take a look at how the pistons work, if the calipers are gliding in/out smooth, or if they seem to bind. If they appear to have hard time moving either way, it may be a sign calipers need refresh. Another way you can see is after driving for a while you stop the car and see if either rotor is super hot (would not want to touch with hand - spit at rotor to see if it boils). If you have not been pressing brakes just before stopping, another sign calipers are not functioning well. Just some more ideas here before you take stuff apart. Good luck.
-
From what you describe it does sound like a possibility, that brake pads (at least some of them), are sticking to the rotor, causing the squeak. Could be the pads, could be the calipers/pistons, not working properly to release pressure once pressed in. If you nail down the side in which it is happening (have someone stand next to car as you roll by to pinpoint), then you can clean out the brakes well (remove, clean, reassemble).
-
When taking lower control arms out: Lower control arm questions 1. any things that need marking for when reinstall takes place, to ensure decent alignment? 2. What are the torx screws under the ball joint screws? Seem to be inside the nuts that I would want to remove to separate joints. Do not want to touch unless I know what these are for and if I need to mark anything. Upper control arms quesitons: 3. How easy/hard is it to remove the upper control arms (wish bones next to shocks). Any special tools? Only see ball joint + 2 bolts (although one bolt seems to be right next to engine wall without enough clearance to remove out once nut is taken off. Stabilizer bar questions 4. I assume front has to be off ground to remove the bushings? 5. Is it all under pressure that I will have to watch out for when loosening the bushing mounts? Trying get general idea of removal (looked at manual but does not seem to have mention of these things). If anyone an run through process for me, I will give you a million bucks - well, not really, but will greatly appreciate it. Thanks.
-
Cayenne Hatch Strut Replacement For those who have been hit by their hatches after opening them, you are likely in need of replacing your struts. Not hard to do. Parts cost about $110 shipped. Tools used shown. Hope this helps. *** EDIT*** - I was gone for a while and all my pics had been removed from my tutorials. Regardless how it happened, here they are. Author ciaka Category Cayenne (9PA, 9PA1) - Common Fixes and Repairs Submitted 04/25/2015 11:48 PM Updated 10/03/2016 10:14 PM
-
Cayenne Hatch Strut Replacement
ciaka posted a tutorial in Cayenne (9PA, 9PA1) - Common Fixes and Repairs
For those who have been hit by their hatches after opening them, you are likely in need of replacing your struts. Not hard to do. Parts cost about $110 shipped. Tools used shown. Hope this helps. *** EDIT*** - I was gone for a while and all my pics had been removed from my tutorials. Regardless how it happened, here they are. -
Awesome. Got it. Thanks. The car was in shop getting Airbag stuff done. Mechanic must have removed the mat and forgotten to put back in. Thanks
-
Cayenne steering wheel removal I just completed doing this, and thought I would take pics to make it easier for others. Here it is, removal of the steering wheel. Thanks and good luck. Edit: at least this one had pictures still. most of my tutorials had photos disappear from them. Author ciaka Category Cayenne (9PA, 9PA1) - Mods Submitted 03/29/2015 01:45 AM Updated 10/03/2016 10:43 PM
-
I just completed doing this, and thought I would take pics to make it easier for others. Here it is, removal of the steering wheel. Thanks and good luck. Edit: at least this one had pictures still. most of my tutorials had photos disappear from them.
-
Pics

-
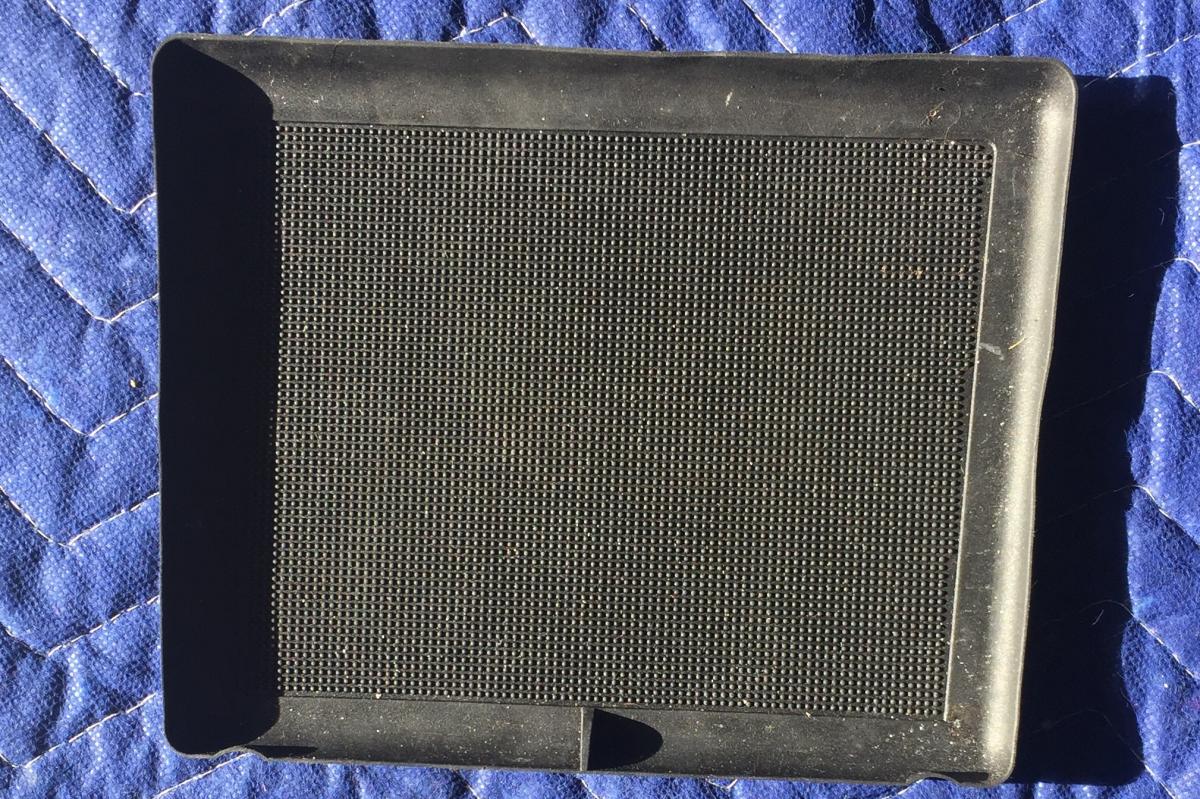
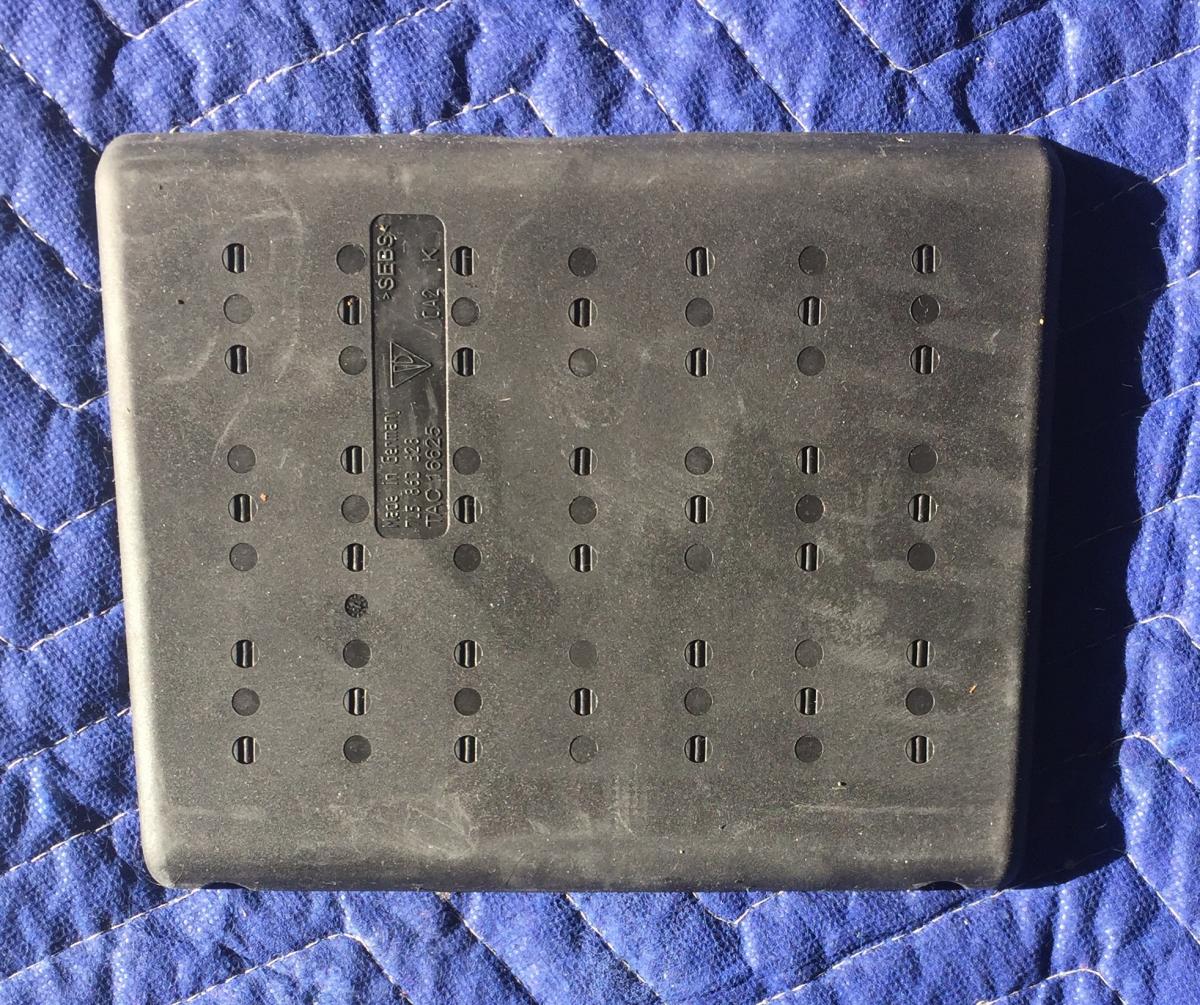
Mechanics were troubleshooting AC and srs module issues. After I got the car back, noticed this part was left on the floor of front passenger side. If you can help ID, I'll greatly appreciate. They need to complete the srs work and I need to tell them to put the part back exactly where it was removed from. Thank you.
-
Thanks. I will have to look for alternative solution. Looks like I'll have to live with the nick on the button. Since really small, that appears to be my resolution until something else is found.
-
Bad SRS Module advice
ciaka replied to ciaka's topic in 9PA, 9PA1 (Cayenne, Cayenne S, Cayenne Turbo, Cayenne Turbo S)
So after some lengthy troubleshooting I was told definitely srs module out. Since dealer part I was told 1200 for part itself and 300 for install, programming and part of troubleshooting time. They said took about 5 hours to determine this. Does that sound decent or am I taken to the cleaners? -
lol, these look like stickers one would place over buttons. Noble idea, but misplaced IMO. Thanks.
-
Bad SRS Module advice
ciaka replied to ciaka's topic in 9PA, 9PA1 (Cayenne, Cayenne S, Cayenne Turbo, Cayenne Turbo S)
Sorry.... 2005 cayenne Turbo