Welcome to RennTech.org Community, Guest
There are many great features available to you once you register at RennTech.org
You are free to view posts here, but you must log in to reply to existing posts, or to start your own new topic. Like most online communities, there are costs involved to maintain a site like this - so we encourage our members to subscribe or donate. All subscriptions and donations go to the costs operating and maintaining this site. We prefer that guests take part in our community and we offer a lot in return to those willing to join our corner of the Porsche world. This site is 99 percent member supported (less than 1 percent comes from advertising) - so please consider an annual subscription or donation to keep this site running.
Here are some of the features available - once you subscribe RennTech.org
- View Classified Ads
- DIY Tutorials
- Porsche TSB Listings (limited)
- VIN Decoder
- Special Offers
- Paint Codes
- Registry
- Videos System
- View Reviews
- and get rid of this welcome message
It takes just a few minutes to register, and it's quality Porsche information at a low cost.
Contributing Members also get these additional benefits:
(you become a Contributing Member by subscribing or donating money to the operation of this site)
- No ads - advertisements are removed
- Access the Contributors Only Forum
- Contributing Members Only Downloads
- Send attachments with PMs
- All image/file storage limits are substantially increased for all Contributing Members
- Option Codes Lookup
- VIN Option Lookups (limited)


ciaka
-
Posts
469 -
Joined
-
Last visited
-
Days Won
16
Content Type
Profiles
Events
Forums
Exterior Paint Colors
Downloads
Tutorials
Links Directory
Collections
Classifieds
Store
Everything posted by ciaka
-
The trim strips are located on on lower part of each door entry, and the door closes onto the trim pieces themselves. Sometimes, when exiting the car, your foot can catch the edge of a trim strip, causing a clip underneath to break, loosening the strip. After a few clips are damages, the strip is very loose and you may need to replace all clips to repair this. Attached pics show which trim strips these are (total 4 on the car - 1 per door). Tools needed: - Cleaner to clean strip and car area after removal of old clips - Rag/towel to clean with - Hole punch (about 1/4 or thicker) - hammer - replacement clips - 6 or so per strip - Part# R95555954700 from THIS WEB SITE ORDERING REPLACEMENT CLIPS: 1. Go HERE 2. In the search field, paste the following text: R95555954700 3. Click GO button 4. At bottom you will have choice of which type of part you want to order (I got the cheapest - same parts - 1.00 each - genuine Porsche parts) 5. Pay for the stuff and wait to receive via mail DIY INSTRUCTIONS: You will need about 6 for each strip. Once you get them, you will have to take off old strip which will likely break the remainder of any good clips on there. 1. Remove the clips from strip and from car mount holes if any. 2. Clean area of dirt/debris - both the car and strips themselves 3. Place new clips into car mount holes claw side into each hole (yes, have to place the clips onto the car, not on the strip) 4. Using a fat hole punch and hammer, punch in the posts in middle of each clip until it is flush with the rest of the clip's plastic - do not use skinny hole punch as the post will go into the clip and into the car, which is not what you want. DO NOT CUT OFF THE POSTS!! they are intended to be there to affix the clips. The post spreads the claw, which is placed into the hole, affixing it to the car. 5. Affix the strip to the mount areas with each clip. Align to clip, press to click into place. NOTE: Once clip in, it may be hard to remove, so make sure you are installing correct strips, and all clips are affixed. Get extra clips just in case, cheap but if you screw up you will pay extra 8 bucks just for shipping. Have fun.
-
Just like last month, satellite radio in your cayenne is free til Feb 10. Just passing the info on.
-
I had this question a while back and my thread on this is located HERE. Located in anoher forum...6speed.... If you do not have access to it, here is the text. Bottom line, was really easy. I chose to wipe the plastic covers by hand after removing them all, and washed entire engine as written below. Ended up being really nice and shiny. Text from other forum: Engine compartment wash I have done this to other cars but wanted to get tips from those of you who wash your own engine compartment on the cayenne. 1. What do you use to spray in there 2. Do you use pressure washer or hose alone 3. Do you take off the plastics and wash them separately 4. Are there areas that you do not spray/wash, or any place that is sensitive and must be careful with 5. Do you do it in your driveway or at car wash 6. Do you take off bottom covers too to let water out easy Above and any other tips will be greatly appreciated Other contributor response: I have just done mine: 1: remove all the plastic trim covers 2: cover as much of the electrical sockets as possible 3: use Gunk to get the worst of the grime off, agitate if stubborn grime 4: gently rinse off the gunk, do not use a power washer!!! 5: use APC at 4:1 ratio and again agitate 6: again rinse 7: pat dry with microfibre cloth 8: spray with 303, gently wipe for matt finish, or leave for 6 hours for gloss finish 9: do the same for the plastic trim covers It takes time to do, but well worth it, nothing like an engine that you can eat your dinner off!! When the rain stops I will take some shots of my engine bay. There are plenty of detaling forums that will show what can be achieved. Contributor #2 response: 1. Wash car. 2. Lift hood 3. Spray clean 4.Close hood 5. Drive off. I wash (with a power washer even) the engine of ALL my cars EVERYTIME I wash the cars. I know several engineers at car manufacturers. The engine bay is considered a "wet compartment" Things in the engine bay, including all the plugs, are designed to get "wet" If you have a running issue after washing your engine, you have a bad part that isn't sealing correctly. Dirt and oil eat away at seals and trap heat in engine components. I've run several cars upwards of 300K miles and one of the best ways to get it there is to keep it clean! This should give you a good idea on the process. I ended up buying: - Degreaser (regular, or you can get the eco friendly one at Wally world too - i got the eco one so I can do in driveway without messing things up). - Engine shine (same make as degreaser) Removed all plastic covers (to clean by hand). Warmed up engine decent (not running hot, just enough to be warm to touch - you risk it bursting into flames if sprayed onto super heated surfaces) Sprayed generously all over the engine bay, even under lid if needed. Waited a few minutes to soak in. using water hose with spray attachment (stayed away from pressure washer - can damage stuff if you are not careful), sprayed all over bay to clean off spray. Used web towel to wipe off excess water. Idled car (i drove for a few minutes) to make all water evaporate. Waited til engine cool. Sprayed engine shine on all parts I wanted to shine, and left it at that. Cleaned all plastic covers by hand and installed back into engine bay. Came out super nice. No need to cover any part in particular when rinsing, just do not have high pressure water jet to rinse with and you will be OK.
-
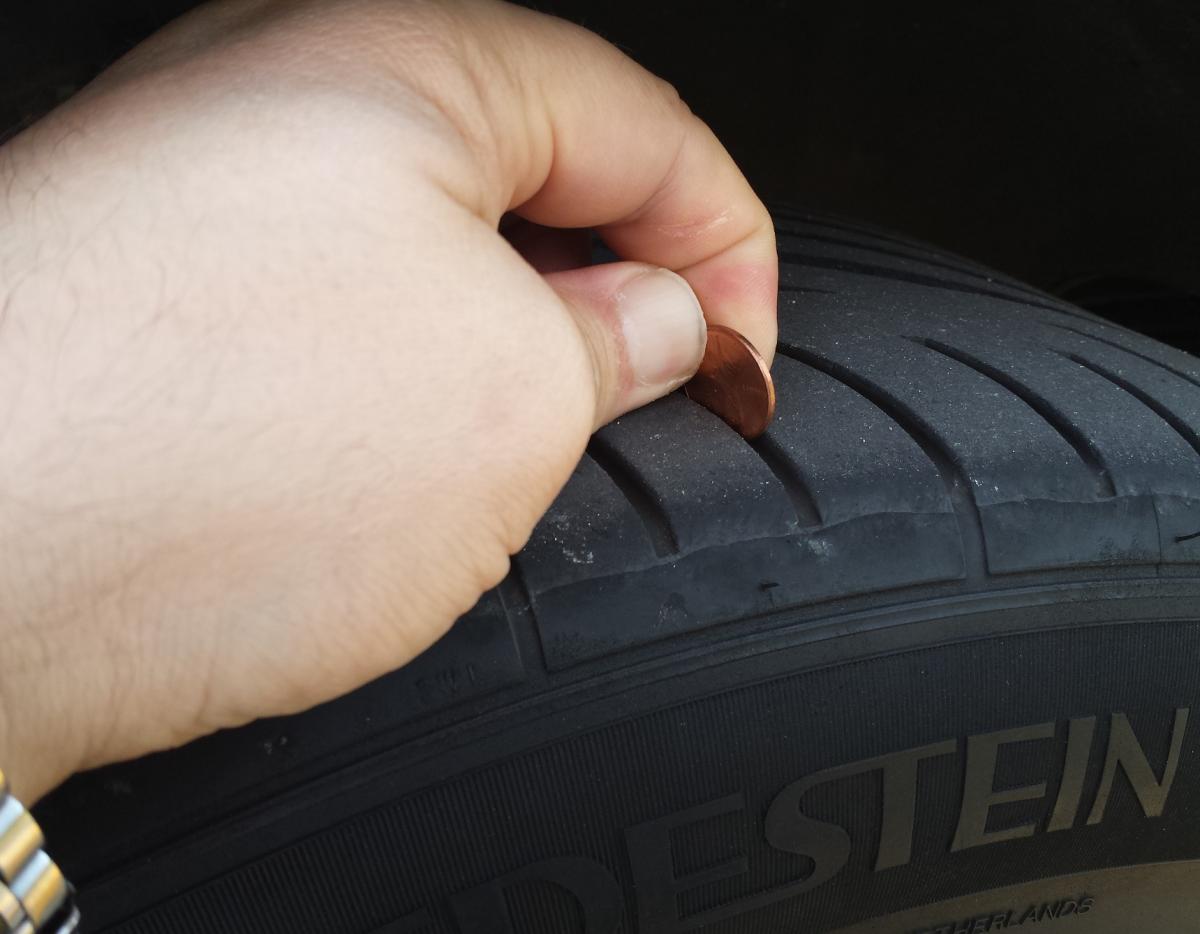
As promised, here is my final review of these tires, after replacement due to wear: Make: Vredestein Ultrac Sessanta Giugiaro - XL (SUV) Size: 275/45 19 Load Index: 108 (XL - 2205 Lbs or 1000 kg) Speed Indx: Y (186 mph or 300km/h) UTQG: 280 Traction: AA Temp: A Date installed: Oct 25, 2012 Date removed: Nov 13, 2013 Time used: 2 days shy of 2 years and 2 weeks of use Mileage installed: 67862 mi Mileage removed: 84919 mi Mileage used: 17057 mi or 27291 km Cost (Total - tires + install+balance+lifetime re-balance/rotations+road Hazard warranty): $1020 tires + $160 all other stuff = $1180 final price Note: No tax - purchased online REVIEW: My suspension settings were probably 80% at low and sport, and 20% low, between normal and comfort (to give you idea of mapping used on car). About less than 3% of the time of use would be in PSM OFF mode (majority when wanting to accel onto highway, or sometimes taking a nice turn, demolishing the occasional turd trying to show off, etc (early on times). Tires were on the car 100% of the time (no winter/other tires). Rotated front-to-back every 4-5K miles and rebalanced each tire until replacement. Initial impressions: - very quiet ride - great handling (stiff sidewalls - although when new and tread was at its tallest, very slight squiggle could be perceived - from flex of tread - at higher speeds) - Looks are awesome (cant remember how many compliments I got) - great rim protection lip on tire (extends past rim lip to protect against curbs, etc) Impressions after use: - This fricking tire sticks to road like nothing I have used before on the street. Comparing to Michelin Latitude Sport (tires taken off for these), hard time even comparing - taking turns at about 85 with old tires, could be taken with new tires at about 118-125 ( :eek: ) - Tire super quiet when driving (fast or slow). Towards the end of life, noise level increased (not dramatically but noticeably). - Sticky level was superior until tire was near worn down to flat. That is when in turns under power, tire would start breaking traction. Very evident when starting from stop and making turns under throttle, so be careful in those times. - OMG - this tire seemed to perform just as good in rain as in dry weather!!! CAN THAT BE POSSIBLE?! Seriously, with pretty hard rain, I was very cautious at first , but eventually got more and more confidence, ultimately deciding not to push my luck, but was astonished with the grip I had - like it did not rain at all!!! In my state had to wait for rain quite long time to perform these tests.. lol. - Looks awesome throughout life of tire (again, cant remember how many people came over to ask what these are, and admiring looks. - I was a little disappointed from distance of use - just over 17k mi or 27k km, was kind of hoping for 20-25k mi, but understand reasons for this, so no biggie here. DRIVING BEHAVIOR WITH TIRES ON: Well, the reason I got about 17k mi on these was due to following: - initial period (about 3 months or so), I was very aggressive on tire (loving every tight turn), accelerating when wanting to feel it, generally driving to enjoy the traction (WOW - let me say it again). So for this period, my driving would be considered hard on tires. Of course, was relatively new to car, so this played a factor in the driving habit as well. Would say about 40% normal driving and 60% handling/accel oriented (getting to know that car...lol). - period after 3 months to about 6 months, driving pattern stabilized and was more of typical driving with occasional bursts of enjoyment/speed/power. Some turns on way from work taken hard to put a smile on a face - before having to go home ( :D ). Majority of driving though was normal or elevated normal, if you will. Would say 60% normal, and 40% elevated normal. - Period after 6 months to replace, I would consider driving habits as very typical of urban driving. Still liked that one turn on way from work, otherwise, pretty typical of any average driver though. Would say 80% normal, 20% still enjoyment of speed/power/handling. OVERALL: - I am so glad to have experienced this tire - only reason I switched to something else was to try it to compare to this tire - if not satisfied enough, I will be back to these on my next set for sure - tire installed after these: Nitto NT420s 275/45 19 (XL). - My recommendation would be: Get these suckers for sure - if living in cold regions (where it snows), be careful, as they will not handle well in the ice/snow (from reviews, not first hand experience though) If you are considering this tire for your C/CS/CTT, my opinion will be: - the C will get more mileage (due to power) - the CS will get less mileage - the CTT/CTTs will get even less mileage - if your driving habits seem harder than what attempts above to describe, this will likely lower tire expectancy as well - mods, other performance done to your car will affect mileage too Including pics of what the tread looked like at replace time (compare with pics from first post - new). Thanks for reading. Now, maybe those who are looking for tires will have a decent info to try to compare to. I will post my reviews on the next tire as well, to add to the pool of info for Cayenne users (maybe other SUVs too).

-
as in the write up, I found it very easy to pull out once you separate the exhaust pipe. It should be in the DYI I put up.
-
Well, time has come for me to depart from Vredestein Sessanta tires. WHAT AWESOME TIRES THEY ARE - WOW!!!!! I will post up my summary for historical purposes, including new tread mileage, and replace time mileage, along with my reviews/opinions, what I liked, what I did not, etc. The only reason I changed is because I just wanted to try something different, but if not improved, will be coming back to these for sure. Hope to update today with my info.
-
you are welcome. ..." I have never seen a vehicle with so many covers and panels to get in your way for maintenance" - but is sure looks nice thought, right? lol
-
A little while back I noticed some small amt of oil under the valve cover gasket area (under the cover and below gasket area). Also saw some oil spot near the valve cover gasket (when looking from front of car into Engine compartment, where the gasket is facing front of car). So looks like the valve cover aging. I am interested in replacing and want to know if anyone has one this, how hard is it to replace valve cover gaskets, etc. Thanks for any help you can give.
-
If I were in your situation, I would not bother trying to do before it fails. The car will still work, you will get engine error code and CEL light on (not critical). Will have to try a few times to start after you fill up the car. However, for all you know, your part may never fail, so why go through the hassle. Again, this is IMO only. Thanks. Purge valve: it is a part of the car's emission control system. It monitors the fuel vapors that get recycled into the engine for combustion. Some call it evap canister, or evap valve, etc.
-
...all went well. Will create DIYs when I have time (work killing me now). parts worked fine and fit fine too. Will update with more info when time is available. Thanks.
-
yup. Not very hard to do, just takes some time. I made a DIY for this as well, I guess there are two of these now to choose from. Mine was located here.
-
well, at the shop now and being done (flush/vacuum pull/fill with 134a). Same vendor of ac compressor for the 3.2L engine came up as 60-01490 I believe. Interestingly enough, when searching the site of place where i bought it, they had a section for common questions/etc. One of them was the connector does not fit. Their explanation was that in some cases the connection may not be identical, in which case, without voiding warranty, one can use the connection from old unit (with proper insulation during the process). I had these connected and used shrink tubing on each lead, then on overall cable and used the heat shielding that the cabling comes with anyway. Soon enough we will know, but I am super confident that this will be a success. Main thing is they do a good job flushing the system out, making sure vacuum is pulled and then all else is a piece of cake. I should have 2 DIYs from this: 1. Replcement of AC compressor for 03-06 CS/CTT (will put in caveat about connection so that each person makes up their mind on this - and based on outcome from today's meet with the shop) 2. Replacement of Drier for 03-06 C/CS/CTT (will put in info on when is a good idea to change)
-
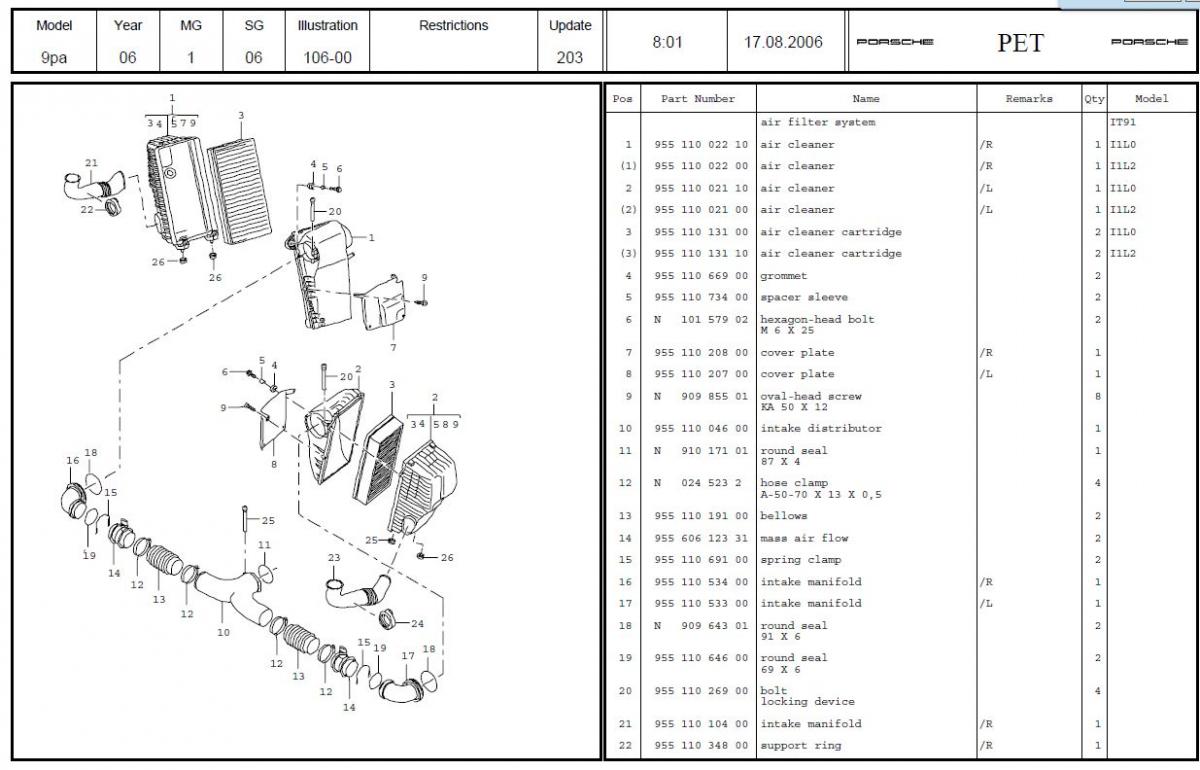
I am thinking of troubleshooting my boost leak error P0299. Have questions and hope you fine folks can assist. 1. Are there boost pressure leak kits available for sale for cayenne 03-06 turbo? Not talking about dealer tools costing thousands. Looking for cost effective tools that can be bought. 2. If I have to make my own boost pressure leak kit, does anyone have info on materials list to make it? Sizes, diameters, etc. 3. Assuming I get a kit to PD my boost leak, where would be the best place to block off the piping to start the testing. Do i need to disconnect/block off at one place only, two places, etc. My plan would be to pressurize to about 12 psi (1bar = 14.7psi), then use soapy water to start spraying each pipe component and junction to see if I observe bubbling. But need advice on where best place to disconnect/block off/connect the kit to for the PD. If you can advise with a pic or diagram to ensure it is clear what areas you refer to, it would be awesome. Here are diagrams to refer to parts by number, so there is no confusion. 4. Anyone in Austin TX that would be willing to help in PD (thought I would ask anyway - really want to learn about it regardless). Thanks for help. Diagram 1 - http://www.renntech.org/forums/uploads/monthly_05_2013/post-79141-0-50523800-1369979044.jpg Diagram 2 - http://www.renntech.org/forums/uploads/monthly_05_2013/post-79141-0-16333500-1369978778.jpg
-
Your P0441 error code is most likely due to a failed purge valve, or evap control valve (same thing different naming). Let me guess. You pull up to a gas station, and fill up, only to find that you have a few very hard starts (car having a hard time starting up), before you finally are able to start and go. After that, no problem starting until you get to a gas station again. If that is the case, your chances of purge valve are in the upper ninety percentile close to 100. I had same errors. Bought purge valve online, replaced myself in under couple hours (with taking picks, etc). I created a DIY for others to follow should they have similar issue. You can find it HERE: http://www.renntech.org/forums/tutorials/article/291-purge-valve-replacement-03-06-cayenne-tt/ Good luck and let us know how it went.
-
confirmed with store and from online resources, get this compressor for my make/model/engine size. 05CTT 4.5L turbo. They are identical in mold, all lines fit just fine, the only diff is the connector on new one has black line grounded at ac compressor chassis, and red line goes into conector, whereas on old one, black and red lines on compressor go into a connector. Connector on new one is slightly different (same shape). Can plug it in, but the red prong inside connector looks thinner and there is no black prong (since gounded at chassis of ac compressor). SO my plan: remove connector from old ac compressor, fit to new compressor so that connection to car is identical. Assuming compressor is for the car, do you see this a logical step? Researched and since this connection activates/deactivates compressor, then it should all fit fine. Lemme know if you can. Putting things back together. That drive belt it a biach to do (putting in a new one anyway). It sounds like that is not the correct compressor, which should be a direct drop in replacement.
-
Yes. The store part number is 60-01801 NC. Another number i see is 477280-6091. Another is 471-1580. For 2005 CTT 4.5L engine. Both compressors are same. Lines same location, mount holes in exact same place too. Only diff us the two wires coming out of the ac unit. Old one has both wires going into connector. New one has Black wire going to ac.compressor chassis, the red going into connector. The new ac unit connector is also slightly different. I plan to transplant connector from old one. Any comments?
-
so I am doing this today. The replacement ac compressor is new denso unit for 05 CTT per sales person I was discussing this with. AC compressor not hard to remove at all (no need to take off tire either or lining in wheel well). However, when I got to hood up the power connector (I assume clutch engage connection), noticed that the new compressor connector internally has one prong (red), whereas the old compressor connector had two prongs (red/black). The new connector prong is much thinner and there seems to be a plastic edge inside the connector, preventing me from making complete contact. SOOOOO....I am pissed. CAN THIS BE MADE TO WORK AS LONG AS I GET GOOD CONNECTION? What are my options? Can this be retrofitted to work? remove connector from old compressor and wire it into the new compressor? I NEED HELP HERE. car apart and I really think return/reorder is the last option I am thinking of at this time. THANKS.
-
already did and compressor is gone for sure with the clutch. been looking for info from those who did it, how easy is access/removal of ac compressor and drier. Will be doing it weekend I think. maybe make a DIY artie of it too.
-
Meyle rotors, anyone?
ciaka replied to ALEV8's topic in 9PA, 9PA1 (Cayenne, Cayenne S, Cayenne Turbo, Cayenne Turbo S)
I purchased the R1 concepts performance series of rotors for my 05CTT. Awesome, and great price too. Fronts are directional vanes (remember, when spinning vanes are supposed to let air out from center of wheel, vs. forcing air into the center of the wheel - many mechanics make this mistake when installing). Rears are non directional vanes (so can go onto your car either way). Slotted and drilled, with coated hats (black) and edges of rotors (rust proofing) I installed my rears to match the direction of slots/drill pattern (starting from center of wheel arching down towards rear). So far, love the rotors. Pads that came with it are ceramic (can buy with or without pads). Since ceramic, do better when heated up so initial bit is not optimal but is all there when heated up. -
great. Question solved. Thanks to all contributing.
-
I am going through compressor fail as we speak too. From info I got, and some limited experience on other cars: - this ac compressor is same for 4.5L engine (turbo or not) - 3.2L has different compressor - both compressors for the cayenne do have a clutch that engages compressor when needed - to do the job right yourself, get the right parts (ac compressor with clutch for your engine type, dryer which must be replaced if you ever brake the ac line circuit, install the parts, have the system flushed to ensure there is no metal/debris left in the lines if the compressor failed, ensure to check expansion valve to make sure not broken/replace if needed, replace the orings on lines going to the compressor, then pull vacuum on system to make sure there are no leaks, then put refrigerant into the system along with proper amount of oil for the compressor). - would recommend checking serpentine belt and replacing if needed (good time while you are doing the ac stuff anyway down there). I bought mine for $50 for the car shipped. - Drive away freezing your ballz off I have the parts, now am contemplating whether to give the parts to shop for install/ready, or if I should install the parts and then let dealer do the flush and refill. If they install parts they only warrant labor for 90 days. parts come with 1 yr warranty themselves. If I do install, shop only warranties labor for 90 days. Difference in price is if they do all, about 600 labor cost. If I do it all and they flush/refill, then 250. Already paid for refridgerant (they refilled then noticed compressor not engaging, then noticing busted clutch - had low pressure in it for a while and TX heat must have killed it). Got my ac compressor with clutch (new-Denso), dryer, orings for $490 shipped total in case someone wonders. Hmmmm, one though here though, should the pressure switch not deactivated the compressor?
-
cool. so the 'there is different compressor for 4.5 non turbo and another for 4.5turbo' is kind of bs. I have this info from few sources now, 2 compressor types, one for 3.2 and another for 4.5 (all flavors). Thanks.
-
if the exhaust is loud then one of the reasons is that the sound absorbing material is not present, allowing free exhaust output and increased noise. You can go to 6speed and check out some pics of my SR1 exhaust before I put it up (may be pics on here too). Search for my name or leistung sr1.
-
Is the first and second pic of same exhaust? If yes then gemballa exhaust is what you have. The top pic looks like Leistung exhaust, the sr1.
-
I know. Just trying to figure out an economical way to do this. Just came back from vacation and kids going away next week...life realities here. I am fine with doing the parts replacement...easy enough, only thing to figure out what the likely hood would be of me not putting the lines in right, after all, when they recharge it, they will pull vacuum to make sure there is no leak again, before recharge. Would that not be indication of decent job installing compressor and dryer? Need advice here.