Welcome to RennTech.org Community, Guest
There are many great features available to you once you register at RennTech.org
You are free to view posts here, but you must log in to reply to existing posts, or to start your own new topic. Like most online communities, there are costs involved to maintain a site like this - so we encourage our members to subscribe or donate. All subscriptions and donations go to the costs operating and maintaining this site. We prefer that guests take part in our community and we offer a lot in return to those willing to join our corner of the Porsche world. This site is 99 percent member supported (less than 1 percent comes from advertising) - so please consider an annual subscription or donation to keep this site running.
Here are some of the features available - once you subscribe RennTech.org
- View Classified Ads
- DIY Tutorials
- Porsche TSB Listings (limited)
- VIN Decoder
- Special Offers
- Paint Codes
- Registry
- Videos System
- View Reviews
- and get rid of this welcome message
It takes just a few minutes to register, and it's quality Porsche information at a low cost.
Contributing Members also get these additional benefits:
(you become a Contributing Member by subscribing or donating money to the operation of this site)
- No ads - advertisements are removed
- Access the Contributors Only Forum
- Contributing Members Only Downloads
- Send attachments with PMs
- All image/file storage limits are substantially increased for all Contributing Members
- Option Codes Lookup
- VIN Option Lookups (limited)


ciaka
-
Posts
469 -
Joined
-
Last visited
-
Days Won
16
Content Type
Profiles
Events
Forums
Exterior Paint Colors
Downloads
Tutorials
Links Directory
Collections
Classifieds
Store
Everything posted by ciaka
-
My turbo has different size tires. Front: 255/40 20" Rear 295/35 20" Car is set for partial pressure, standard, faster than 100mph, summer tires. What you you folks set these tire pressure at? The sticker at side of the door frame driver side, states partial pressure should be 44psi in both front and rear. The multi function display shows that for cold tires to be filled right (per above settings), fronts have to be inflated to 44psi, rears inflated to 38psi. This way fill info shows 0mpsi needed in tires. Max tire pressure is 49psi, so I am starting to think 44psi may be high. Also, is there a way to reset the display to show full pressure at differently set levels from the 38/44 psi? Wanted to hear advice on how to set thgem right.
-
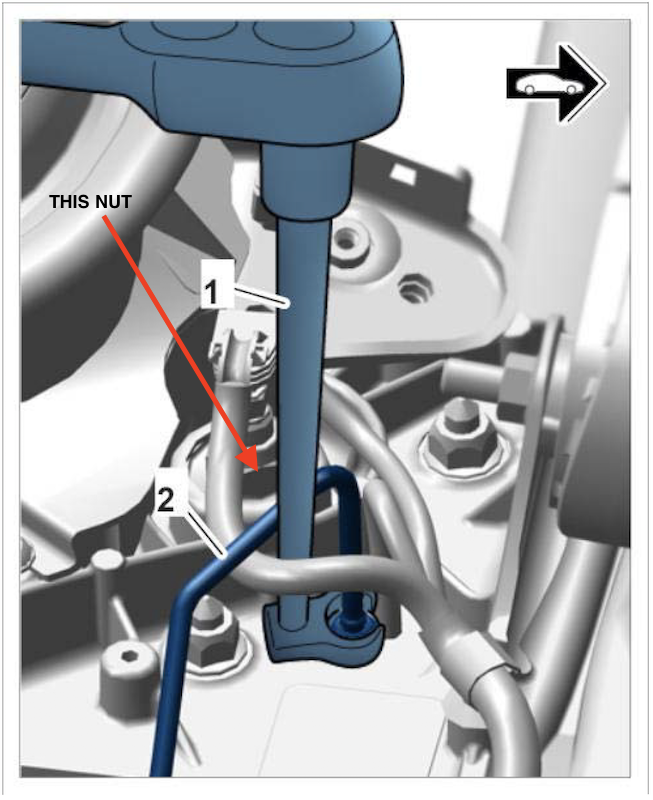
Does anyone have info on what the torque should be for the front passenger air shock main nut (one top of the shock, not the air line but the one that large air line plugs into - its 21mm). Showing pic for reference. I cannot seem to find it in the FSM. I was doing some stuff on car, took a 21mm wrench and was able to turn it quite easily (saw bubbles come out when sprayed soap water). Trying to see if it needs tightening, but dont want to over tighten. When I attempted initially, started turnn clock wise and more bubbles started coming out. Need the torque to make sure its on properly, before I run out get another shock. Thanks.

-
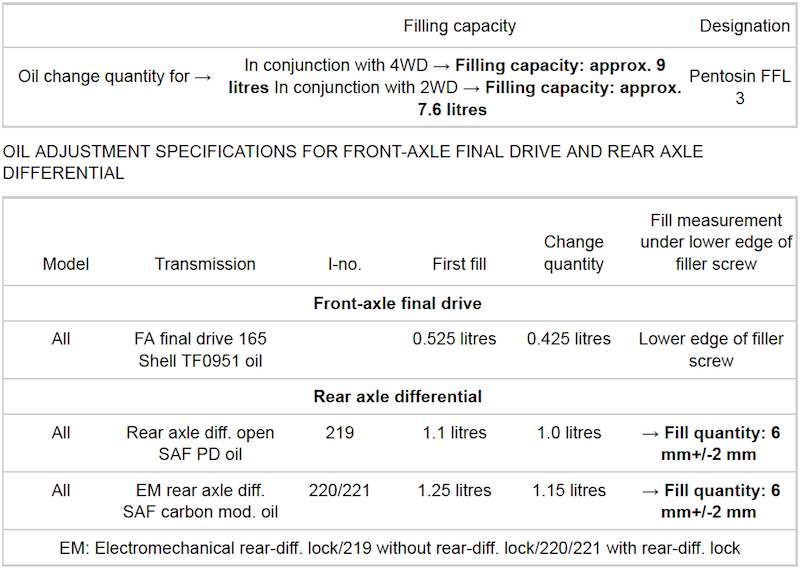
Great work JFP. Awesome to have such fellow forum members, who can take the time and help clear up important details. Just to sum up, for sake of having all info in single post, the below details are for PDK on Porsche Panamera models 970, MY2010-2013: PDK made by ZF - a unique version of the PDK just for Panamera Uses dual clutch, wet design, uses one fluid compartment for gearbox and clutches, and another fluid compartment for front final drive Gearbox & clutches - fluid used is Pentosin FFL3 - about 9 quarts Front final drive - fluid used is Shell TF0951 - change quantity 0.425 liter (a bit less than half a quart) I was able to cross reference this to Mobil Delvac 1 synthetic gear oil 75-W90 Service manual does not state change interval, although service book in car shows every 60k miles (I will do every 60k). At least the 970 generation of Panamera MY2010-2013, PDK that comes with it has two separate fluid compartments, one for transmission (FFL3), and another for the front final drive (Shell TF0951). Service manual still calls for PIWIS, but my guess is they used parts of other PDK manual, and having temp at 40C would not hurt the change anyway. When I was searching details on front final drive, I cross referenced the Shell TF0951 oil, to Mobil Delvac 1 75-W90 synthetic. To wrap up, to complete this model Panamera PDK service, you would need: FFL3 (about 9 quarts) - while level, drain via drain plug, pour in via inspection plug, run through gears at 40C (may not be required), make sure fluid topped up to fill hole. Shell TF0951 or Mobil Delvac 1 gear oil, synthetic 75W-90 (0.42 liter change qty) - while level, drain via drain plug, fill via fill plug until fluid leaks out fill plug hole. If you have 4 wheel drive, you need to also do rear differential fluid: GL-5 rated gear oil 75W-90 - I used Mobil Delvac 1 75W-90 gear oil - change qty ~1.15 liter - while level, drain via drain plug, fill via fill plug until fluid comes out fill hole. Per maintenance schedules in manuals, I see (for USA market only): PDK transmission fluid change (FFL3) - service manual does not call for at all I will do change every 60k miles (fluid only), and fluid + pan/filter change every 120k miles Doing so because of info I gathered from other sites/forums, where PDK was analyzed vs used oil, not necessary to replace pan/filter after 60k miles Front final drive fluid change (Shell TF0951) - service manual calls for change at 120k miles I will do every 60k miles Rear differential fluid change (GL-5 gear oil) - service manual calls for change at 120k miles I will do every 60k miles For non USA markets, I would follow the 60k mile/100,000km schedule as service manual calls for similar intervals in non USA markets Thank you JFP for your contribution to the information. I am sure many will find it invaluable in their quest to keep their Panameras running trouble free.
-
Good to know. I was starting to doubt the FSM I have. No need now. As to the fluid levels, good to know the above is from 911. Yes, Panamera quantities are different (above table shows qty for V8 Panameras). That seems to be a huge difference in gear oil qty between the 911 (showing above at 3.1 quarts), and Panamera V8 flavors gear oil qty at 0.425 L change. Thought these would be similar if they have very similar PDK.
-
Are these FSM info and values? Could it be these are for Panamera (V6), which I believe did not come with PDK? Other models had PDK standard from what I recall. The FSM I use states different info for Porsche Panamera 970 - MY 2010-2013. It could be your numbers are for different model of Porsche as I do not see these details anywhere in my FSM. I see ATF fluid change details and front final drive fluid change details (two separate fluids, both having their own inspect/fill plug, and drain plug). ATF fluid is FFL3, front final drive fluid is Shell TF0951 (cross referenced it to Mobil Delvac 1 synthetic gear oil 75-W90). ATF inspect/fill plug is between exhaust pipes (facing towards the rear). ATF drain plug is at bottom of the pan (black colored, ridged synthetic rectangular structure middle of the car, facing down). Front final drive fill/inspection plug is on passenger side, facing passenger front wheel, behind the wheel well lining. Front final drive drain plug is in same area as fill plug, but a little lower and a hex bolt (right next to the front axle shaft to passenger wheel). General process for change appears similar. With ATF process showing PDK temp of 40 deg C (up to 45 deg C - +5 deg. variance). The quantity to use is until it drips out of the fill/inspection hole when at temp, and after working through all gears few times slowly. General process for front differential oil change is level car, drain via drain plug, fill via fill plug until oil drips out, then close. The technical info for V8 engines PDK ATF, front final drive, rear diff, are: Could it be your values are for different displacement/model of Panamera?
-
970 - 2010-2013 Panamera Maintenance Schedule - B market countries (USA) I thought I would collect this for ease of use by forum members. Hope it helps with questions like 'when should I do this', or what kind of maintenance at xxxx miles. All of the below pertains only to B markets. Porsche organizes countries it sells its cars to, into markets, classified as A, B, or C. USA falls into the B market category, and since I reside there, below info will be only for B markets. If you live in other market, I am sure you can approximate duration Author ciaka Category Panamera (970) - Maintenance Submitted 07/26/2018 08:46 AM
-
I thought I would collect this for ease of use by forum members. Hope it helps with questions like 'when should I do this', or what kind of maintenance at xxxx miles. All of the below pertains only to B markets. Porsche organizes countries it sells its cars to, into markets, classified as A, B, or C. USA falls into the B market category, and since I reside there, below info will be only for B markets. If you live in other market, I am sure you can approximate durations, etc, but from what I see, there is language stating countries with leaded fuel do their maintenance on intervals that are shorter than in B markets. So please go check your market or take the info as an approximation only. Also, I have Panamera Turbo, so these intervals are for this model. Most models follow same if not very similar schedule though. B market countries: Armenia, Australia, Bahrain, Brunei, Bulgaria, Estonia, French Polynesia, GhanaIndonesia, Israel, Japan, Jordan, Canada, Kazakhstan, Qatar, KuwaitLatvia, Lebanon, Lithuania, Malaysia, Moldova, New Caledonia, New Zealand, Oman, Philippines, Reunion, Romania, Russia, Saudi Arabia, Singapore, Sri Lanka, South Korea, SyriaTaiwan, Thailand, Turkey, Ukraine, USA, UAE (Abu Dhabi, Dubai), Vietnam, Belarus, Cyprus. PANAMERA 970: OIL CHANGE SERVICE: Oil & Filter Change - Every 15,000 km or 10,000 miles, or 1 year - ~9 quarts (Panamera V8) Whichever comes first - 1 year, or distance Oil & Filter Change - Every 10,000 km or 6,000 miles, in countries with leaded fuel INTERMEDIATE MAINTENANCE: Every 30,000 km or 20,000 miles If mileage for intermediate maintenance not reached, it must be done after 2, 6, 10, etc years (starting year 2, every 4 years) Change engine oil & filter - following oil & filter change schedule Windscreen wiper/washer system, headlight cleaning system: check operation and nozzle. Tires and spare wheel: check tire pressure Diagnostic system: read out fault memory; reset maintenance interval Read out out soot mass in particle filter (Diesel version only) Particle filter: replace filter element Check wiper blades All headlights: check adjustment Battery vent hose: check condition Replace fuel filter (Diesel version only) Tires and spare wheel: check condition Brake lines: visual inspection for damage, routing and corrosion Brake hoses: visual inspection for damage and routing Brake system: visual inspection of brake pads, brake discs for wear (not removing wheels) Drive shafts: visual inspection of the boots for leaks and damage Radiators and air intakes: visual inspection for external contamination and blockage Coolant: check level and antifreeze Windscreen wiper/washer system: check fluid level; check window cleaner and antifreeze, depending on the season PDCC and power steering: check fluid level Test Drive & check function: Remote control Front seats Electric parking Foot brakes (also actuation travel) Engine Steering Transmission ParkAssist Cruise control PSM switch Heating Air conditioning Instruments Any other oils, fluids: visual inspection for leaks REGULAR MAINTENANCE: Every 60,000 km or 40,000 miles If mileage for regular maintenance not reached, it must be done after 4, 8, 12, etc years (every 4 years) Change engine oil & filter - following oil & filter change schedule Windscreen wiper/washer system, headlight cleaning system - check operation and nozzle settings Horn: check operation Tires and spare wheel: check tire pressure Diagnostic system: read out fault memory; reset regular maintenance interval Seat belts: check operation and condition Particle filter: replace filter element Check wiper blades All headlights: check adjustment Trailer hitch: check function Battery vent hose: check condition Tires and spare wheel: check condition Brake system: visual inspection of brake pads and brake discs for wear Brake hoses: visual inspection for damage and routing Radiators and air intakes: visual inspection for external contamination and blockage Underbody panels: visual inspection for completeness, secure installation and damage Replace fuel filter (diesel version only) All other fluids visual inspection for leaks Brake lines: visual inspection for damage, routing and corrosion Steering gear: visual inspection of bellows for damage Tie rod joints: check the play and dust boots Drive shafts: visual inspection of the boots for leaks and damage Axle joints: check the play and visually inspect the dust boots for damage Exhaust system: visual inspection for leaks and damage, check engine mount Fuel lines and connections: visual inspection (in visible area) Coolant: check level and antifreeze Windscreen wiper/washer system: check fluid level; check window cleaner and antifreeze, depending on the season PDCC and power steering: check fluid level Test drive & check function: Remote control Front seats Electric parking Foot brakes (also actuation travel) Engine Steering Transmission ParkAssist Cruise control PSM switch Heating Air conditioning Instruments Other oils, fluids: visual inspection for leaks ADDITIONAL MAINTENANCE EVERY 2 YEARS: Change engine oil & filter - following oil & filter change schedule Change brake fluid (use only original Porsche brake fluid) Tire sealing compound: check use-by date and replace if necessary File Condition Report for long-life guarantee ADDITIONAL MAINTENANCE EVERY 4 YEARS: Change engine oil & filter - following oil & filter change schedule Replace tire sealing compound ADDITIONAL MAINTENANCE FOR SPARK PLUGS: V6 - Replace every 60,000 km or 40,000 miles or every 4 years V8 S - Replace every 45,000km or 30,000mi or every 4 years GTS - Replace every 60,000km or 40,000mi or every 4 years Turbo - Replace every 45,000km or 30,000mi or every 4 years V8 S E-Hybrid - Replace every 60,000km or 40,000mi or every 4 years ADDITIONAL MAINTENANCE EVERY 120,000km or 80,000 miles: Do every 120,000km or 80,000 miles or every 6 years For markets A & B Change oil & filter following oil & filter change schedule maintenance Air cleaner: replace filter element ADDITIONAL MAINTENANCE EVERY 180,000km or 120,000 miles: For markets A & B Do every 180,000km or 120,000 miles or every 12 years Change engine oil & filter - following oil & filter change schedule All-wheel final drive: change oil Rear final drive: change oil Other noteworthy remarks from reviewing the maintenance schedule: - PDCC reservoir change replacement recommended only for C markets (non USA), at 90k km or 54k miles, then again at 240k km or 144k miles or after 16 years - PDK transmission oil change mentioned only for B markets (Panamera S E-hybrid, Panamera S hybrid only), at 90k km or 54k miles, then again at 240k km or 144k miles or after 16 years. I will be checking the maintenance schedule book inside the car to compare. If there are differences, I can chime in. This is really surprising. There are many places where PDK, PDCC reservoir is called for after 60k. I do not see that in the FSM. Some food for thought.
-
Looked up details and thank you for correction. Looking at the schedules, final drive oil change 12 years or 120k miles for B country market (USA). ATF oil no changes expected for B market. When I spoke to shop about ATF, was learning that they're ok doing atf oil change at 60k, then atf oil change with pan/filter change at 120k. They would do front final drive oil change at 60k. So maybe thats the twice service rate of final drive per each full (with filter and pan) change of atf. What do you say about not changing ATF oil? I guess that is similar to the Cayenne 'no need to change atf', but all doing the change anyways, since it wont hurt the car.
-
I thought I would collect this for ease of use by forum members. Hope it helps with questions like 'when should I do this', or what kind of maintenance at xxxx miles. All of the below pertains only to B markets. Porsche organizes countries it sells its cars to, into markets, classified as A, B, or C. USA falls into the B market category, and since I reside there, below info will be only for B markets. If you live in other market, I am sure you can approximate durations, etc, but from what I see, there is language stating countries with leaded fuel do their maintenance on intervals that are shorter than in B markets. So please go check your market or take the info as an approximation only. Also, I have Panamera Turbo, so these intervals are for this model. Most models follow same if not very similar schedule though. B market countries: Armenia, Australia, Bahrain, Brunei, Bulgaria, Estonia, French Polynesia, GhanaIndonesia, Israel, Japan, Jordan, Canada, Kazakhstan, Qatar, KuwaitLatvia, Lebanon, Lithuania, Malaysia, Moldova, New Caledonia, New Zealand, Oman, Philippines, Reunion, Romania, Russia, Saudi Arabia, Singapore, Sri Lanka, South Korea, SyriaTaiwan, Thailand, Turkey, Ukraine, USA, UAE (Abu Dhabi, Dubai), Vietnam, Belarus, Cyprus. PANAMERA 970: OIL CHANGE SERVICE: Oil & Filter Change - Every 15,000 km or 10,000 miles, or 1 year - ~9 quarts (Panamera V8) Whichever comes first - 1 year, or distance Oil & Filter Change - Every 10,000 km or 6,000 miles, in countries with leaded fuel INTERMEDIATE MAINTENANCE: Every 30,000 km or 20,000 miles If mileage for intermediate maintenance not reached, it must be done after 2, 6, 10, etc years (starting year 2, every 4 years) Change engine oil & filter - following oil & filter change schedule Windscreen wiper/washer system, headlight cleaning system: check operation and nozzle. Tires and spare wheel: check tire pressure Diagnostic system: read out fault memory; reset maintenance interval Read out out soot mass in particle filter (Diesel version only) Particle filter: replace filter element Check wiper blades All headlights: check adjustment Battery vent hose: check condition Replace fuel filter (Diesel version only) Tires and spare wheel: check condition Brake lines: visual inspection for damage, routing and corrosion Brake hoses: visual inspection for damage and routing Brake system: visual inspection of brake pads, brake discs for wear (not removing wheels) Drive shafts: visual inspection of the boots for leaks and damage Radiators and air intakes: visual inspection for external contamination and blockage Coolant: check level and antifreeze Windscreen wiper/washer system: check fluid level; check window cleaner and antifreeze, depending on the season PDCC and power steering: check fluid level Test Drive & check function: Remote control Front seats Electric parking Foot brakes (also actuation travel) Engine Steering Transmission ParkAssist Cruise control PSM switch Heating Air conditioning Instruments Any other oils, fluids: visual inspection for leaks REGULAR MAINTENANCE: Every 60,000 km or 40,000 miles If mileage for regular maintenance not reached, it must be done after 4, 8, 12, etc years (every 4 years) Change engine oil & filter - following oil & filter change schedule Windscreen wiper/washer system, headlight cleaning system - check operation and nozzle settings Horn: check operation Tires and spare wheel: check tire pressure Diagnostic system: read out fault memory; reset regular maintenance interval Seat belts: check operation and condition Particle filter: replace filter element Check wiper blades All headlights: check adjustment Trailer hitch: check function Battery vent hose: check condition Tires and spare wheel: check condition Brake system: visual inspection of brake pads and brake discs for wear Brake hoses: visual inspection for damage and routing Radiators and air intakes: visual inspection for external contamination and blockage Underbody panels: visual inspection for completeness, secure installation and damage Replace fuel filter (diesel version only) All other fluids visual inspection for leaks Brake lines: visual inspection for damage, routing and corrosion Steering gear: visual inspection of bellows for damage Tie rod joints: check the play and dust boots Drive shafts: visual inspection of the boots for leaks and damage Axle joints: check the play and visually inspect the dust boots for damage Exhaust system: visual inspection for leaks and damage, check engine mount Fuel lines and connections: visual inspection (in visible area) Coolant: check level and antifreeze Windscreen wiper/washer system: check fluid level; check window cleaner and antifreeze, depending on the season PDCC and power steering: check fluid level Test drive & check function: Remote control Front seats Electric parking Foot brakes (also actuation travel) Engine Steering Transmission ParkAssist Cruise control PSM switch Heating Air conditioning Instruments Other oils, fluids: visual inspection for leaks ADDITIONAL MAINTENANCE EVERY 2 YEARS: Change engine oil & filter - following oil & filter change schedule Change brake fluid (use only original Porsche brake fluid) Tire sealing compound: check use-by date and replace if necessary File Condition Report for long-life guarantee ADDITIONAL MAINTENANCE EVERY 4 YEARS: Change engine oil & filter - following oil & filter change schedule Replace tire sealing compound ADDITIONAL MAINTENANCE FOR SPARK PLUGS: V6 - Replace every 60,000 km or 40,000 miles or every 4 years V8 S - Replace every 45,000km or 30,000mi or every 4 years GTS - Replace every 60,000km or 40,000mi or every 4 years Turbo - Replace every 45,000km or 30,000mi or every 4 years V8 S E-Hybrid - Replace every 60,000km or 40,000mi or every 4 years ADDITIONAL MAINTENANCE EVERY 120,000km or 80,000 miles: Do every 120,000km or 80,000 miles or every 6 years For markets A & B Change oil & filter following oil & filter change schedule maintenance Air cleaner: replace filter element ADDITIONAL MAINTENANCE EVERY 180,000km or 120,000 miles: For markets A & B Do every 180,000km or 120,000 miles or every 12 years Change engine oil & filter - following oil & filter change schedule All-wheel final drive: change oil Rear final drive: change oil Other noteworthy remarks from reviewing the maintenance schedule: - PDCC reservoir change replacement recommended only for C markets (non USA), at 90k km or 54k miles, then again at 240k km or 144k miles or after 16 years - PDK transmission oil change mentioned only for B markets (Panamera S E-hybrid, Panamera S hybrid only), at 90k km or 54k miles, then again at 240k km or 144k miles or after 16 years. I will be checking the maintenance schedule book inside the car to compare. If there are differences, I can chime in. This is really surprising. There are many places where PDK, PDCC reservoir is called for after 60k. I do not see that in the FSM. Some food for thought.
-
I just thoroughly reviewed maintenance schedule for Panamera. It appears that PDCC reservoir change is called for in C market countries (not USA). USA is in B market designation, and for this market, PDCC reservoir change is not called for. Bringing that up just food for thought. I will try to post up maintenance schedule summary for B market, so others can have more details on what to maintain. Thanks.
-
Panamera PDK has Pentosin FFL3 hydraulic fluid for transmission, as well as well as another fluid for the front final drive, the Shell TF0951. Those are separate fluids all together. The transmission/hydraulic fluid is for the clutches. The front final drive fluid is for the front gearing. No other fluids are required for the PDK.
-
I agree with your thoughts. Looks like this was the first change. Glad I did it. Now, only thing left is front final drive and I'm set for many miles. Do you maybe know if the front axle carrier (a metal cross brace plate) has to be removed to do the change of diff oil? Is the plate holding anything in place, or just there as protection for components? Mean in ng, nothing will crash on my head when I'm down th here removing the brace, to get to the diff drain plug?
-
I believe it is made by ZF - the 7 gear dual clutch transmission. Talking about 2010-2013 gen of Panamera here. If anyone knows better, please chime in.
-
Recently did PDK transmission change on the PTT. Before doing so, did research for some time, trying to get some technical details about the process. Have done this on my CTT as well a couple times. To be honest, many folks in CTT world (non PDK), were doing without PIWIS, and I have not heard of anyone having any issues. The general process is: - car up off ground but level - drain old fluid measuring how much came out - put in new fluid - run through gears few times while stationary - bring transmission to 40 deg. Celsius - top up until fluid starts leaking out fill/inspection hole -close off all plugs and put things together. Done. My curiosity is around how precise does the fill have to be? Surely, the car cannot tell difference in mL. Putting in 1/4 of a quart too much is 250cc or 250mL (thats one glass). What is the level of precision needed for these fills? I have been reading that overfilling transmission can lead to issues like over pressurizing system, foaming, etc. However the more I read, I find contradictions in each point. For example - foaming. Foaming can occur if oil is picked up by gears in overfilled transmission. Causes fluid to overheat and lose its lubrication properties. Can help damage transmission. I found that Pentosine FF3 and other trans. fluids, all have anti foaming agents in them, preventing that exact behavior. So if fluid has anti foaming, surely small amount of overfill will not be something to lose sleep over, or is it? Another example, fluid expands as temperature increases. PDK is to be filled to max at 40C. That is 104 deg. F. Anyone who has Panamera can tell that the car is hot at run time. Once parked overnight, engine is still at about 85 deg F or 30deg Celsius in the morning. So if I do PDK change in summer time, and ambient temp is 85F, how much can this fluid expand in 20 deg. F? I am sure it wont be a lot. Read below. Looking into this further, there are charts showing thermal expansion of petroleum products. These values are between 0.0007 and 0.001 (this is a coefficient value only to help calculate volume expansion). Here is some mathematical stuff: You can calculate thermal expansion of liquid by formula: dV = Vo β (t1 - t0) dV = change of volume Vo = Original volume (initial volume amount) β = coefficient of expansion, (m3/m3 oC, ft3/ft3 oF) - sample Chart Here t1 = final temperature (C or F) t0 = initial temperature (C or F) Given above, we know for PDK: Vo = 8.5 (quarts = 0.284071 cubic feet - used typical change time fill quantity, at volume converted to cubit feet per coefficient of expansion) β = 0.001 (used worst case or most expanding coefficient - Petroleum...rage is from 0.0007 to 0.001 from chart - using values from the Celsius column since we use temp in that unit too) t1 = 40 Celsius (temp at time of top PDK up) t2 = 30 Celsius (cool engine summer time temp) Mixing all this together, you get result of 0.284071 cu. ft ( (0.001)(40C-30C) ) = (0.284071 cu.ft.) (0.01) = 0.00284071 cu.ft = 0.08499994597403 quart (converting back to US quarts) = about 4cc (one fifth of a 20cc cup of cough medicine) This cup shows you about 20cc of fluid, so 4cc is way less. Imagine adding that to your FFL3 fluid fill in PDK, sitting already at 8.5 quarts or 8044cc. So looking at above, if you put in 8.5 quarts of FFL3 fluid into your PDK, while car is at cool temp, once you heat the PDK to 40C, that 8.5 quarts will expand to be 8.50284071 quarts. Meaning, the fluid will have expanded by about 0.99% or rounding off, to about 0.1%. If that is true, then your 8.5quarts added, when heated, will become 8.5028 quarts, which is a minuscule amount of change, equivalent to about one hundredth of a glass, about 2cc worth. If we assume that PDK transmission fluid expands at twice this rate (say coefficient is not accurate and we want to compensate for its possible error), doubling this bring expansion to about 4cc. That is still a very small volume, about one fifth of a small cup you take your favorite cough medication with (20cc cup). All that in mind, I find this very surprising, that PDK transmission would have this level of sensitivity, to be accurate to 2cc difference in expansion. Is it possible that there is some bs mixed in the PDK fluid change technique, to help the company bottom line in terms of revenue from customers? Dealers charge about 750 from what I remember for doing this. Selling 10k cars brings in $7.5 million dollars revenue after 60k miles (or about 4-5 years, about $1.85 million per year). That would be for USA market only. I looked up sales numbers for USA market. Took the 2014 model as it is more reflective of those who are more likely to do PDK oil sooner than later. USA market sold some 4750 cars in 2014. Adding other markets in the World, you are looking well over 10000 units per year. What am I getting at here? Is it possible PDK transmission fluid tolerance is so precise because of technical reasons that elude me? Do these technical reasons justify fluid volume sensitivity of one fifth of a medicine cup (4cc)? Put that 4 cc in a glass of water. Now picture 8.5 quarts of FFL3 in the transmission. Then add the 4cc to that volume. I bet transmission would not even detect that difference. Please give me some info if you have it, so I can change my mind on this. I understand overfill/underfill of fluids is an important issue, just trying to justify how the modern PDK in Panamera, would detect 4cc (which is already overinflated number), and cause damage in its parts over time. I can see overfill of quart or 2 quarts can be an issue, but 4cc? Please give me more insight if you have the details. Chime in with your thoughts. Thank you.
-
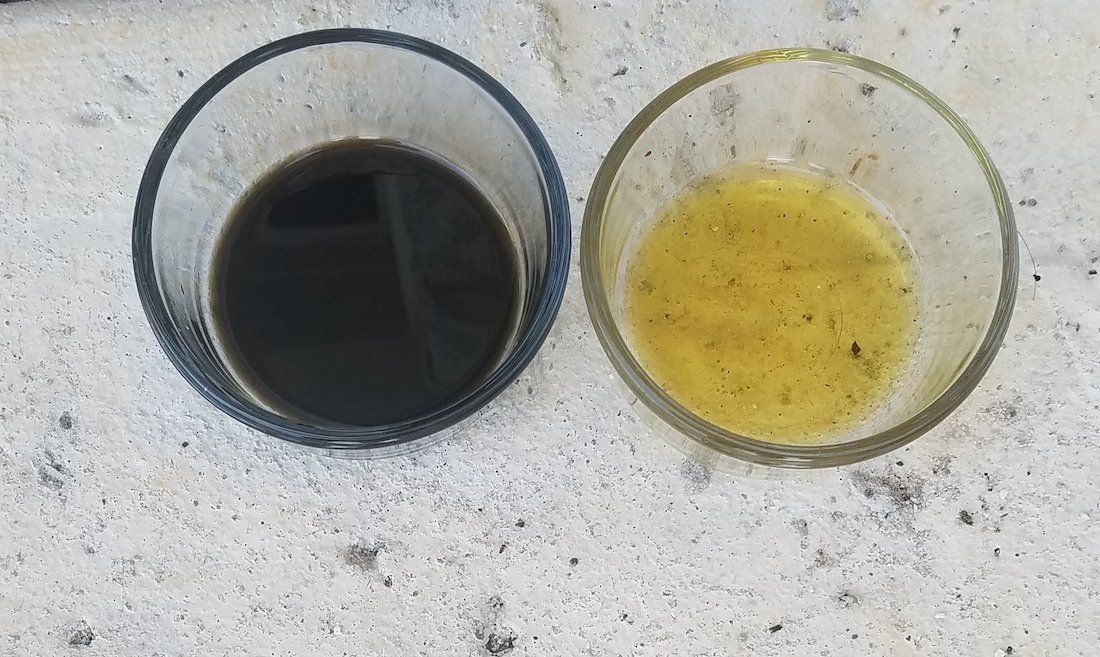
The maintenance interval for panamera pdk is 60k km or 40k miles. You are correct my friend. However I was looking at the small print and in great detail, and noticed that PDK is not even called upon for a change, unless you are in C markets (not USA), and only for Panamera S hybrid, Panamera S E-hybrid models only, at 54k miles. So looks to me the PDK interval is not shown due to company not feeling there is a need. Hmmm. I will have to go to the actual book in the PTT, to see if there are differences. I was wondering why info can be gleaned from fluid color. Someone mentioned should be clear slightly brownish. This is definitely darker and less clear. Just wondering. Thanks for info though.
-
Edit: THIS post has updated info about PDK fluid change, how many fluids need changing, what the fluids are, what service intervals, etc. Go to that post for updated info. Thanks. Did my change today. Easy but time consuming. I thought the old PDK fluid should be clear, maybe a little brownish. When it came out it was dark. Any input is appreciated. When I drained old fluid out, about 8.5 quarts came out. On refill, I put in about 8.8 quarts to fill. Wonder if anyone can fill me in on what can happen if the PDK fluid is too low, and what can happen if the PDK fluid is overfilled. Say under or overfilled by half a quart or 1 quart. Just wondering what the possibilities are. Thank you.
-
EDIT: Additional info added at bottom of tutorial, refers to recently found info, clarifying how many different fluids are needed for the 970 generation of Panamera PDK (at end of tutorial). Attached is a DIY for changing fluid on Panamera PDK transmission. Got this from a fellow forum member who happened to do the change. This should help many interested in doing maintenance on Panamera without paying thousands for it. Speaking to shop/dealer, after 60k, filter/pan replacement not absolutely necessary (cost of the kit is about $350). So for 60k, drain and refill fluid is fine. At 120k, you would do same fluid change, but this time replace the pan/filter as well. Read the entire DIY before you start to get a good idea of requirements and estimate time involvement for you to complete. Do not forget to replace the drain plug with its built in seal. Last thing you need is have a $15 part cause small leaking, and then have to put car up, open up drain plug, lose a bunch of expensive oil, just to put new drain plug in. So dont cut on this one part. You can get the Pentosine FFL3 PDK fluid directly from Porsche, or from Pentosine resellers. Porsche will charge you triple the price for identical fluid. You choose. Everything you need is mentioned in the DIY. Since Durametric does not have capability to monitor PDK temperature yet, you can use an IR thermometer, when you heat up the PDK to 40 celsius, after you put in 6-8 quarts or so, and when doing final level check. Good luck. 970 generation Panamera PDK transmission info: ZF is manufacturer of PDK transmission for Porsche They make 2 PDK transmissions One for mid & rear engine applications (911, boxter, etc) Another one specifically made for the Panamera Panamera PDK servicing requires two (2) fluids only (as compared to 3 fluids in other PDK car models at Porsche FFL3 fluid - Gearbox & clutches - need about 9 quarts Shell TF0951 - Front final drive - need about 0.4 quarts Here is the info dug up from ZF on this topic: "In fact, two separate DCT ranges or 'platforms' have been developed by ZF, both fitted with wet clutches, for use in Porsche's various longitudinal applications. The first is for use in the mid- and rear-engine sports cars (the 911, the Cayman and the Boxster), while a completely different platform has been developed for use in the larger Panamera. For each platform, two different torque options are available, with the 500N.m versions using an 'ND2015' clutch pack, and the 780N.m versions using an 'ND2216' clutch pack, both supplied by ZF Sachs....... In terms of the oil circuit itself, two completely different approaches have been employed for the two platforms. Non Panamera models: The 7DT45 and 7DT70 have two oil circuits, and hence two different oils; the first is Pentosin FFL-3 for the clutch and hydraulics, and the second is ExxonMobil Mobilube PTX 75W-90 for the gear-set and bevel gear. The oil levels have been kept as low as possible, to reduce churning losses for those moving parts that are immersed in oil. Panamera: Conversely, the 7DT75 has a single oil circuit and a dry sump (to minimize churning losses), with an 'active lubrication system' to feed oil to each gear-set and clutch. This version uses only the Pentosin FFL-3 lubricant, which was developed exclusively for the ZF DCTs. One of the main reasons for using a single oil circuit is that clutch cooling is required at both ends of the transmission, for the main dual-clutch module and for the hang-on clutch used in the four-wheel-drive variant. This would have presented significant sealing complications had multiple circuits been chosen." Bottom line: What this means is that the Panamera PDK uses transmission design which uses one fluid compartment for the gearbox and the clutches, and another separate compartment for the final drive. Two fluids total.
-
Cayenne brake line replacement & fluid flush I put this together as I was replacing lines on the car. My symptom was passenger caliper, under very heavy braking would sometimes not release pressure fully. Result was car would bind and I would have to wait for pressure to relieve over about 30 seconds, before pressure released fully. To determine this, I inspected the brake system. Fluid condition, pistons and caliper (check for scoring). Replaced piston seals. Ensured to use new brake hardware kit also. After all the inspections and Author ciaka Category Cayenne (9PA, 9PA1) - Common Fixes and Repairs Submitted 07/03/2018 08:28 AM
-
I put this together as I was replacing lines on the car. My symptom was passenger caliper, under very heavy braking would sometimes not release pressure fully. Result was car would bind and I would have to wait for pressure to relieve over about 30 seconds, before pressure released fully. To determine this, I inspected the brake system. Fluid condition, pistons and caliper (check for scoring). Replaced piston seals. Ensured to use new brake hardware kit also. After all the inspections and maintenance, behavior still present. Only option then wass to replace brake lines. Ordered from ECS tuning for a great price of $55 per front (2 lines!). Braded steel lines, red color matching calipers. Easy DIY, take your time, follow bleeding/flushing instructions exactly, and you will be fine. Each new line has a metal notch on end of the connection. That notch goes through a cutout on the line connection bracket on the car. Make sure you match them together so you can have full and secure connection. The DIY uses vacuum line caps (I used blue, not sure of size). Got off eBay for $5 shipped. Search for vacuum line caps and you will find them. Pic of the kit is in diy instructions. Very useful to prevent line fluid leaking after you open it (stops air from coming in and fluid from leaking all over the bottom of car). Good luck.
-
Panamera b-pillar vent repair This vent repair is for fixing ability of vent to direct air to left or right side. The main slider plastic detached from internals of vent, causing the vertical slats inside vent, to close and not allow air into the side of car. New vent cost was into hundreds, so decided to put my own touch on it. Work slowly and gently. Plastic breaks easy, so slow is fast here. Hope this helps. Author ciaka Category Panamera (970) - Common Fixes and Repairs Submitted 07/02/2018 09:37 PM
-
This vent repair is for fixing ability of vent to direct air to left or right side. The main slider plastic detached from internals of vent, causing the vertical slats inside vent, to close and not allow air into the side of car. New vent cost was into hundreds, so decided to put my own touch on it. Work slowly and gently. Plastic breaks easy, so slow is fast here. Hope this helps.
-
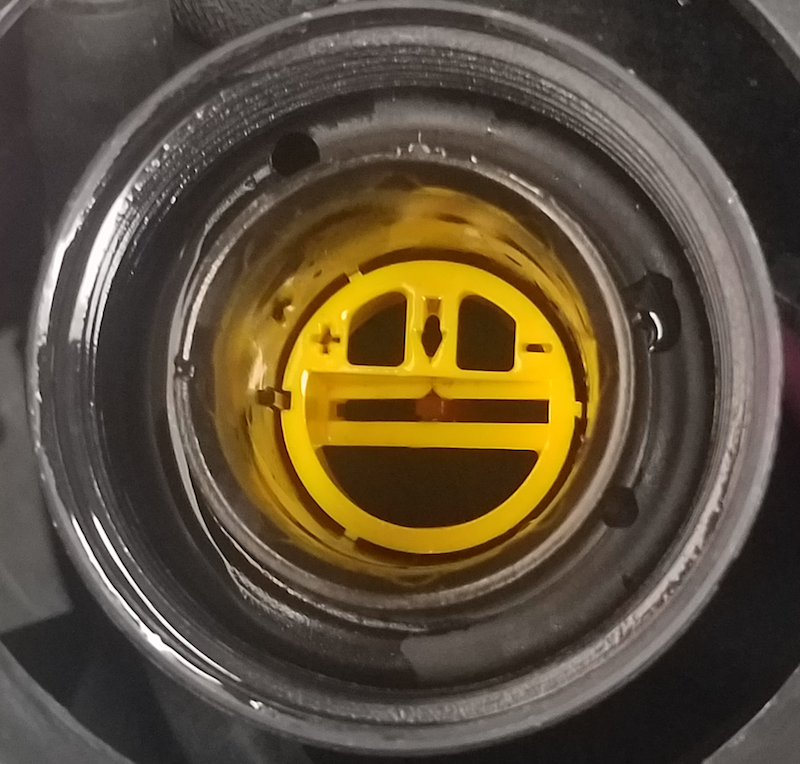
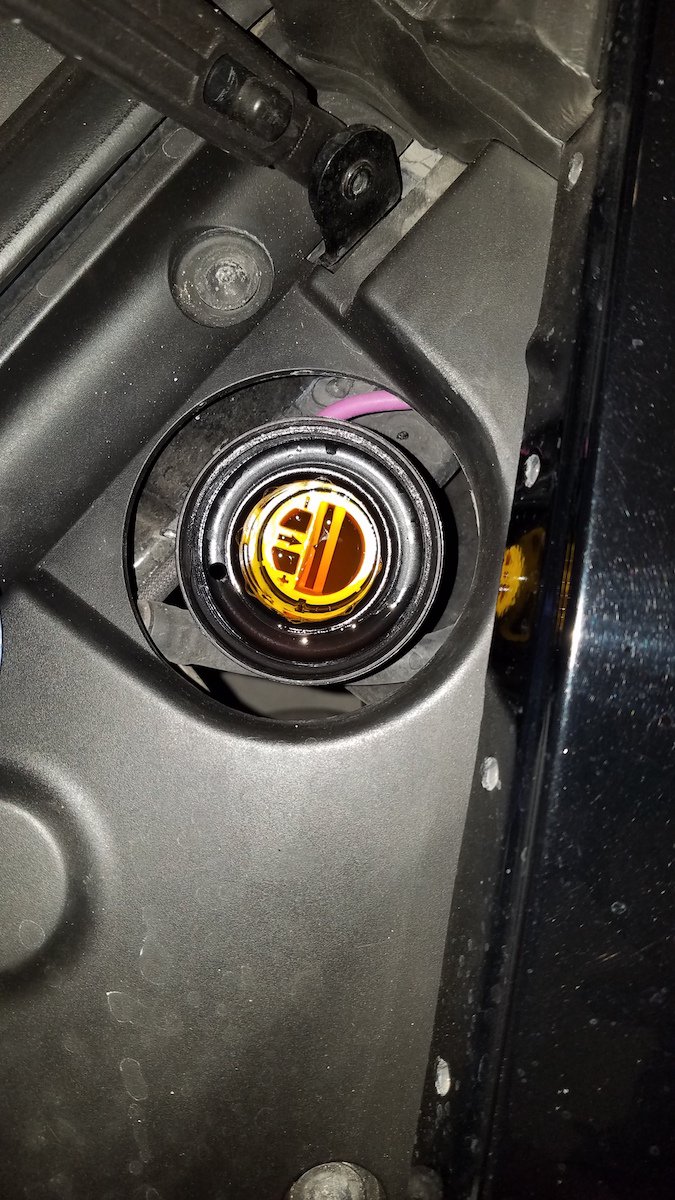
Got it sorted out. When I got the car from dealer, it was filled as shown above. So I assumed it is supposed to be like this. When I read the manual, noticed I could not see the needle. It was there, but submerged under coolant, so I could not see. Digging into it, ended up siphoning some out (about 2 glasses worth), and saw the needle, which started moving towards center. It is all good now. Thanks for help.
-
yes, thats why noticed I do not appear to have the level indicator needle. Further search shows there is a part called level sensor which appears to be a separate needle like part that I assume goes into the tank itself. Thats why I started to wonder if its missing.
-
I was comparing what my coolant reservoir looks like with online pics. Starting to think its missing something, like the level sensor (red needle telling you to put in more or that its too full, etc). Can anyone with the know how, chime in? Thank you.