Welcome to RennTech.org Community, Guest
There are many great features available to you once you register at RennTech.org
You are free to view posts here, but you must log in to reply to existing posts, or to start your own new topic. Like most online communities, there are costs involved to maintain a site like this - so we encourage our members to subscribe or donate. All subscriptions and donations go to the costs operating and maintaining this site. We prefer that guests take part in our community and we offer a lot in return to those willing to join our corner of the Porsche world. This site is 99 percent member supported (less than 1 percent comes from advertising) - so please consider an annual subscription or donation to keep this site running.
Here are some of the features available - once you subscribe RennTech.org
- View Classified Ads
- DIY Tutorials
- Porsche TSB Listings (limited)
- VIN Decoder
- Special Offers
- Paint Codes
- Registry
- Videos System
- View Reviews
- and get rid of this welcome message
It takes just a few minutes to register, and it's quality Porsche information at a low cost.
Contributing Members also get these additional benefits:
(you become a Contributing Member by subscribing or donating money to the operation of this site)
- No ads - advertisements are removed
- Access the Contributors Only Forum
- Contributing Members Only Downloads
- Send attachments with PMs
- All image/file storage limits are substantially increased for all Contributing Members
- Option Codes Lookup
- VIN Option Lookups (limited)


ciaka
-
Posts
469 -
Joined
-
Last visited
-
Days Won
16
Content Type
Profiles
Events
Forums
External Paint Colors
Downloads
Tutorials
Links Directory
Collections
Classifieds
Store
Everything posted by ciaka
-
Great. Thanks. The part is one you provided so much obliged for the check.
-
Why is it needed to use newest? Is it just the age, or some technical differences? Thank you again.
-
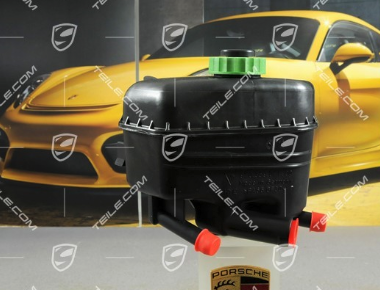
I have been reading about the need to replace the PDCC reservoir for Panamera (on models with the said option). Should be done at 60k miles. Since reservoir has a built in filter module that cannot be removed/replaced, entire tank needs replacement. Have seen folks say its a real PITA to do. Started looking closer and found this photo of the tank itself. Somehow it does not appear to be difficult. There are 3 lines going to the tank. Just guessing, if I was to remove driver front wheel and lining, I can get to that side. Then I could siphon out the fluid, protect the area with rags, etc, disconnect the 3 lines, and change the tank with a new one. Anyone comment on the above, whether I am missing something? Other folks were saying you have to remove the (serpentine?) belt, to get the tank out. I somehow do not see the need unless you are changing the lines too (unnecessary IMO, as I think they are metal). Thanks for input. Below is pic of a new tank, showing where the 3 lines connect to it.

-
Edited initial post to add part numbers for pads that I would consider.
-
Went to Hawk web site and researched front pads for my vehicle 2011 Panamera Turbo (non PCCB). I am considering ceramic to reduce brake dust. Very unusual for me to be stomping on the brakes full tilt. So for me, it would be between ceramic and street hps 5.0 pads. Hawk Performance Ceramic brake pads: Yellow/black packaging box Ceramic Little brake dust Quieter pads Less rotor wear States exceptional braking - from experience, may not be better than the HPS 5.0 or street race pads though Front Pads Part Number: HWKHB761Z.593F Rear pads Part Number: HWKHB807Z.587R When changing pads, replace the hardware kits as well. You can take the numbers and do your research, should be able to get prices for front pads around $140/set. Rears for about $130/set. Hawk Performance HPS 5.0 brake pads: Red/black packaging box (HPS = High Performance Street) Semi metallic More brake dust More rotor wear than with ceramic pads Better stopping grip than ceramic Front Pads Part Number: HWKHB761B.593F Rear pads Part Number: HWKHB807B.587R When changing pads, replace the hardware kits as well. Research to see if you can get prices better than at hawk site Hawk Performance StreetRace brake pads: White/black packaging box Semi metallic More brake dust More rotor wear than with ceramic pads or street Suitable for consistent braking up to 1200 F temps Better stopping grip than ceramic or street pads Front Pads Part Number: HWKHB761R.593F Rear pads Part Number: HWKHB807R.587R When changing pads, replace the hardware kits as well Research to see if you can get prices better than at hawk site
-
That makes sense now. Great, thank you. Add another maintenance item on my list. Hope not difficult to replace - will have to start digging into manuals. If anyone did this, advice will be greatly appreciated. Thank you.
-
Panamera turbo rear differential fluid change Follow each picture in order from start to end. Read entire set before you start. This gives you a good idea of what to expect, without any surprises (oh, I dont have this tool, etc). This DIY uses Mobil Delvac 1 full synthetic gear oil 75-W90, which I was able to reference to the replacement fluid Porsche recommends - Shell TF0951. Replacement schedule is every 120,000 miles or 12 years. I would definitely not wait that long to do this. After 60,000 miles the fluid is not ev Author ciaka Category Panamera (970) - Maintenance Submitted 06/24/2018 03:58 PM
-
Panamera turbo rear differential fluid change
ciaka posted a tutorial in Panamera (970) - Maintenance
Follow each picture in order from start to end. Read entire set before you start. This gives you a good idea of what to expect, without any surprises (oh, I dont have this tool, etc). This DIY uses Mobil Delvac 1 full synthetic gear oil 75-W90, which I was able to reference to the replacement fluid Porsche recommends - Shell TF0951. Replacement schedule is every 120,000 miles or 12 years. I would definitely not wait that long to do this. After 60,000 miles the fluid is not even translucent, has a very characteristic metallic smell to it. Similar numbers were stated for Cayenne turbo vehicles, and folks were all changing these fluids after 60k miles. I would do so here as well. If you see anything that you know is not correct, please chime in so it can be corrected. Thanks and hope it helps. -
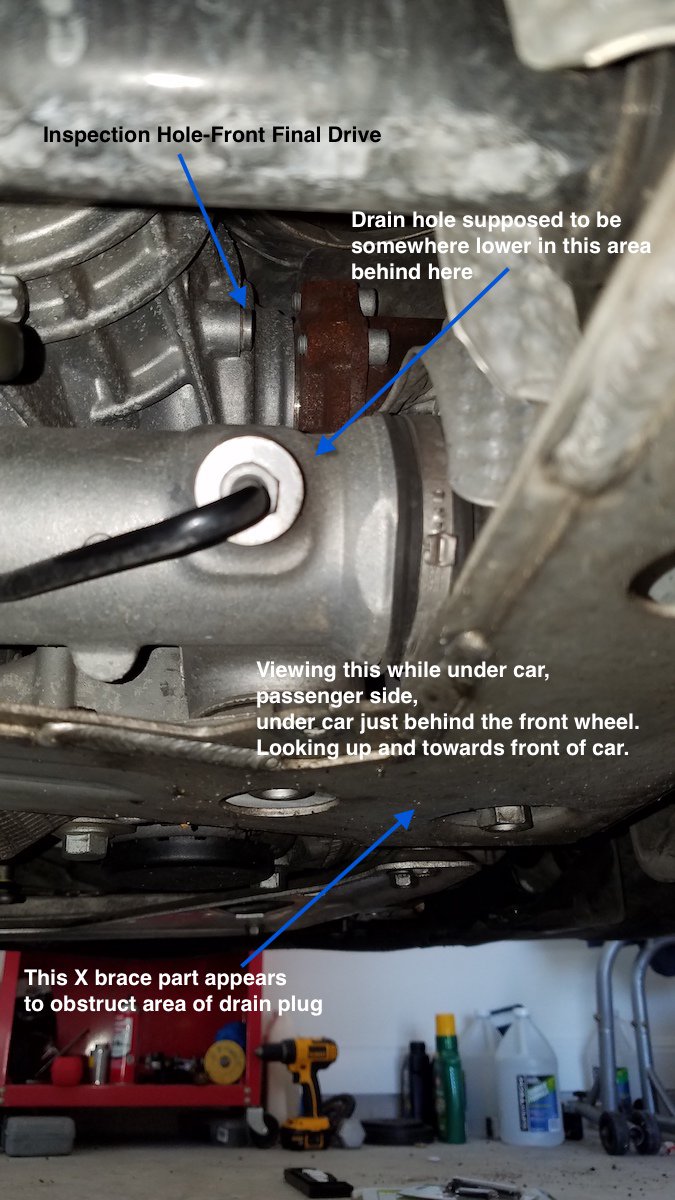
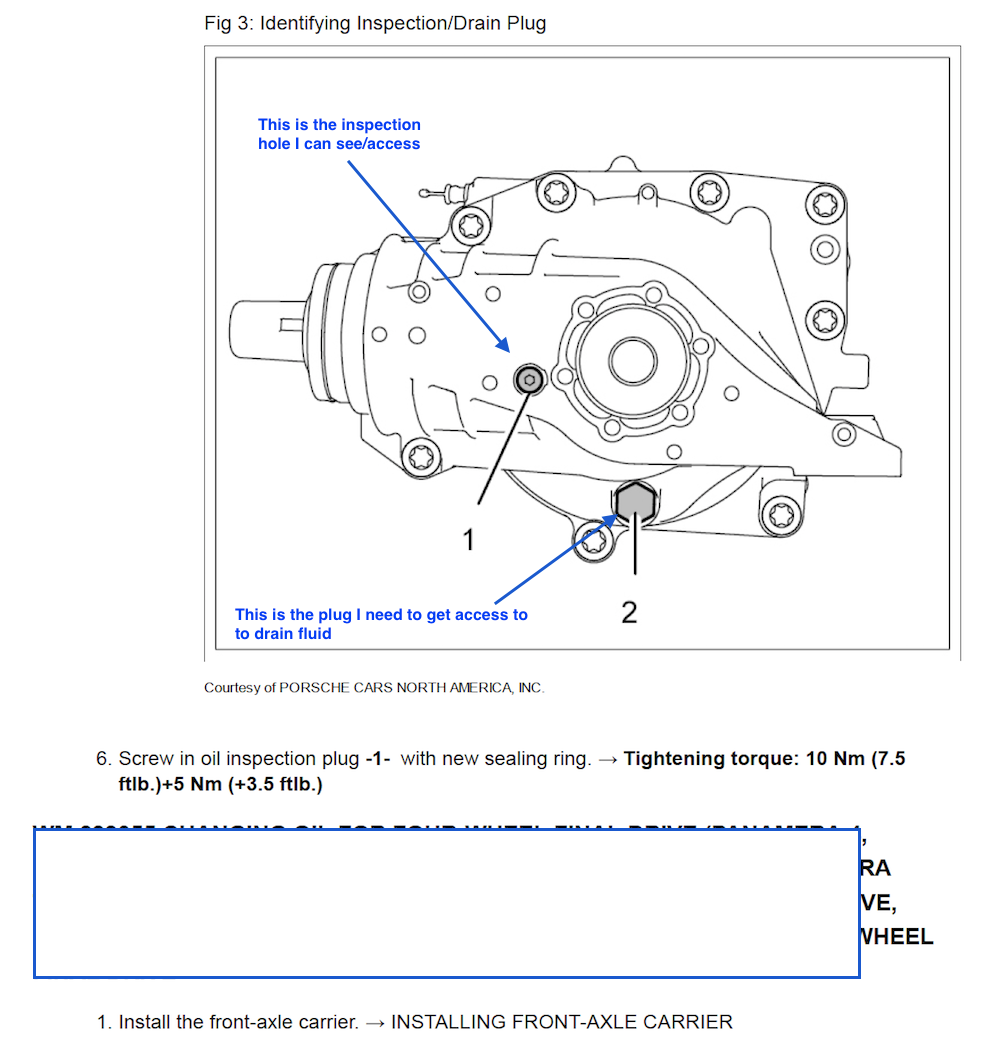
I was doing fluid changes on the front and rear final/diff/. Rear was no problem (actually making DIY for it now). For the front, I was able to locate the fill plug, but had a very hard time locating the drain plug (large hex bolt on lower part of the body). There appeared to be a large x brace covering the area. Did not want to pull it as I am not sure if this would weaken something and cause problems. Does anyone have input/info on how to access the front final drive drain bolt so I can drop the fluid, put in new one and make a DIY for it? Thanks. Also, is the x brace I refer to in pics below, the front axle carrier that the manual talks about? Here is what I see from underneath, and a pic from manual where the plugs should be.
-
Good job on the 6:1 result today UKers! Here in USA, auto start/stop is remembered. So in my case, I leave it off (light is turned on the button). If I turn the feature back on, after car restart, the position of the switch is remembered by the car.
-
Question, what is the reason to replace entire PDCC reservoir as opposed to just the fluid?
-
I confirmed that there are EBC yellowstuff pads for my vehicle 2011 Panamera Turbo (non PCCB). EBC YellowStuff Pads for that car are: Front Pads Part Number: DP41835R Rear pads Part Number: DP41858R When changing pads, replace the hardware kits as well.
-
Panamera turbo Spark Plug Replacement Here is a DIY for spark plug replacement. If your coils need changing, use this DIY as well. Hope it helps others. This is a simple maintenance item. Dealer will charge upwards of 500 dollars. you can do this spending about $60 on plugs, and few hours of time. Think how much beer money you will have left over. If you don't normally work on cars, expect to take about half day. Still real easy to do, just take your time, don't rush. If you do other DIY Author ciaka Category Panamera (970) - Maintenance Submitted 06/18/2018 12:21 PM
-
Here is a DIY for spark plug replacement. If your coils need changing, use this DIY as well. Hope it helps others. This is a simple maintenance item. Dealer will charge upwards of 500 dollars. you can do this spending about $60 on plugs, and few hours of time. Think how much beer money you will have left over. If you don't normally work on cars, expect to take about half day. Still real easy to do, just take your time, don't rush. If you do other DIY stuff on the car, I would estimate 2-3 hours with cleaning. Subsequent replacement would be about an hour and an half at most. Wobble extension needed for the job, to remove rear most plugs (cyliner 4 and 8.) Those are the nearest to passenger and driver. The way to use it is to plug wobble extension into plug socket, then plug in extension into the wobble, then insert that into the hole. Then attache ratchet and loosen up. Follow pics in their order and look for instructions in them. Good luck.
-
lol, here in Austin traffic with people switching lanes without regard, sometimes feels like i am on a track trying to avoid getting hit or hitting the oned budding in.
-
someone else also pointed out to hawk ceramic. Dont ceramic ones have longer stopping distance? Less dust is nice, but stopping power is nice too. Also, I think ceramic will use the rotors less.
-
I am more thinking spirited street. I wont be tracking it but like the ability when desired. Was surprised I could not find suitable pads on EBC website (expected to see options). Or maybe I did not search properly (only discs were available).
-
Can anyone recommend good front pads for the PTT? I have iron discs, and looking to put new pads on front for the car. Went to EBC for yellow stuff, but did not see pads info for the car. Looking for good pads, with ability when needed, not necessarily because I will use it every day, but better to have and not need. Appreciate help. EDIT: Compiled these for others as reference. These are what I found that I would consider for the car. Looking for replacement pads for my vehicle, 2011 Panamera turbo. After doing some research, I found some numbers which I think others can use for their maintenance purposes. Hope it helps. Went to Hawk & EBC web site and researched front pads for my vehicle 2011 Panamera Turbo (non PCCB). I am considering ceramic to reduce brake dust. Very unusual for me to be stomping on the brakes full tilt. So for me, it would be between ceramic and street hps 5.0 pads. Still, having and not needing is a nice place to be overall. We will see by the time I have to choose. 2010-2013 Panamera turbo rotor sizes: Front: Size: 360mm New thickness: 36mm Replace thickness: 34mm Max wear: 2mm Rear: Size: 350mm New thickness: 28mm Replace thickness: 26mm Max wear: 2mm HAWK BRAKE PADS: Hawk Performance Ceramic brake pads: Yellow/black packaging box Ceramic Little brake dust Quieter pads Less rotor wear States exceptional braking - from experience, may not be better than the HPS 5.0 or street race pads though Front Pads Part Number: HWKHB761Z.593F Rear pads Part Number: HWKHB807Z.587R When changing pads, replace the hardware kits as well. You can take the numbers and do your research, should be able to get prices for front pads around $140/set. Rears for about $130/set. Hawk Performance HPS 5.0 brake pads: Red/black packaging box (HPS = High Performance Street) Semi metallic More brake dust More rotor wear than with ceramic pads Better stopping grip than ceramic Front Pads Part Number: HWKHB761B.593F Rear pads Part Number: HWKHB807B.587R When changing pads, replace the hardware kits as well. Research to see if you can get prices better than at hawk site Hawk Performance StreetRace brake pads: White/black packaging box Semi metallic More brake dust More rotor wear than with ceramic pads or street Suitable for consistent braking up to 1200 F temps Better stopping grip than ceramic or street pads Front Pads Part Number: HWKHB761R.593F Rear pads Part Number: HWKHB807R.587R When changing pads, replace the hardware kits as well Research to see if you can get prices better than at hawk site EBC BRAKE PADS: EBC Yellowstuff 4000 Series Street And Track Brake Pad Set: Blue packaging box Yellow colored pads Semi metallic Include brake in coating on pads - pads bedding is quicker More brake dust (states less than OEM but not true per my experience) More rotor wear than with ceramic pads or street Suitable for consistent braking even for racing Better stopping grip than ceramic or street pads Recommended for high horsepower cars Front Pads Part Number: DP41835R Rear pads Part Number: DP41858R When changing pads, replace the hardware kits as well Research to see if you can get prices better than at oem site. Got mine for $140/front EBC Bluestuff NDX Trackday Brake Pad Set: Blue packaging box Blue colored pads Non metallic compound Factory bedded - ready for wear from box More brake dust (states not low dust pad - made for racing) States less rotor wear, states rotors wear very flat and smooth Specifically made for racing Better stopping grip than ceramic or street pads Recommended for high horsepower cars Front Pads Part Number: DP51835NDX Rear pads Part Number: DP51858NDX When changing pads, replace the hardware kits as well Research to see if you can get prices better than at EBC
-
I ended up replacing a lower control arm yesterday on my PTT. I may have a write up about it, partial pictures. About upper control arms, I noticed that the upper control arms are NOT connected directly to the air shock as they are on the Cayenne. The upper control arms appear to be mounted to the vehicle body, with bolts accessible after removing the wheel well lining, as well as inside the engine bay. I have not replaced one, but to me it looks like you would have to: - open engine compratment - remove the corner trim piece (next to the washer fluid for passenger side, or next to coolant cap area for driver side)...this gives access to one of the nuts for control arm - raise the car - remove wheel - remove wheel lining (there are 4 screws under car for rear facing part of lining, and another 4 screws for the front facing piece of lining, under the car) - separate the upper control arm ball joint (secure control arm so it does not slam into top of wheel well (put a bungee on it or tie down - ball joint separation will launch it fast) - remove the expansion plug for level sensor attached to the control arm - remove the level sensor attached to the control arm - remove nut inside engine bay for each of the upper control arm bolts (two in total) -- not sure about the bolt removal, I have not inspected how much clearance there would be - once bolts are out, remove control arm - install new control arm - replace level sensor into new control arm - plug in level sensor expansion plug to secure level sensor in new arm - Tighten both side bolts/nuts - Tighten ball joint at steering knuckle - Put back the wheel well lining - Put back the trim pieces inside engine bay If I was to estimate, first time would take probably 3 or 4 hrs as long as no surprises arise (like ball joint seized to knuckle, etc.). Subsequent visits I expect to take about 2 hrs. This appears to be a good place to start digging if you hear squeaking/banging noises when you go over bumps. It is hard to determine by trying to move upper control arm by hand, since bolts will keep that part secured tightly. After you remove the control arm, you will notice tears in the rubber. Hope this helps. If I get in there one day, I may do a write up with decent pics.
-
wow. The lock finally arrived. Nearly $200 for it too. Works perfect though. Now, remove them, and never use again (will probably save for when I choose to put them back on). Good end to the story.
-
I was read in a service manual about removal of the upper control arm, and think it stated there is access to screws, without need to remove the entire shock. Can anyone comment on this from experience? I will be doing this soon and wanted to get additional info on this. Avoiding removal of shock saves you need to disconnect from air suspension, removing entire shock. On Cayenne that was the case, where upper control arm required removing entire shock, so access to upper control arm could be made. Thanks in advance.
-
brake booster faulty
ciaka replied to TopGun2000's topic in 9PA, 9PA1 (Cayenne, Cayenne S, Cayenne Turbo, Cayenne Turbo S)
there is diy for brake booster issues, go check diy section. -
If you are at standstill, and start accelerating slowly, you will begin to hear and feel clunking coming from under middle of the car. Can be felt coming from variety of locations since the problem area is located in middle of the car, around back of center console. When you start accelerating, you will hear the banging increase. You can also raise suspension on the cayenne, crawl under there, and put your hand on the cardan shaft, near the bushing. If you can easily move the shaft around (up/down, etc), the bushing is gone and your cardan shaft is no longer stationary. It starts wobbling creating the banging noise. While you are under there, check the flex disk (right at front of the drive shaft), the shaft is screwed down to it with bolts. The flex disk looks like a black thick rubber round disk. If you inspect, you will likely find tears or cracks in it. This is due to shaft not being centered in line. Once you make the determination the shaft is going, I would suggest you get yourself a good person to do the replacement (cost would be about $1600 including parts & labor), or follow a DYI. I made on on here. Give it a read to see if you are handy enough to do yourself. You will save at least $1000 by DIY. I ordered mine from Colorado Drive shafts when it happened to me. Most Cayennes did have this problem. Its a question of when, not if. DIY for cardan shaft replacement - CLICK HERE Good luck. Let us know what happened.
-
A/C Flap Actuator
ciaka replied to seafeye's topic in 9PA, 9PA1 (Cayenne, Cayenne S, Cayenne Turbo, Cayenne Turbo S)
...as another update, I compared the servo motor Porsche part numbers, between 2003-2006 Cayenne, and 2007-2010. Compared servos for front and rear AC zones. All numbers are identical. All of the 2007-2010 cayenne parts refer to 955 numbers. This means identical parts, so as long as you get them new, you will be set. Getting used parts means you will take 50/50 chance. It may work, or it may not. If the part is old, chances increase that it will not work correctly, or will fail sooner than later. For all the work to do on removing these, it will be wiser to just get the new parts. -
Cayenne Instrument Cluster LCD Brightness Repair Symptom: Your LCD display inside your instrument cluster is very dim, or was dim before, but now you cannot see anything at all on it. So you are left with only the analog dials (needles) to rely on, for information. This prevents you from accessing settings for the car. This DIY will help you fix this issue. Most of the time, the issue is a transformer located on the main board of cluster, that becomes defective. Remedy is to replace it. Below info will show you every step of the way, fr Author ciaka Category Cayenne (9PA, 9PA1) - Common Fixes and Repairs Submitted 05/21/2018 11:48 AM